TableLayout is a ViewGroup that
displays child View elements in rows and columns.
- Start a new project named HelloTableLayout.
- Open the
res/layout/main.xmlfile and insert the following:<?xml version="1.0" encoding="utf-8"?> <TableLayout xmlns:android="http://schemas.android.com/apk/res/android" android:layout_width="fill_parent" android:layout_height="fill_parent" android:stretchColumns="1"> <TableRow> <TextView android:layout_column="1" android:text="Open..." android:padding="3dip" /> <TextView android:text="Ctrl-O" android:gravity="right" android:padding="3dip" /> </TableRow> <TableRow> <TextView android:layout_column="1" android:text="Save..." android:padding="3dip" /> <TextView android:text="Ctrl-S" android:gravity="right" android:padding="3dip" /> </TableRow> <TableRow> <TextView android:layout_column="1" android:text="Save As..." android:padding="3dip" /> <TextView android:text="Ctrl-Shift-S" android:gravity="right" android:padding="3dip" /> </TableRow> <View android:layout_height="2dip" android:background="#FF909090" /> <TableRow> <TextView android:text="X" android:padding="3dip" /> <TextView android:text="Import..." android:padding="3dip" /> </TableRow> <TableRow> <TextView android:text="X" android:padding="3dip" /> <TextView android:text="Export..." android:padding="3dip" /> <TextView android:text="Ctrl-E" android:gravity="right" android:padding="3dip" /> </TableRow> <View android:layout_height="2dip" android:background="#FF909090" /> <TableRow> <TextView android:layout_column="1" android:text="Quit" android:padding="3dip" /> </TableRow> </TableLayout>Notice how this resembles the structure of an HTML table. The
TableLayoutelement is like the HTML<table>element;TableRowis like a><tr>>element; but for the cells, you can use any kind ofViewelement. In this example, aTextViewis used for each cell. In between some of the rows, there is also a basicView, which is used to draw a horizontal line. - Make sure your HelloTableLayout Activity loads this layout in the
onCreate()method:public void onCreate(Bundle savedInstanceState) { super.onCreate(savedInstanceState); setContentView(R.layout.main); }The
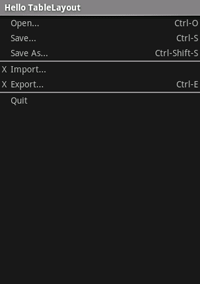
setContentView(int)method loads the layout file for theActivity, specified by the resource ID —R.layout.mainrefers to theres/layout/main.xmllayout file. - Run the application.
You should see the following: