| Oracle® Application Express Application Builder User's Guide Release 3.2 Part Number E11947-02 |
|
|
PDF · Mobi · ePub |
| Oracle® Application Express Application Builder User's Guide Release 3.2 Part Number E11947-02 |
|
|
PDF · Mobi · ePub |
This section describes how to run the two demonstration applications provided with Oracle Application Express. It also explains how to modify the demonstration application called Sample Application that installs with Application Builder. Running and analyzing how an application works is an effective way to better understand how you can use Application Builder to build your own applications.
This section contains the following topics:
See Also:
"Next Steps" in Oracle Database 2 Day + Oracle Application Express Developer's Guide to learn more about other resources to expand your knowledge of Oracle Application ExpressApplication Builder includes two demonstration applications you can install. Use these applications to learn more about the different types of functionality you can include in your applications.
To install the demonstration applications:
From the Workspace home page, click the down arrow on the right side of the Application Builder icon.
From the menu, select Demonstrations.
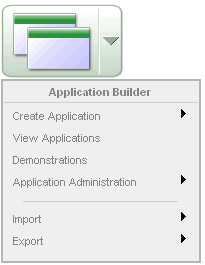
The Demonstration Applications page appears, displaying the following applications:
To install a demonstration application, locate the application you want to install, and click Install.
Follow the on-screen instructions.
The Application home page appears.
To run an installed demonstration application, click the Run Application icon.
Enter the appropriate login credentials and click Login.
For Sample Application:
For User Name, enter either demo or admin.
For Password, enter the current workspace name in lowercase letters.
For other demonstration applications, enter your workspace user name and password.
Note:
You can also access the Demonstration Applications page by clicking Create on the Application home page and then selecting Demonstration Application.Once you have installed a demonstration application, you can run it from the Demonstration Applications page or from the Application Builder home page.
Topics in this section include:
To run a demonstration application from the Demonstration Applications page:
From the Workspace home page, click the down arrow on the right side of the Application Builder icon.
From the menu, select Demonstrations.
The Demonstration Applications page appears.
On the Demonstration Applications page, locate the application you want to run.
In the Action column, click Run.
Enter the appropriate login credentials and click Login.
For Sample Application:
For User Name, enter either demo or admin.
For Password, enter the current workspace name in lowercase letters.
For other demonstration applications, enter your workspace user name and password.
Once you have installed a demonstration application, you can run it from the Application Builder home page.
To run a demonstration application from the Application Builder home page:
Log in to the Workspace home page.
Click the Application Builder icon.
Click the application to be run.
The Application home page appears.
Click the Run Application icon.
Enter the appropriate login credentials and click Login.
For Sample Application:
For User Name, enter either demo or admin.
For Password, enter the current workspace name in lowercase letters.
For other demonstration applications, enter your workspace user name and password.
This section describes the demonstration application called Sample Application.
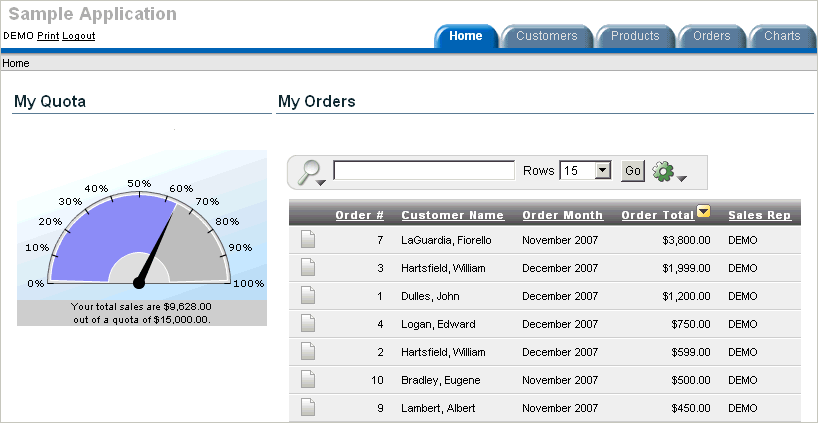
Sample Application shows an easy-to-use interface for viewing, updating, and searching order and customer information for electronic and computer products. Users can navigate among the pages using the Home, Customers, Products, Orders, and Charts tabs.
Sample Application demonstrates the following functionality:
Examples of ways to display summary information, including a dial chart and summary reports
Reports for viewing, updating, and adding customers, products, and orders
A Calendar report
Flash charts available in Oracle Application Express including cluster bar, pie chart, and stacked bar
Printer friendly mode
The following sections describe specific functionality available on each page.
See Also:
"What Is a Page?"The Home page contains four regions:
My Quota
My Orders
Sample Application
Tasks
My Quota demonstrates the use of a Flash Dial Chart. This chart displays a value based on an underlying SQL statement.
Although not demonstrated in this example, you can enable an asynchronous refresh by editing the attributes of any SVG or Flash chart.
Tip:
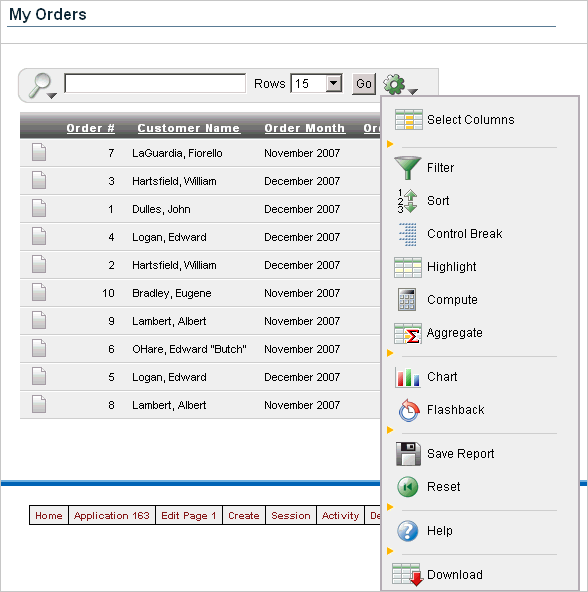
The Flash Dial Chart only displays if you log in using the user namedemo.My Orders is a interactive report based on a SQL query. This report displays a subset of the information that appears on the Orders page. Users can link to order details by selecting the Edit icon. Users can also change the appearance of the report using the Actions menu.
Sample Application is a simple HTML region that displays static text. You can create this type of region to display explanatory information to users.
Tasks contains a list with links to other pages within the application. Links available on the Home page Tasks list include:
About this Application links to an informational page that describes this application.
Enter a New Order links to a wizard for creating a new order.
Add a New Customer links to a form for entering new customer information.
Add a New Product links to a form for adding new products.
The Customers page enables users to view and edit customer information. The Customers page consists of two main regions:
Customers
Top Customers
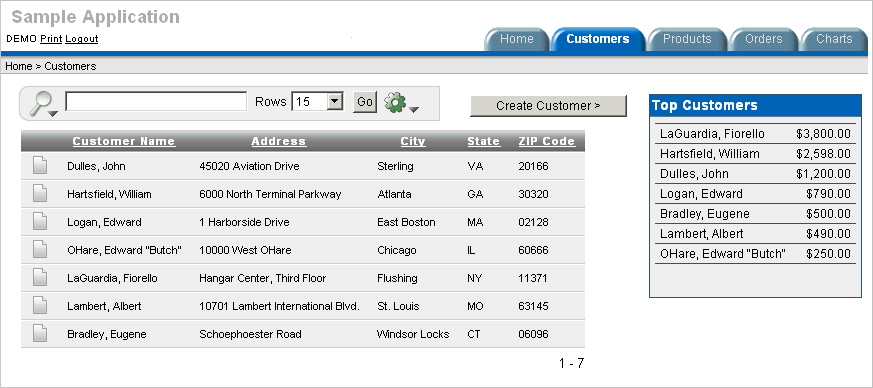
Customers is an interactive report for tracking customer information. This region is also based on a SQL query. To search for a customer, enter a customer name in the Search field and click Go. To sort by customer name, click the column heading. A Sort icon then appears to the right of the heading Customer Name. Users can change the appearance of the report using the Actions menu. To update existing customer information, click the Edit icon. 'To add a new customer, click the New Customer button.
Top Customers ranks customers by order amount. This report is based on a SQL query that returns top customers based on their orders.
See Also:
"Creating Reports"The Products page enables users to view and edit product information. The Products page consists of two main regions:
Products
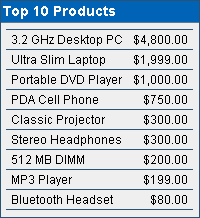
Top 10 Products
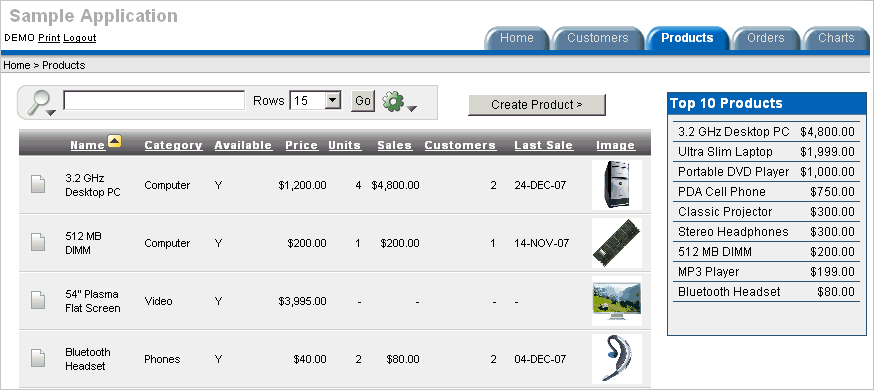
Products displays an interactive report for tracking product information. This region is based on a SQL query that uses a custom function for displaying images stored in the database. To sort by product category, click the column heading. To edit a product description, click the Edit icon. To add a new product, click the Create Product button at the top of the page. Users can change the appearance of the report using the Actions menu.
Top 10 Products is also a SQL report. This report outlines the top ten products based on quantities sold.
See Also:
"Creating Reports"The Orders page enables users to view and edit customer orders. The Orders page contains two regions:
My Orders
Orders by Day
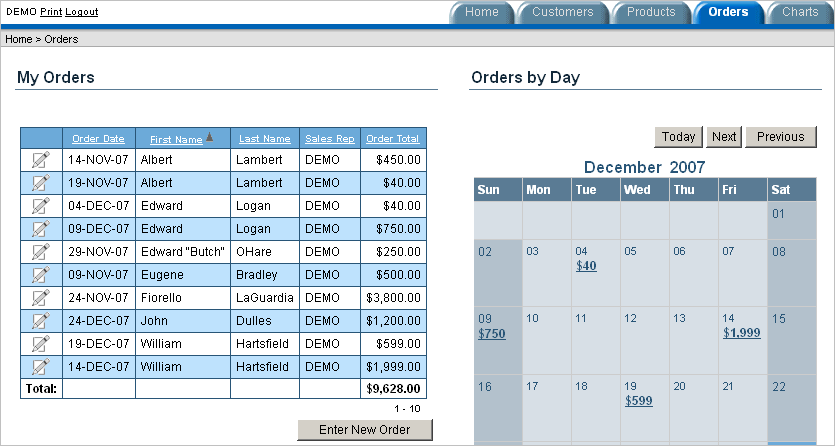
My Orders is a wizard report that summarizes the current orders in the system. To sort a column, click the column heading. A Sort icon then appears to the right of the column heading. To edit an existing order, click the Edit icon. To add a new order, click the Enter New Order button.
Orders by Day is a Calendar report. This report displays each order on the appropriate date in a calendar. Users can select a calendar entry to view order details. Click the Previous and Next buttons to previous and future entries.
The Charts page illustrates three types of Flash charts available in Application Builder: cluster bar, pie chart, and stacked bar. To view a chart, select it from the list on the left.
See Also:
"Creating Charts"The Admin page displays only if you log in to Sample Application using the user name admin. Sample Application makes use of a custom authentication scheme that stores user names and obfuscated passwords in a table. The Manage Users page enables you to manage additional users. To add a new user, click Add User at the bottom of the page. To delete a user, select the user and click Remove Selected Users.
Note that this custom authentication scheme does not use any user names or passwords associated with Oracle Application Express application developers.
Clicking Print in the upper left corner of the page displays the current page in Printer Friendly mode. When in Printer Friendly mode, the Application Express engine displays all text within the HTML form fields as text.
To enable your application to display in Printer Friendly mode, you must create and then specify a Print Mode Page Template on the Edit Definition page.
See Also:
"Optimizing a Page for Printing"Once you understand the type of functionality available in a demonstration application, the next step is to learn more about the construction of each page. An efficient way to speed up the learning process is to analyze and deconstruct the pages in the demonstration applications. If you happen to break something, you can quickly delete the demonstration application and install it again. See "Deleting an Application" and "Installing a Demonstration Application".
You edit existing pages in an application, add pages to an application, or create entirely new applications using Application Builder.
Topics in this section include:
The Developer toolbar is a quick way to edit the current application, the current running page, create a new page, control, or component, view session state, or turn edit links on or off.
See Also:
"About the Developer Toolbar"The Developer toolbar consists of the following links:
Home links you to the Workspace home page. See "About the Workspace Home Page".
Application links you to the Application home page. See "Application Builder Concepts".
Edit Page accesses the Page Definition for the current running page. See "About the Page Definition".
Create links to a wizard for creating a new page, region, page control (item, button, branch, computation, process, or validation), or a shared control (navigation bar icon, tab, list of values, list, or breadcrumb). See "Building an Application".
Session links you to session state information for the current page. See "Viewing Session State".
Activity links you to the Activity reports page. See "Activity Reports".
Debug toggles the page between Debug and No Debug mode. See "Accessing Debug Mode".
Show Edit Links toggles between Show Edit Links and Hide Edit Links. Clicking Show Edit Links displays a small orange icon next to each editable object on the page. Each icon is orange and contains a triangle with two rules beneath it. Clicking the link displays another window in which to edit the object.
There are two ways to edit a demonstration application:
From the Demonstration Applications page, click Edit next to the desired application.
If you are running an application, click Application on the Developer toolbar.
The Application home page appears. The application ID and application name display at the top of the page.
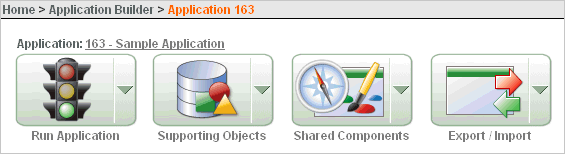
You can run the current application, edit supporting objects, create shared components, or export and import information by clicking one of the following:
Run Application submits the pages in the current application to the Application Express engine to render viewable HTML. See "How the Application Express Engine Renders and Processes Pages".
Supporting Objects links to the Supporting Objects page. See "How to Create a Packaged Application".
Shared Components links to a list of shared components and user interface controls that can display or be applied on every page within an application. See "Working with Shared Components".
Export/Import links you to the Export/Import Wizard. Use this wizard to import and export an entire application and related files such as cascading style sheets, images, static files, script files, themes, user interface defaults, and workspace users. See "Exporting an Application and Related Files".
The pages that make up the application appear on the Application home page. To access a specific page, simply click it. To search for a specific page, enter a case insensitive query for the page title or page number in the Page field and click Go.
The Application Express engine renders applications in real time based on data stored in database tables. You can view the database objects for any demonstration application in Object Browser, or by viewing the Application Database Object Dependencies report.
Topics in this section include:
The Database Object Dependencies report identifies database objects referenced by the current application. Review this report to determine what objects to move when deploying an application.
To view the Database Object Dependencies report:
Navigate to the Workspace home page.
Click the Application Builder icon.
Select an application.
The Application home page appears.
On the Tasks list, click Application Reports.
Click Shared Components.
Under Application, click Database Object Dependencies.
Click Compute Dependencies.
To view the components that reference a specific database object, select the Reference Count number.
See Also:
"Viewing Application Reports"To view the database objects in Object Browser:
On the Workspace home page, click SQL Workshop and then Object Browser.
Object Browser appears.
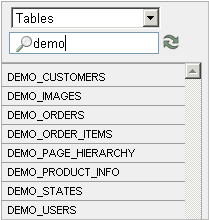
Select an object type from the Object list in the upper left corner of the page. For example, to view tables, select Tables.
To search for an object name, enter keywords in the search field beneath the Object list.
A list of matching objects appears.
To perform a specific task related to the selected object, select the appropriate task button.
For example, to modify a column in the DEMO_CUSTOMERS table:
From the Objects list, select Tables.
From the Tables list, select DEMO_CUSTOMERS.
Click Modify Column.
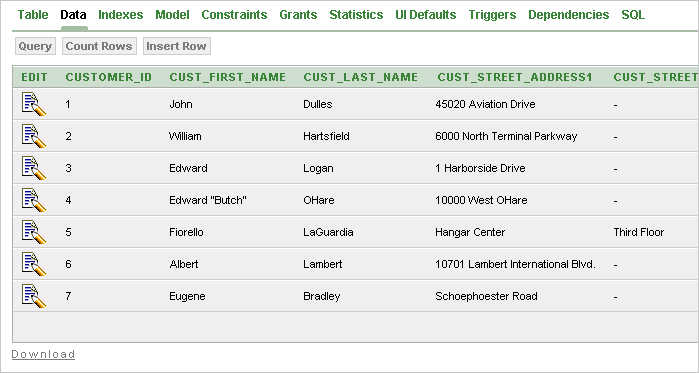
To view additional object details, select a tab beneath the object name. For example, to view the data in the DEMO_CUSTOMERS table:
From the Tables list, select DEMO_CUSTOMERS.
Select the Data tab.
A report appears that displays the data in the DEMO_CUSTOMERS table appears.
See Also:
"Managing Database Objects with Object Browser" in Oracle Application Express SQL Workshop and Utilities Guide
|
Copyright © 2003, 2012, Oracle and/or its affiliates. All rights reserved. Legal Notices |
|