9.6 Managing Performance Policies
- Creating a Performance Policy and Specifying Performance Objectives
Use Oracle Enterprise Manager Cloud Control to create a Performance Policy. - Editing an Existing Performance Policy
On the Edit Policy page, you can change the rank of each Performance Class, or change the Measure Only setting for a Performance Class. - Copying a Performance Policy
- Setting the Current Performance Policy
- Deleting a Performance Policy
- Automatically Implementing Recommendations for a Performance Policy
- Setting Server Pool Directive Overrides
A server pool directive override gives you the ability to enforce different settings for server pool sizes, or change the importance of server pools.
Parent topic: Administering the Oracle Database QoS Management System
9.6.1 Creating a Performance Policy and Specifying Performance Objectives
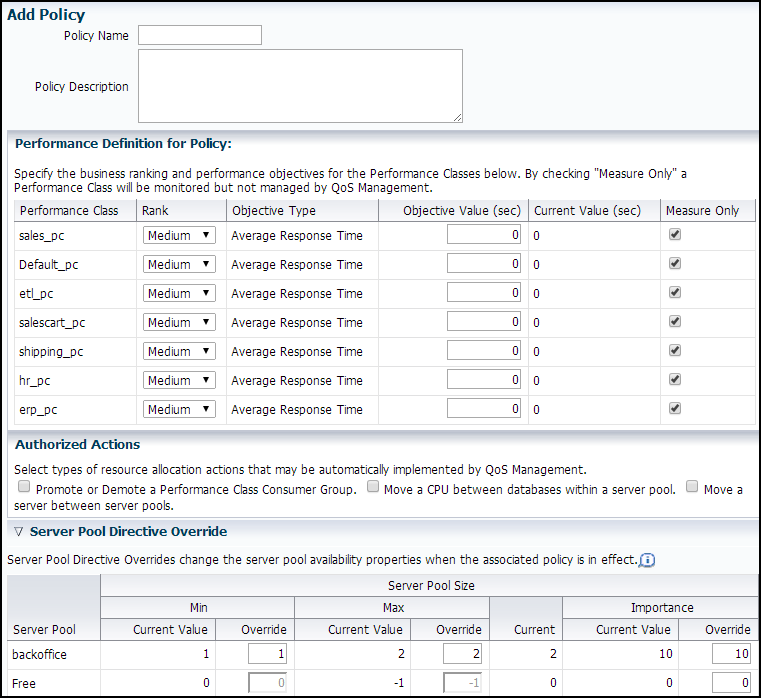
Use Oracle Enterprise Manager Cloud Control to create a Performance Policy.
To create and configure a Performance Policy, perform the following steps:
9.6.2 Editing an Existing Performance Policy
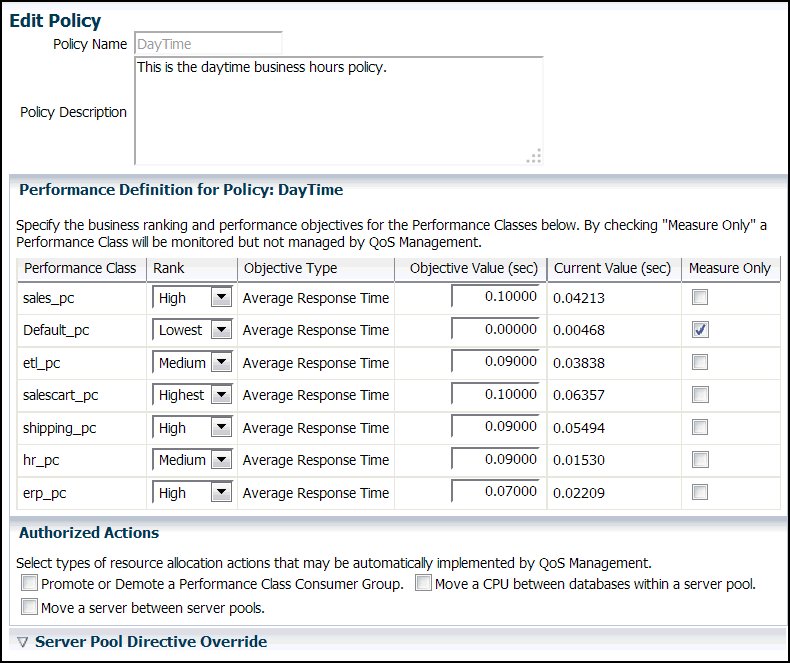
On the Edit Policy page, you can change the rank of each Performance Class, or change the Measure Only setting for a Performance Class.
You can also select the type of resource allocation actions that can be automatically implemented by QoS Management and set server pool directive overrides.
9.6.3 Copying a Performance Policy
Instead of creating a new Performance Policy, you can instead copy an existing Performance Policy. A copied Performance Policy is identical to the original Performance Policy. You can then simply rename and edit the copy instead of re-creating all the details in a new Performance Policy.
Parent topic: Managing Performance Policies
9.6.4 Setting the Current Performance Policy
A Performance Policy is a collection of Performance Objectives, one for each Performance Class, that are in force at the same time. There are multiple ways to modify the active Performance Policy for Oracle Database QoS Management.
- Changing the Active Performance Policy from the Dashboard
- Changing the Active Performance Policy from the Policy Set Editor Wizard
- Changing the Active Performance Policy using a Script
Parent topic: Managing Performance Policies
9.6.4.1 Changing the Active Performance Policy from the Dashboard
Parent topic: Setting the Current Performance Policy
9.6.4.2 Changing the Active Performance Policy from the Policy Set Editor Wizard
You can change the Performance Policy that will be active when you submit the Policy Set to Oracle Database QoS Management.
- Start the Policy Set Editor wizard.
- Proceed to the fifth page in the wizard, which is titled Edit Policy Set: Set Policy.
- Select the Performance Policy you want enforced, and click Set Policy.
At the end of the Policy Set Editor wizard, you can review the settings you specified, then click Submit Policy Set to configure Oracle Database QoS Management.
Parent topic: Setting the Current Performance Policy
9.6.4.3 Changing the Active Performance Policy using a Script
Many Oracle Database QoS Management policies are calendar based. You can switch the active performance policy automatically through a job scheduler such as Enterprise Manager Cloud Control, Task Scheduler or CRON by using a QOSCTL command to set the active policy.
Related Topics
Parent topic: Setting the Current Performance Policy
9.6.5 Deleting a Performance Policy
To delete a Performance Policy, perform the following steps:
- Start the Policy Set Editor wizard.
- Proceed to the fourth page in the wizard, which is titled Edit Policy Set: Performance Policies.
- Click the Delete Policy button to delete a Performance Policy.
- You then advance to the end of the Edit Policy Set wizard, and click Submit Policy Set to make the change permanent.
Parent topic: Managing Performance Policies
9.6.6 Automatically Implementing Recommendations for a Performance Policy
You can use the appropriate check boxes to specify which of the following actions can be implemented automatically by Oracle Database QoS Management:
-
Promote or demote a performance class consumer group
-
Move a CPU between databases within a server pool
-
Move CPU shares between PDBs
-
Move a server between server pools
If you do not authorize any of these actions, then Oracle Database QoS Management does not implement any changes to the active system until you review the current Recommendations for a Performance Class and click the Implement button.
Parent topic: Managing Performance Policies
9.6.7 Setting Server Pool Directive Overrides
A server pool directive override gives you the ability to enforce different settings for server pool sizes, or change the importance of server pools.
webapps, HR, and payroll. You create a server pool directive override to increase the minimum server pool size for the payroll server pool. When the server pool directive override is active, a server could be removed from the HR or webapps server pool to satisfy the higher minimum server requirement of the payroll server pool.
Related Topics
Parent topic: Managing Performance Policies


