| Oracle® Database Administrator's Guide 11g Release 2 (11.2) Part Number E25494-02 |
|
|
PDF · Mobi · ePub |
| Oracle® Database Administrator's Guide 11g Release 2 (11.2) Part Number E25494-02 |
|
|
PDF · Mobi · ePub |
This section describes how to use the Enterprise Manager Support Workbench (Support Workbench) to investigate and report a problem (critical error), and in some cases, resolve the problem. The section begins with a "roadmap" that summarizes the typical set of tasks that you must perform.
Note:
The tasks described in this section are all Enterprise Manager–based. You can also accomplish all of these tasks (or their equivalents) with theADRCI command-line utility, with PL/SQL packages such as DBMS_HM and DBMS_SQLDIAG, and with other software tools. See Oracle Database Utilities for more information on the ADRCI utility, and see Oracle Database PL/SQL Packages and Types Reference for information on PL/SQL packages.See Also:
"About the Oracle Database Fault Diagnosability Infrastructure" for more information on problems and their diagnostic dataYou can begin investigating a problem by starting from the Support Workbench home page in Enterprise Manager. However, the more typical workflow begins with a critical error alert on the Database Home page. This section provides an overview of that workflow.
Figure 9-3 illustrates the tasks that you complete to investigate, report, and in some cases, resolve a problem.
Figure 9-3 Workflow for Investigating, Reporting, and Resolving a Problem
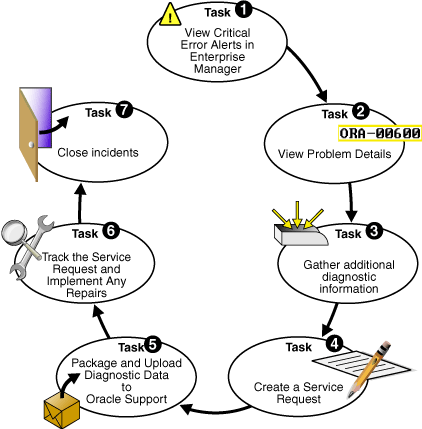
The following are task descriptions. Subsequent sections provide details for each task.
Task 1 – View Critical Error Alerts in Enterprise Manager
Start by accessing the Database Home page in Enterprise Manager, and reviewing critical error alerts. Select an alert for which to view details, and then go to the Problem Details page.
Examine the problem details and view a list of all incidents that were recorded for the problem. Display findings from any health checks that were automatically run.
Task 3 – (Optional) Gather Additional Diagnostic Information
Optionally run additional health checks or other diagnostics. For SQL-related errors, optionally invoke the SQL Test Case Builder, which gathers all required data related to a SQL problem and packages the information in a way that enables the problem to be reproduced at Oracle Support.
Task 4 – (Optional) Create a Service Request
Optionally create a service request with My Oracle Support and record the service request number with the problem information. If you skip this step, you can create a service request later, or the Support Workbench can create one for you.
Task 5 – Package and Upload Diagnostic Data to Oracle Support
Invoke a guided workflow (a wizard) that automatically packages the gathered diagnostic data for a problem and uploads the data to Oracle Support.
Task 6 – Track the Service Request and Implement Any Repairs
Optionally maintain an activity log for the service request in the Support Workbench. Run Oracle advisors to help repair SQL failures or corrupted data.
Set status for one, some, or all incidents for the problem to Closed.
You begin the process of investigating problems (critical errors) by reviewing critical error alerts on the Database Home page or Oracle Automatic Storage Management Home page.
To view critical error alerts:
Access the Database Home page in Enterprise Manager.
For Oracle Enterprise Manager Database Control, see Oracle Database 2 Day DBA for instructions. For Oracle Enterprise Manager Grid Control, go to the desired database target.
Do one of the following to view critical error alerts. (Critical error alerts are indicated by a red × in the Severity column, and the text "Incident" in the Category column.)
View the alerts in the Alerts section.
You may have to click the hide/show icon next to the Alerts heading to display the alerts.
View the alerts in the Related Alerts section.
The Target Name indicates the Oracle product or component that experienced the critical error. See "Related Problems Across the Topology" for more information.
View critical alerts for the Oracle ASM instance by completing these steps:
In the General section, click the link next to the label ASM.
On the Oracle Automatic Storage Management Home page, scroll down to view the Alerts section.
Figure 9-4 Alerts Section of the Database Home Page

In the Message column, click the message of the critical error alert that you want investigate.
The Incident page or Data Failure page appears. This page includes:
Problem information, including the number of incidents for the problem
A Performance and Critical Error graphical timeline for the 24-hour period in which the critical error occurred (database instance only).
Alert details, including severity, timestamp, and message
Controls that enable you to clear the alert or record a comment about it.
Review the Performance and Critical Error graphical timeline if present, and note any time correlation between performance issues and the critical error. Optionally clear the alert or leave a comment about it.
You continue your investigation by viewing the Problem Details page.
On the Incident page or Data Failure page, click View Problem Details.
The Problem Details page appears, showing the Incidents subpage.
(Optional) Do one or both of the following:
In the Investigate and Resolve section, on the Self Service tab, under Diagnose, click Related Problems Across Topology.
A page appears showing any related problems in the local Oracle Automatic Storage Management (Oracle ASM) instance, or in the database or Oracle ASM instances on other nodes in an Oracle Real Application Clusters environment. This step is recommended if any critical alerts appear in the Related Alerts section on the Enterprise Manager Database Home page.
See "Related Problems Across the Topology" for more information.
View incident details by completing these steps:
In the Incidents subpage, select an incident, and then click View.
(Optional) On the Incident Details page, click Checker Findings to view the Checker Findings subpage.
This page displays findings from any health checks that were automatically run when the critical error was detected.
See "Running Health Checks with Health Monitor" for more information.
You can perform the following activities to gather additional diagnostic information for a problem. This additional information is then automatically included in the diagnostic data that is uploaded to Oracle Support. If you are unsure about performing these activities, then check with your Oracle Support representative.
Manually invoke additional health checks
Invoke the SQL Test Case Builder
See Oracle Database Performance Tuning Guide for instructions.
At this point, you can create an Oracle Support service request and record the service request number with the problem information. If you choose to skip this task, the Support Workbench will automatically create a draft service request for you in Task 5.
On the Problem Details page, in the Investigate and Resolve section, click Go to My Oracle Support and Research.
The My Oracle Support Sign In and Registration page appears in a new browser window.
Note:
See "Viewing Problems with the Enterprise Manager Support Workbench" for instructions for returning to the Problem Details page if you are not already there.Log in to My Oracle Support and create a service request in the usual manner.
(Optional) Remember the service request number (SR#) for the next step.
(Optional) Return to the Problem Details page, and then do the following:
In the Summary section, click the Edit button that is adjacent to the SR# label.
Enter the SR#, and then click OK.
The SR# is recorded in the Problem Details page. This is for your reference only.
For this task, you use the quick packaging process of the Support Workbench to package and upload the diagnostic information for the problem to Oracle Support. Quick packaging has a minimum of steps, organized in a guided workflow (a wizard). The wizard assists you with creating an incident package (package) for a single problem, creating a zip file from the package, and uploading the file. With quick packaging, you are not able to edit or otherwise customize the diagnostic information that is uploaded. However, quick packaging is the more direct, straightforward method to package and upload diagnostic data.
To edit or remove sensitive data from the diagnostic information, enclose additional user files (such as application configuration files or scripts), or perform other customizations before uploading, you must use the custom packaging process, which is a more manual process and has more steps. See "Creating, Editing, and Uploading Custom Incident Packages" for instructions. If you choose to follow those instructions instead of the instructions here in Task 5, do so now and then continue with Task 6 – Track the Service Request and Implement Any Repairs when you are finished.
Note:
The Support Workbench uses Oracle Configuration Manager to upload the diagnostic data. If Oracle Configuration Manager is not installed or properly configured, the upload may fail. In this case, a message is displayed with a request that you upload the file to Oracle Support manually. You can upload manually with My Oracle Support.For more information about Oracle Configuration Manager, see Oracle Configuration Manager Installation and Administration Guide.
To package and upload diagnostic data to Oracle Support:
On the Problem Details page, in the Investigate and Resolve section, click Quick Package.
The Create New Package page of the Quick Packaging wizard appears.
Note:
See "Viewing Problems with the Enterprise Manager Support Workbench" for instructions for returning to the Problem Details page if you are not already there.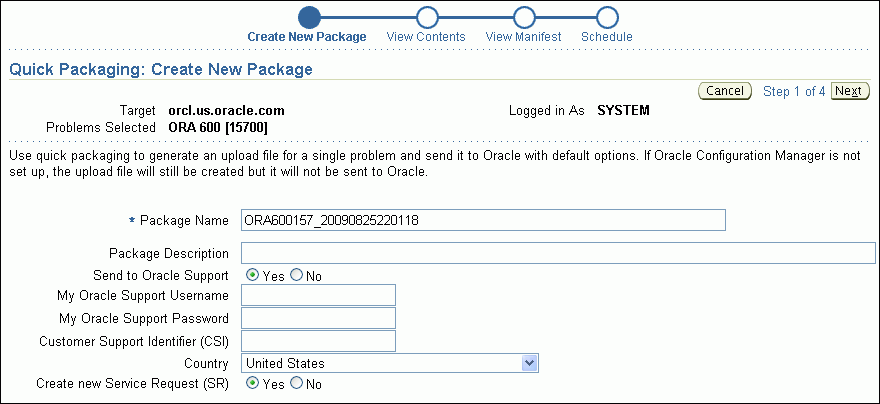
Optionally enter a package name and description.
Fill in the remaining fields on the page. If you already created a service request for this problem, select No next to Create new Service Request (SR).
If you select Yes, the Quick Packaging wizard creates a draft service request on your behalf. You must later log in to My Oracle Support and fill in the details of the service request.
Click Next, and then proceed with the remaining pages of the Quick Packaging wizard.
When the Quick Packaging wizard is complete, the package that it creates remains available in the Support Workbench. You can then modify it with custom packaging operations (such as adding new incidents) and reupload at a later time. See "Viewing and Modifying Incident Packages".
After uploading diagnostic information to Oracle Support, you might perform various activities to track the service request, to collect additional diagnostic information, and to implement repairs. Among these activities are the following:
Adding an Oracle bug number to the problem information.
To do so, on the Problem Details page, click the Edit button that is adjacent to the Bug# label. This is for your reference only.
Adding comments to the problem activity log.
You may want to do this to share problem status or history information with other DBAs in your organization. For example you could record the results of your conversations with Oracle Support. To add comments, complete the following steps:
Access the Problem Details page for the problem, as described in "Viewing Problems with the Enterprise Manager Support Workbench".
Click Activity Log to display the Activity Log subpage.
In the Comment field, enter a comment, and then click Add Comment.
Your comment is recorded in the activity log.
As new incidents occur, adding them to the package and reuploading.
For this activity, you must use the custom packaging method described in "Creating, Editing, and Uploading Custom Incident Packages".
Running health checks.
Running a suggested Oracle advisor to implement repairs.
Access the suggested advisor in one of the following ways:
Problem Details page—In the Self-Service tab of the Investigate and Resolve section
Support Workbench home page—on the Checker Findings subpage
Incident Details page—on the Checker Findings subpage
Table 9-5 lists the advisors that help repair critical errors.
See Also:
"Viewing Problems with the Enterprise Manager Support Workbench" for instructions for viewing the Checker Findings subpage of the Incident Details pageWhen a particular incident is no longer of interest, you can close it. By default, closed incidents are not displayed on the Problem Details page.
All incidents, whether closed or not, are purged after 30 days. You can disable purging for an incident on the Incident Details page.
Access the Support Workbench home page.
See "Viewing Problems with the Enterprise Manager Support Workbench" for instructions.
Select the desired problem, and then click View.
The Problem Details page appears.
Select the incidents to close and then click Close.
A confirmation page appears.
Enter an optional comment and click OK.
|
Copyright © 2001, 2011, Oracle and/or its affiliates. All rights reserved. Legal Notices |
|