| Oracle® Database Administrator's Guide 11g Release 2 (11.2) Part Number E25494-02 |
|
|
PDF · Mobi · ePub |
| Oracle® Database Administrator's Guide 11g Release 2 (11.2) Part Number E25494-02 |
|
|
PDF · Mobi · ePub |
Using the Enterprise Manager Support Workbench (Support Workbench), you can create, edit, and upload custom incident packages. With custom incident packages, you have fine control over the diagnostic data that you send to Oracle Support.
In this section:
For the customized approach to uploading diagnostic data to Oracle Support, you first collect the data into an intermediate logical structure called an incident package (package). A package is a collection of metadata that is stored in the Automatic Diagnostic Repository (ADR) and that points to diagnostic datafiles and other files both in and out of the ADR. When you create a package, you select one or more problems to add to the package. The Support Workbench then automatically adds to the package the problem information, incident information, and diagnostic data (such as trace files and dumps) associated with the selected problems. Because a problem can have many incidents (many occurrences of the same problem), by default only the first three and last three incidents for each problem are added to the package, excluding any incidents that are over 90 days old. You can change these default numbers on the Incident Packaging Configuration page of the Support Workbench.
After the package is created, you can add any type of external file to the package, remove selected files from the package, or edit selected files in the package to remove sensitive data. As you add and remove package contents, only the package metadata is modified.
When you are ready to upload the diagnostic data to Oracle Support, you first create a zip file that contains all the files referenced by the package metadata. You then upload the zip file through Oracle Configuration Manager.
Note:
If you do not have Oracle Configuration Manager installed and properly configured, you must upload the zip file manually through My Oracle Support.For more information about Oracle Configuration Manager, see Oracle Configuration Manager Installation and Administration Guide.
More information about packages is presented in the following sections:
See Also:
To diagnose problem, it is sometimes necessary to examine not only diagnostic data that is directly related to the problem, but also diagnostic data that is correlated with the directly related data. Diagnostic data can be correlated by time, by process ID, or by other criteria. For example, when examining an incident, it may be helpful to also examine an incident that occurred five minutes after the original incident. Similarly, while it is clear that the diagnostic data for an incident should include the trace file for the Oracle Database process that was running when the incident occurred, it might be helpful to also include trace files for other processes that are related to the original process.
Thus, when problems and their associated incidents are added to a package, any correlated incidents are added at the same time, with their associated trace files.
During the process of creating the physical file for a package, the Support Workbench calls upon the Incident Packaging Service to finalize the package. Finalizing means adding to the package any additional trace files that are correlated by time to incidents in the package, and adding other diagnostic information such as the alert log, health checker reports, SQL test cases, configuration information, and so on. Therefore, the number of files in the zip file may be greater than the number of files that the Support Workbench had previously displayed as the package contents.
The Incident Packaging Service follows a set of rules to determine the trace files in the ADR that are correlated to existing package data. You can modify some of those rules in the Incident Packaging Configuration page in Enterprise Manager.
Because both initial package data and added correlated data may contain sensitive information, it is important to have an opportunity to remove or edit files that contain this information before uploading to Oracle Support. For this reason, the Support Workbench enables you to run a command that finalizes the package as a separate operation. After manually finalizing a package, you can examine the package contents, remove or edit files, and then generate and upload a zip file.
Note:
Finalizing a package does not mean closing it to further modifications. You can continue to add diagnostic data to a finalized package. You can also finalize the same package multiple times. Each time that you finalize, any new correlated data is added.See Also:
"Setting Incident Packaging Preferences"The Enterprise Manager Support Workbench provides two methods for creating and uploading an incident package: the quick packaging method and the custom packaging method.
Quick Packaging—This is the more automated method with a minimum of steps, organized in a guided workflow (a wizard). You select a single problem, provide a package name and description, and then schedule upload of the package contents, either immediately or at a specified date and time. The Support Workbench automatically places diagnostic data related to the problem into the package, finalizes the package, creates the zip file, and then uploads the file. With this method, you do not have the opportunity to add, edit, or remove package files or add other diagnostic data such as SQL test cases. However, it is the simplest and quickest way to get first-failure diagnostic data to Oracle Support. Quick packaging is the method used in the workflow described in "Investigating, Reporting, and Resolving a Problem".
Note that when quick packaging is complete, the package that was created by the wizard remains. You can then modify the package with custom packaging operations at a later time and manually reupload.
Custom Packaging—This is the more manual method, with more steps. It is intended for expert Support Workbench users who want more control over the packaging process. With custom packaging, you can create a new package with one or more problems, or you can add one or more problems to an existing package. You can then perform a variety of operations on the new or updated package, including:
Adding or removing problems or incidents
Adding, editing, or removing trace files in the package
Adding or removing external files of any type
Adding other diagnostic data such as SQL test cases
Manually finalizing the package and then viewing package contents to determine if you must edit or remove sensitive data or remove files to reduce package size.
You might conduct these operations over several days, before deciding that you have enough diagnostic information to send to Oracle Support.
With custom packaging, you create the zip file and request upload to Oracle Support as two separate steps. Each of these steps can be performed immediately or scheduled for a future date and time.
See Also:
"Task 5 – Package and Upload Diagnostic Data to Oracle Support" for instructions for the Quick Packaging methodCorrelated packages provide a means of packaging and uploading diagnostic data for related problems. A database instance problem can have related problems in other database instances or in Oracle Automatic Storage Management instances, as described in "Related Problems Across the Topology". After you create and upload a package for one or more database instance problems (the "main package"), you can create and upload one or more correlated packages, each with one or more related problems. You can accomplish this only with the custom packaging workflow in Enterprise Manager Support Workbench.
You use Enterprise Manager Support Workbench (Support Workbench) to create and upload custom incident packages (packages). Before uploading, you can manually add, edit, and remove diagnostic datafiles from the package.
To package and upload problems with custom packaging:
Access the Support Workbench home page.
See "Viewing Problems with the Enterprise Manager Support Workbench" for instructions.
(Optional) For each problem that you want to include in the package, indicate the service request number (SR#) associated with the problem, if any. To do so, complete the following steps for each problem:
In the Problems subpage at the bottom of the Support Workbench home page, select the problem, and then click View.
Note:
If you do not see the desired problem in the list of problems, or if there are too many problems to scroll through, select a time period from the View list and click Go. You can then select the desired problem and click View.The Problem Details page appears.
Next to the SR# label, click Edit, enter a service request number, and then click OK.
The service request number is displayed on the Problem Details page.
Return to the Support Workbench home page by clicking Support Workbench in the locator links at the top of the page.

On the Support Workbench home page, select the problems that you want to package, and then click Package.
The Select Packaging Mode page appears.
Note:
The packaging process may automatically select additional correlated problems to add to the package. An example of a correlated problem is one that occurs within a few minutes of the selected problem. See "About Correlated Diagnostic Data in Incident Packages" for more information.Select the Custom packaging option, and then click Continue.
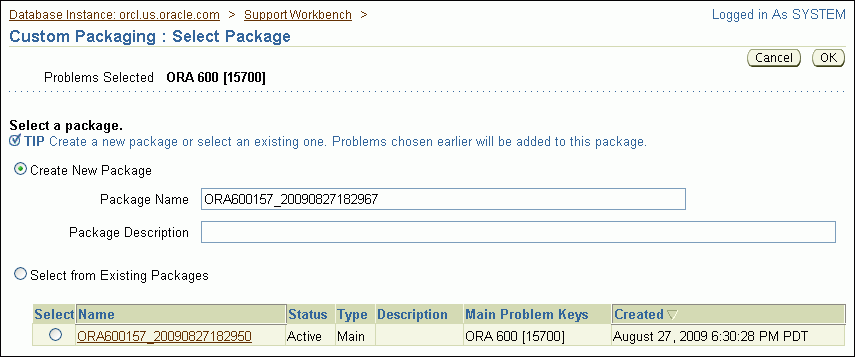
The Select Package page appears.
Do one of the following:
To create a new package, select the Create new package option, enter a package name and description, and then click OK.
To add the selected problems to an existing package, select the Select from existing packages option, select the package to update, and then click OK.
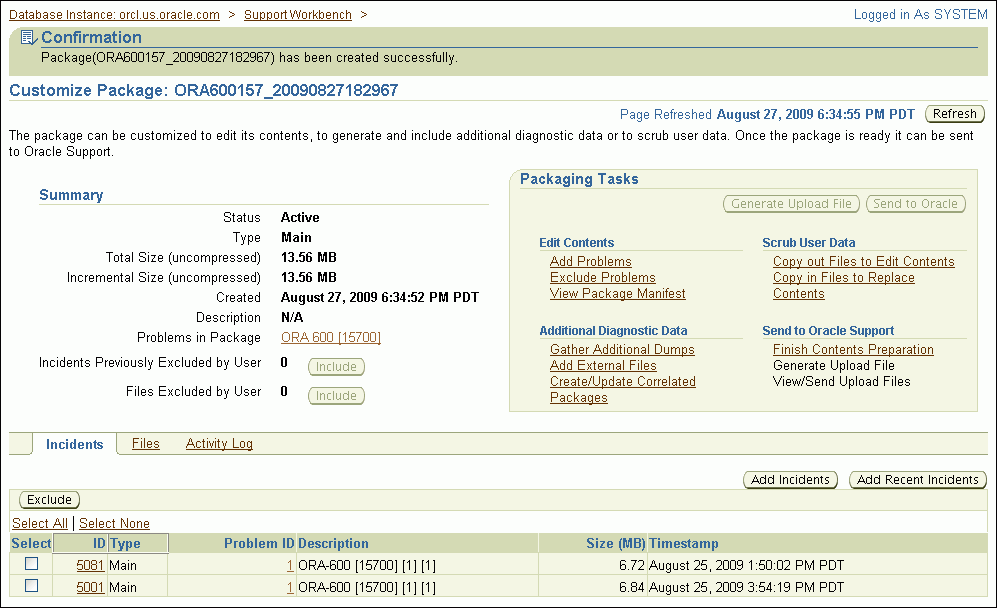
The Customize Package page appears. It displays the problems and incidents that are contained in the package, plus a selection of packaging tasks to choose from. You run these tasks against the new package or the updated existing package.
(Optional) In the Packaging Tasks section, click links to perform one or more packaging tasks. Or, use other controls on the Customize Package page and its subpages to manipulate the package. Return to the Customize Package page when you are finished.
See "Viewing and Modifying Incident Packages" for instructions for some of the most common packaging tasks.
In the Packaging Tasks section of the Customize Package page, under the heading Send to Oracle Support, click Finish Contents Preparation to finalize the package.
A list (or partial list) of files included in the package is displayed. (This may take a while.) The list includes files that were determined to contain correlated diagnostic information and added by the finalization process.
See "About Correlated Diagnostic Data in Incident Packages" for a definition of package finalization.
Click the Files link to view all the files in the package. Examine the list to see if there are any files that might contain sensitive data that you do not want to expose. If you find such files, exclude (remove) or edit them.
See "Editing Incident Package Files (Copying Out and In)" and "Removing Incident Package Files" for instructions for editing and removing files.
To view the contents of a file, click the eyeglasses icon in the rightmost column in the table of files. Enter host credentials, if prompted.
Note:
Trace files are generally for Oracle internal use only.Click Generate Upload File.
The Generate Upload File page appears.
Select the Full or Incremental option to generate a full package zip file or an incremental package zip file.
For a full package zip file, all the contents of the package (original contents and all correlated data) are always added to the zip file.
For an incremental package zip file, only the diagnostic information that is new or modified since the last time that you created a zip file for the same package is added to the zip file. For example, if trace information was appended to a trace file since that file was last included in the generated physical file for a package, the trace file is added to the incremental package zip file. Conversely, if no changes were made to a trace file since it was last uploaded for a package, that trace file is not included in the incremental package zip file.
Note:
The Incremental option is dimmed (unavailable) if an upload file was never created for the package.Schedule file creation either immediately or at a future date and time (select Immediately or Later), and then click Submit.
File creation can use significant system resources, so it may be advisable to schedule it for a period of low system usage.
A Processing page appears, and creation of the zip file proceeds. A confirmation page appears when processing is complete.
Note:
The package is automatically finalized when the zip file is created.Click OK.
The Customize Package page returns.
Click Send to Oracle.
The View/Send Upload Files page appears.
(Optional) Click the Send Correlated Packages link to create correlated packages and send them to Oracle.
See "Creating, Editing, and Uploading Correlated Packages". When you are finished working with correlated packages, return to the View/Send Upload Files page by clicking the Package Details link at the top of the page, clicking Customize Package, and then clicking Send to Oracle again.
Select the zip files to upload, and then click Send to Oracle.
The Send to Oracle page appears. The selected zip files are listed in a table.
Fill in the requested My Oracle Support information. Next to Create new Service Request (SR), select Yes or No. If you select Yes, a draft service request is created for you. You must later log in to My Oracle Support and fill in the service request details. If you select No, enter an existing service request number.
Schedule the upload to take place immediately or at a future date and time, and then click Submit.
A Processing page appears. If the upload is completed successfully, a confirmation page appears. If the upload could not complete, an error page appears. The error page may include a message that requests that you upload the zip file to Oracle manually. If so, contact your Oracle Support representative for instructions.
Click OK.
The View/Send Upload Files page returns. Under the Time Sent column, check the status of the files that you attempted to upload.
Note:
The Support Workbench uses Oracle Configuration Manager to upload the physical files. If Oracle Configuration Manager is not installed or properly configured, the upload may fail. In this case, a message is displayed with a path to the package zip file and a request that you upload the file to Oracle Support manually. You can upload manually with My Oracle Support.For more information about Oracle Configuration Manager, see Oracle Configuration Manager Installation and Administration Guide.
(Optional) Create and upload correlated packages.
See "Creating, Editing, and Uploading Correlated Packages" for instructions.
After creating an incident package with the custom packaging method, you can view or modify the contents of the package before uploading the package to Oracle Support. In addition, after using the quick packaging method to package and upload diagnostic data, you can view or modify the contents of the package that the Support Workbench created, and then reupload the package. To modify a package, you choose from among a selection of packaging tasks, most of which are available from the Customize Package page. (See Figure 9-7.)
This section provides instructions for some of the most common packaging tasks. It includes the following topics:
Also included are the following topics, which explains how to view package details and how to access the Customize Package page for a particular package:
The Package Details page contains information about the incidents, trace files, and other files in a package, and enables you to view and add to the package activity log.
Access the Support Workbench home page.
See "Viewing Problems with the Enterprise Manager Support Workbench" for instructions.
Click the Packages link to view the Packages subpage.
A list of packages that are currently in the Automatic Diagnostic Repository (ADR) is displayed.
(Optional) To reduce the number of packages displayed, enter text into the Search field above the list, and then click Go.
All packages that contain the search text anywhere in the package name are displayed. To view the full list of packages, click the Packages link again.
Under the Package Name column, click the link for the desired package.
The Package Details page appears.
The Customize Package page is used to perform various packaging tasks, such as adding and removing problems; adding, removing, and scrubbing (editing) package files; and generating and uploading the package zip file.
To access the Customize Package page:
Access the Package Details page for the desired package, as described in "Viewing Package Details".
Click Customize Package.
The Customize Package page appears. See Figure 9-7.
The Support Workbench enables you to edit one or more files in an incident package. You may want to do this to delete or overwrite sensitive data in the files. To edit package files, you must first copy the files out of the package into a designated directory, edit the files with a text editor or other utility, and then copy the files back into the package, overwriting the original package files.
The following procedure assumes that the package is already created and contains diagnostic data.
To edit incident package files:
Access the Customize Package page for the desired incident package.
See "Accessing the Customize Package Page" for instructions.
In the Packaging Tasks section, under the Scrub User Data heading, click Copy out Files to Edit contents.
The Copy Out Files page appears. It displays the name of the host to which you can copy files.
Do one of the following to specify a destination directory for the files:
Enter a directory path in the Destination Folder field.
Click the flashlight icon next to the Destination Folder field, and then complete the following steps:
If prompted for host credentials, enter credentials for the host to which you want to copy out the files, and then click OK. (Select Save as Preferred Credential to avoid the prompt for credentials next time.)
In the Browse and Select File or Directory window, click directory links to move down the directory hierarchy, and click directory names next to the Path label to move up the directory hierarchy, until you see the desired destination directory.
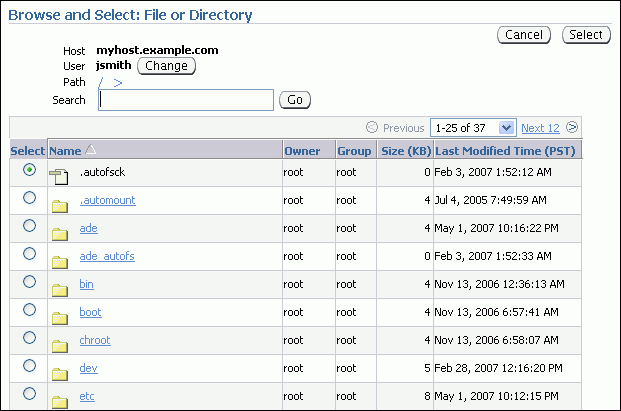
To reduce the number of directories displayed in the list, enter search text in the Search field and click Go. All directories that have the search text anywhere in the directory name are displayed.
Select the desired destination directory, and then click Select.
The Browse and Select File or Directory window closes, and the path to the selected directory appears in the Destination Folder field of the Copy Out Files page.
Under Files to Copy Out, select the desired files, and then click OK.
Note:
If you do not see the desired files, they may be on another page. Click the Next link to view the next page. Continue clicking Next, or select from the list of file numbers (to the left of the Next link) until you see the desired files. You can then select the files and click OK.The Customize Package page returns, displaying a confirmation message that lists the files that were copied out.
Using a text editor or other utility, edit the files.
On the Customize Package page, in the Packaging Tasks section, under the Scrub User Data heading, click Copy in Files to Replace Contents.
The Copy In Files page appears. It displays the files that you copied out.
Select the files to copy in, and then click OK.
The files are copied into the package, overwriting the existing files. The Customize Package page returns, displaying a confirmation message that lists the files that were copied in.
You can add any type of external file to an incident package.
To add an external file to an incident package:
Access the Customize Package page for the desired incident package.
See "Accessing the Customize Package Page" for instructions.
Click the Files link to view the Files subpage.
Figure 9-9 Files Subpage of Customize Package Page

From this page, you can add and remove files to and from the package.
Click Add external files.
The Add External File page appears. It displays the host name from which you may select a file.
Do one of the following to specify a file to add:
Enter the full path to the file in the File Name field.
Click the flashlight icon next to the File Name field, and then complete the following steps:
If prompted for host credentials, enter credentials for the host on which the external file resides, and then click OK. (Select Save as Preferred Credential to avoid the prompt for credentials next time.)
In the Browse and Select File or Directory window, click directory links to move down the directory hierarchy, and click directory names next to the Path label to move up the directory hierarchy, until you see the desired file.
To reduce the number of files or directories displayed in the list, enter search text in the Search field and click Go. All files or directories that have the search text anywhere in the file name or directory name are displayed.
In the Select column, click to select the desired file, and then click Select.
The Browse and Select window closes, and the path to the selected file appears in the File Name field of the Add External File page.
Click OK.
The Customize Package page returns, displaying the Files subpage. The selected file is now shown in the list of files.
You can remove one or more files of any type from the incident package.
To remove incident package files:
Access the Customize Package page for the desired incident package.
See "Accessing the Customize Package Page" for instructions.
Click the Files link to view the Files subpage.
A list of files in the package is displayed.
If you have not yet generated a physical file for this package, all package files are displayed in the list. If you have already generated a physical file, a View list appears above the files list. It enables you to choose between viewing only incremental package contents or the full package contents. The default selection is incremental package contents. This default selection displays only those package files that were created or modified since the last time that a physical file was generated for the package. Select Full package contents from the View list to view all package files.
Select the files to remove, and then click Exclude.
Note:
If you do not see the desired files, they may be on another page. Click the Next link to view the next page. Continue clicking Next, or select from the list of file numbers (to the left of the Next link) until you see the desired files. You can then select the files and click Remove.The Support Workbench maintains an activity log for each incident package. Most activities that you perform on a package, such as adding or removing files or creating a package zip file, are recorded in the log. You can also add your own notes to the log. This is especially useful if multiple database administrators are working with packages.
To view and update the incident package activity log:
Access the Package Details page for the desired incident package.
See "Accessing the Customize Package Page" for instructions.
Click the Activity Log link to view the Activity Log subpage.
The activity log is displayed.
To add your own note to the activity log, enter text into the Note field, and then click Add Note.
Your note is timestamped and appended to the list.
After you upload a package to Oracle Support, you can create and upload one or more correlated packages. This is recommended if critical alerts appeared in the Related Alerts section of the Database Home page. The correlated packages are associated with the original package, also known as the main package. The main package contains problems that occurred in a database instance. Correlated packages contain problems that occurred on other instances (Oracle ASM instances or other database instances) and that are related problems for the problems in the main package. There can be only one correlated package for each related instance.
To create, edit, and upload a correlated package:
View the Package Details page for the main package.
See "Viewing Package Details" for instructions.
On the Package Details page, click Customize Package.
On the Customize Package page, in the Packaging Tasks section, under Additional Diagnostic Data, click Create/Update Correlated Packages.
See Figure 9-7.
On the Correlated Packages page, under Correlated Packages, select one or more instances that have incidents and click Create.
A confirmation message appears, and the package IDs of the newly created correlated packages appear in the ID column.
Select the instance on which you created the correlated package, and click Finish Contents Preparation.
A confirmation message appears.
(Optional) View and edit a correlated package by completing these steps:
Click the package ID to view the package.
If prompted for credentials, enter them and click Login.
On the Package Details page, click Files to view the files in the package.
Click Customize Package and perform any desired customization tasks, as described in "Viewing and Modifying Incident Packages".
For each correlated package to upload, click Generate Upload File.
For each correlated package to send to Oracle, select the package and click Send to Oracle.
Note:
If Send to Oracle is unavailable (dimmed), there were no correlated incidents for the instance.You delete a correlated package with the Enterprise Manager Support Workbench for the target for which you created the package. For example, if you created a correlated package for an Oracle ASM instance target, access the Support Workbench for that Oracle ASM instance.
To delete a correlated package:
Access the Support Workbench for the target on which you created the correlated package.
Tip:
See the Related Links section at the bottom of any Support Workbench page. Or, see "Viewing Problems with the Enterprise Manager Support Workbench"Click Packages to view the Packages subpage.
Locate the correlated package in the list. Verify that it is a correlated package by viewing the package description.
Select the package and click Delete.
On the confirmation page, click Yes.
This section provides instructions for setting incident packaging preferences. Examples of incident packaging preferences include the number of days to retain incident information, and the number of leading and trailing incidents to include in a package for each problem. (By default, if a problem has many incidents, only the first three and last three incidents are packaged.) You can change these and other incident packaging preferences with Enterprise Manager or with the ADRCI utility.
To set incident packaging preferences with Enterprise Manager:
Access the Support Workbench home page.
See "Viewing Problems with the Enterprise Manager Support Workbench" for instructions.
In the Related Links section at the bottom of the page, click Incident Packaging Configuration.
The View Incident Packaging Configuration page appears. Click Help to view descriptions of the settings on this page.
Click Edit.
The Edit Incident Packaging Configuration page appears.
Edit settings, and then click OK to apply changes.
See Also:
|
Copyright © 2001, 2011, Oracle and/or its affiliates. All rights reserved. Legal Notices |
|