8 Managing Schema Objects
8.1 About Schema Objects
Note:
There is no relationship between a tablespace and a schema. Objects in the same schema can use storage in different tablespaces, and a tablespace can contain data from different schemas.
Naming Schema Objects
Every object in the database belongs to one schema and has a unique name within that schema. Multiple database objects can share the same name, if they are in different schemas. You can use the schema name to unambiguously refer to objects. For example, hr.employees refers to the table named employees in the hr schema. (The employees table is owned by hr.) The terms database object and schema object are used interchangeably.
When you create a database object, you must ensure that you create it in the intended schema. One method is to log in to the database as the user who owns the schema and then create the object. Generally, you place all the objects that belong to a single application in the same schema.
A schema object name must abide by certain rules. In addition to being unique within a schema, a schema object name cannot be longer than 30 bytes and must begin with a letter. If you attempt to create an object with a name that violates any of these rules, then the database raises an error.
The DDL Tab
You can create and manipulate schema objects with SQL or with SQL Developer.
When creating schema objects using SQL Developer, you can click the DDL tab to display the SQL statement that is the equivalent of the schema object properties that you specified with the graphical user interface. SQL Developer submits this SQL statement to create the schema object. This option shows the statement even if it is incomplete, so you must enter all specifications for the schema object to see the complete SQL statement that SQL Developer submits.
See Also:
Oracle Database Concepts for more detailed information about schema objects
8.2 About Schema Object Management Privileges
DBA role. This includes the SYS and SYSTEM users by default. Oracle recommends granting the DBA role only to those users who require administrative type access.
You can enable other users to manage schema objects without necessarily granting them DBA privileges. For example, a common scenario is to enable an application developer to create, modify, and delete schema objects in his or her own schema. To do so, you grant the RESOURCE role to the application developer.
8.3 About SQL Developer
You can connect to any target Oracle database schema using standard Oracle database authentication. Once connected, you can perform operations on schema objects.
The following topics provide basic information needed to begin using SQL Developer effectively:
See Also:
You can also use SQL Developer to perform other database tests, such as unit testing, migrations, and data modeling.
See Oracle SQL Developer User's Guide for more information on other SQL Developer features.
8.3.1 Installing and Starting SQL Developer
To install and start SQL Developer, you download a ZIP file and unzip it into a desired parent directory or folder, and then type a command or double-click a file name.
See Also:
Oracle SQL Developer User's Guide for detailed instructions on installing and starting SQL Developer.
8.3.2 Understanding the SQL Developer User Interface
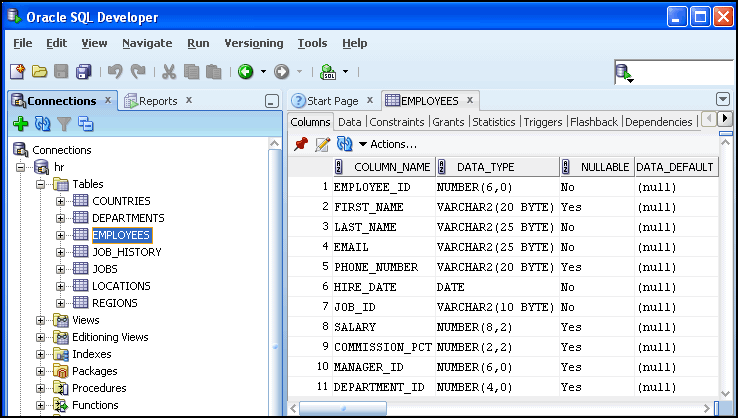
When you start SQL Developer, the SQL Developer window appears.
The SQL Developer window generally uses the left side for navigation to find and select objects, and the right side to display information about selected objects.
The menus along the top of the page contain standard entries, plus entries for features specific to SQL Developer.
The left side of the SQL Developer window has tabs and panes for the Connections and Reports navigators, icons for performing actions, and a hierarchical tree display for the currently selected navigator.
In the figure, the HR database connection appears in the Connections navigator, and the schema objects for the HR schema appear in the metadata tree.
The metadata tree in the Connections navigator displays all the objects (categorized by object type) accessible to the defined connections. To select an object, expand the appropriate tree node or nodes, then click the object.
The right side of the SQL Developer window has tabs and panes for objects that you select or open. For example, the object pane in the figure displays information about a table named EMPLOYEES. (If you hold the mouse pointer over the tab label -- EMPLOYEES in this figure -- a tooltip displays the object's owner and the database connection.)
See Also:
Oracle SQL Developer User's Guide for more information about the SQL Developer user interface.
8.3.3 Creating a Database Connection Using SQL Developer
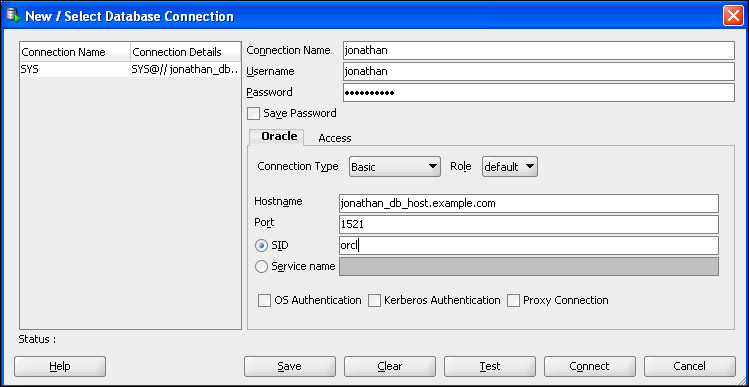
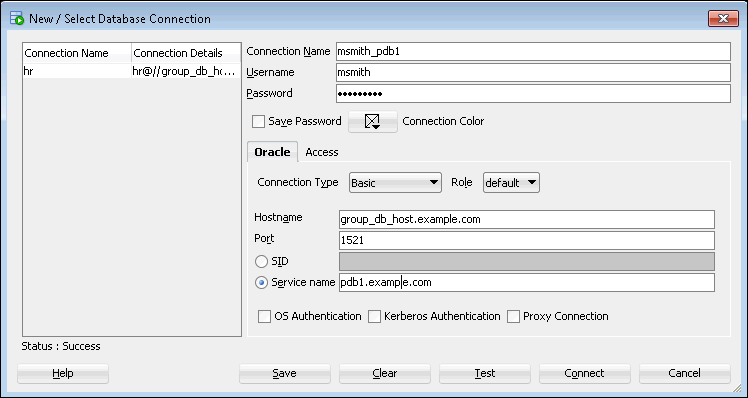
A database connection is a SQL Developer object that specifies the necessary information for connecting to a specific database as a specific user of that database. You must have at least one database connection (existing, created, or imported) to use SQL Developer.
To create a database connection:
See Also:
-
Oracle SQL Developer User's Guide for more information about creating, editing, exporting, and importing database connections.
-
Oracle Multitenant Administrator's Guide for an overview of the multitenant architecture introduced in Oracle Database 12c, which enables an Oracle database to function as a multitenant container database (CDB) that includes zero, one, or many customer created pluggable databases (PDBs). A non-CDB is a traditional Oracle database that cannot contain PDBs. All Oracle databases before Oracle Database 12c were non-CDBs.
-
Oracle Multitenant Administrator's Guide for complete information about creating and configuring a CDB.
8.4 Managing Tables
This section introduces database tables and describes how to perform various table operations using SQL Developer.
This section includes these topics:
8.4.1 About Tables
employees table, for example, there are columns called last_name and employee_id. Each row in the table represents a different employee, and contains a value for last_name and employee_id.
When you create a table, you specify the table type, and define its columns and constraints. Constraints are rules that help preserve data integrity.
This section contains the following topics:
8.4.1.1 About Table Types
employees table. Two other table types are supported: object tables and XMLType tables. Any of the three table types can be defined as permanent or temporary. Temporary tables hold session-private data that exists only for the duration of a transaction or session. They are useful in applications where a results set must be held temporarily in memory, perhaps because the results set is constructed by running multiple operations.
You can build relational tables in either heap or index-organized structures. In heap structures, the rows are not stored in any particular order. In index-organized tables, the row order is determined by the values in one or more selected columns. For some applications, index-organized tables provide enhanced performance and more efficient use of disk space.
This section describes permanent, heap-organized tables. For information about other table types and when to use them, see Oracle Database Administrator’s Guide and Oracle Database Concepts. For the syntax required to create tables with SQL, see Oracle Database SQL Language Reference.
8.4.1.2 About Table Column Attributes
8.4.1.2.1 Data Type
The data type attribute defines the kind of data to be stored in the column. When you create a table, you must specify a data type for each of its columns.
Data types define the domain of values that each column can contain. For example, DATE columns cannot accept the value February 29 (except for a leap year) or the values 2 or SHOE. Each value subsequently inserted in a column assumes the column data type. For example, if you insert 17-JAN-2004 into a date column, then Oracle Database treats that character string as a date value after verifying that it converts to a valid date.
Table 8-1 lists some common Oracle Database built-in data types.
Table 8-1 Common Data Types
| Data Type | Description |
|---|---|
|
|
Variable-length character string having a maximum length of You can use the See Oracle Database Globalization Support Guide for more information. |
|
|
Number having precision |
|
|
A composite value that includes both a date and time component. For each |
|
A character large object (CLOB) containing single-byte or multibyte characters. Both fixed-width and variable-width character sets are supported, both using the database character set. The maximum size is (4 gigabytes - 1) * (database block size). For example, for a block size of 32K, the maximum CLOB size is 128 terabytes. |
8.4.1.2.2 NOT NULL Column Constraint
NOT NULL constraint, which requires that a value be included in the column whenever a row is inserted or updated. Unlike other constraints described in "About Table-Level Constraints", which can be defined as part of the column definition or part of the table definition, the NOT NULL constraint must be defined as part of the column definition.
Use a NOT NULL constraint when data must be supplied for a column for the integrity of the database. For example, if all employees must belong to a specific department, then the column that contains the department identifier must be defined with a NOT NULL constraint. However, do not define a column as NOT NULL if the data can be unknown or may not exist when rows are added or changed. An example of a column for which you must not use a NOT NULL constraint is the second, optional line in a mailing address.
The database automatically adds a NOT NULL constraint to the column or columns included in the primary key of a table.
8.4.1.2.3 Default Value
8.4.1.3 About Table-Level Constraints
NULL as a value. Similarly, in this table, you cannot have two employees with the same ID.
Oracle Database enables you to apply data integrity rules called constraints, both at the table level and at the column level. Any SQL statement that attempts to insert or update a row that violates a constraint results in an error, and the statement is rolled back. Likewise, any attempt to apply a new constraint to a populated table also results in an error if any existing rows violate the new constraint.
The types of constraints that you can apply at the table level are as follows:
-
Primary Key—Requires that a column (or combination of columns) be the unique identifier of the row. A primary key column does not allow
NULLvalues. -
Unique Key—Requires that no two rows can have duplicate values in a specified column or combination of columns. The set of columns is considered to be a unique key.
-
Check—Requires that a column (or combination of columns) satisfy a condition for every row in the table. A check constraint must be a Boolean expression. It is evaluated each time that a row is inserted or updated. An example of a check constraint is:
SALARY > 0. -
Foreign Key—Requires that for a particular column (or combination of columns), all column values in the child table exist in the parent table. The table that includes the foreign key is called the dependent or child table. The table that is referenced by the foreign key is called the parent table. An example of a foreign key constraint is where the department column of the employees table must contain a department ID that exists in the parent department table.
Constraints can be created and usually modified with different statuses. The options include enabled or disabled, which determine if the constraint is checked when rows are added or modified, and deferred or immediate, which cause constraint validation to occur at the end of a transaction or at the end of a statement, respectively.
See Also:
-
Oracle Database Concepts for more information about constraints
8.4.1.4 Other Table Creation Considerations
8.4.1.4.1 User-Defined Types and Large Objects (LOBs)
CREATE TYPE statement and are described in detail in Oracle Database SQL Language Reference.
Large object (LOB) columns are used to contain unstructured data (such as text or streaming video), and can hold terabytes of information.
To create a LOB column using SQL Developer, click the Advanced checkbox when creating a table. Then click LOB Parameters to see the options available when creating a LOB column. For details about creating LOB columns, see Oracle Database SQL Language Reference.
8.4.1.4.2 Partitioned Tables and Indexes
After partitions are defined, certain operations become more efficient. For example, for some queries, the database can generate query results by accessing only a subset of partitions, rather than the entire table. This technique (called partition pruning) can provide order-of-magnitude gains in improved performance. In addition, data management operations can take place at the partition level, rather than on the entire table. This results in reduced times for operations such as data loads; index creation and rebuilding; and backup and recovery.
Each partition can be stored in its own tablespace, independent of other partitions. Because different tablespaces can be on different disks, this provides a table structure that can be better tuned for availability and performance. Storing partitions in different tablespaces on separate disks can also optimize available storage usage, because frequently accessed data can be placed on high-performance disks, and infrequently retrieved data can be placed on less expensive storage.
Partitioning is useful for many types of applications that manage large volumes of data. Online transaction processing (OLTP) systems often benefit from improvements in manageability and availability, while data warehousing systems benefit from increased performance and manageability.
To specify partitioning options using SQL Developer, click the Advanced checkbox when creating a table. Then click Partitioning to see the partitioning options available. For details about partitioning, see Oracle Database SQL Language Reference.
8.4.1.4.3 Physical Storage Attributes
To specify storage attributes for a table using SQL Developer, click the Advanced checkbox when creating a table, then click Table Properties, and then click Storage Options.
8.4.1.4.4 Compressed Tables
To configure table compression using SQL Developer, click the Advanced checkbox when creating a table. Then click Table Properties and enable the Compression option.
See Also:
-
Oracle Database Administrator’s Guide for design and management considerations for different table types
-
Oracle Database Concepts and Oracle Database VLDB and Partitioning Guide for more information about partitioned tables and indexes
-
Oracle Database SecureFiles and Large Objects Developer's Guide for more information about SecureFiles LOBs and BasicFiles LOBs
8.4.2 Viewing Tables
You can use SQL Developer to list all the tables in a specified schema, and to view the definitions of individual tables.
To view tables:
8.4.3 Viewing Table Data
To view table data:
You can also write and submit your own SQL SELECT statement to see the contents of a table. You can run SQL statements by starting a SQL Worksheet session in SQL Developer. To do so, from the Tools menu, select SQL Worksheet.
A detailed description of the SELECT statement is in Oracle Database SQL Language Reference.
See Also:
8.4.4 Example: Creating a Table
You can use SQL Developer to create a table.
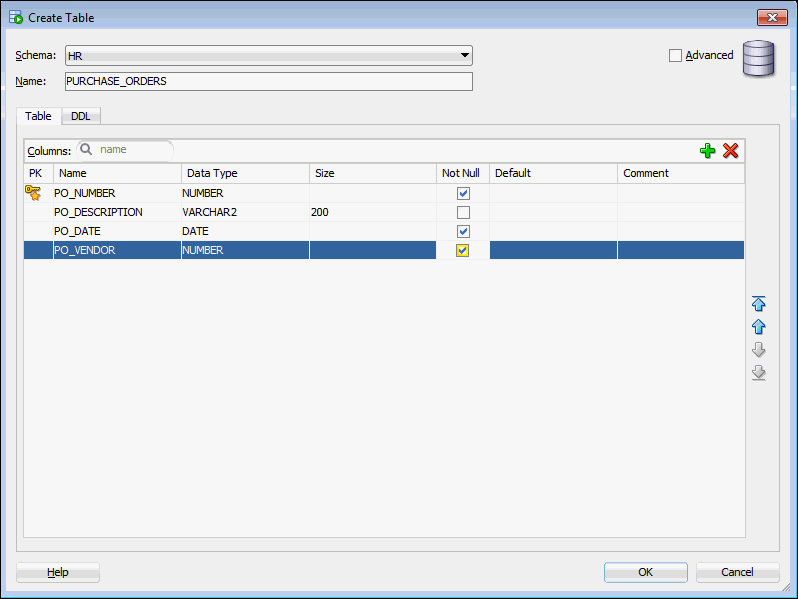
In the following example, you create a table called purchase_orders in the HR schema. The table has the following columns:
| Column Name | Data Type | Size | Not Null | Primary Key |
|---|---|---|---|---|
|
|
|
|
Yes |
Yes |
|
|
|
200 |
No |
|
|
|
|
|
Yes |
|
|
|
|
|
Yes |
|
To create the PURCHASE_ORDERS table in the HR schema:
See Also:
8.4.5 Modifying Table Attributes
See Also:
8.4.5.1 Example: Adding Table Columns
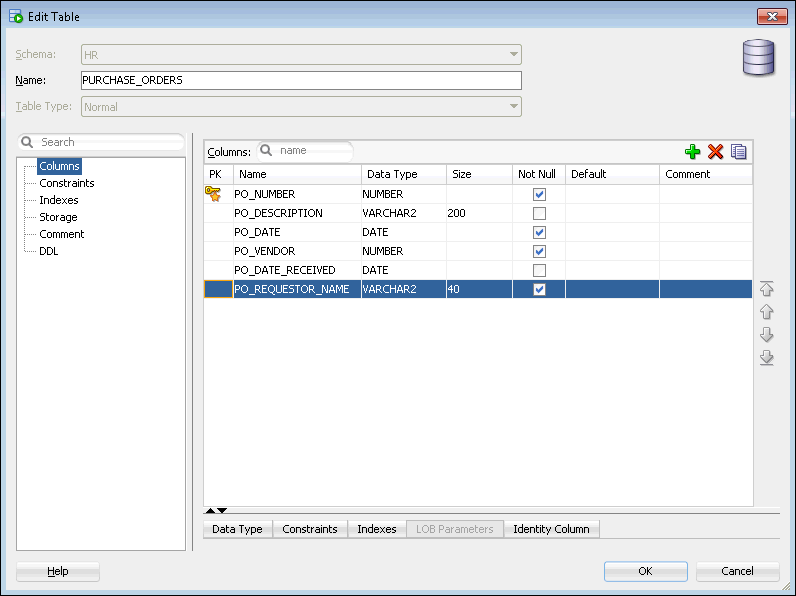
po_date_received and po_requestor_name to the purchase_orders table that you created previously in "Example: Creating a Table".
To add columns to the PURCHASE_ORDERS table:
See Also:
8.4.5.2 Example: Deleting a Table Column
po_requestor_name column that you added to the purchase_orders table in "Example: Adding Table Columns".
To delete the PO_REQUESTOR_NAME column:
See Also:
8.4.5.3 Example: Adding a New Table Constraint
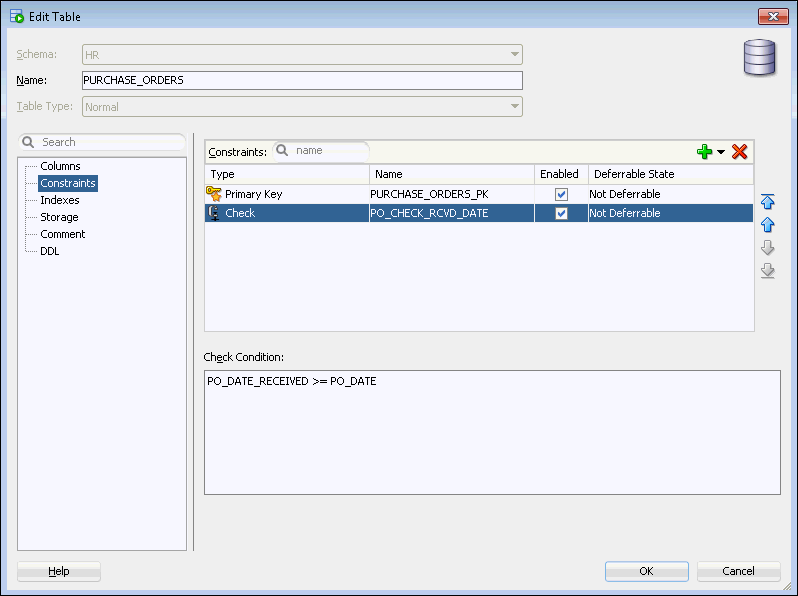
purchase_orders table that you created in "Example: Creating a Table". To enforce the rule that the po_date_received value must be either the same day as, or later than, the value of po_date, you will add a check constraint.
Note:
You can also add constraints during table creation, as shown in "Example: Creating a Table". In that example, you added a primary key constraint.
To add a table constraint to the PURCHASE_ORDERS table:
See Also:
8.4.5.4 Example: Modifying an Existing Table Constraint
purchase_orders table in "Example: Adding a New Table Constraint".
To disable a constraint for the PURCHASE_ORDERS table:
See Also:
8.4.5.5 Example: Deleting a Table Constraint
In this example, you delete the check constraint that you created for the purchase_orders table in "Example: Adding a New Table Constraint".
To delete a constraint from the PURCHASE_ORDERS table:
See Also:
-
Oracle Database Concepts for more information about the cascading delete mechanism
8.4.6 Example: Loading Data into a Table
You can use SQL Developer to load data into a table. You can load data from an .xls file or a .csv file into the table.
In this example, you load data into the PURCHASE_ORDERS table that you created in "Example: Creating a Table". For simplicity, this example loads only three rows.
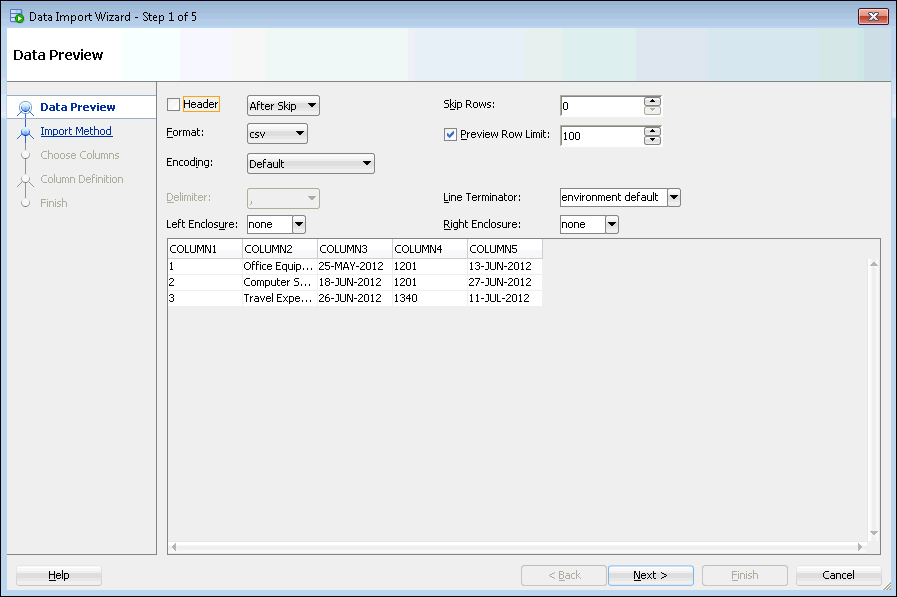
To prepare for this example, you must create a text file named load.csv on the file system of the database host computer or on the file system of your local computer. The contents of the file should be as follows:
1,Office Equipment,25-MAY-2012,1201,13-JUN-2012
2,Computer System,18-JUN-2012,1201,27-JUN-2012
3,Travel Expense,26-JUN-2012,1340,11-JUL-2012
Note:
This example assumes that the columns in the PURCHASE_ORDERS table are the following: PO_NUMBER, PO_DESCRIPTION, PO_DATE, PO_VENDOR, and PO_DATE_RECEIVED. If your PURCHASE_ORDERS table does not have all these columns (or has additional columns), then modify the data in the text file accordingly.
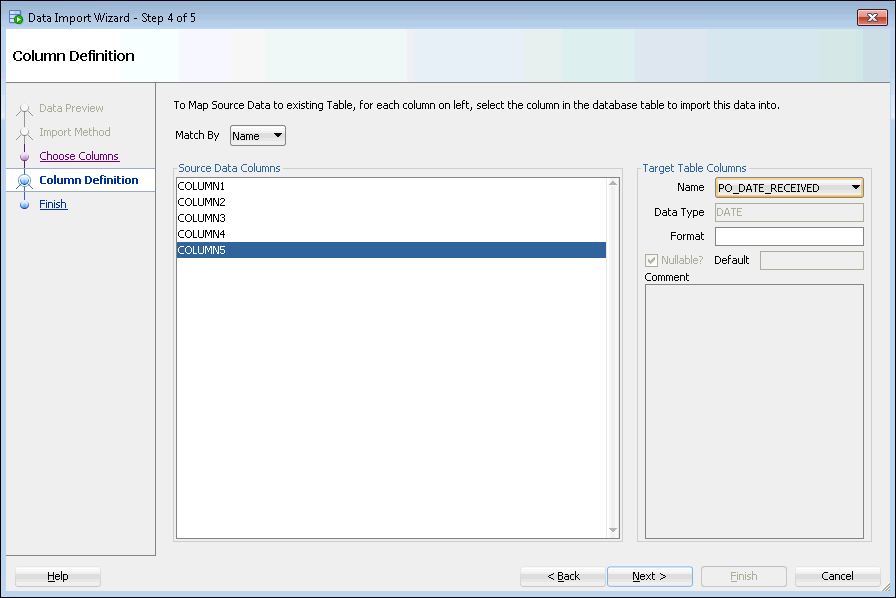
To load data into the PURCHASE_ORDERS table:
See Also:
8.4.7 Deleting a Table
If you no longer need a table, then you can delete it using SQL Developer. When you delete a table, the database deletes the data and dependent objects of the table (such as indexes), and removes the table from the data dictionary.
When you delete a table from a locally managed tablespace that is not the SYSTEM tablespace, the database does not immediately reclaim the space associated with the table. Instead, it places the table and any dependent objects in the recycle bin. You can then restore the table, its data, and its dependent objects from the recycle bin if necessary. You can view the contents of the recycle bin by clicking Recycle Bin on the Tables page. Note that users can see only tables that they own in the recycle bin. See Oracle Database Administrator’s Guide for more information about the recycle bin, including how to view, purge, and recover tables for which you are not the owner.
To delete a table:
See Also:
8.5 Managing Indexes
8.5.1 About Indexes
Indexes are optional schema objects that are associated with tables. You create indexes on tables to improve query performance. Just as the index in a guide helps you to quickly locate specific information, an Oracle Database index provides quick access to table data.
You can create as many indexes on a table as you need. You create each index on one or more columns of a table. For example, in a purchase orders table, if you create an index on the vendor number column, then you can sequentially access the rows of the table in vendor number order, without having to actually sort the rows. Additionally, you can directly access all purchase orders issued to a particular vendor without having to scan the entire table.
After an index is created, it is automatically maintained and used by the database. Changes to the data or structure of a table, such as adding new rows, updating rows, or deleting rows, are automatically incorporated into all relevant indexes. This is transparent to the user.
Some indexes are created implicitly through constraints that are placed on a table. For example, the database automatically creates an index on the columns of a primary key constraint or unique key constraint.
The following topics provide more background information about indexes:
8.5.1.1 Indexes and Performance
Before you add additional indexes, examine the performance of your database for queries and DML. You can then compare performance after the new indexes are added.
See Also:
Oracle Database Testing Guide for information about using the SQL Performance Analyzer to analyze the SQL performance impact of any type of schema or system changes
8.5.1.2 Index Attributes
Standard (B-tree) and Bitmap
A standard, B-tree index contains an entry for each value in the index key along with a disk address of the row where the value is stored. A B-tree index is the default and most common type of index in an Oracle database.
A bitmap index uses strings of bits to encapsulate values and potential row addresses. It is more compact than a B-tree index and can perform some types of retrieval more efficiently. For general use, however, a bitmap index requires more overhead during row operations on the table and should be used primarily for data warehouse environments, as described in Oracle Database Data Warehousing Guide.
Ascending and Descending
The default search through an index is from lowest to highest value, where character data is sorted by ASCII values, numeric data from smallest to largest number, and date from the earliest to the latest value. This default search method is performed in indexes created as ascending indexes. You can cause index searches to reverse the search order by creating the related index with the descending option.
Column and Functional
Typically, an index entry is based on the value or values found in the column or columns of a table. This is a column index. Alternatively, you can create a function-based index in which the indexed value is derived from the table data. For example, to find character data that can be in various combinations of upper and lowercase letters, you can use a function-based index based on the UPPER() function to look for the values as if they were all in uppercase characters.
Single-Column and Concatenated
You can create an index on just one column, which is called a single-column index, or on multiple columns, which is called a concatenated index. Concatenated indexes are useful when all the index columns are likely to be included in the WHERE clause of frequently executed SQL statements.
Nonpartitioned and Partitioned
As with tables, you can partition an index. In most situations, it is useful to partition an index when the associated table is partitioned, and to partition the index using the same partitioning scheme as the table. (For example, if the table is range-partitioned by sales date, then you create an index on sales date and partition the index using the same ranges as the table partitions.) This is known as a local partitioned index. However, you do not have to partition an index using the same partitioning scheme as its table. You can also create a nonpartitioned, or global, index on a partitioned table.
See Also:
-
Oracle Database Concepts for design and management considerations of different index types
-
Oracle Database SQL Language Reference for the syntax to create indexes
-
Oracle Database VLDB and Partitioning Guide for more information about partitioned tables and indexes
8.5.2 Viewing Indexes
You use SQL Developer to view the indexes in your database.
To view indexes:
See Also:
8.5.3 Example: Creating an Index
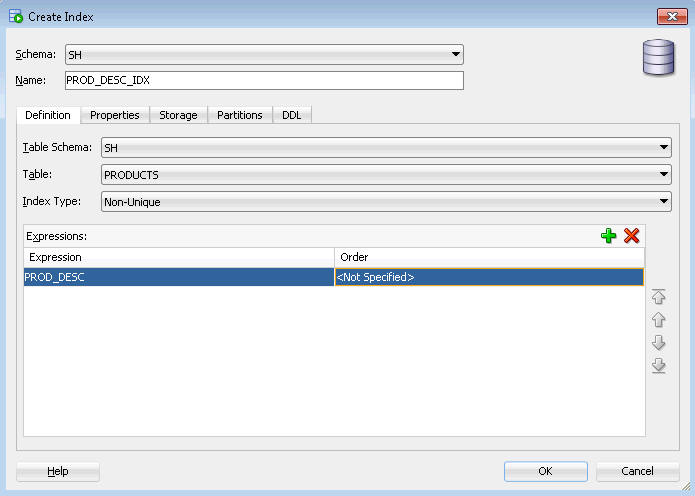
When you create an index using SQL Developer, you specify one or more table columns to be indexed and the type of index to create.
In this example, you create an index on the PROD_DESC column in the SH.PRODUCTS table. (The SH schema is part of the sample schemas.)
To create a description index on the SH.PRODUCTS table:
See Also:
8.5.4 Example: Deleting an Index
If you no longer need an index, then you can delete it using SQL Developer.
In this example, you delete the PROD_DESC_IDX index that you created previously on the SH.PRODUCTS table in "Example: Creating an Index".
Note:
You cannot delete an index that is currently used to enforce a constraint. You must disable or delete the constraint and then, if the index is not deleted as a result of that action, delete the index.
To delete the description index on the SH.PRODUCTS table:
See Also:
8.6 Managing Views
8.6.1 About Views
Similar to tables, views can be queried, updated, inserted into, and deleted from, with some restrictions. All operations performed on a view actually affect the base tables of the view. Views can provide an additional level of security by restricting access to a predetermined set of rows and columns of a table. They can also hide data complexity and store complex queries.
Many important views are in the SYS schema. There are two types: static data dictionary views and dynamic performance views. Complete descriptions of the views in the SYS schema are in Oracle Database Reference.
Static Data Dictionary Views
The data dictionary views are called static views because they change infrequently, only when a change is made to the data dictionary. Examples of data dictionary changes include creating a new table or granting a privilege to a user.
Many data dictionary tables have three corresponding views:
-
A
DBA_view displays all relevant information in the entire database.DBA_views are intended only for administrators.An example of a
DBA_view isDBA_TABLESPACES, which contains one row for each tablespace in the database. -
An
ALL_view displays all the information accessible to the current user, including information from the schema of the current user, and information from objects in other schemas, if the current user has access to those objects through privileges or roles.An example of an
ALL_view isALL_TABLES, which contains one row for every table for which the user has object privileges. -
A
USER_view displays all the information from the schema of the current user. No special privileges are required to query these views.An example of a
USER_view isUSER_TABLES, which contains one row for every table owned by the user.
The columns in the DBA_, ALL_, and USER_ views are usually nearly identical. The USER_ view usually does not have an OWNER column.
Dynamic Performance Views
Dynamic performance views monitor ongoing database activity. They are available only to administrators. The names of dynamic performance views start with the characters V$. For this reason, these views are often referred to as V$ views.
An example of a V$ view is V$SGA, which returns the current sizes of various System Global Area (SGA) memory components.
8.6.2 Displaying Views
You can use SQL Developer to list the views in a specified schema. You can also display the view definitions.
To display views:
See Also:
8.6.3 Example: Creating a View
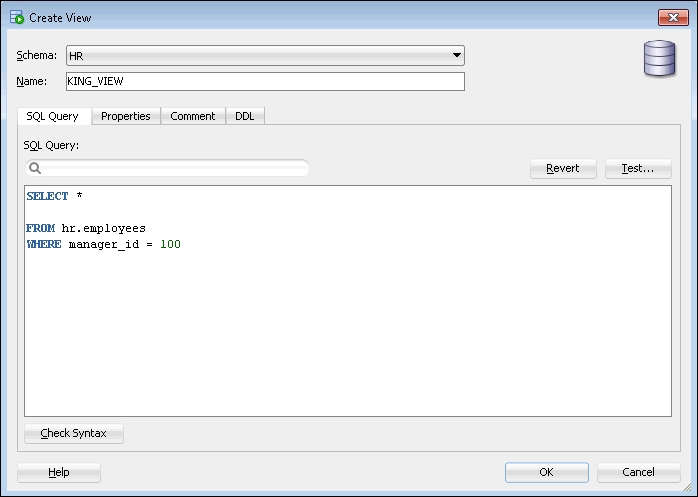
king_view, which uses the HR.EMPLOYEES table as its base table. (The HR schema is part of the sample schemas.) This view filters the table data so that only employees who report directly to the manager King, whose employee ID is 100, are returned in queries. In an application scenario, this view adds an additional level of security to the HR.EMPLOYEES table while providing a suitable presentation of relevant information for manager King.
To create the KING_VIEW view on the HR.EMPLOYEES table:
-
In the Connections navigator in SQL Developer, navigate to the Views node in the HR schema, by following the instructions in "Displaying Views".
-
Right-click the Views node and select New View.
The Create View dialog box appears, with the SQL Query tab displayed.
-
Enter the following information:
-
In the Schema field, select
HR. -
In the Name field, enter
KING_VIEW. -
In the SQL Query field, enter the following SQL statement that will be used to create
KING_VIEW:SELECT * FROM hr.employees WHERE manager_id = 100
-
-
Click OK.
The
KING_VIEWis created and appears in the list of views for the HR schema.
To test the new KING_VIEW view:
See Also:
8.6.4 Example: Deleting a View
If you no longer need a view, then you can delete it using SQL Developer.
In this example, you delete the HR.KING_VIEW view that you created previously in "Example: Creating a View".
To delete the HR.KING_VIEW view:
See Also:
8.7 Managing Program Code Stored in the Database
8.7.1 About Program Code Stored in the Database
-
PL/SQL packages, procedures, functions, and triggers
-
Java source code (Java sources) and compiled Java classes
The actions that you can perform include creating, compiling, creating synonyms for, granting privileges on, and showing dependencies for these code objects. You can also edit and debug PL/SQL code objects using SQL Developer. You access administration pages for these objects by clicking links in the Programs section of the Schema subpage.
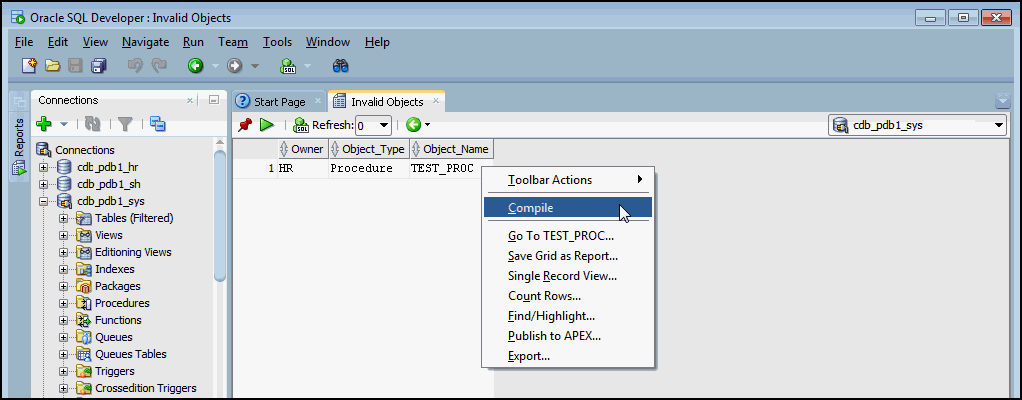
Note that creating and managing program code objects is primarily the responsibility of application developers. However, as a DBA you might have to assist in managing these objects. Your most frequent task for program code objects might be to revalidate (compile) them, because they can become invalidated if the schema objects on which they depend change or are deleted.
Note:
Other types of schema objects besides program code objects can become invalid. For example, if you delete a table, then any views that reference that table become invalid.
See Also:
-
Oracle Database Concepts for an overview of using PL/SQL and Java for server-side programming
-
Oracle Database 2 Day + Java Developer's Guide for more information about Java sources and Java classes
-
Oracle Database PL/SQL Language Reference to learn about PL/SQL code
-
Oracle Database Administrator’s Guide for more information about object invalidation
8.7.2 Validating (Compiling) Invalid Schema Objects
Note:
It is not always possible to revalidate a schema object that stores program code by compiling it. You may have to take remedial actions first. For example, if a view becomes invalid because a table that it references is deleted, then compiling the view produces an error message that indicates that the table does not exist. You cannot validate the view until you re-create the table.
You can use SQL Developer to run a report that finds invalid schema objects.
To find invalid schema objects:
See Also:
-
Oracle Database Concepts for more information about schema object dependencies
-
Oracle Database Administrator’s Guide for information about managing object dependencies
8.8 Working with Other Schema Objects
-
A sequence is a database object that generates unique integers. Each time that you query the sequence, it increments its current value by a designated amount and returns the resulting integer. Sequences can be simultaneously queried by multiple users, and each user receives a unique value. For this reason, using a sequence to provide the value for a primary key in a table is an easy way to guarantee that the key value is unique, regardless of the number of users inserting data into the table.
-
A synonym is an alias for any schema object, such as a table or view. Synonyms provide an easy way to hide the underlying database structure from an application or a user. Synonyms can be private or public. A public synonym does not have to be qualified with a schema name, whereas a private synonym does, if the user referencing the private synonym is not the synonym owner. For example, consider the following query, issued by a user who has been granted the
READobject privilege on theHR.EMPLOYEEStable:SELECT employee_id, salary FROM hr.employees ORDER BY salary
Now suppose you create a public synonym named
PERSONNELas an alias for theHR.EMPLOYEEStable, and you grant theREADprivilege on theHR.EMPLOYEEStable toPUBLIC(all database users). With the public synonym in place, any user can issue the following simpler query:SELECT employee_id, salary FROM personnel ORDER BY salary
The user who created this query did not need to know the name of the schema that contains the personnel data.
Note:
If a user owns a table named
personnel, then that table is used in the query. If no such table exists, then the database resolves the public synonym and uses theHR.EMPLOYEEStable.An additional benefit of synonyms is that you can use the same synonym in a development database as in the production database, even if the schema names are different. This technique enables application code to run unmodified in both environments. For example, the preceding query would run without errors in a development database that had the
EMPLOYEEStable in theDEV1schema, if thePERSONNELsynonym is defined in the development database to point to theDEV1schema.Because a synonym is simply an alias, it requires no storage other than its definition in the data dictionary. To reference a synonym in a query, you must have privileges on the object to which it points. Synonyms themselves cannot be secured. If you grant object privileges on a synonym to a user, then you are granting privileges on the object to which the synonym points.
-
A database link is a schema object that points to another Oracle database. You use a database link to query or update objects in a remote database. Database links are used in distributed database environments, which are described in Oracle Database Administrator’s Guide.
8.9 Managing Schema Objects: Oracle by Example Series
Oracle By Example (OBE) has a series on the Oracle Database 2 Day DBA guide. This OBE steps you through the tasks in this chapter and includes annotated screenshots.
To view the Managing Schema Objects OBE, enter the following URL in your web browser:
https://apexapps.oracle.com/pls/apex/f?p=44785:24:::NO:24:P24_CONTENT_ID:16831
