| Oracle® Database 2 Day + Data Replication and Integration Guide 11g Release 2 (11.2) Part Number E17516-08 |
|
|
PDF · Mobi · ePub |
| Oracle® Database 2 Day + Data Replication and Integration Guide 11g Release 2 (11.2) Part Number E17516-08 |
|
|
PDF · Mobi · ePub |
This chapter contains conceptual information about Oracle Streams replication and describes how to replicate data continuously between databases.
This chapter contains the following sections:
See Also:
Replication is the process of sharing database objects and data at multiple databases. To maintain the database objects and data at multiple databases, a change to one of these database objects at a database is shared with the other databases. In this way, the database objects and data are kept synchronized at all of the databases in the replication environment.
Some replication environments must continually replicate the changes made to shared database objects. Oracle Streams is the Oracle Database feature for continuous replication. Typically, in such environments, the databases that contain the shared database objects are connected to the network nearly all the time and continually push database changes over these network connections.
When a change is made to one shared database object, Oracle Streams performs the following actions to ensure that the same change is made to the corresponding shared database object at each of the other databases:
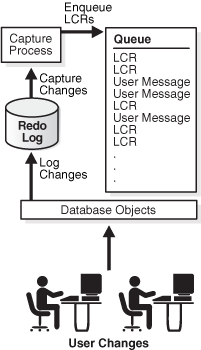
Oracle Streams automatically captures the change and stages it in a queue.
Oracle Streams automatically pushes the change to a queue in each of the other databases that contain the shared database object.
Oracle Streams automatically consumes the change at each of the other databases. During consumption, Oracle Streams dequeues the change and applies the change to the shared database object.
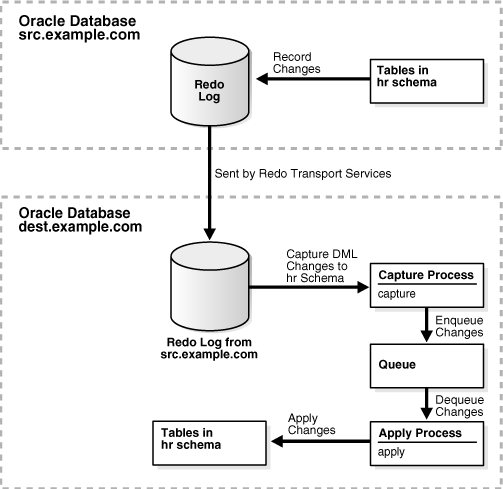
Figure 4-1 shows the Oracle Streams information flow:
Figure 4-1 Oracle Streams Information Flow

You can use Oracle Streams replication to share data at multiple databases and efficiently keep the data current at these databases. For example, a company with several call centers throughout the world might want to store customer information in a local database at each call center. In such an environment, continuous replication with Oracle Streams can ensure that a change made to customer data at one location is pushed to all of the other locations as soon as possible.
When you use Oracle Streams to capture changes to database objects, the changes are formatted into logical change records (LCRs). An LCR is a message with a specific format that describes a database change. If the change was a data manipulation language (DML) operation, then a row LCR encapsulates each row change resulting from the DML operation. One DML operation might result in multiple row changes, and so one DML operation might result in multiple row LCRs. If the change was a data definition language (DDL) operation, then a single DDL LCR encapsulates the DDL change.
The following topics describe Oracle Streams replication in more detail:
About Rules for Controlling the Behavior of Capture, Propagation, and Apply
About the Common Types of Oracle Streams Replication Environments
About Key Oracle Streams Supplied PL/SQL Packages and Data Dictionary Views
Oracle Streams provides two ways to capture database changes automatically:
Use a capture process to capture data manipulation language (DML) changes to a relatively large number of tables, an entire schema, or a database. Also, a capture process must be used to capture data definition language (DDL) changes to tables and other database objects. See "About Change Capture with a Capture Process".
Use a synchronous capture to capture DML changes to a relatively small number of tables. See "About Change Capture with a Synchronous Capture".
A single capture process or a single synchronous capture can capture changes made to only one database. The database where a change originated is called the source database for the change.
Note:
The examples in this guide replicate DML changes only. You should understand the implications of replicating DDL changes before doing so. See Oracle Streams Replication Administrator's Guide and Oracle Database PL/SQL Packages and Types Reference for information about replicating DDL changes.A capture process is an optional Oracle Database background process that asynchronously captures changes recorded in the redo log. When a capture process captures a database change, it converts it into a logical change record (LCR) and enqueues the LCR. Enqueuing is the process of placing messages into queues.
A capture process is always associated with a single queue, and it enqueues LCRs into this queue only. For improved performance, captured LCRs are always stored in a buffered queue, which is System Global Area (SGA) memory associated with a queue.
Figure 4-2 shows how a capture process works.
A capture process can run on the source database or on a remote database. When a capture process runs on the source database, the capture process is called a local capture process. When a capture process runs on a remote database, the capture process is called a downstream capture process.
With downstream capture, redo transport services use the log writer process (LGWR) at the source database to send redo data to the database that runs the downstream capture process. A downstream capture process requires fewer resources at the source database because a different database captures the changes. A local capture process, however, is easier to configure and manage than a downstream capture process. Local capture processes also provide more flexibility in replication environments with different platforms or different versions of Oracle Database.
See Also:
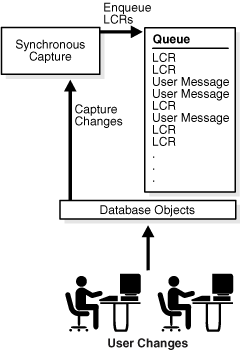
Instead of asynchronously mining the redo log, a synchronous capture uses an internal mechanism to capture data manipulation language (DML) changes when they are made to tables. A single DML change can result in changes to one or more rows in the table. A synchronous capture captures each row change, converts it into a row logical change record (LCR), and enqueues it.
A synchronous capture is always associated with a single queue, and it enqueues row LCRs into this queue only. Synchronous capture always enqueues row LCRs into the persistent queue. The persistent queue is the portion of a queue that stores messages on hard disk in a queue table, not in memory.
It is usually best to use synchronous capture in a replication environment that captures changes to a relatively small number of tables. If you must capture changes to many tables, to an entire schema, or to an entire database, then you should use a capture process instead of a synchronous capture.
Figure 4-3 shows how a synchronous capture works.
Note:
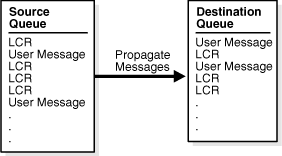
If you are using Oracle Database 11g Standard Edition, then synchronous capture is the only Oracle Streams component that can capture database changes automatically. To use capture processes, you must have Oracle Database 11g Enterprise Edition.A propagation sends messages from one queue to another. You can use Oracle Streams to configure message propagation between two queues in the same database or in different databases. Oracle Streams uses a database link and Oracle Scheduler jobs to send messages. A propagation is always between a source queue and a destination queue. In an Oracle Streams replication environment, a propagation typically sends messages that describe database changes (in the form of LCRs) from a source queue in the local database to a destination queue in a remote database.
Figure 4-4 shows a propagation.
See Also:
Oracle Database Administrator's Guide for information about Oracle Scheduler
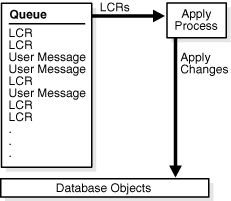
After database changes have been captured and propagated, they reside in a queue and are ready to be applied to complete the replication process. An apply process is an optional Oracle Database background process that dequeues logical change records (LCRs) and other types of messages from a specific queue. Dequeuing is the process of retrieving messages from queues. In a simple Oracle Streams replication environment, an apply process typically applies the changes in the LCRs that it dequeues directly to the database objects in the local database.
An apply process is always associated with a single queue, and it dequeues messages from this queue only. A single apply process either can dequeue messages from the buffered queue or from the persistent queue, but not both. Therefore, if an apply process applies changes that were captured by a capture process, then the apply process must be configured to dequeue LCRs from the buffered queue. However, if an apply process applies changes that were captured by a synchronous capture, then the apply process must be configured to dequeue LCRs from the persistent queue.
Figure 4-5 shows how an apply process works.
When an apply process cannot apply an LCR successfully, it moves the LCR, and all of the other LCRs in the transaction, to a special queue called the error queue. The error queue contains all of the current apply errors for a database. If there are multiple apply processes in a database, then the error queue contains the apply errors for each apply process. You can correct the condition that caused an error and then reexecute the corresponding transaction in the error queue to apply its changes. For example, you might modify a row in a table to correct the condition that caused an error in a transaction and then reexecute the transaction.
For an apply process to apply changes to a database object, an instantiation system change number (SCN) must be set for the database object. An instantiation SCN is the SCN for a database object that specifies that only changes that were committed after the SCN at the source database are applied by an apply process. The instantiation SCN for a table assumes that the table is consistent at the source and destination database at the specified SCN. Typically, the instantiation SCN is set automatically when you configure the Oracle Streams replication environment.
Note:
An apply process can also pass a message that it dequeues to an apply handler. An apply handler is either a collection of SQL statements or a user-defined PL/SQL procedure that performs custom processing of the message. Apply handlers are beyond the scope of this guide. See Oracle Streams Concepts and Administration for more information.An Oracle Streams replication configuration must identify what to replicate. Capture processes, synchronous captures, propagations, and apply processes are called Oracle Streams clients. Rules determine what Oracle Streams clients replicate. You can configure rules for each Oracle Streams client independently, and the rules for different Oracle Streams clients do not need to match.
Rules can be organized into rule sets, and the behavior of each Oracle Streams client is determined by the rules in the rule sets that are associated with it. You can associate a positive rule set and a negative rule set with a capture process, a propagation, and an apply process, but a synchronous capture can only have a positive rule set.
In a replication environment, an Oracle Streams client performs its task if a database change satisfies its rule sets. In general, a change satisfies the rule sets for an Oracle Streams client if no rules in the negative rule set evaluate to TRUE for the change, and at least one rule in the positive rule set evaluates to TRUE for the change. The negative rule set is always evaluated first.
Specifically, you use rule sets in an Oracle Streams replication environment to do the following:
Specify the changes that a capture process captures from the redo log or discards. If a change found in the redo log satisfies the rule sets for a capture process, then the capture process captures the change. If a change found in the redo log does not satisfy the rule sets for a capture process, then the capture process discards the change.
Specify the changes that a synchronous capture captures. If a data manipulation language (DML) change satisfies the rule set for a synchronous capture, then the synchronous capture captures the change immediately after the change is committed. If a DML change made to a table does not satisfy the rule set for a synchronous capture, then the synchronous capture does not capture the change.
Specify the changes (encapsulated in LCRs) that a propagation sends from one queue to another or discards. If an LCR in a queue satisfies the rule sets for a propagation, then the propagation sends the LCR. If an LCR in a queue does not satisfy the rule sets for a propagation, then the propagation discards the LCR.
Specify the LCRs that an apply process dequeues or discards. If an LCR in a queue satisfies the rule sets for an apply process, then the apply process dequeues and processes the LCR. If an LCR in a queue does not satisfy the rule sets for an apply process, then the apply process discards the LCR.
See Also:
Oracle Streams Concepts and Administration for detailed information about rules
A rule-based transformation is an additional configuration option that provides flexibility when a database object is not identical at the different databases. Rule-based transformations modify changes to a database object so that the changes can be applied successfully at each database. Specifically, a rule-based transformation is any modification to a message when a rule in a positive rule set evaluates to TRUE.
For example, suppose a table has five columns at the database where changes originated, but the shared table at a different database only has four of the five columns. When a data manipulation language (DML) operation is performed on the table at the source database, the row changes are captured and formatted as row LCRs. A rule-based transformation can delete the extra column in these row LCRs so that they can be applied successfully at the other database. If the row LCRs are not transformed, then the apply process at the other database will raise errors because the row LCRs have an extra column.
There are two types of rule-based transformations: declarative and custom. Declarative rule-based transformations include a set of common transformation scenarios for row changes resulting from DML changes (row LCRs). Custom rule-based transformations require a user-defined PL/SQL function to perform the transformation. This guide discusses only declarative rule-based transformations.
The following declarative rule-based transformations are available:
An add column transformation adds a column to a row LCR.
A delete column transformation deletes a column from a row LCR.
A keep columns transformation keeps a list of columns in a row LCR, while deleting the columns that are not in the list.
A rename column transformation renames a column in a row LCR.
A rename schema transformation renames the schema in a row LCR.
A rename table transformation renames the table in a row LCR.
When you add one of these declarative rule-based transformations, you specify the rule to associate with the transformation. When the specified rule evaluates to TRUE for a row LCR, Oracle Streams performs the declarative transformation internally on the row LCR. Typically, rules and rule sets are created automatically when you configure your Oracle Streams replication environment.
You can configure multiple declarative rule-based transformations for a single rule, but you can only configure one custom rule-based transformation for a single rule. In addition, you can configure declarative rule-based transformations and a custom rule-based transformation for a single rule.
A transformation can occur at any stage in the Oracle Streams information flow: during capture, propagation, or apply. When a transformation occurs depends on the rule with which the transformation is associated. For example, to perform a transformation during propagation, associate the transformation with a rule in the positive rule set for a propagation.
See Also:
Oracle Streams Concepts and Administration for detailed information about rule-based transformations
Supplemental logging is the process of adding additional column data to the redo log whenever an operation is performed (such as a row update). A capture process captures this additional information and places it in logical change records (LCRs). Apply processes that apply these LCRs might need this additional information to apply database changes properly.
See Also:
Oracle Streams Replication Administrator's Guide for detailed information about supplemental logging
Conflicts occur when two different databases that are sharing data in a table modify the same row in the table at nearly the same time. When these changes are captured at one of these databases and sent to the other database, an apply process detects the conflict when it attempts to apply a row LCR to the table. By default, apply errors are placed in the error queue, where they can be resolved manually. To avoid apply errors, you must configure conflict resolution so that apply processes handle conflicts in the best way for your environment.
Oracle Database supplies prebuilt conflict handlers that provide conflict resolution when a conflict results from an UPDATE on a row. These handlers are called prebuilt update conflict handlers.
When an apply process encounters an update conflict for a row LCR that it has dequeued, it must either apply the row LCR or discard it to keep the data in the two databases consistent. The most common way to resolve update conflicts is to keep the change with the most recent time stamp and discard the older change. See "Tutorial: Configuring Latest Time Conflict Resolution for a Table" for instructions about configuring latest time conflict resolution for a table.
The following topics discuss how to configure conflict resolution in a particular type of replication environment:
Tutorial: Configuring Two-Database Replication with Local Capture Processes
Tutorial: Configuring Hub-and-Spoke Replication with Local Capture Processes
Tutorial: Configuring Two-Database Replication with Synchronous Captures
Note:
Conflicts are not possible in a replication environment when changes to only one database are captured. In these replication environments, typically the replicas at the other databases are read-only.See Also:
"Tutorial: Configuring Latest Time Conflict Resolution for a Table"
Oracle Streams Replication Administrator's Guide for detailed information about conflicts and conflict resolution
Change cycling means sending a change back to the database where it originated. Typically, change cycling should be avoided because it can result in each database change going through endless loops to the database where it originated. Such loops can result in unintended data in the database and tax the networking and computer resources of an environment. By default, Oracle Streams is designed to avoid change cycling.
A tag is additional information in a change record. Each redo entry that records a database change and each logical change record (LCR) that encapsulates a database change includes a tag. The data type of the tag is RAW.
By default, change records have the following tag values:
When a user or application generates database changes, the value of the tag is NULL for each change. This default can be changed for a particular database session.
When an apply process generates database changes by applying them to database objects, the tag value for each change is the hexadecimal equivalent of '00' (double zero). This default can be changed for a particular apply process.
The tag value in an LCR depends on how the LCR was captured:
An LCR captured by a capture process has the tag value of the redo record that was captured.
An LCR captured by a synchronous capture has the tag value of the database session that made the change.
Rules for Oracle Streams clients can include conditions for tag values. For example, the rules for a capture process can determine whether a change in the redo log is captured based on the tag value of the redo record. In an Oracle Streams replication environment, Oracle Streams clients use tags and rules to avoid change cycling.
The following topics discuss how change cycling is avoided in a particular type of replication environment:
Tutorial: Configuring Two-Database Replication with Local Capture Processes
Tutorial: Configuring Hub-and-Spoke Replication with Local Capture Processes
Tutorial: Configuring Two-Database Replication with Synchronous Captures
Note:
Change cycling is not possible in a replication environment when changes to only one database are captured.
You can also use tags to avoid replicating the changes made by a particular session. Use the DBMS_STREAMS.SET_TAG procedure to set the tag for a session. See "Correcting Apply Errors in Database Objects" for an example.
See Also:
Oracle Streams Replication Administrator's Guide for detailed information about tags
Oracle Streams enables you to configure many different types of custom replication environments. However, three types of replication environments are the most common: two-database, hub-and-spoke, and n-way.
The following topics describe these common types of replication environments and help you decide which one is best for you:
A two-database replication environment is one in which only two databases share the replicated database objects. The changes made to replicated database objects at one database are captured and sent directly to the other database, where they are applied. In a two-database replication environment, only one database might allow changes to the database objects, or both databases might allow changes to them.
If only one database allows changes to the replicated database objects, then the other database contains read-only replicas of these database objects. This is a one-way replication environment and typically has the following basic components:
The first database has a capture process or synchronous capture to capture changes to the replicated database objects.
The first database has a propagation that sends the captured changes to the other database.
The second database has an apply process to apply changes from the first database.
For the best performance, each capture process and apply process has its own queue.
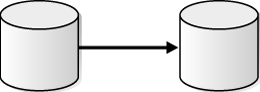
Figure 4-6 shows a two-database replication environment configured for one-way replication.
Figure 4-6 One-Way Replication in a Two-Database Replication Environment
In a two-database replication environment, both databases can allow changes to the replicated database objects. In this case, both databases capture changes to these database objects and send the changes to the other database, where they are applied. This is a bi-directional replication environment and typically has the following basic components:
Each database has a capture process or synchronous capture to capture changes to the replicated database objects.
Each database has a propagation that sends the captured changes to the other database.
Each database has an apply process to apply changes from the other database.
For the best performance, each capture process and apply process has its own queue.
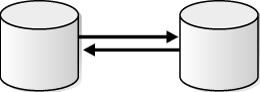
Figure 4-7 show a two-database replication environment configured for bi-directional replication.
Figure 4-7 Bi-Directional Replication in a Two-Database Replication Environment
Typically, in a bi-directional replication environment, you should configure conflict resolution to keep the replicated database objects synchronized. You can configure a two-database replication environment using Setup Streams Replication Wizard in Oracle Enterprise Manager or the configuration procedures in the DBMS_STREAMS_ADM package.
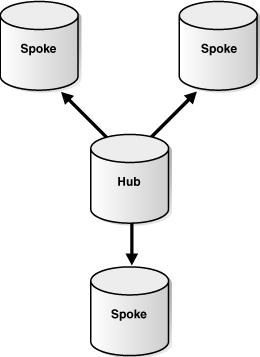
A hub-and-spoke replication environment is one in which a central database, or hub, communicates with secondary databases, or spokes. The spokes do not communicate directly with each other. In a hub-and-spoke replication environment, the spokes might or might not allow changes to the replicated database objects.
If the spokes do not allow changes, then they contain read-only replicas of the database objects at the hub. This type of hub-and-spoke replication environment typically has the following basic components:
The hub has a capture process or synchronous capture to capture changes to the replicated database objects.
The hub has propagations that send the captured changes to each of the spokes.
Each spoke has an apply process to apply changes from the hub.
For the best performance, each capture process and apply process has its own queue.
Figure 4-8 shows a hub-and-spoke replication environment with read-only spokes.
Figure 4-8 Hub-and-Spoke Replication Environment with Read-Only Spokes
If the spokes allow changes to the database objects, then typically the changes are captured and sent back to the hub, and the hub replicates the changes with the other spokes. This type of hub-and-spoke replication environment typically has the following basic components:
The hub has a capture process or synchronous capture to capture changes to the replicated database objects.
The hub has propagations that send the captured changes to each of the spokes.
Each spoke has a capture process or synchronous capture to capture changes to the replicated database objects.
Each spoke has a propagation that sends changes made at the spoke back to the hub.
Each spoke has an apply process to apply changes from the hub and from the other spokes.
The hub has a separate apply process to apply changes from each spoke. A different apply process must apply changes from each spoke.
For the best performance, each capture process and apply process has its own queue.
Figure 4-9 shows a hub-and-spoke replication environment with read/write spokes.
Figure 4-9 Hub-and-Spoke Replication Environment with Read/Write Spokes

Typically, in a hub-and-spoke replication environment that allows changes at spoke databases, you should configure conflict resolution to keep the replicated database objects synchronized. Some hub-and-spoke replication environments allow changes to the replicated database objects at some spokes but not at others.
You can configure a hub-and-spoke replication environment using the Setup Streams Replication Wizard in Oracle Enterprise Manager or the configuration procedures in the DBMS_STREAMS_ADM package.
See "When to Replicate Data with Oracle Streams" for information about when hub-and-spoke replication is useful.
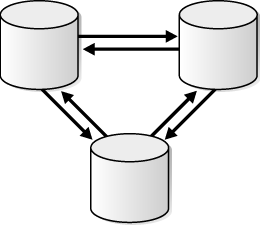
An n-way replication environment is one in which each database communicates directly with each other database in the environment. The changes made to replicated database objects at one database are captured and sent directly to each of the other databases in the environment, where they are applied.
An n-way replication environment typically has the following basic components:
Each database has one or more capture processes or synchronous captures to capture changes to the replicated database objects.
Each database has propagations that send the captured changes to each of the other databases.
Each database has apply processes that apply changes from each of the other databases. A different apply process must apply changes from each source database.
For the best performance, each capture process and apply process has its own queue.
Figure 4-10 shows an n-way replication environment.
Figure 4-10 N-Way Replication Environment
You can configure an n-way replication environment by using the following Oracle-supplied packages:
DBMS_STREAMS_ADM can perform most of the configuration actions, including setting up queues, creating capture processes or synchronous captures, creating propagations, creating apply processes, and configuring rules and rule sets for the replication environment.
DBMS_CAPTURE_ADM can start any capture processes you configured in the replication environment.
DBMS_APPLY_ADM can configure apply processes, configure conflict resolution, and start apply processes, as well as other configuration tasks.
See "When to Replicate Data with Oracle Streams" for information about when n-way replication is useful.
Typically, in an n-way replication environment, you should configure conflict resolution to keep the replicated database objects synchronized.
Configuring an n-way replication environment is beyond the scope of this guide. See Oracle Streams Extended Examples for a detailed example that configures an n-way replication environment.
In addition to Oracle Enterprise Manager, you can use several supplied PL/SQL packages to configure and administer an Oracle Streams replication environment. You can also use several data dictionary views to monitor an Oracle Streams replication environment.
The following topics describe the key Oracle Streams supplied PL/SQL packages and data dictionary views:
Table 4-1 describes the supplied PL/SQL packages that are important for configuring and administering an Oracle Streams replication environment.
Table 4-1 Key Oracle Streams Supplied PL/SQL Packages
| Package | Description |
|---|---|
|
This package provides an easy way to complete common tasks in an Oracle Streams environment. This package contains procedures that enable you to configure and maintain an Oracle Streams replication environment. This package also provides an administrative interface for adding and removing simple rules for capture processes, synchronous captures, propagations, and apply processes at the table, schema, and database level. This package also contains procedures for creating queues and for managing Oracle Streams metadata, such as data dictionary information. |
|
|
This package provides an administrative interface for starting, stopping, and configuring a capture process. It also provides an administrative interface for configuring a synchronous capture. This package also provides administrative procedures that prepare database objects at the source database for instantiation at a destination database. |
|
|
This package provides an administrative interface for starting, stopping, and configuring a propagation. |
|
|
This package provides an administrative interface for starting, stopping, and configuring an apply process. This package also includes subprograms for configuring conflict detection and resolution and for managing apply errors. This package also includes procedures that enable you to configure apply handlers. This package also provides administrative procedures that set the instantiation SCN for objects at a destination database. |
|
|
This package provides subprograms for granting privileges to Oracle Streams administrators and revoking privileges from Oracle Streams administrators. |
|
|
This package provides an interface for gathering information about an Oracle Streams environment and advising database administrators based on the information gathered. This package is part of the Oracle Streams Performance Advisor. |
See Also:
Oracle Streams Concepts and Administration for more information about these Oracle Streams packages and other Oracle Streams packages
Table 4-2 describes the data dictionary views that are important for monitoring an Oracle Streams replication environment.
Table 4-2 Key Oracle Streams Data Dictionary Views
| Data Dictionary View | Description |
|---|---|
|
Displays information about apply processes. |
|
|
Displays information about conflict handlers. |
|
|
Displays information about the error transactions generated by apply processes. |
|
|
Displays information about capture processes. |
|
|
Displays information about propagations. |
|
|
Displays information about the columns that are not supported by synchronous captures and apply processes. |
|
|
Displays information about the rules used by capture processes, synchronous captures, propagations, and apply processes. |
|
|
Displays information about the database objects that are not supported by capture processes. |
|
|
Displays information about synchronous captures. |
|
|
Displays information about buffered queues and the messages in the buffered queues. |
|
|
Displays information about the messages received into buffered queues by propagations. |
|
|
Displays information about the messages sent from buffered queues by propagations. |
|
|
Displays information about apply process coordinators for enabled apply processes. |
|
|
Displays information about apply process reader servers for enabled apply processes. |
|
|
Displays information about apply process apply servers for enabled apply processes. |
|
|
Displays information about enabled capture processes. |
|
|
Displays information about transactions that are being processed by capture processes or apply processes. This view can identify long running transactions and to determine how many logical change records (LCRs) are being processed in each transaction. This view only contains information about LCRs that were captured by a capture process. |
See Also:
Oracle Streams Concepts and Administration for more information about these Oracle Streams data dictionary views and other Oracle Streams data dictionary views
Before configuring Oracle Streams replication, prepare the databases that will participate in the replication environment.
To prepare for Oracle Streams replication:
Set initialization parameters properly before you configure a replication environment with Oracle Streams:
Global Names: Set the GLOBAL_NAMES initialization parameter to TRUE at each database that will participate in the Oracle Streams replication environment. See "Setting the GLOBAL_NAMES Initialization Parameter to TRUE".
Compatibility: To use the latest features of Oracle Streams, it is best to set the COMPATIBLE initialization parameter as high as you can. If possible, then set this parameter to 11.2.0 or higher.
System Global Area (SGA) and the Oracle Streams pool: Ensure that the Oracle Streams pool is large enough to accommodate the Oracle Streams components created for the replication environment. The Oracle Streams pool is part of the System Global Area (SGA). You can manage the Oracle Streams pool by setting the MEMORY_TARGET initialization parameter (Automatic Memory Management), the SGA_TARGET initialization parameter (Automatic Shared Memory Management), or the STREAMS_POOL_SIZE initialization parameter. See Oracle Streams Replication Administrator's Guide for more information about the Oracle Streams pool.
The memory requirements for Oracle Streams components are:
Each queue requires at least 250 MB of memory. Each queue must have enough memory to store captured changes.
Each capture process parallelism requires at least 15 MB of memory. The parallelism capture process parameter controls the number of processes used by the capture process to capture changes. You might be able to improve capture process performance by adjusting capture process parallelism.
Each propagation requires at least 1 MB of memory.
Each apply process parallelism requires at least 1 MB of memory. The parallelism apply process parameter controls the number of processes used by the apply process to apply changes. You might be able to improve apply process performance by adjusting apply process parallelism.
Processes and Sessions: Oracle Streams capture processes, propagations, and apply processes use processes that run in the background. You might need to increase the value of the PROCESSES and SESSIONS initialization parameters to accommodate these processes.
Review the best practices for Oracle Streams replication environments and follow the best practices when you configure the environment. See Oracle Streams Replication Administrator's Guide for information about best practices.
Following the best practices ensures that your environment performs optimally and avoids problems. The Setup Streams Replication Wizard in Oracle Enterprise Manager and the configuration procedures in the DBMS_STREAMS_ADM package follow the best practices automatically. However, if you plan to configure an Oracle Streams replication environment without using the wizard or a configuration procedure, then learn about the best practices and follow them whenever possible.
The following are some important best practices to follow during Oracle Streams configuration:
Configure a separate tablespace for the Oracle Streams administrator. The instructions in "Tutorial: Configuring an Oracle Streams Administrator" follow this best practice.
Use separate queues for capture processes, synchronous captures, and apply processes. For the best performance, these components typically should not share a queue.
Use queue-to-queue propagations.
After the Oracle Streams environment is configured, the following are some important best practices to follow for operation of the Oracle Streams environment:
Monitor performance and make adjustments when necessary.
Monitor queues for size.
Follow the Oracle Streams best practices for backups.
Check the alert log for Oracle Streams information.
Set capture process parallelism for best performance.
Set apply process parallelism for best performance.
Check for apply errors and manage them if they occur.
See Oracle Streams Replication Administrator's Guide for detailed information about these best practices, and for information about other Oracle Streams best practices.
See Also:
Oracle Streams Replication Administrator's Guide for information about initialization parameters that are important in an Oracle Streams environment
This section uses examples to show you how to configure Oracle Streams replication environments. The examples configure the most common types of Oracle Streams replication environments.
The following are descriptions of the examples:
Tutorial: Configuring Two-Database Replication with Local Capture Processes
This example configures an Oracle Streams replication environment that replicates data manipulation language (DML) changes to all of the tables in the hr schema at two databases. The configuration uses capture processes to capture the changes to the replicated database objects.
The example shows you how to configure the environment for one-way replication or bi-directional replication. With one-way replication, only one database allows changes to the database objects. With bi-directional replication, both databases allow changes to the database objects.
Use this configuration when you want to configure a relatively simple replication environment that only involves two databases. You might configure a one-way replication environment to use a second database for reporting or data analysis. You might configure a two-way replication environment if the data must be read/write at both databases. For example, two-way replication can improve scalability or increase the availability of the data.
See "About Two-Database Replication Environments" for more information about two-database replication environments.
Tutorial: Configuring Two-Database Replication with a Downstream Capture Process
This example configures an Oracle Streams replication environment that replicates DML changes to all of the tables in the hr schema at two databases. The example shows you how to configure the environment for one-way replication, where changes to the replicated database objects are only allowed at one source database. The configuration uses a downstream capture process at a destination database to capture the changes that were made to these database objects at the source database. The database objects are read-only at the destination database.
Use this configuration when you want to offload reporting or data analysis from a primary database to another database. In this example, the capture process runs on the second database to reduce the load on the primary database.
See "About Two-Database Replication Environments" for more information about two-database replication environments.
Tutorial: Configuring Hub-and-Spoke Replication with Local Capture Processes
This example configures an Oracle Streams replication environment that replicates DML changes to all of the tables in the hr schema at three databases. This example configures a hub-and-spoke replication environment with one hub and two spokes. A hub-and-spoke replication environment is one in which a central database, or hub, communicates with secondary databases, or spokes. In this example, the spoke databases allow changes to the replicated database objects. The configuration uses capture processes to capture the changes to the replicated database objects.
Use this configuration when you have a central database that must replicate data with several secondary databases. For example, a business with a central database at headquarters and several secondary databases at sales offices might choose this configuration.
See "About Hub-And-Spoke Replication Environments" for more information about hub-and-spoke replication environments.
Tutorial: Configuring Two-Database Replication with Synchronous Captures
This example configures an Oracle Streams replication environment that replicates DML changes to the employees and departments tables in the hr schema at two databases. This example configures bi-directional replication between the two databases. So, changes to the databases objects are allowed at each database. The configuration uses synchronous captures to capture the changes to the replicated database objects.
Use this configuration when you want to configure a relatively simple replication environment that only involves two databases and a small number of tables. You might also choose to use synchronous captures if you have Oracle Database 11g Standard Edition. To use capture processes, you must have Oracle Database 11g Enterprise Edition.
See "About Two-Database Replication Environments" for more information about two-database replication environments.
This section also includes an example that configures conflict resolution for a table. See "Tutorial: Configuring Latest Time Conflict Resolution for a Table". Use conflict resolution in a replication environment that allows multiple databases to perform DML changes on replicated tables. This example configures latest time conflict resolution. Therefore, when a conflict occurs for a row change to a table, the most recent change is retained, and the older change is discarded. See "About Conflicts and Conflict Resolution" for more information about conflict resolution.
Note:
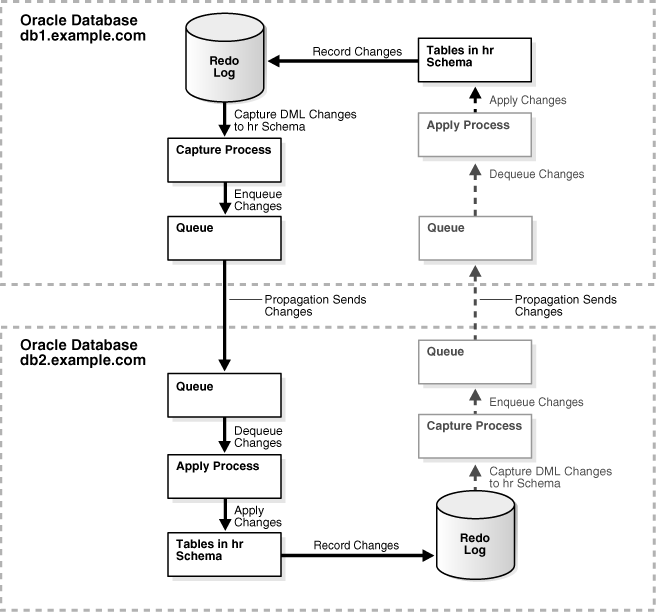
Another common Oracle Streams replication environment is the n-way environment. See "About N-Way Replication Environments".This example configures an Oracle Streams replication environment that replicates data manipulation language (DML) changes to all of the tables in the hr schema. This example configures a two-database replication environment with local capture processes to capture changes. This example uses the global database names db1.example.com and db2.example.com. However, you can substitute databases in your environment to complete the example. See "About Two-Database Replication Environments" for more information about two-database replication environments.
This example uses the Setup Streams Replication Wizard in Oracle Enterprise Manager to configure the two-database replication environment. This wizard is the fastest and simplest way to configure an Oracle Streams environment that replicates one or more schemas. In addition, the wizard follows established best practices for Oracle Streams replication environments.
The database objects being configured for replication might or might not exist at the destination database when you run the wizard. If the database objects do not exist at the destination database, then the wizard instantiates them at the destination database using a Data Pump export/import. During instantiation, the instantiation SCN is set for these database objects. If the database objects exist at the destination database, then the wizard retains the existing database objects and sets the instantiation SCN for them. In this example, the hr schema exists at both the db1.example.com database and the db2.example.com database before the wizard is run.
This example provides instructions for configuring either one-way or bi-directional replication. To configure bi-directional replication, you must complete additional steps and select Setup Bi-directional replication on the appropriate wizard page.
Figure 4-11 provides an overview of the environment created in this example. The additional components required for bi-directional replication are shown in gray, and their actions are indicated by dashed lines.
Figure 4-11 Two-Database Replication Environment with Local Capture Processes
To configure this two-database replication environment:
Complete the following tasks to prepare for the two-database replication environment:
Configure network connectivity so that the db1.example.com database can communicate with the db2.example.com database.
See Oracle Database 2 Day DBA for information about configuring network connectivity between databases.
Configure an Oracle Streams administrator at each database that will participate in the replication environment. See "Tutorial: Configuring an Oracle Streams Administrator" for instructions. This example assumes that the Oracle Streams administrator is strmadmin.
Set initialization parameters properly at each database that will participate in the Oracle Streams replication environment. See "Preparing for Oracle Streams Replication" for instructions.
Configure the db1.example.com database to run in ARCHIVELOG mode. For a capture process to capture changes generated at a source database, the source database must be running in ARCHIVELOG mode. See Oracle Database Administrator's Guide for information about configuring a database to run in ARCHIVELOG mode.
If you are configuring a bi-directional replication environment, then configure the db2.example.com database to run in ARCHIVELOG mode. If you are configuring a one-way replication environment, then this step is not required, and you can move on to Step 2.
In Enterprise Manager, log in to the source database as the Oracle Streams administrator.
In this example, the source database is db1.example.com.
Go to the Database Home page for the database instance.
Click Data Movement to open the Data Movement subpage.
Click Setup in the Streams section.
The Streams page appears, showing the setup options.
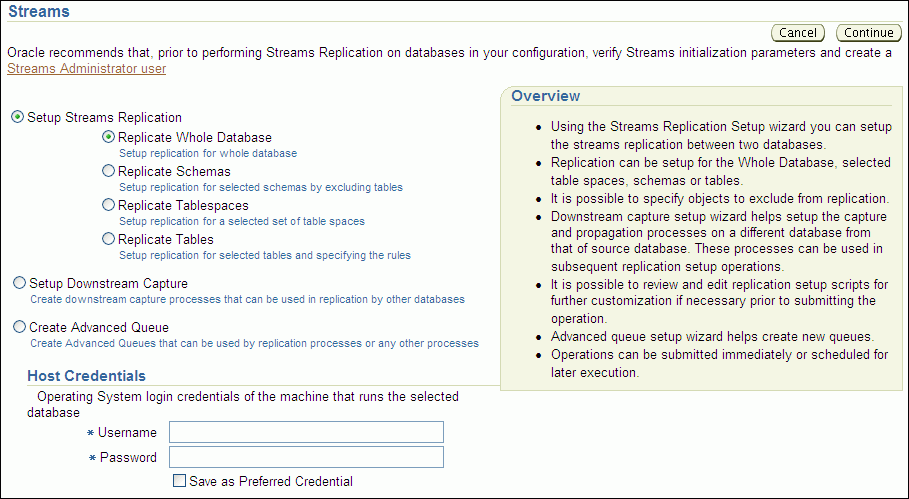
Select Replicate Schemas in Setup Streams Replication.
In the Host Credentials section, enter the username and password for an administrative user on the host computer system.
Click Continue.
On the Object Selection page, select HR and click Next.
On the Destination Options page, identify the destination database by specifying its host name, port, SID or service name, and Oracle Streams administrator credentials.
Click Next.
The Replication Options page appears.
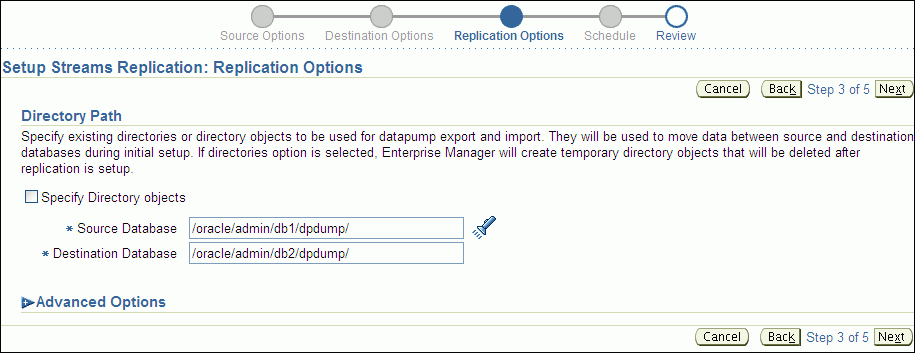
Complete the Replication Options page:
In the Directory Path section, leave the directory paths for the source and destination database unchanged if the host user you specified in Step 7 can read from and write to the directories and the directories have enough space for a Data Pump export dump file. Otherwise, specify different directory paths, or create directory objects that meet these requirements and specify those.
Expand Advanced Options.
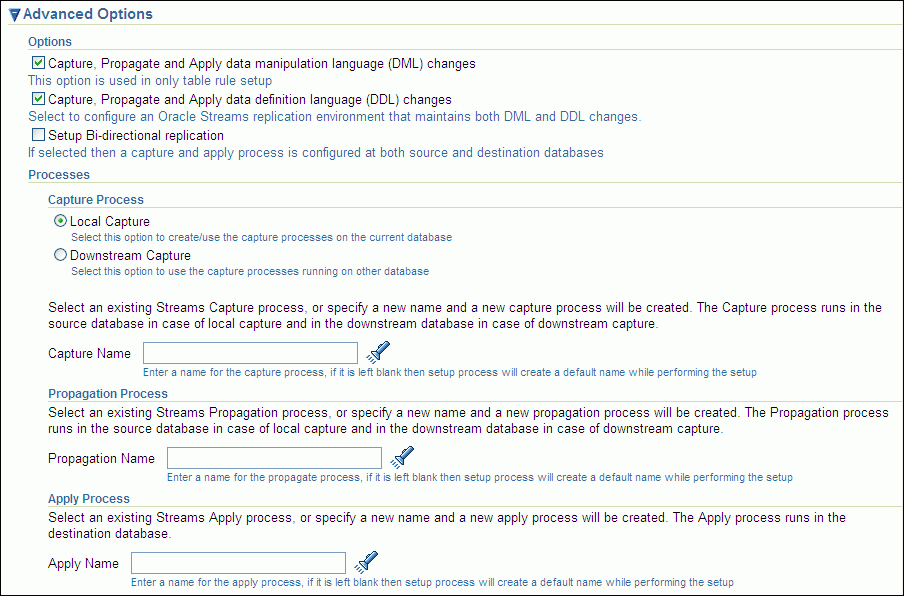
In the Options section, ensure that Capture, Propagate and Apply data manipulation language (DML) changes is selected.
If you do not want to replicate DDL changes, then deselect Capture, Propagate and Apply data definition language (DDL) changes.
To configure bi-directional replication, select Setup Bi-directional replication.
Click Next.
On the Schedule Job page, either select Immediately or specify a time for the job to run later.
Click Next.
On the Review page, review the configuration information and click Submit.
On the Confirmation page, optionally click the job link to monitor the job.
When the job is running, information about its progress is recorded in the following data dictionary views: DBA_RECOVERABLE_SCRIPT, DBA_RECOVERABLE_SCRIPT_PARAMS, DBA_RECOVERABLE_SCRIPT_BLOCKS, and DBA_RECOVERABLE_SCRIPT_ERRORS. If the job stops because it encounters an error, then see Oracle Streams Replication Administrator's Guide for instructions about using the RECOVER_OPERATION procedure in the DBMS_STREAMS_ADM package to recover from these errors.
When the job completes successfully, a two-database replication environment with the following characteristics is configured:
At db1.example.com, supplemental logging is configured for the tables in the hr schema.
The db1.example.com database has the following components:
A capture process with a system-generated name. The capture process captures DML changes to the hr schema.
A queue with a system-generated name. This queue is for the capture process at the database.
A propagation with a system-generated name that sends changes from the queue at the db1.example.com database to the queue at the db2.example.com database.
The db2.example.com database has the following components:
A queue with a system-generated name that receives the changes sent from the db1.example.com database. This queue is for the apply process at the local database.
An apply process with a system-generated name. The apply process dequeues changes from its queue and applies them to the hr schema.
If the replication environment is bi-directional, then the following are also configured:
At db2.example.com, supplemental logging for the tables in the hr schema.
At db2.example.com, a capture process with a system-generated name. The capture process captures DML changes to the hr schema.
At db2.example.com, a queue with a system-generated name. This queue is for the capture process at the database.
At db1.example.com, a queue with a system-generated name that receives the changes sent from the db2.example.com database. This queue is for the apply process at the local database.
At db1.example.com, an apply process with a system-generated name. The apply process dequeues changes from its queue and applies them to the hr schema.
If the replication environment is bi-directional, then tags are used to avoid change cycling in the following way:
Each apply process uses an apply tag, and redo records for changes applied by the apply process include the tag. Each apply process uses an apply tag that is unique in the replication environment.
Each capture process captures all of the changes to the replicated database objects, regardless of the tag in the redo record. Therefore, each capture process captures the changes applied by the apply processes on its source database.
Each propagation sends all changes made to the replicated database objects to the other database in the replication environment, except for changes that originated at the other database. The propagation rules instruct the propagation to discard these changes.
See "About Tags for Avoiding Change Cycling" for more information about how the replication environment avoids change cycling. If you configured one-way replication, then change cycling is not possible because changes are only captured in a single location.
To check the Oracle Streams replication configuration:
At the db1.example.com database, ensure that the capture process is enabled and that the capture type is local. To do so, follow the instructions in "Viewing Information About a Capture Process", and check the Status and Capture Type fields on the Capture subpage.
At the db1.example.com database, ensure that the propagation is enabled. To do so, follow the instructions in "Viewing Information About a Propagation", and check the Status field on the Propagation subpage.
At the db2.example.com database, ensure that the apply process is enabled. To do so, follow the instructions in "Viewing Information About an Apply Process", and check the Status field on the Apply subpage.
If you configured bi-directional replication, then complete the following additional steps:
At the db2.example.com database, ensure that the capture process is enabled and that the capture type is local.
At the db2.example.com database, ensure that the propagation is enabled.
At the db1.example.com database, ensure that the apply process is enabled.
To replicate changes:
At a database that captures changes to the hr schema, make DML changes to any table in the hr schema. In this example, the db1.example.com database captures changes to the hr schema, and, if you configured bi-directional replication, then db2.example.com also captures changes to the hr schema.
After some time has passed to allow for replication of the changes, use SQL*Plus to query the modified table at the other database to view the DML changes.
Note:
The wizard does not configure the replicated tables to be read only at the destination databases. If one-way replication is configured and they should be read only, then configure privileges at the destination databases accordingly. However, the apply user for the apply process must be able to make DML changes to the replicated database objects. In this example, the apply user is the Oracle Streams administrator. See Oracle Database Security Guide for information about configuring privileges.See Also:
Chapter 5, "Administering an Oracle Streams Replication Environment"
Oracle Streams Replication Administrator's Guide for an example that configures this replication environment using the DBMS_STREAMS_ADM supplied PL/SQL package
This example configures an Oracle Streams replication environment that replicates data manipulation language (DML) changes to all of the tables in the hr schema. This example configures a two-database replication environment with a downstream capture process at the destination database. This example uses the global database names src.example.com and dest.example.com. However, you can substitute databases in your environment to complete the example. See "About Two-Database Replication Environments" for more information about two-database replication environments.
In this example, the downstream capture process runs on the destination database dest.example.com. Therefore, the resources required to capture changes are freed at the source database src.example.com. This example configures a real-time downstream capture process, not an archived-log downstream capture process. The advantage of real-time downstream capture is that it reduces the amount of time required to capture the changes made at the source database. The time is reduced because the real-time downstream capture process does not need to wait for the redo log file to be archived before it can capture data from it.
This example assumes that the replicated database objects are used for reporting and analysis at the destination database. Therefore, these database objects are assumed to be read-only at the dest.example.com database.
This example uses the Setup Streams Replication Wizard in Oracle Enterprise Manager to configure the two-database replication environment. This wizard is the fastest and simplest way to configure an Oracle Streams environment that replicates one or more schemas. In addition, the wizard follows established best practices for Oracle Streams replication environments.
The database objects being configured for replication might or might not exist at the destination database when you run the wizard. If the database objects do not exist at the destination database, then the wizard instantiates them at the destination database using a Data Pump export/import. During instantiation, the instantiation SCN is set for these database objects. If the database objects exist at the destination database, then the wizard retains the existing database objects and sets the instantiation SCN for them. In this example, the hr schema exists at both the src.example.com database and the dest.example.com database before the wizard is run.
Figure 4-12 provides an overview of the environment created in this example.
Figure 4-12 Two-Database Replication Environment with a Downstream Capture Process
Note:
Local capture processes provide more flexibility than downstream capture processes in replication environments with different platforms or different versions of Oracle Database. See Oracle Streams Concepts and Administration for more information.To configure this two-database replication environment:
Complete the following tasks to prepare for the two-database replication environment:
Configure network connectivity so that the src.example.com database and the dest.example.com database can communicate with each other.
See Oracle Database 2 Day DBA for information about configuring network connectivity between databases.
Configure an Oracle Streams administrator at each database that will participate in the replication environment. See "Tutorial: Configuring an Oracle Streams Administrator" for instructions. This example assumes that the Oracle Streams administrator is strmadmin.
Set initialization parameters properly at each database that will participate in the Oracle Streams replication environment. See "Preparing for Oracle Streams Replication" for instructions.
Configure both databases to run in ARCHIVELOG mode. For a downstream capture process to capture changes generated at a source database, both the source database and the downstream capture database must be running in ARCHIVELOG mode. In this example, the src.example.com and dest.example.com databases must be running in ARCHIVELOG mode. See Oracle Database Administrator's Guide for information about configuring a database to run in ARCHIVELOG mode.
Configure authentication at both databases to support the transfer of redo data.
Redo transport sessions are authenticated using either the Secure Sockets Layer (SSL) protocol or a remote login password file. If the source database has a remote login password file, then copy it to the appropriate directory on the downstream capture database system. The password file must be the same at the source database and the downstream capture database.
In this example, the source database is src.example.com and the downstream capture database is dest.example.com. See Oracle Data Guard Concepts and Administration for detailed information about authentication requirements for redo transport.
Configure initialization parameters at both the source database and the downstream database to support downstream capture.
The initialization parameters must be set properly at both databases for redo transport services to transmit redo data from the online redo log at the source database src.example.com to the standby redo log at the downstream database dest.example.com.
To configure initialization parameters to support downstream capture:
In Enterprise Manager, log in to the source database as the Oracle Streams administrator.
In this example, the source database is src.example.com.
Go to the Database Home page for the database instance.
Click Data Movement to open the Data Movement subpage.
Click Setup in the Streams section.
The Streams page appears, showing the setup options.
Select Setup Downstream Capture.
In the Host Credentials section, enter the username and password for an administrative user on the host computer system.
Click Continue.
The Setup Downstream Capture page appears.
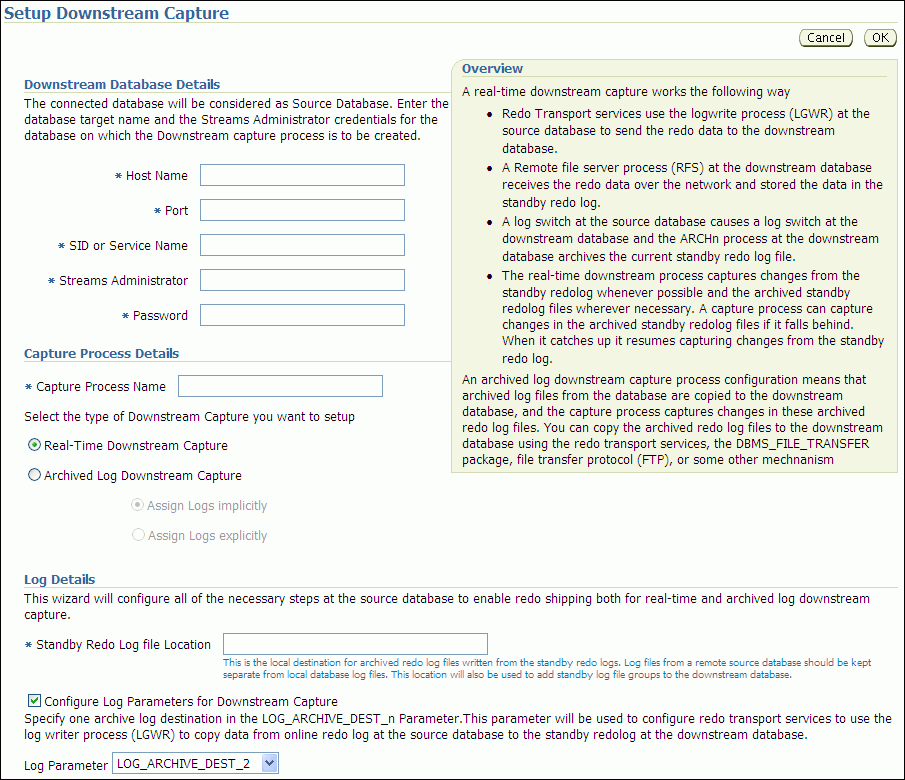
In the Downstream Database Details section, identify the downstream capture database host name, port, and SID or service name, and enter the credentials for the Oracle Streams administrator at the downstream database.
In this example, the downstream capture database is dest.example.com.
In the Capture Process Details section, enter capture in the Capture Process Name field and ensure that Real-Time Downstream Capture is selected.
In the Log Details section, enter a location for the archived redo log files on the computer system running the downstream database in the Standby Redo Log File Location field.
Specify either a valid path name for a disk directory or, to use a fast recovery area, specify USE_DB_RECOVERY_FILE_DEST. This location is the local destination for archived redo log files written from the standby redo logs. Log files from a remote source database should be kept separate from local database log files. See Oracle Database Backup and Recovery User's Guide for information about configuring a fast recovery area.
In the Log Details section, ensure that Configure Log Parameters for Downstream Capture is selected and that LOG_ARCHIVE_DEST_n parameter in Log Parameter is not already in use at the source database.
Click OK.
On the Schedule Job page, either select Immediately or specify a time for the job to run later.
Click OK.
On the Confirmation page, optionally click the job link to monitor the job.
When the job completes successfully, downstream capture is configured. Do not proceed until the jobs completes successfully.
While still logged in to the source database in Enterprise Manager as the Oracle Streams administrator, go to the Database Home page for the database instance.
Click Data Movement to open the Data Movement subpage.
Click Setup in the Streams section.
The Streams page appears, showing the setup options.
Select Replicate Schemas in Setup Streams Replication.
In the Host Credentials section, enter the username and password for an administrative user on the host computer system.
Click Continue.
On the Object Selection page, select HR and click Next.
You might need to click the Next link to show the HR user.
On the Destination Options page, identify the destination database by specifying its host name, port, SID or service name, and Oracle Streams administrator credentials.
In this example, the destination database is dest.example.com.
Click Next.
The Replication Options page appears.
Complete the Replication Options page:
In the Directory Path section, leave the directory paths for the source and destination database unchanged if the host user you specified in Step 7 can read from and write to the directories and the directories have enough space for a Data Pump export dump file. Otherwise, specify different directory paths, or create directory objects that meet these requirements and specify those.
Expand Advanced Options.
In the Options section, ensure that Capture, Propagate and Apply data manipulation language (DML) changes is selected.
In the Options section, deselect Capture, Propagate and Apply data definition language (DDL) changes and ensure that Setup Bi-directional replication is not selected.
In the Capture Process section, select Downstream Capture.
In the Capture Process section, enter the downstream capture database host name, port, and SID or service name, and enter the credentials for the Oracle Streams administrator at the downstream database.
In the Capture Name field, enter capture. You configured this downstream capture process in Step 2.
In the Apply Name field, enter apply.
Click Next.
On the Schedule Job page, either select Immediately or specify a time for the job to run later.
Click Next.
On the Review page, review the configuration information and click Submit.
On the Confirmation page, click the job link to monitor the job. Do not proceed to the next step until the job completes successfully.
When the job is running, information about its progress is recorded in the following data dictionary views: DBA_RECOVERABLE_SCRIPT, DBA_RECOVERABLE_SCRIPT_PARAMS, DBA_RECOVERABLE_SCRIPT_BLOCKS, and DBA_RECOVERABLE_SCRIPT_ERRORS. If the job stops because it encounters an error, then see Oracle Streams Replication Administrator's Guide for instructions about using the RECOVER_OPERATION procedure in the DBMS_STREAMS_ADM package to recover from these errors.
In SQL*Plus, connect to the source database src.example.com as an administrative user.
See Oracle Database 2 Day DBA for more information about starting SQL*Plus.
Archive the current log file at the source database:
ALTER SYSTEM ARCHIVE LOG CURRENT;
Archiving the current log file at the source database starts real-time mining of the source database redo log.
When you complete the example, a two-database replication environment with the following characteristics is configured:
At the src.example.com database, supplemental logging is configured for the tables in the hr schema.
The dest.example.com database has the following components:
A downstream capture process named capture. The capture process captures changes to the hr schema in the redo log information sent from the source database src.example.com.
A queue with a system-generated name. This queue is for the capture process and apply process at the database.
An apply process named apply. The apply process applies changes to the hr schema.
To check the Oracle Streams replication configuration:
At the dest.example.com database, ensure that the capture process is enabled and that the capture type is downstream. To do so, follow the instructions in "Viewing Information About a Capture Process", and check the Status and Capture Type fields on the Capture subpage.
If the capture process appears to be waiting for redo data for an inordinately long time, then check the alert log for errors. See Oracle Streams Concepts and Administration for more information.
At the dest.example.com database, ensure that the apply process is enabled. To do so, follow the instructions in "Viewing Information About an Apply Process", and check Status field on the Apply subpage.
To replicate changes:
At the src.example.com database, make DML changes to any table in the hr schema, and commit the changes.
After some time has passed to allow for replication of the changes, use SQL*Plus to query the modified table at the dest.example.com database to view the DML changes.
Note:
The wizard does not configure the replicated tables to be read only at the destination database. If they should be read only, then configure privileges at the destination database accordingly. However, the apply user for the apply process must be able to make DML changes to the replicated database objects. In this example, the apply user is the Oracle Streams administrator. See Oracle Database Security Guide for information about configuring privileges.See Also:
Chapter 5, "Administering an Oracle Streams Replication Environment"
Oracle Streams Concepts and Administration for more information about downstream capture processes
Oracle Streams Replication Administrator's Guide for an example that configures this replication environment using the DBMS_STREAMS_ADM supplied PL/SQL package
This example configures an Oracle Streams hub-and-spoke replication environment that replicates data manipulation language (DML) changes to all of the tables in the hr schema. This example uses a capture process at each database to capture these changes. Hub-and-spoke replication means that a central hub database replicates changes with one or more spoke databases. The spoke databases do not communicate with each other directly. In this sample configuration, the hub database sends changes generated at one spoke database to the other spoke database. See "About Hub-And-Spoke Replication Environments" for more information about hub-and-spoke replication environments.
This example uses the Setup Streams Replication Wizard in Oracle Enterprise Manager to configure the hub-and-spoke replication environment. This wizard is the fastest and simplest way to configure an Oracle Streams environment that replicates one or more schemas. In addition, the wizard follows established best practices for Oracle Streams replication environments.
In this example, the global name of the hub database is hub.example.com, and the global names of the spoke databases are spoke1.example.com and spoke2.example.com. However, you can substitute databases in your environment to complete the example.
The database objects being configured for replication might or might not exist at the destination databases when you run the wizard. If the database objects do not exist at a destination database, then the wizard instantiates them at the destination database using a Data Pump export/import. During instantiation, the instantiation SCN is set for these database objects. If the database objects exist at a destination database, then the wizard retains the existing database objects and sets the instantiation SCN for them. In this example, the hr schema exists at each database before the wizard is run.
Figure 4-13 provides an overview of the environment created in this example.
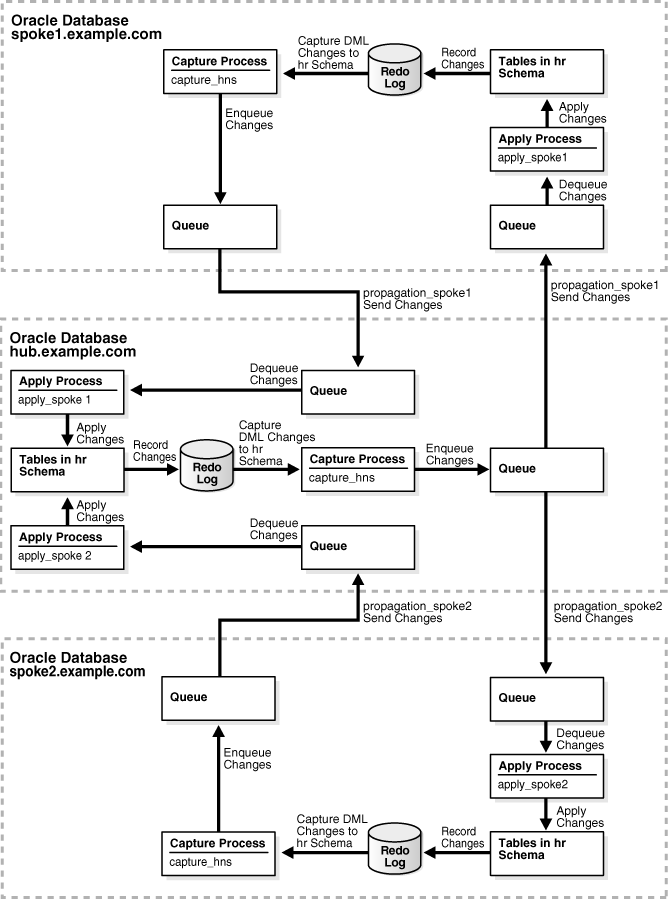
Figure 4-13 Hub-and-Spoke Environment with Capture Processes and Read/Write Spokes
To configure this hub-and-spoke replication environment with read/write spokes:
Complete the following tasks to prepare for the hub-and-spoke replication environment:
Configure network connectivity so that the following databases can communicate with each other:
The hub.example.com database and the spoke1.example.com database
The hub.example.com database and the spoke2.example.com database
See Oracle Database 2 Day DBA for information about configuring network connectivity between databases.
Configure an Oracle Streams administrator at each database that will participate in the replication environment. See "Tutorial: Configuring an Oracle Streams Administrator" for instructions. This example assumes that the Oracle Streams administrator is strmadmin.
Set initialization parameters properly at each database that will participate in the Oracle Streams replication environment. See "Preparing for Oracle Streams Replication" for instructions.
Configure each source database to run in ARCHIVELOG mode. For a capture process to capture changes generated at a source database, the source database must be running in ARCHIVELOG mode. In this example, all databases must be running in ARCHIVELOG mode. See Oracle Database Administrator's Guide for information about configuring a database to run in ARCHIVELOG mode.
In Enterprise Manager, log in to the hub database hub.example.com as the Oracle Streams administrator.
Click Data Movement to open the Data Movement subpage.
Click Setup in the Streams section.
The Streams page appears, showing the setup options.
Select Replicate Schemas in Setup Streams Replication.
In the Host Credentials section, enter the username and password for an administrative user on the host computer system.
Click Continue.
On the Object Selection page, select HR and click Next.
On the Destination Options page, identify the spoke database spoke1.example.com by specifying its host name, port, SID or service name, and Oracle Streams administrator credentials.
(When you configure replication with the spoke2.example.com database, identify spoke2.example.com.)
Click Next.
The Replication Options page appears.
Complete the Replication Options page:
In the Directory Path section, leave the directory paths for the source and destination database unchanged if the host user you specified in Step 7 can read from and write to the directories and the directories have enough space for a Data Pump export dump file. Otherwise, specify different directory paths, or create directory objects that meet these requirements and specify those.
Expand Advanced Options.
In the Options section, ensure that Capture, Propagate and Apply data manipulation language (DML) changes is selected.
If you do not want to replicate DDL changes, then deselect Capture, Propagate and Apply data definition language (DDL) changes.
Select Setup Bi-directional replication.
In the Capture Process section, enter capture_hns in Capture Name.
In the Propagation Process section, enter propagation_spoke1 in Propagation Name. (When you configure replication with the spoke2.example.com database, enter propagation_spoke2.)
In the Apply Process section, enter apply_spoke1 in Apply Name. (When you configure replication with the spoke2.example.com database, enter apply_spoke2.)
Click Next.
On the Schedule Job page, either select Immediately or specify a time for the job to run later.
Click Next.
On the Review page, review the configuration information and click Submit.
On the Confirmation page, optionally click the job link to monitor the job.
When the job is running, information about its progress is recorded in the following data dictionary views: DBA_RECOVERABLE_SCRIPT, DBA_RECOVERABLE_SCRIPT_PARAMS, DBA_RECOVERABLE_SCRIPT_BLOCKS, and DBA_RECOVERABLE_SCRIPT_ERRORS. If the job stops because it encounters an error, then see Oracle Streams Replication Administrator's Guide for instructions about using the RECOVER_OPERATION procedure in the DBMS_STREAMS_ADM package to recover from these errors.
While still connected as the Oracle Streams administrator to the hub.example.com database, complete Steps 3 to 17 again. However, in Step 10, on the Destination Options page, identify the spoke database spoke2.example.com by specifying its host name, port, SID or service name, and Oracle Streams administrator credentials.
Also, in Step 12g, enter propagation_spoke2 in Propagation Name, and in Step 12h, enter apply_spoke2 in Apply Name
When you complete the example, a hub-and-spoke replication environment with the following characteristics is configured:
Supplemental logging is configured for the tables in the hr schema at each database.
Each database has a capture process named capture_hns. The capture process captures changes to the hr schema at the database.
Each database has a queue with a system-generated name. Each queue is for the capture process at the database.
The hub database hub.example.com has the following additional components:
An apply process named apply_spoke1. This apply process applies changes to the hr schema that were sent from the spoke1.example.com database.
A queue with a system-generated name. This queue is for the apply_spoke1 apply process at the database.
An apply process named apply_spoke2. This apply process applies changes to the hr schema that were sent from the spoke2.example.com database.
A queue with a system-generated name. This queue is for the apply_spoke2 apply process at the database.
A propagation named propagation_spoke1. This propagation sends changes to the hr schema from a local queue to a queue at the spoke1.example.com database.
A propagation named propagation_spoke2. This propagation sends changes to the hr schema from a local queue to a queue at the spoke2.example.com database.
The spoke database spoke1.example.com has the following additional components:
An apply process named apply_spoke1. The apply process applies changes to the hr schema that were sent from the hub.example.com database.
A queue with a system-generated name. This queue is for the apply_spoke1 apply process at the database.
A propagation named propagation_spoke1. This propagation sends changes to the hr schema from a local queue to a queue at the hub.example.com database.
The spoke database spoke2.example.com has the following additional components:
An apply process named apply_spoke2. The apply process applies changes to the hr schema that were sent from the hub.example.com database.
A queue with a system-generated name. This queue is for the apply_spoke2 apply process at the database.
A propagation named propagation_spoke2. This propagation sends changes to the hr schema from a local queue to a queue at the hub.example.com database.
Tags are used to avoid change cycling in the following way:
Each apply process uses an apply tag, and redo records for changes applied by the apply process include the tag. Each apply process uses an apply tag that is unique in the replication environment.
Each capture process captures all of the changes to the replicated database objects, regardless of the tag in the redo record. Therefore, each capture process captures the changes applied by the apply processes on its source database.
Each propagation sends all changes made to the replicated database objects to another database in the replication environment, except for changes that originated at the other database. The propagation rules instruct the propagation to discard these changes.
See "About Tags for Avoiding Change Cycling" and Oracle Database PL/SQL Packages and Types Reference for more information about how the replication environment avoids change cycling.
To check the Oracle Streams replication configuration:
At each database, ensure that the capture process is enabled and that the capture type is local. To do so, follow the instructions in "Viewing Information About a Capture Process", and check the Status and Capture Type fields on the Capture subpage.
At each database, ensure that each propagation is enabled. To do so, follow the instructions in "Viewing Information About a Propagation", and check the Status field on the Propagation subpage. The hub database should have two propagations, and they should both be enabled. Each spoke database should have one propagation that is enabled.
At each database, ensure that each apply process is enabled. To do so, follow the instructions in "Viewing Information About an Apply Process", and check the Status field on the Apply subpage. The hub database should have two apply processes, and they should both be enabled. Each spoke database should have one apply process that is enabled.
To replicate changes:
At one of the databases, make DML changes to any table in the hr schema.
After some time has passed to allow for replication of the changes, use SQL*Plus to query the modified table at the other databases to view the DML changes.
See Also:
Chapter 5, "Administering an Oracle Streams Replication Environment"
Oracle Streams Replication Administrator's Guide for an example that configures this replication environment using the DBMS_STREAMS_ADM supplied PL/SQL package
The example in this topic configures an Oracle Streams replication environment that replicates data manipulation language (DML) changes to two tables in the hr schema. This example uses a synchronous capture at each database to capture these changes. In this example, the global names of the databases in the Oracle Streams replication environment are sync1.example.com and sync2.example.com. However, you can substitute any two databases in your environment to complete the example. See "About Two-Database Replication Environments" for more information about two-database replication environments.
Specifically, this example configures a two-database Oracle Streams replication environment that shares the hr.employees and hr.departments tables at the sync1.example.com and sync2.example.com databases. The two databases replicate all of the DML changes to these tables. The hr sample schema is installed by default with Oracle Database.
Note:
A synchronous capture can only capture changes at the table level. It cannot capture changes at the schema or database level. You can configure a synchronous capture using theADD_TABLE_RULES and ADD_SUBSET_RULES procedures in the DBMS_STREAMS_ADM package.Figure 4-14 provides an overview of the environment created in this example.
Figure 4-14 Two-Database Replication Environment with Synchronous Captures
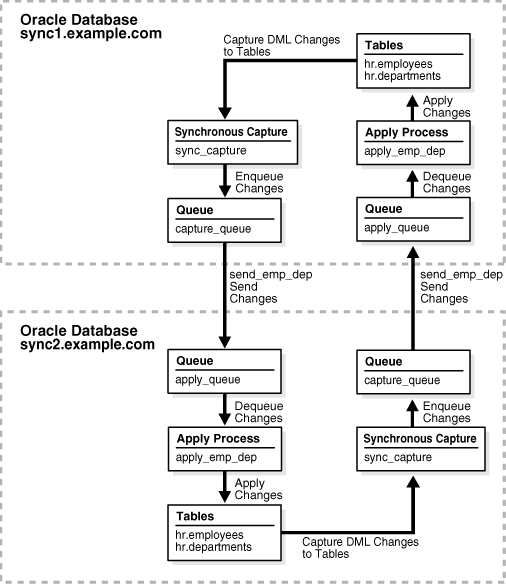
To configure this replication environment with synchronous captures:
Complete the following tasks to prepare for the two-database replication environment:
Configure network connectivity so that the two databases can communicate with each other. See Oracle Database 2 Day DBA for information about configuring network connectivity between databases.
Configure an Oracle Streams administrator at each database that will participate in the replication environment. See "Tutorial: Configuring an Oracle Streams Administrator" for instructions. This example assumes that the Oracle Streams administrator is strmadmin.
Set initialization parameters properly at each database that will participate in the Oracle Streams replication environment. See "Preparing for Oracle Streams Replication" for instructions.
Ensure that the hr.employees and hr.departments tables exist at the two databases and are consistent at these databases. If the database objects exist at only one database, then you can use export/import to create and populate them at the other database. See Oracle Database Utilities for information about export/import.
Create two ANYDATA queues at each database. For this example, create the following two queues at each database:
A queue named capture_queue owned by the Oracle Streams administrator strmadmin. This queue will be used by the synchronous capture at the database.
A queue named apply_queue owned by the Oracle Streams administrator strmadmin. This queue will be used by the apply process at the database.
See "Creating an ANYDATA Queue" for instructions.
Create a database link from each database to the other database:
Create a database link from the sync1.example.com database to the sync2.example.com database. The database link should be created in the Oracle Streams administrator's schema. Also, the database link should connect to the Oracle Streams administrator at the sync2.example.com database. Both the name and the service name of the database link must be sync2.example.com.
Create a database link from the sync2.example.com database to the sync1.example.com database. The database link should be created in the Oracle Streams administrator's schema. Also, the database link should connect to the Oracle Streams administrator at the sync1.example.com database. Both the name and the service name of the database link must be sync1.example.com.
See "Tutorial: Creating a Database Link" for instructions.
Configure an apply process at the sync1.example.com database. This apply process will apply changes to the shared tables that were captured at the sync2.example.com database and propagated to the sync1.example.com database.
Open SQL*Plus and connect to the sync1.example.com database as the Oracle Streams administrator.
See Oracle Database 2 Day DBA for more information about starting SQL*Plus.
Create the apply process:
BEGIN
  DBMS_APPLY_ADM.CREATE_APPLY(
    queue_name     => 'strmadmin.apply_queue',
    apply_name     => 'apply_emp_dep',
    apply_captured => FALSE);
END;
/
The apply_captured parameter is set to FALSE because the apply process applies changes in the persistent queue. These are changes that were captured by a synchronous capture. The apply_captured parameter should be set to TRUE only when the apply process applies changes captured by a capture process.
Do not start the apply process.
Add a rule to the apply process rule set:
BEGIN
  DBMS_STREAMS_ADM.ADD_TABLE_RULES(
    table_name      => 'hr.employees',
    streams_type    => 'apply',
    streams_name    => 'apply_emp_dep',
    queue_name      => 'strmadmin.apply_queue',
    source_database => 'sync2.example.com');
END;
/
This rule instructs the apply process apply_emp_dep to apply all DML changes to the hr.employees table that appear in the apply_queue queue. The rule also specifies that the apply process applies only changes that were captured at the sync2.example.com source database.
Add an additional rule to the apply process rule set:
BEGIN
  DBMS_STREAMS_ADM.ADD_TABLE_RULES(
    table_name      => 'hr.departments',
    streams_type    => 'apply',
    streams_name    => 'apply_emp_dep',
    queue_name      => 'strmadmin.apply_queue',
    source_database => 'sync2.example.com');
END;
/
This rule instructs the apply process apply_emp_dep to apply all DML changes to the hr.departments table that appear in the apply_queue queue. The rule also specifies that the apply process applies only changes that were captured at the sync2.example.com source database.
Configure an apply process at the sync2.example.com database. This apply process will apply changes that were captured at the sync1.example.com database and propagated to the sync2.example.com database.
In SQL*Plus, connect to the sync2.example.com database as the Oracle Streams administrator.
See Oracle Database Administrator's Guide for information about connecting to a database in SQL*Plus.
Create the apply process:
BEGIN
  DBMS_APPLY_ADM.CREATE_APPLY(
    queue_name     => 'strmadmin.apply_queue',
    apply_name     => 'apply_emp_dep',
    apply_captured => FALSE);
END;
/
The apply_captured parameter is set to FALSE because the apply process applies changes in the persistent queue. These changes were captured by a synchronous capture. The apply_captured parameter should be set to TRUE only when the apply process applies changes captured by a capture process.
Do not start the apply process.
Add a rule to the apply process rule set:
BEGIN
  DBMS_STREAMS_ADM.ADD_TABLE_RULES(
    table_name      => 'hr.employees',
    streams_type    => 'apply',
    streams_name    => 'apply_emp_dep',
    queue_name      => 'strmadmin.apply_queue',
    source_database => 'sync1.example.com');
END;
/
This rule instructs the apply process apply_emp_dep to apply all DML changes that appear in the apply_queue queue to the hr.employees table. The rule also specifies that the apply process applies only changes that were captured at the sync1.example.com source database.
Add an additional rule to the apply process rule set:
BEGIN
  DBMS_STREAMS_ADM.ADD_TABLE_RULES(
    table_name      => 'hr.departments',
    streams_type    => 'apply',
    streams_name    => 'apply_emp_dep',
    queue_name      => 'strmadmin.apply_queue',
    source_database => 'sync1.example.com');
END;
/
This rule instructs the apply process apply_emp_dep to apply all DML changes that appear in the apply_queue queue to the hr.departments table. The rule also specifies that the apply process applies only changes that were captured at the sync1.example.com source database.
Create a propagation to send changes from a queue at the sync1.example.com database to a queue at the sync2.example.com database:
In SQL*Plus, connect to the sync1.example.com database as the Oracle Streams administrator.
Create the propagation that sends changes to the sync2.example.com database:
BEGIN
  DBMS_STREAMS_ADM.ADD_TABLE_PROPAGATION_RULES(
    table_name              => 'hr.employees',
    streams_name            => 'send_emp_dep',
    source_queue_name       => 'strmadmin.capture_queue',
    destination_queue_name  => 'strmadmin.apply_queue@sync2.example.com',
    source_database         => 'sync1.example.com',
    queue_to_queue          => TRUE);
END;
/
The ADD_TABLE_PROPAGATION_RULES procedure creates the propagation and its positive rule set. This procedure also adds a rule to the propagation rule set that instructs it to send DML changes to the hr.employees table to the apply_queue queue in the sync2.example.com database.
Add an additional rule to the propagation rule set:
BEGIN
  DBMS_STREAMS_ADM.ADD_TABLE_PROPAGATION_RULES(
    table_name              => 'hr.departments',
    streams_name            => 'send_emp_dep',
    source_queue_name       => 'strmadmin.capture_queue',
    destination_queue_name  => 'strmadmin.apply_queue@sync2.example.com',
    source_database         => 'sync1.example.com',
    queue_to_queue          => TRUE);
END;
/
The ADD_TABLE_PROPAGATION_RULES procedure adds a rule to the propagation rule set that instructs it to send DML changes to the hr.departments table to the apply_queue queue in the sync2.example.com database.
Create a propagation to send changes from a queue at the sync2.example.com database to a queue at the sync1.example.com database:
In SQL*Plus, connect to the sync2.example.com database as the Oracle Streams administrator.
Create the propagation that sends changes to the sync1.example.com database:
BEGIN
  DBMS_STREAMS_ADM.ADD_TABLE_PROPAGATION_RULES(
    table_name              => 'hr.employees',
    streams_name            => 'send_emp_dep',
    source_queue_name       => 'strmadmin.capture_queue',
    destination_queue_name  => 'strmadmin.apply_queue@sync1.example.com',
    source_database         => 'sync2.example.com',
    queue_to_queue          => TRUE);
END;
/
The ADD_TABLE_PROPAGATION_RULES procedure creates the propagation and its positive rule set. This procedure also adds a rule to the propagation rule set that instructs it to send DML changes to the hr.employees table to the apply_queue queue in the sync1.example.com database.
Add an additional rule to the propagation rule set:
BEGIN
  DBMS_STREAMS_ADM.ADD_TABLE_PROPAGATION_RULES(
    table_name              => 'hr.departments',
    streams_name            => 'send_emp_dep',
    source_queue_name       => 'strmadmin.capture_queue',
    destination_queue_name  => 'strmadmin.apply_queue@sync1.example.com',
    source_database         => 'sync2.example.com',
    queue_to_queue          => TRUE);
END;
/
The ADD_TABLE_PROPAGATION_RULES procedure adds a rule to the propagation rule set that instructs it to send DML changes to the hr.departments table to the apply_queue queue in the sync1.example.com database.
Configure a synchronous capture at the sync1.example.com database:
In SQL*Plus, connect to the sync1.example.com database as the Oracle Streams administrator.
Run the ADD_TABLE_RULES procedure to create the synchronous capture and add a rule to instruct it to capture changes to the hr.employees table:
BEGIN
  DBMS_STREAMS_ADM.ADD_TABLE_RULES(
    table_name    => 'hr.employees',
    streams_type  => 'sync_capture',
    streams_name  => 'sync_capture',
    queue_name    => 'strmadmin.capture_queue');
END;
/
Add an additional rule to the synchronous capture rule set:
BEGIN
  DBMS_STREAMS_ADM.ADD_TABLE_RULES(
    table_name    => 'hr.departments',
    streams_type  => 'sync_capture',
    streams_name  => 'sync_capture',
    queue_name    => 'strmadmin.capture_queue');
END;
/
Running these procedures performs the following actions:
Creates a synchronous capture named sync_capture at the current database. A synchronous capture with the same name must not exist.
Enables the synchronous capture. A synchronous capture cannot be disabled.
Associates the synchronous capture with an existing queue named capture_queue owned by strmadmin.
Creates a positive rule set for synchronous capture sync_capture. The rule set has a system-generated name.
Creates a rule that captures DML changes to the hr.employees table and adds the rule to the positive rule set for the synchronous capture. The rule has a system-generated name.
Prepares the hr.employees table for instantiation by running the DBMS_CAPTURE_ADM.PREPARE_SYNC_INSTANTIATION function for the table automatically.
Creates a rule that captures DML changes to the hr.departments table and adds the rule to the positive rule set for the synchronous capture. The rule has a system-generated name.
Prepares the hr.departments table for instantiation by running the DBMS_CAPTURE_ADM.PREPARE_SYNC_INSTANTIATION function for the table automatically.
Configure a synchronous capture at the sync2.example.com database:
In SQL*Plus, connect to the sync2.example.com database as the Oracle Streams administrator.
Run the ADD_TABLE_RULES procedure to create the synchronous capture and add a rule to instruct it to capture changes to the hr.employees table:
BEGIN
  DBMS_STREAMS_ADM.ADD_TABLE_RULES(
    table_name    => 'hr.employees',
    streams_type  => 'sync_capture',
    streams_name  => 'sync_capture',
    queue_name    => 'strmadmin.capture_queue');
END;
/
Add an additional rule to the synchronous capture rule set:
BEGIN
  DBMS_STREAMS_ADM.ADD_TABLE_RULES(
    table_name    => 'hr.departments',
    streams_type  => 'sync_capture',
    streams_name  => 'sync_capture',
    queue_name    => 'strmadmin.capture_queue');
END;
/
Step 8 describes the actions performed by these procedures at the current database.
Set the instantiation SCN for the tables at the sync2.example.com database:
In SQL*Plus, connect to the sync1.example.com database as the Oracle Streams administrator.
Set the instantiation SCN for the hr.employees table at the sync2.example.com database:
DECLARE
  iscn  NUMBER;    -- Variable to hold instantiation SCN value
BEGIN
  iscn := DBMS_FLASHBACK.GET_SYSTEM_CHANGE_NUMBER();
  DBMS_APPLY_ADM.SET_TABLE_INSTANTIATION_SCN@sync2.example.com(
    source_object_name    => 'hr.employees',
    source_database_name  => 'sync1.example.com',
    instantiation_scn     => iscn);
END;
/
Set the instantiation SCN for the hr.departments table at the sync2.example.com database:
DECLARE
  iscn  NUMBER;    -- Variable to hold instantiation SCN value
BEGIN
  iscn := DBMS_FLASHBACK.GET_SYSTEM_CHANGE_NUMBER();
  DBMS_APPLY_ADM.SET_TABLE_INSTANTIATION_SCN@sync2.example.com(
    source_object_name    => 'hr.departments',
    source_database_name  => 'sync1.example.com',
    instantiation_scn     => iscn);
END;
/
An instantiation SCN is the lowest SCN for which an apply process can apply changes to a table. Before the apply process can apply changes to the shared tables at the sync2.example.com database, an instantiation SCN must be set for each table.
Set the instantiation SCN for the tables at the sync1.example.com database:
In SQL*Plus, connect to the sync2.example.com database as the Oracle Streams administrator.
Set the instantiation SCN for the hr.employees table at the sync1.example.com database:
DECLARE
  iscn  NUMBER;    -- Variable to hold instantiation SCN value
BEGIN
  iscn := DBMS_FLASHBACK.GET_SYSTEM_CHANGE_NUMBER();
  DBMS_APPLY_ADM.SET_TABLE_INSTANTIATION_SCN@sync1.example.com(
    source_object_name    => 'hr.employees',
    source_database_name  => 'sync2.example.com',
    instantiation_scn     => iscn);
END;
/
Set the instantiation SCN for the hr.departments table at the sync2.example.com database:
DECLARE
  iscn  NUMBER;    -- Variable to hold instantiation SCN value
BEGIN
  iscn := DBMS_FLASHBACK.GET_SYSTEM_CHANGE_NUMBER();
  DBMS_APPLY_ADM.SET_TABLE_INSTANTIATION_SCN@sync1.example.com(
    source_object_name    => 'hr.departments',
    source_database_name  => 'sync2.example.com',
    instantiation_scn     => iscn);
END;
/
Start the apply process at each database:
In SQL*Plus, connect to the sync1.example.com database as the Oracle Streams administrator.
Start the apply process:
BEGIN
  DBMS_APPLY_ADM.START_APPLY(
    apply_name => 'apply_emp_dep');
END;
/
In SQL*Plus, connect to the sync2.example.com database as the Oracle Streams administrator.
Start the apply process:
BEGIN
  DBMS_APPLY_ADM.START_APPLY(
    apply_name => 'apply_emp_dep');
END;
/
If you would rather start the apply processes using Enterprise Manager, then see "Starting and Stopping an Apply Process" for instructions.
Configure latest time conflict resolution for the hr.departments and hr.employees tables at the sync1.example.com and sync2.example.com databases. See "Tutorial: Configuring Latest Time Conflict Resolution for a Table" for instructions.
A two-database replication environment with the following characteristics is configured:
Each database has a synchronous capture named sync_capture. The synchronous capture captures all DML changes to the hr.employees hr.departments tables.
Each database has a queue named capture_queue. This queue is for the synchronous capture at the database.
Each database has an apply process named apply_emp_dep. The apply process applies all DML changes to the hr.employees table and hr.departments tables.
Each database has a queue named apply_queue. This queue is for the apply process at the database.
Each database has a propagation named send_emp_dep. The propagation sends changes from the capture_queue in the local database to the apply_queue in the other database. The propagation sends all DML changes to the hr.employees and hr.departments tables.
Tags are used to avoid change cycling in the following way:
Each apply process uses the default apply tag. The default apply tag is the hexadecimal equivalent of '00' (double zero).
Each synchronous capture only captures changes in a session with a NULL tag. Therefore, neither synchronous capture captures the changes that are being applied by the local apply process. The synchronous capture rules instruct the synchronous capture not to capture these changes.
See "About Tags for Avoiding Change Cycling" for more information about how the replication environment avoids change cycling.
To check the Oracle Streams replication configuration:
At each database, complete the following steps to ensure that synchronous capture is configured:
Start SQL*Plus and connect to the database as the Oracle Streams administrator.
See Oracle Database 2 Day DBA for more information about starting SQL*Plus.
Query the ALL_SYNC_CAPTURE data dictionary view:
SELECT CAPTURE_NAME FROM ALL_SYNC_CAPTURE;
Ensure that a synchronous capture named sync_capture exists at each database.
At each database, ensure that the propagation is enabled. To do so, follow the instructions in "Viewing Information About a Propagation", and check Status on the Propagation subpage.
At each database, ensure that the apply process is enabled. To do so, follow the instructions in "Viewing Information About an Apply Process", and check Status on the Apply subpage.
To replicate changes:
At one of the databases, make DML changes to the hr.employees table or hr.departments table.
After some time has passed to allow for replication of the changes, use SQL*Plus to query the hr.employees or hr.departments table at the other database to view the changes.
Conflict resolution automatically resolves conflicts in a replication environment. See "About Conflicts and Conflict Resolution" for more information about conflict resolution.
The most common way to resolve update conflicts is to keep the change with the most recent time stamp and discard the older change. With this method, when a conflict is detected during apply, the apply process applies the change if the time-stamp column for the change is more recent than the corresponding row in the table. If the time-stamp column in the table is more recent, then the apply process discards the change.
The example in this topic configures latest time conflict resolution for the hr.departments table by completing the following actions:
Adds a time column of the TIMESTAMP WITH TIME ZONE data type to the table
Configures a trigger to update the time column in a row with the current time when the row is changed
Adds supplemental logging for the columns in the table
Runs the SET_UPDATE_CONFLICT_HANDLER procedure in the DBMS_APPLY_ADM package to configure conflict resolution for the table
You can use the steps in this topic to configure conflict resolution for any table. To do so, substitute your schema name for hr and your table name for departments. Also, substitute the columns in your table for the columns in the hr.departments table when you run the SET_UPDATE_CONFLICT_HANDLER procedure.
To configure latest time conflict resolution for the hr.departments table:
Add a time column to the table.
In SQL*Plus, connect to the database as an administrative user, such as the Oracle Streams administrator or SYSTEM. Alternatively, you can connect as the user who owns the table to which the time column will be added.
See Oracle Database 2 Day DBA for more information about starting SQL*Plus.
Use the ALTER TABLE SQL statement to add the time column to the table. In this example, run the following statement to add the time column to the hr.departments table.
ALTER TABLE hr.departments ADD (time TIMESTAMP WITH TIME ZONE);
Create a trigger to update the time column in each master table with the current time when a change occurs.
Tip:
Instead of using a trigger to update thetime column, an application can populate the time column each time it modifies or inserts a row into a table.In Oracle Enterprise Manager, log in to the database as an administrative user, such as the Oracle Streams administrator or SYSTEM.
Go to the Database Home page.
Click Schema to open the Schema subpage.
Click Triggers in the Programs section.
On the Triggers page, click Create.
The Create Trigger page appears, showing the General subpage.
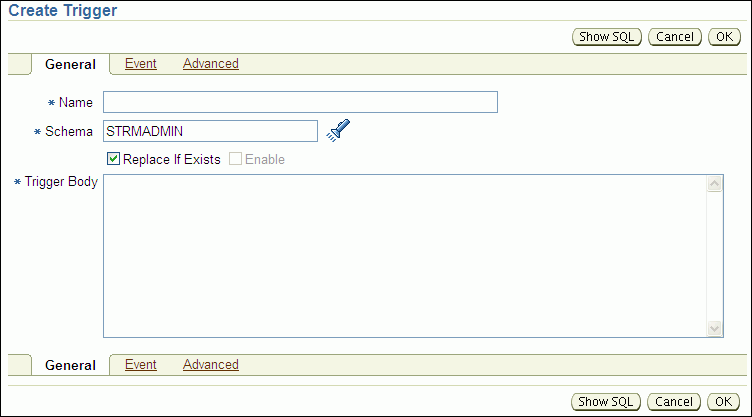
Enter the name of the trigger in the Name field. In this example, enter insert_departments_time.
Enter the schema that owns the table in the Schema field. In this example, enter hr in the Schema field.
Enter the following in the Trigger Body field:
BEGIN
   -- Consider time synchronization problems. The previous update to this
   -- row might have originated from a site with a clock time ahead of
   -- the local clock time.
   IF :OLD.TIME IS NULL OR :OLD.TIME < SYSTIMESTAMP THEN
     :NEW.TIME := SYSTIMESTAMP;
   ELSE
     :NEW.TIME := :OLD.TIME + 1 / 86400;
   END IF;
END;
Click Event to open the Event subpage.
Ensure that Table is selected in the Trigger On list.
Enter the table name in the form schema.table in the Table (Schema.Table) field, or use the flashlight icon to find the database object. In this example, enter hr.departments.
Ensure that Before is selected for Fire Trigger.
Select Insert and Update of Columns for Event.
The columns in the table appear.
Select every column in the table except for the new time column.
Click Advanced to open the Advanced subpage.
Select Trigger for each row.
Click OK to create the trigger.
Note:
You can also use theCREATE TRIGGER SQL statement to create a trigger.In SQL*Plus, connect to the database as the Oracle Streams administrator.
See Oracle Database 2 Day DBA for more information about starting SQL*Plus.
Add supplemental logging for the columns in the table:
ALTER TABLE hr.departments ADD SUPPLEMENTAL LOG DATA (ALL) COLUMNS;
Supplemental logging is required for conflict resolution during apply.
Run the SET_UPDATE_CONFLICT_HANDLER procedure to configure latest time conflict resolution for the table.
For example, run the following procedure to configure latest time conflict resolution for the hr.departments table:
DECLARE
  cols  DBMS_UTILITY.NAME_ARRAY;
BEGIN
  cols(1) := 'department_id';
  cols(2) := 'department_name';
  cols(3) := 'manager_id';
  cols(4) := 'location_id';
  cols(5) := 'time';
  DBMS_APPLY_ADM.SET_UPDATE_CONFLICT_HANDLER(
    object_name        =>  'hr.departments',
    method_name        =>  'MAXIMUM',
    resolution_column  =>  'time',
    column_list        =>  cols);
END;
/
Include all of the columns in the table in the cols column list.
Repeat these steps for any tables that require conflict resolution in your replication environment. You might need to configure conflict resolution for the tables at several databases.
If you are completing an example that configures or extends a replication environment, then configure latest time conflict resolution for the appropriate tables:
For "Tutorial: Configuring Two-Database Replication with Local Capture Processes", configure conflict resolution for all of the tables in the hr schema at the db1.example.com and db2.example.com databases. This schema includes the countries, departments, employees, jobs, job_history, locations, and regions tables.
For "Tutorial: Configuring Hub-and-Spoke Replication with Local Capture Processes", configure conflict resolution for all of the tables in the hr schema at the hub1.example.com, spoke1.example.com, and spoke2.example.com databases. This schema includes the countries, departments, employees, jobs, job_history, locations, and regions tables.
For "Tutorial: Configuring Two-Database Replication with Synchronous Captures", configure conflict resolution for the hr.departments and hr.employees tables at the sync1.example.com and sync2.example.com databases.
For "Tutorial: Adding Database Objects to a Replication Environment", configure conflict resolution for the oe.orders and oe.order_items tables at the hub.example.com, spoke1.example.com, and spoke2.example.com databases.
For "Tutorial: Adding Databases to a Replication Environment", configure conflict resolution for all of the tables in the hr schema at the spoke3.example.com database. This schema includes the countries, departments, employees, jobs, job_history, locations, and regions tables.
If you were directed to this section from an example, then go back to the example now.
|
Copyright © 2007, 2011, Oracle and/or its affiliates. All rights reserved. Legal Notices |
|