| Oracle® Database 2 Day + Data Replication and Integration Guide 11g Release 2 (11.2) Part Number E17516-08 |
|
|
PDF · Mobi · ePub |
| Oracle® Database 2 Day + Data Replication and Integration Guide 11g Release 2 (11.2) Part Number E17516-08 |
|
|
PDF · Mobi · ePub |
This chapter contains conceptual information about replicating data using materialized views. It also describes how to synchronize the replicated data periodically to a transactionally consistent point in time.
This chapter contains the following sections:
See Also:
Replication is the process of sharing database objects and data at multiple databases. To maintain replicated database objects and data at multiple databases, a change to one of these database objects at a database is shared with the other databases. In this way, the database objects and data are kept synchronized at all of the databases in the replication environment.
In many environments, such as field sales, databases are not connected to the network for periods of time. In these environments, replicas must synchronize data on demand, or at regularly scheduled intervals, such as nightly. These databases can synchronize with other databases that share the same data when they are reconnected to the network.
To address these needs, Oracle Database offers a replication type called materialized view replication. A materialized view contains a complete or partial copy of a table from a single point in time. Materialized views can be either read-only or updatable:
Read-only materialized views provide read-only access to the table copy. Using read-only materialized views, applications and users can access local copies of tables that reside at remote locations. Read-only materialized views provide local access to data and reduce the resources required at any single location by allowing queries on the same data at multiple locations. For example, read-only materialized views are typically used for reporting purposes.
Updatable materialized views provide read/write access to the table copy. Using updatable materialized views, applications and users can change both the table and the copy of the table, and these changes can be synchronized at a point in time. For example, updatable materialized views are typically used to periodically disseminate a product catalog to regional offices and to enable the sales force to place orders from customer sites.
Because of their support for easy mass deployment and disconnected computing, both read-only and updatable materialized views are especially suited to mobile computing applications.
The following topics provide more information about materialized view replication:
See Also:
In a replication environment, a materialized view shares data with a table in a different database called a master site. The table associated with the materialized view at the master site is called the master table. A materialized view contains a complete or partial copy of a master table from a single point in time. The database in which the materialized view resides is called the materialized view site.
See Also:
Refreshing a materialized view synchronizes data in the materialized view with data in its master table. The materialized view controls when the refresh is performed, either on a fixed schedule or on demand. During a refresh, row data from the master table is pulled down and applied at the materialized view site. Oracle Database provides the following refresh methods:
Fast refresh pulls down only the rows that have changed since the last refresh.
Complete refresh updates the entire materialized view.
Force refresh performs a fast refresh when possible. When a fast refresh is not possible, force refresh performs a complete refresh.
A fast refresh is more efficient than a complete refresh. A fast refresh of a materialized view is possible only if the master table has a materialized view log. A materialized view log is a table at the master site that records all of the insert, update, and delete operations performed on the master table.
A materialized view log is associated with a single master table, and each master table has only one materialized view log, regardless of how many materialized views refresh from the master table. When a fast refresh is performed on a materialized view, entries in the materialized view log that have appeared since the materialized view was last refreshed are applied to the materialized view.
When it is important for two or more materialized views to be transactionally consistent with each other, you can organize them into refresh groups. By refreshing a refresh group, you can ensure that the data in all of the materialized views in the refresh group correspond to the same transactionally consistent point in time. A materialized view in a refresh group still can be refreshed individually. However, doing so nullifies the benefits of the refresh group because refreshing the materialized view individually does not refresh the other materialized views in the refresh group.
Before configuring materialized view replication, prepare the databases that will participate in the replication environment.
To prepare for materialized view replication:
If possible, then ensure that each replicated table has a primary key. Where a primary key is not possible, each replicated table must have a column or set of columns that can be used as a unique identifier for each row of the table. If the tables that you plan to use in your replication environment do not have a primary key or a set of unique columns, then alter these tables accordingly.
Set initialization parameters properly at each database in your replication environment before you configure materialized view replication:
Global names: Set the GLOBAL_NAMES initialization parameter to TRUE at each database that will participate in the replication environment. See "Setting the GLOBAL_NAMES Initialization Parameter to TRUE".
System Global Area (SGA) and the shared pool: Ensure that the shared pool is large enough to accommodate the components created for the replication environment. The shared pool is part of the SGA. You can manage the shared pool by setting the MEMORY_TARGET initialization parameter (Automatic Memory Management), the SGA_TARGET initialization parameter (Automatic Shared Memory Management), or the SHARED_POOL_SIZE initialization parameter. Typically, the shared pool should be larger for an Oracle database in a replication environment than in a nonreplication environment.
See Oracle Database 2 Day DBA for information about modifying initialization parameters.
Configure network connectivity so that the databases in the replication environment can communicate with each other. See Oracle Database 2 Day DBA for information about configuring network connectivity between databases.
See Also:
Oracle Database Advanced Replication for more information about initialization parameters in a replication environment
Before you configure materialized views, you must configure the databases that will function as materialized view sites in your replication environment. Completing the steps in this topic will configure the necessary users and database links required by the materialized view environment. In addition, if you plan to configure updatable materialized views, then these steps also configure scheduled links and scheduled purges for changes made to updatable materialized views.
To configure materialized view sites with Enterprise Manager:
Complete the actions described in "Preparing for Materialized View Replication".
In Oracle Enterprise Manager, log in to the materialized view site as an administrative user, such as SYSTEM.
Go to the Database Home page.
Click Data Movement to open the Data Movement subpage.
On the Advanced Replication: Setup page, expand Updateable Materialized View Replication.
Select Configure Materialized View Sites for Replication.
Click Continue to open the Configure Materialized View Sites for Replication Wizard.
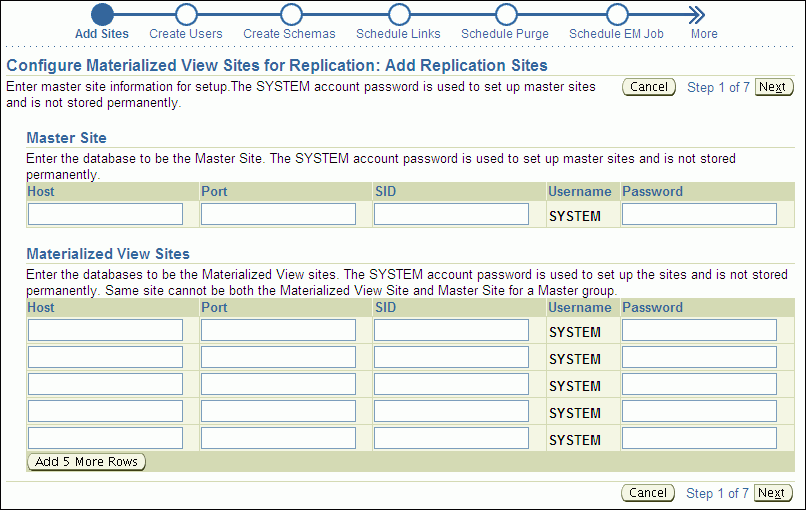
Complete the pages in the wizard to configure the materialized view sites. On the Create Users page, enter an appropriate password for the materialized view administrator. See Oracle Database 2 Day + Security Guide for information about choosing passwords.
Tip:
On the Create Schemas page of the wizard, make sure you select the schemas that contain the database objects to replicate.When you finish the wizard, an Enterprise Manager job is scheduled to configure the materialized view sites. After the job runs successfully, the materialized view sites are configured, and each one has a materialized view administrator. By default, the user name of the materialized view administrator is mvadmin. You specified the password for this user when you completed the wizard. Also, each materialized view site contains each schema that you specified on the Create Schemas page of the wizard.
At each materialized view site, create the required database links for the replicated schemas.
To create materialized views in a schema at the materialized view site, the schema must be able to connect to the corresponding schema at the master site through a database link.
To create the database links:
On a command line, open SQL*Plus and connect to the materialized view database as the owner of the replicated schema.
For example, if you plan to create materialized views in the hr schema at the ii2.example.com database, then enter the following:
sqlplus hr@ii2.example.com
Enter password: password
See Oracle Database 2 Day DBA for more information about starting SQL*Plus.
Create a database link that connects to the corresponding replicated schema at the master database.
For example, to create a database link that connects to the hr schema at the ii1.example.com database, enter the following:
CREATE DATABASE LINK ii1.example.com CONNECT TO hr
   IDENTIFIED BY password USING 'ii1.example.com';
Repeat Steps a through b for each replicated schema at the materialized view database.
Repeat Steps a through c for each materialized view database.
To enable fast refresh of a materialized view, configure a materialized view log for its master table at the master site. A fast refresh is more efficient than a complete refresh, because it updates only rows that have changed since the last refresh. See "About Materialized View Refresh" for more information.
To configure materialized view logs:
In Oracle Enterprise Manager, log in to the master site as an administrative user, such as SYSTEM.
Click Data Movement to open the Data Movement subpage.
Click Setup in the Advanced Replication section.
On the Advanced Replication: Setup page, expand Updateable Materialized View Replication.
Select Create Materialized View log on source database tables for fast refresh.
Click Continue to open the Create Materialized View Log page.
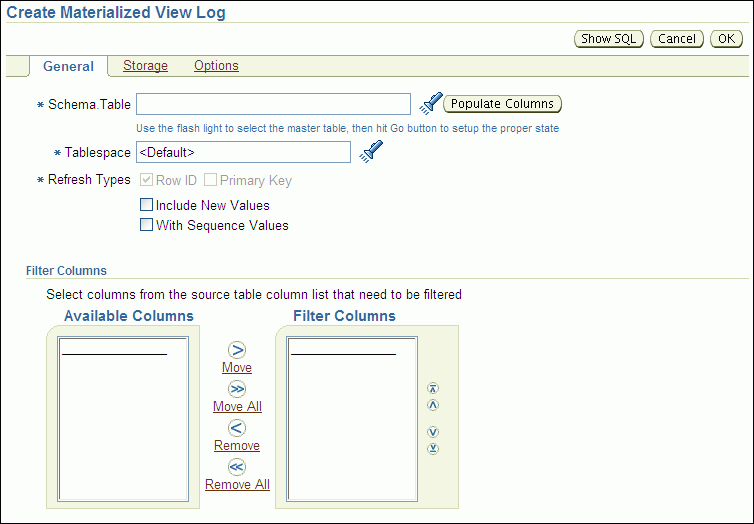
Enter the schema name and table name for the master table in the form schema.table in the Schema.Table field, or click the flashlight icon to find the table.
Click Populate Columns.
If you have a specific tablespace for the materialized view log you are creating, then enter the tablespace name in the Tablespace field. Otherwise, leave <Default> in the field.
Ensure that Primary Key is selected in Refresh Types.
Note:
You can also use theCREATE MATERIALIZED VIEW LOG SQL statement to create a materialized view log.A read-only replica of a table is appropriate for databases that provide access to the replicated data without allowing applications to modify the replicated data.
The following topics describe replicating read-only data using materialized views:
See Also:
Read-only materialized views provide read-only access to the table data that originates from a master site. Applications can query data from read-only materialized views to avoid network access to the master site, regardless of network availability. However, applications throughout the system must access data at the master site to perform insert, update, and delete operations.
Figure 7-1 shows how a read-only materialized view works.
Figure 7-1 shows that client applications can perform local queries on a read-only materialized view at the materialized view site. These applications can update data at the remote master. The materialized view is updated with the changes at the master when the materialized view refreshes over the network.
The example in this topic configures read-only data replication using materialized views. Specifically, this example creates the following read-only materialized views at a materialized view site:
The mvadmin.employees_mvr materialized view based on the hr.employees table at the master site.
The mvadmin.departments_mvr materialized view based on the hr.departments table at the master site.
To configure these read-only materialized views:
Complete the actions described in the following topics:
"Configuring Materialized View Logs at the Master Site" if you want to perform a fast refresh of the materialized views. For this example, create a materialized view log for each of the following tables: hr.departments and hr.employees.
In Enterprise Manager, log in to the materialized view site as the materialized view administrator. The materialized view site is the database in which you want to create materialized views. The default user name for the materialized view administrator is mvadmin.
Go to the Database Home page.
Click Data Movement to open the Data Movement subpage.
Click Setup in the Advanced Replication section.
On the Advanced Replication: Setup page, expand Read-only Materialized Views.
Select Create Materialized View.
Click Continue to open the Create Materialized View page.
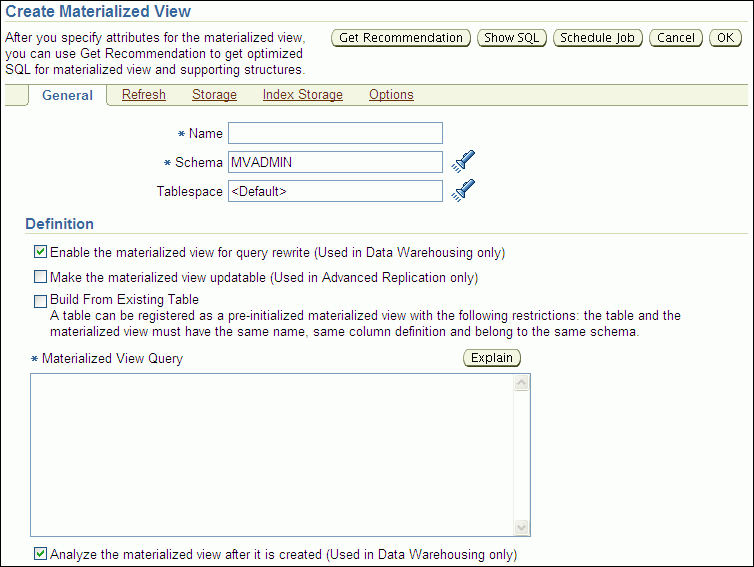
Complete the following actions to create the hr.employees_mvr materialized view:
Enter employees_mvr in the Name field.
Enter hr in the Schema field.
If you have a specific tablespace for the materialized view you are creating, then enter the tablespace name in the Tablespace field. Otherwise, leave <Default> in the field.
Deselect Enable the materialized view for query rewrite.
Ensure that the following are not selected:
Make the materialized view updatable
Build From Existing Table
Enter the following in the Materialized View Query field:
SELECT employee_id,
        first_name,
        last_name,
        email,
        phone_number,
        hire_date,
        job_id,
        salary,
        commission_pct,
        manager_id,
        department_id
FROM hr.employees@master_site
Replace master_site with the global name of the master site that contains the master table.
Deselect Analyze the materialized view after it is created.
If necessary, then set options for the materialized view on the other subpages.
Click OK to create the materialized view.
The hr.employees_mvr materialized view is a complete copy of the master hr.employees table. To create a materialized view that contains a subset of the data, you can include a WHERE clause in your SELECT statement.
On the Advanced Replication: Setup page, expand Read-only Materialized Views.
Select Create Materialized View.
Click Continue to open the Create Materialized View page.
Complete the following actions to create the hr.departments_mvr materialized view:
Enter departments_mvr in the Name field.
Enter hr in the Schema field.
If you have a specific tablespace for the materialized view you are creating, then enter the tablespace name in the Tablespace field. Otherwise, leave <Default> in the field.
Deselect Enable the materialized view for query rewrite.
Ensure that the following are not selected:
Make the materialized view updatable
Build From Existing Table
Enter the following in the Materialized View Query field:
SELECT department_id,
        department_name,
        manager_id,
        location_id
FROM hr.departments@master_site
Replace master_site with the master site that contains the master table.
Deselect Analyze the materialized view after it is created.
If necessary, then set options for the materialized view on the other subpages.
Click OK to create the materialized view.
Create a refresh group and add the materialized views to it so that they are consistent with a single point in time when they are refreshed. In this example, add the hr.employees_mvr and hr.departments_mvr materialized views to the refresh group. See "Configuring a Refresh Group".
Note:
You can also use theCREATE MATERIALIZED VIEW SQL statement to create a materialized view.A read/write replica of a table is appropriate for databases that allow applications to modify the replicated data.
The following topics describe replicating read/write data using materialized views:
See Also:
Updatable materialized views enable users to insert, update, and delete rows in the materialized views. When an updatable materialized view is refreshed, these changes are pushed to the master site and applied to the master table.
Figure 7-2 shows how an updatable materialized view works.
Figure 7-2 shows that client applications can query and update an updatable materialized view at the materialized view site. These applications can also update data at the remote master site. When the materialized view initializes a refresh over the network, the refresh includes two key phases. First, transactions that have been performed on the materialized view are pushed to the master site and applied as appropriate. Next, after resolving any conflicting updates, the materialized view pulls the changed row data from the master site and applies it.
The following topics provide more information about replicating read/write data using materialized views:
See Also:
A replication group is a collection of replication objects that are logically related. Organizing related database objects within a replication group makes it easier to administer many objects together. At a master site, a replication group is called a master group. At a materialized view site, a replication group is called a materialized view group.
For changes made to an updatable materialized view to be pushed to the master during refresh, the following conditions must be met:
The updatable materialized view must belong to a materialized view group.
The materialized view group must be based on a master group at the master site.
The materialized view group can contain materialized views for all of the tables in the master group or for a subset of the tables.
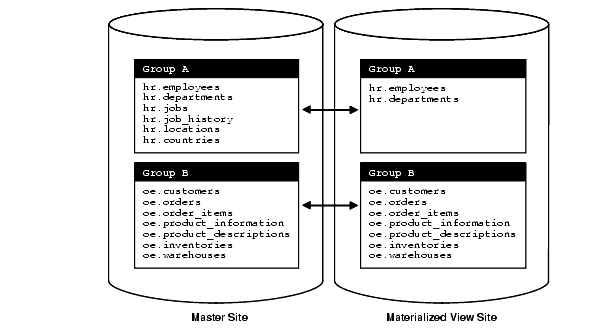
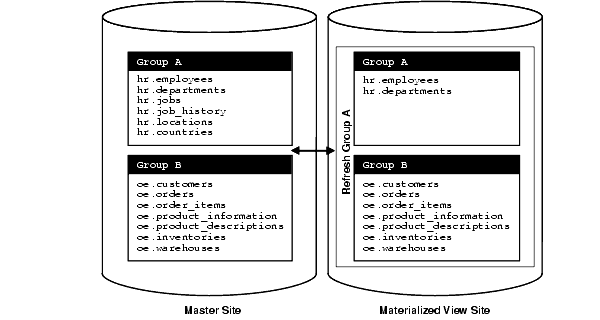
Figure 7-3 shows two materialized view groups. Materialized view group A contains materialized views that correspond to a subset of the tables in the master group, while materialized view group B contains a materialized view for each table in the master group.
Figure 7-3 Materialized View Groups Correspond with Master Groups
If you are using materialized view groups and refresh groups at the same site, then a single refresh group can contain multiple materialized view groups. A materialized view group is different from a refresh group, although it can contain the same materialized views.
Figure 7-4 shows a refresh group that contains two materialized view groups.
Figure 7-4 Refresh Groups Can Contain Objects from Multiple Materialized View Groups
At a materialized view site, deferred transactions include changes to updatable materialized views. The deferred transactions are stored at the materialized view site so that they can be sent to the master site and applied to master tables.
A refresh of an updatable materialized view first pushes the deferred transactions at the materialized view site to its master site. Then, the data at the master site is pulled down and applied to the materialized view.
Optionally, you can choose to push the deferred transactions at a regular interval independent of refresh. A scheduled link is a database link with a user-defined schedule to push deferred transactions. A scheduled link determines how a materialized view site sends its deferred transaction queue to its master site. When you create a scheduled link, Oracle Database creates a job in the local job queue to push the deferred transaction queue to the master site.
If the materialized view site has a constant connection to its master site, then you optionally can use a scheduled link to push the deferred transactions to the master site at regular intervals. If the materialized view site is disconnected from its master site for extended periods of time, then it is typically better not to push deferred transactions on a schedule. In this case, it is best to refresh on demand, which also pushes changes to the master site.
After changes made to updatable materialized views are pushed to the master site, they no longer need to be stored at the materialized view site. To keep the size of the deferred transaction queue in check, you should purge successfully completed deferred transactions. These deferred transactions can be purged at regular intervals according to a purge schedule.
When you use updatable materialized views, conflicts are possible. A conflict occurs when a change is made to the same row in the master table and materialized view at nearly the same time. During refresh, the master site detects a conflict when the same row was changed at the master table and its corresponding materialized view since the last refresh.
By default, Oracle Database always detects and logs conflicting updates. You can use conflict resolution to ensure that each conflict is resolved in accordance with your business rules and to ensure that the data converges correctly at all sites. Oracle Database provides built-in conflict resolution methods that you can configure at the master site.
This topic provides instructions for configuring read/write data replication using materialized views. Specifically, this example configures:
A master group at a master site that contains master tables. See "About Replication Groups and Updatable Materialized Views".
A materialized view group at a materialized view site that contains updatable materialized views that are based on the master tables at the master site. For materialized views to be updatable, they must be in a materialized view group at the materialized view site, and the materialized view group must correspond with a master group at the master site. See "About Replication Groups and Updatable Materialized Views".
Latest timestamp conflict resolution at the master site for the master tables. Conflict resolution ensures that the master tables and materialized views remain consistent if changes are made to the same rows in the master table and its corresponding updatable materialized view at nearly the same time. See "About Conflicts and Updatable Materialized Views".
When a conflict occurs, latest timestamp conflict resolution means that the most recent change is retained and the older change is discarded. So, if a row is updated in a materialized view at one point in time, and then the row is updated in the master table at a later time, then the row in the master table replaces the row in the materialized view automatically when the materialized view is refreshed. If the row in the materialized view was updated more recently than the row in the master table, then the row in the materialized view replaces the row in the master table during refresh.
To configure updatable materialized views:
Complete the actions described in the following topics:
"Configuring Materialized View Logs at the Master Site" if you want to perform a fast refresh of the materialized views. Configure a materialized view log for each table that will be a master table.
Configure the master site. The master site contains the master tables on which the updatable materialized views are based.
In Oracle Enterprise Manager, log in to the database that will be the master site as an administrative user, such as SYSTEM.
Go to the Database Home page.
Click Data Movement to open the Data Movement subpage.
Click Setup in the Advanced Replication section.
On the Advanced Replication: Setup page, expand Updateable Materialized View Replication.
Select Configure Master Sites for Replication.
Click Continue to open the Configure Master Sites for Replication Wizard.
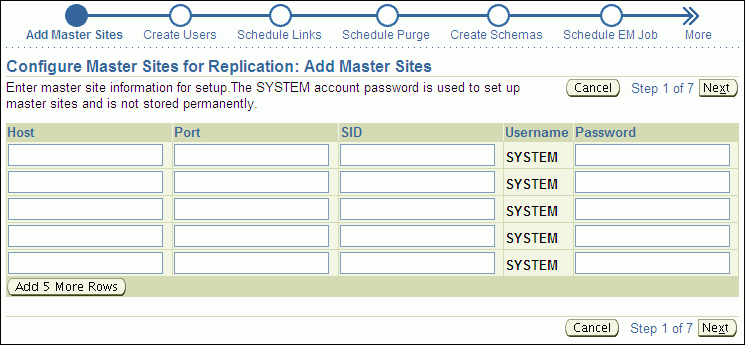
Complete the pages in the wizard to configure the master site.
When you finish the wizard, an Enterprise Manager job is scheduled to configure the master site. After the job runs successfully, the master site is configured, and it has a replication administrator. By default, the user name of the replication administrator is repadmin. You specified the password for this user when you completed the wizard.
Add a time column to each master table for latest timestamp conflict resolution.
In SQL*Plus, connect to the database as an administrative user, such as SYSTEM. Alternatively, you can connect as the user who owns the table to which the time column will be added.
See Oracle Database 2 Day DBA for more information about starting SQL*Plus.
Use the ALTER TABLE SQL statement to add the time column to the table. For example, the following SQL statement adds the time column to the hr.departments table.
ALTER TABLE hr.departments ADD (time TIMESTAMP WITH TIME ZONE);
Create a trigger to update the time column in each master table with the current time when a change occurs.
Tip:
Instead of using a trigger to update thetime column, an application can populate the time column each time it modifies or inserts a row into a table.In Oracle Enterprise Manager, log in to the database that contains the master tables as an administrative user, such as SYSTEM.
If you did not log out of Enterprise Manager after completing Step 3, then you can remain logged in to the master site as an administrative user.
Click Schema to open the Schema subpage.
Click Triggers in the Programs section.
On the Triggers page, click Create.
The Create Trigger page appears, showing the General subpage.
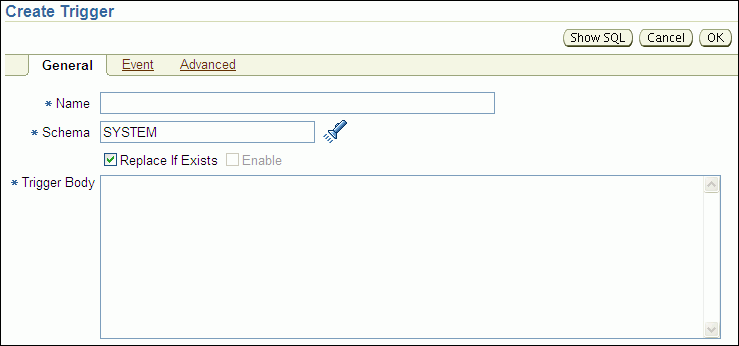
Enter the name of the trigger in the Name field.
Retain the administrative user name in the Schema field.
Enter the following in the Trigger Body field:
BEGIN
   -- The IF/THEN statement ensures that the trigger does not fire during
   -- materialized view refresh.
   IF (DBMS_REPUTIL.FROM_REMOTE = FALSE AND
       DBMS_SNAPSHOT.I_AM_A_REFRESH = FALSE)
   THEN
      :NEW.TIME := SYSTIMESTAMP;
   END IF;
END;
Click Event to open the Event subpage.
Ensure that Table is selected in the Trigger On list.
Enter the table name in the form schema.table in the Table (Schema.Table) field, or use the flashlight icon to find the database object.
Ensure that Before is selected for Fire Trigger.
Select Insert and Update of Columns for Event.
The columns in the table appear.
Select every column in the table except for the new time column.
Click Advanced.
Select Trigger for each row.
Repeat Steps e through q to create a trigger for each master table.
Log out of Enterprise Manager.
Note:
You can also use theCREATE TRIGGER SQL statement to create a trigger.In Enterprise Manager, log in to the master site as the replication administrator. By default, the user name of the replication administrator is repadmin.
Go to the Database Home page.
Click Data Movement to open the Data Movement subpage.
Click Setup in the Advanced Replication section.
The Advanced Replication: Setup page appears.
Expand Multi-master Replication.
Select Create Master Group.
Click Continue to open the Create Master Group Wizard.
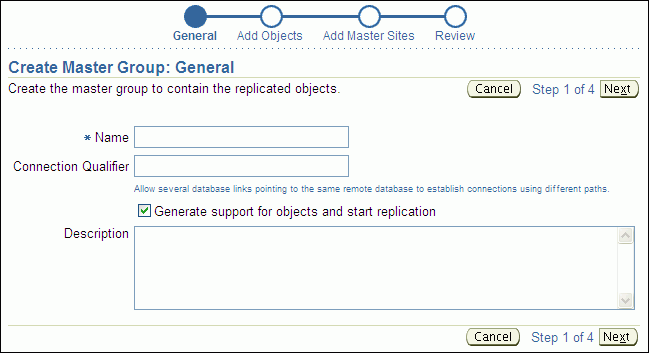
Complete the pages in the wizard to configure the master group.
Tip:
On the Add Objects page, add the tables that will be master tables for the materialized views.
On the Add Master Sites page, do not add any additional master sites.
When you finish the wizard, an Enterprise Manager job is scheduled to configure the master group.
Configure conflict resolution for each master table:
While still logged in as the replication administrator at the master site, go to the Database Home page of the database that contains the new master group.
Click Manage in the Advanced Replication section.
The Advanced Replication: Administration page appears, showing the Overview subpage.
Click the number associated with Master Groups in the Multimaster Replication section.
On the Master Groups page, if the master group status is NORMAL, then click Quiesce. If the status is QUIESCED, then move on to the next step.
On a command line, open SQL*Plus and connect to the master site as the replication administrator.
For example, if the replication administrator is repadmin and the master site is ii1.example.com, then enter the following:
sqlplus repadmin@ii1.example.com
Enter password: password
See Oracle Database 2 Day DBA for more information about starting SQL*Plus.
In SQL*Plus, run the MAKE_COLUMN_GROUP procedure in the DBMS_REPCAT package to create a column group for a replicated table.
For example, to create a column group for the hr.departments table, run the following procedure:
BEGIN
   DBMS_REPCAT.MAKE_COLUMN_GROUP(
      sname                => 'hr',
      oname                => 'departments',
      column_group         => 'dep_time_cg',
      list_of_column_names => 'department_id,
                               department_name,
                               manager_id,
                               location_id,
                               time');
END;
/
Include all of the table columns in the list_of_columns parameter.
See Oracle Database Advanced Replication Management API Reference for more information about the MAKE_COLUMN_GROUP procedure.
In SQL*Plus, run the ADD_UPDATE_RESOLUTION procedure in the DBMS_REPCAT package to specify LATEST TIME conflict resolution for the table.
For example, to specify LATEST TIME conflict resolution using the column group you created in Step g for the hr.departments table, run the following procedure:
BEGIN
   DBMS_REPCAT.ADD_UPDATE_RESOLUTION (
      sname                 => 'hr',
      oname                 => 'departments',
      column_group          => 'dep_time_cg',
      sequence_no           => 1,
      method                => 'LATEST TIMESTAMP',
      parameter_column_name => 'time');
END;
/
Specify the column group you created in Step g for the column_group parameter, and specify the time column for the parameter_column_name column.
See Oracle Database Advanced Replication Management API Reference for more information about the ADD_UPDATE_RESOLUTION procedure.
Repeat Steps g through h for each table in the master group.
In Enterprise Manager, log in to the master site as the replication administrator. By default, the user name of the replication administrator is repadmin.
Click Data Movement to open the Data Movement subpage.
Click Manage in the Advanced Replication section.
The Advanced Replication: Administration page appears, showing the Overview subpage.
Click the number associated with Master Groups in the Multimaster Replication section.
On the Master Groups page, select the master group.
Click Edit to open the General subpage of the Edit Master Group page.
Click Objects to open the Objects subpage.
Ensure that Generate Replication Support is selected for each object to which you added conflict resolution.
Click Master Groups at the top of the page to return to the Master groups page.
Click Resume for the master group.
Create the materialized view group.
In Enterprise Manager, log in to the materialized view site as the materialized view administrator. The materialized view site is the database in which you want to create materialized views. The default user name for the materialized view administrator is mvadmin.
Go to the Database Home page.
Click Data Movement to open the Data Movement subpage.
Click Setup in the Advanced Replication section.
On the Advanced Replication: Setup page, expand Updateable Materialized View Replication.
Select Create Materialized View Group.
Click Continue to open the Create Materialized View Group Wizard.
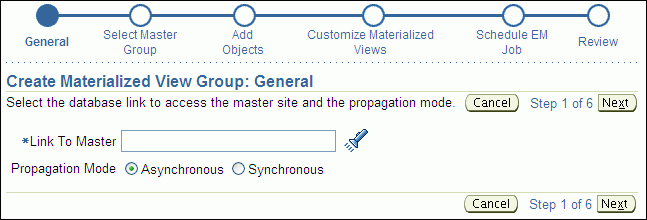
Complete the pages in the wizard to configure the materialized group.
Tip:
For each materialized view on the Customize Materialized Views page:Select Min. Communications for each table that uses conflict resolution at the master site. This option reduces the amount of data required to support conflict resolution mechanisms.
Select Updatable for each materialized view that you want to be updatable.
Select Fast Refresh for each materialized view on which you want to perform fast refreshes.
When you finish the wizard, an Enterprise Manager job is scheduled to configure the materialized view group.
Create a trigger to update the time column in each materialized view with the current time when a change occurs. The trigger is required for latest timestamp conflict resolution.
In Enterprise Manager, log in to the materialized view site as the materialized view administrator. The materialized view site is the database in which you want to create materialized views. The default user name for the materialized view administrator is mvadmin.
If you did not specify an existing refresh group during materialized view group configuration, then create a refresh group and add the materialized views to it so that they are consistent to a single point in time when they are refreshed. See "Configuring a Refresh Group".
See Also:
When two or more materialized views must be consistent to a point in time, the materialized views should belong to the same refresh group.
To create a refresh group and add materialized views to it:
In Enterprise Manager, log in to the materialized view site as the materialized view administrator. The default user name for the materialized view administrator is mvadmin.
Go to the Database Home page.
Click Data Movement to open the Data Movement subpage.
Click Manage in the Advanced Replication section.
The Advanced Replication: Administration page appears, showing the Overview subpage.
Click the number associated with Refresh Groups in the Materialized View Site section.
On the Refresh Groups page, click Create.
The Create Refresh Group page appears, showing the General subpage.
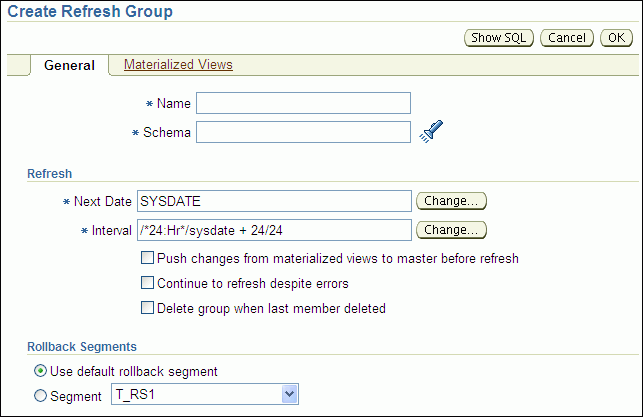
Complete the following actions:
Enter a name for the refresh group in the Name field.
Enter the owner of the refresh group in the Schema field. Typically, the materialized view administrator owns refresh groups.
If necessary, then adjust the Next Date and Interval settings. The Next Date setting determines when the next refresh of the refresh group will occur. The Interval setting determines how often the refresh group is refreshed automatically. You can click Change to open a new page that adjusts each setting.
If you have limited connectivity between the materialized view site and the master site, then you might want to refresh on demand. In this case, clear the Interval field.
Select Push changes from materialized views to master before refresh. This option specifies that, during refresh, the materialized view site pushes changes made to updatable materialized views to the master tables before refreshing the materialized views.
Click Materialized Views to open the Materialized Views subpage.

Click Add to open the Search and Select: Materialized View page.
Use the search tool to list the materialized views to add to the refresh group.
Select the materialized views to add to the refresh group.
Click OK to return to the Materialized Views subpage. The selected materialized views should be listed in the refresh group.
Click OK to create the refresh group.
Note:
You can also use the following procedures in theDBMS_REFRESH package to create a refresh group and add objects to it:
MAKE
ADD