| Oracle® Warehouse Builder Data Modeling, ETL, and Data Quality Guide 11g Release 2 (11.2) Part Number E10935-05 |
|
|
PDF · Mobi · ePub |
| Oracle® Warehouse Builder Data Modeling, ETL, and Data Quality Guide 11g Release 2 (11.2) Part Number E10935-05 |
|
|
PDF · Mobi · ePub |
The Mapping Editor provides a set of pre-built mapping operators. These operators enable you to define common transformations that specify how data moves from the source to the target.
This chapter provides details on how to use operators in a mapping to transform data. Some operators have wizards that assist you in designing the mapping. And some operators enable you to start the Expression Builder as an aide to writing SQL expressions.
This chapter contains the following topics:
For operators that require you to make numerous design decisions, wizards guide you in defining the operator. Each wizard begins with a welcome page that provides an overview of the steps you must perform. And each wizard concludes with a summary page listing your selections. Use Next and Back to navigate through the wizard. To close an operator wizard, click Finish on any of the wizard pages.
The following operators have wizards to assist you:
Match Merge operator, see "Using the Match Merge Operator to Eliminate Duplicate Source Records"
Name and Address operator, see "Using the Name and Address Operator to Cleanse and Correct Name and Address Data"
Once you become proficient with defining an operator, you may prefer to disable the wizard and use the operator editor instead. To start the operator editor, right-click the operator on the Mapping Editor and select Open Details. The operator editor displays the same content as the wizard except in a tab format rather than wizard pages.
Whether you are using an operator wizard or the operator editor, you must complete the following pages for each operator:
Use the General page to specify a name and optional description for the operator. By default, the wizard assigns the operator type as the name. For example, the default name for a new pivot operator is "Pivot".
Edit group information on the Groups tab.
Each group has a name, direction, and optional description. You can rename groups for most operators but cannot change group direction for any of the operators. A group can have one of these directions: Input, Output, I/O.
Depending on the operator, you can add and remove groups from the Groups tab. For example, you add input groups to Joiners and output groups to Splitters.
The operator editor displays a tab for each type of group displayed on the Groups tab. Each of these tabs displays the attribute name, data type, length, precision, scale and optional description.
Depending on the operator, you may be able to add, remove, and edit attributes. The Mapping Editor grays out properties that you cannot edit. For example, if the data type is NUMBER, you can edit the precision and scale but not the length.
Use the Input Connections page to copy and map attributes into the operator. The attributes you select become mapped members in the input group. The Available Attributes panel displays a list of all the operators in the mapping.
To complete the Input Connections page for an operator:
Select complete groups or individual attributes from the Available Attributes panel.
To search for a specific attribute or group by name, type the text in Search for and select Go. To find the next match, select Go again.
Hold the Shift key down to select multiple groups or attributes. To select attributes from different groups, then you must first combine the groups with a Joiner or Set operator.
Use the right arrow button between the two panels to move your selections to the Mapped Attributes panel.
You can use the left arrow to remove groups or attributes from the input connections list. Oracle Warehouse Builder removes the selection from the input group and removes the data flow connection between the source operator and the current operator.
Some of the data flow operators require that you create expressions. An expression is a statement or clause that transforms data or specifies a restriction. These expressions are portions of SQL that are used inline as part of a SQL statement. Each expression belongs to a type that is determined by the role of the data flow operator. You can create expressions using Expression Builder, or by typing them into the expression field located in the Property Inspector of the operator or operator attributes.
You can open the Expression Builder from the Property Inspector of the operator for operators such as filters, joiners, and aggregators. For operators such as expressions, data generators, splitters, and constants, you can open the Expression Builder from the Property Inspector of the operator attribute.
To open the Expression Builder:
On the Mapping Editor, select the operator or the attribute for which you want to open the Expression Builder.
The Property Inspector displays the properties of the selected operator or operator attribute.
In the Property Inspector, click the Ellipsis button in the property to set using the Expression Builder.
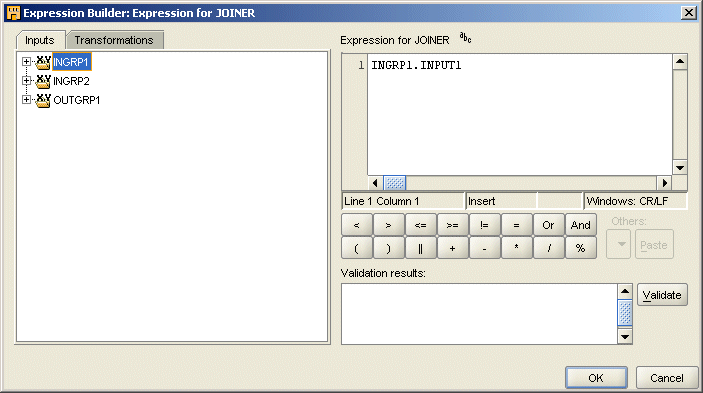
The Expression Builder displays as shown in Figure 26-1.
Create an expression by:
Typing text into the Expression field on the right of the Expression Builder.
Dragging items from the Inputs and Transformations tabs on the left panel and dropping them into the Expression field on the right.
Double clicking on items from the Inputs and Transformations tabs on the left panel.
Clicking arithmetic operator buttons available under the Expression field.
Click Validate.
This verifies the accuracy of the Expression syntax.
Click OK to save the expression and close the Expression Builder.
The Expression Builder contains the following parts:
In the left panel, the navigation tree displays two tabs:
Inputs Tab: A list of input parameters.
Transformations Tab: A list of predefined functions and procedures located in the public Oracle Predefined library, the public Oracle Custom library, and a private Oracle library.
Expression Field: At the top of the right panel is the Expression field. Use this field to type and edit expressions.
Arithmetic Operator Buttons: Below the Expression field are buttons for arithmetic operators. Use these buttons to build an expression without typing. The arithmetic operators available vary by the type of data flow operator that is active.
Others: A list of available SQL clauses that are appropriate for the active expression type.
Beginning in Oracle9i, the CASE function is recommended over the DECODE function because the CASE function generates both SQL and PL/SQL while DECODE is limited to SQL. If you use the DECODE function in an expression, then it is promoted to CASE where appropriate during code generation. It enables you to deploy the DECODE functionality in all operating modes (such as setbased or rowbased) and transparently across Oracle Database releases (8.1, 9.0 and higher).
For example, the function
DECODE (T1.A, 1, 'ABC', 2, 'DEF', 3, 'GHI', 'JKL')
is converted to the following:
CASE T1.A WHEN 1 THEN 'ABC'
WHEN 2 THEN 'DEF'
WHEN 3 THEN 'GHI'
ELSE 'JKL'
Validate Button: Use this button to validate the current expression in the Expression Builder. Validation ensures that all mapping objects referred to by the expression have associated workspace objects. The expressions you create with the Expression Builder are limited to the operator inputs and to any transformations available in a project. This limitation protects the expression from becoming invalid because of changes external to the operator. If the deployment database is different from the design workspace, then it may not accept the expression. If this happens, then the expression may be valid but incorrect against the database. In this case, expression errors can only be found at deployment time.
Validation Results Field: At the bottom of the right panel is the Validation Results field. After you select the Validate button to the right of this field, this field displays the validation results.
The Aggregator operator calculates data aggregations, such as summations and averages, on the input data. It provides an output row set that contains the aggregated data.
The Aggregator operator has one input group and one output group. For the output group, define a GROUP BY clause that specifies the attributes over which the aggregation is performed. You can optionally specify a HAVING clause that restricts the aggregated data. Each attribute in the output group has the same cardinality. The number of rows in the output row set is less than or equal to the number of input rows.
You can use a single Aggregator operator to perform multiple aggregations. Although you can specify a different aggregation function for each attribute in the output group of an Aggregator, each Aggregator supports only one GROUP BY and one HAVING clause.
Figure 26-2 shows a mapping that uses the Aggregator operator to aggregate the total sales over channels and products. Use the Expression property of the output attribute to specify that the aggregate function to be applied to the attribute TOTAL_SALES is SUM. Use the Group By property of the Aggregator operator to specify that the sales are aggregated over channel ID and product ID. The output of the Aggregator operator is mapped to the target table SALES_FACT.
Figure 26-2 Aggregator Operator in a Mapping
To define an Aggregator operator in a mapping:
Drag and drop an Aggregator operator onto the Mapping Editor canvas.
On the canvas, connect source attributes to the input group of the Aggregator operator.
Right-click the Aggregator operator and select Open Details.
Oracle Warehouse Builder displays the Aggregator Editor.
On the Output Attributes tab, create the output attributes that store the aggregated data.
To create an output attribute, click the empty cell under the Attribute column and enter the attribute name. The default data type assigned to the attribute is NUMBER. You can change the data type and other parameters related to the data type such as length, precision, and so on.
If the output attribute refers to an input attribute (from the Input group), the Group By Clause is automatically set.
In the example displayed in Figure 26-2, you add an output attribute and rename it to TOTAL_SALES.
Define an expression for each output attribute. You can directly enter the expression in the Expression column associated with the attribute. Or, click the Ellipsis button to the right of the Expression field to display the Expression Builder. For detailed instructions on using the Expression Builder, see "Aggregate Function Expression".
In the example displayed in Figure 26-2, you define the expression as SUM(amount_sold).
Click OK to close the Aggregator Editor.
Define a Group By clause and an optional Having clause for the operator. For detailed instructions, see "Group By Clause" and "Having Clause".
Map the attributes in the output group of the Aggregator operator to the input group of the target.
The Group By clause defines how to group the incoming row set to return a single summary row for each group. An ordered list of attributes in the input group specifies how this grouping is performed. The default GROUP BY clause is NONE.
To define the Group By Clause:
Select the Aggregator operator on the Mapping Editor canvas.
The Property Inspector displays the properties of the Aggregator operator.
Click the Ellipsis button to the right of the Group By Clause property.
The Expression Builder is displayed.
Move the attributes to use to group source data from the Inputs tab to the Group By Clause for Aggregator section. When you select multiple attribute, separate attributes using a comma.
Click OK.
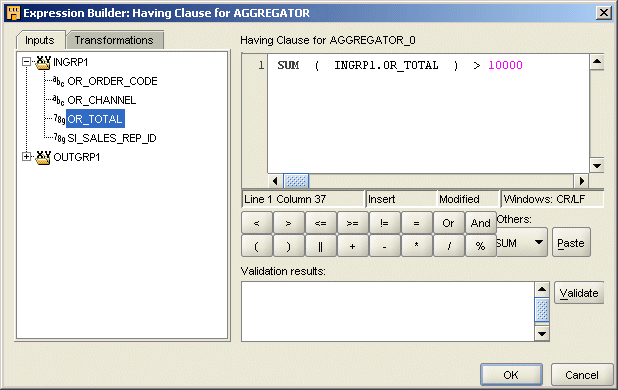
The Having clause is a boolean condition that restricts the groups of rows returned in the output group to those groups for which this condition is true. If this clause is not specified, then all summary rows for all groups are returned in the output group.
To define the Having Clause:
Select the Aggregator operator on the mapping canvas.
The Property Inspector displays the properties of the Aggregator operator.
Click the Ellipsis button to the right of the Having Clause property.
The Expression Builder dialog box for the Having Clause displays as shown in Figure 26-3.
Create an expression for the Having Clause of the Aggregator operator.
For example, Figure 26-3 shows a sample Having Clause expression.
Click OK to close the Expression Builder.
Map the attributes you edited from the output group of the Aggregator operator to the attributes in the target.
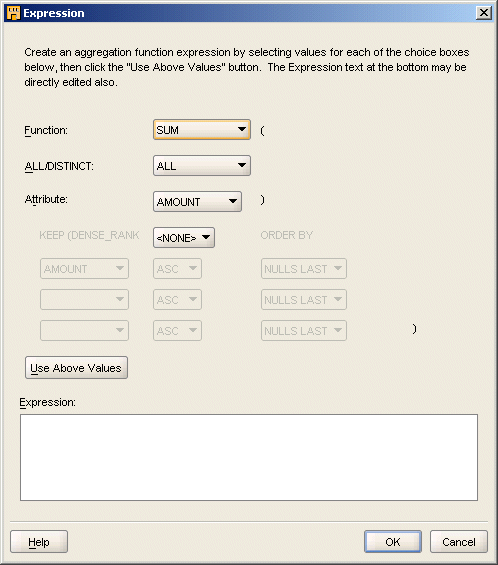
The Expression property of an attribute defines the aggregation functions to be performed on the attribute. For each ungrouped output attribute, select whether the aggregation expression should be a DISTINCT or ALL result. ALL is the default setting. For example,
A DISTINCT result removes all duplicate rows before the average is calculated.
An ALL result returns an average value on all rows.
If no aggregation function is necessary, specify NONE for the function. Specifying NONE on the attribute aggregation automatically adds the attribute to the resulting GROUP BY function.
To define expressions for output attributes:
In the Aggregator operator on the mapping canvas, select the output attribute for which you want to define an aggregate function.
The Property Inspector displays the properties of the selected output attribute.
Click the Ellipsis button to the right of the Expression property.
The Expression dialog box displays as shown in Figure 26-4.
Select an aggregate function from the Function list.
The aggregate functions you can select are as follows: AVG, COUNT, GROUP_ID, GROUPING, GROUPING_ID, MAX, MEDIAN, MIN, None, STDDEV, STDDEV_POP, STDDEV_SAMP, SUM, VAR_POP, VAR_SAMP, VARIANCE, and WB_RT_CONCAT.
In the example displayed in Figure 26-2, you select SUM as the aggregate function.
Select either ALL or DISTINCT as the aggregation expression.
Select the attribute that should be aggregated from the Attribute list.
In the example displayed in Figure 26-2, you select the attribute amount_sold from the list.
Click Use Above Values to display the aggregate expression in the Expression field.
Click OK.
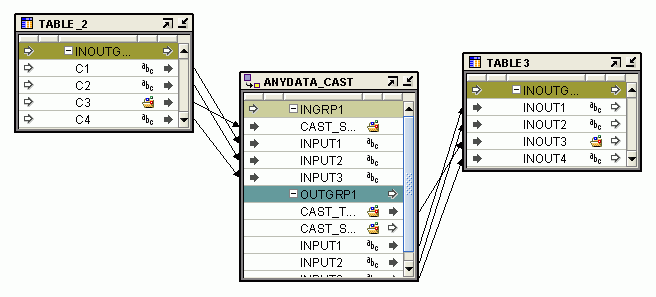
Anydata Cast operator enables you to convert an object of type Sys.AnyData to either a primary type or to a user-defined type. The Anydata Cast operator accepts an Anydata attribute as a source and transforms the object to the desired type.
The Anydata Cast operator is used with user-defined data types and primitive data types. This operator acts as a filter. The number of attributes in the output group is n+1 where n is the number of attributes in the input group. This operator has one input group and one output group. The input group is editable. The output group is not editable. In an output group, you can only rename the attributes and change the data type of only the cast target. You cannot change the data type of any other output group attribute.
You can connect attributes to the input group. Each output group gets a copy of the input group attributes, including the Anydata attributes. You must choose an Anydata attribute of the input group as the source of the Cast operation.
If you change the data type to which you are going to cast the Anydata attribute, then you must:
Edit the output group attribute that is the target of the Cast operation
Change the data type of the attribute.
Because the Anydata Cast operator is unbound, it does not support any synchronization operations.
Figure 26-5 displays a mapping that uses an Anydata Cast operator.
To define a Anydata Cast operator in a mapping:
Drop an Anydata Cast operator onto the Mapping Editor canvas.
The AnyData Cast dialog box is displayed. The tree inside the dialog box has one parent node that opens to display the primary data types (other than Anydata). Each of the other parent nodes corresponds to the modules.
Select the target type for casting and click Finish.
Right-click the ANYDATA CAST operator and select Open Details.
Oracle Warehouse Builder displays the ANYDATA_CAST Editor.
On the Input Attributes tab, click Add and specify the attribute name, data type, and other properties.
Click OK to close the operator editor.
Map the attributes of the output group of the Anydata Cast operator to the target.
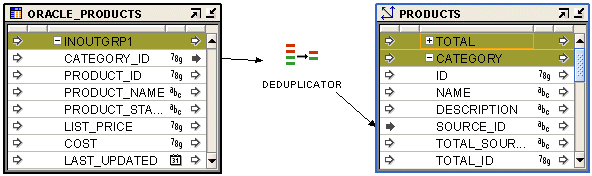
The Deduplicator operator enables you to remove duplicate data in a source by placing a DISTINCT clause in the select code represented by the mapping.
For example, when you load data from a source table into a dimension, the higher levels within a dimension may be duplicated in the source.
All attributes from a source rowset must pass through the Deduplicator operator. You cannot map part of the output from a source rowset and part of the output from the Deduplicator operator to the same target table.
Figure 26-6 displays a mapping that uses the Deduplicator operator to remove duplicate values in the source while loading data into the PRODUCTS dimension. The source table contains duplicate values for category ID because more than one products may belong to the same category. The Deduplicator operator removes these duplicates and loads distinct values of category ID into the PRODUCTS dimension.
To remove duplicates:
Drop the Deduplicator operator onto the Mapping Editor canvas.
Connect the attributes from the source operator to the I/O group of the Deduplicator operator.
Connect the attributes from the Deduplicator operator group to the attributes of the target operator.
Use the Expression operator to write SQL expressions that define nonprocedural algorithms for one output parameter of the operator.
The expression text can contain combinations of input parameter names, variable names, and library functions. Use the Expression operator to transform the column value data of rows within a row set using SQL-type expressions, while preserving the cardinality of the input row set. To create these expressions, open the Attribute properties window for the output attribute and then open the Expression Builder.
By default, the Expression operator contains one input group and one output group.
Figure 26-7 shows a mapping that uses the Expression operator. The transaction table ORACLE_ORDERS contains order details such as product ID, unit price, and quantity sold. The ORDERS_FACT table contains an aggregation of the total sales amount across channels, products, and orders. The Expression operator is used to compute the amount of sale for each product by multiplying the unit price by the quantity sold. The Aggregator operator aggregates the sale amounts over channel code, product ID, and order ID before loading the target table.
Figure 26-7 Expression Operator in a Mapping
Do not use the Expression operator to write aggregation functions. Use the Aggregator operator. See "Aggregator Operator" for more information about the Aggregator operator.
Also, do not use a line-end or double-dash comment (--) after an expression in an expression operator if the expression is connected to an aggregation operator, as this causes a deployment compile error. This is because an aggregation operator in this scenario adds parenthesis, and the commenting removes one of them, creating unbalanced parenthesis.
To define an Expression operator in a mapping:
Drag and drop an Expression operator onto the Mapping Editor canvas.
Right-click the Expression operator and select Open Details.
Oracle Warehouse Builder displays the Expression Editor.
On the Output Attributes tab, create an output attribute by clicking on a blank cell under the Attribute column. The default data type assigned is NUMERIC. You can modify the data type and other parameters associated with the data type.
Define the expression used for the output attribute.
Enter the expression directly in the Expression field of the output attribute. Or click the Ellipsis button to the right of the Expression field to display the Expression builder dialog box that enables you to specify the expression.
Click OK to close the Expression Editor.
Connect the Expression output attribute to the appropriate target attribute.
You can conditionally filter out rows using the Filter operator.
You connect a source operator to the Filter operator, apply a filter condition, and send a subset of rows to the next operator. The Filter operator filters data from a source to a target by placing a WHERE clause in SQL statement or a IF statement of the generated PL/SQL code. You specify the filter condition using the Expression Builder. The filter condition can be based on all supported data types and can contain constants.
A Filter operator has only one I/O group that can be connected to both a source and target row set. The resulting row set is a filtered subset of the source row set-based on a boolean filter condition expression. All rows that are required at the target must pass through the Filter operator. No row set can bypass the filter and be directly inserted in the target.
For a mapping that contains a Filter operator, code that displays the filter condition expression as a WHERE clause for set-based view mode is generated. The filter input names in the original filter condition are replaced by actual column names from the source table, qualified by the source table alias.
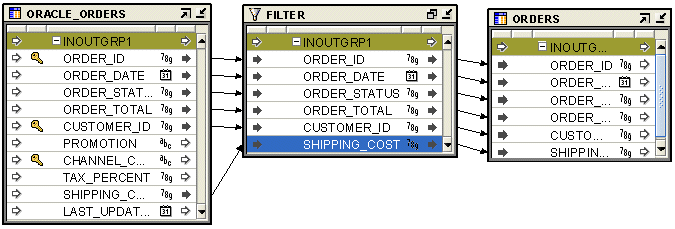
Figure 26-8 shows the mapping that uses the Filter operator to move selected data to the target table. The ORACLE_ORDERS table contains orders data. Use the Filter Condition property of the Filter operator to move only the booked orders which were last updated on the current system date into the ORDERS table.
To define a Filter operator in a mapping:
Drag and drop the Filter operator onto the Mapping Editor canvas.
Connect source attributes to the I/O group of the Filter operator.
Select the Filter operator header.
The Property Inspector displays the properties of the Filter operator.
Click the Ellipsis button to the right of the Filter Condition property.
Oracle Warehouse Builder displays the Expression Builder dialog box for the filter condition.
Define a filter condition expression using the Expression Builder.
Click OK to close the Expression Builder.
Connect the Filter operator outputs to the I/O group in the target.
The Mapping Editor enables you to recursively join a table, view, or other source data operators onto itself.
Also known as tree walking, recursively joining a table back onto itself enables you to retrieve records in a hierarchy. For example, consider a table that contains employee data including the manager for each employee. Using tree walking, you could determine the hierarchy of employees reporting up to a given manager.
To perform tree walking:
Create a mapping and add the desired source data operator such as a Table, View, or a Materialized View operator, which contains the hierarchal definition.
Connect that source data operator to a Filter operator.
In the Filter operator, define the filter condition with CONNECT BY as the first two words. Make sure that you include only the connect by logic in the Filter operator. That is, do not include any AND or OR logic in the filter.
The Joiner operator joins multiple row sets from different sources with different cardinalities, and produces a single output row set.
In general, a Joiner operator corresponds to a SQL JOIN clause. For more information about SQL joins, see Oracle Database SQL Language Reference.
The Joiner operator uses a boolean condition called the join condition that relates column values in each source row set to at least one other row set. The Joiner operator results in a WHERE clause in the generated SQL query. When run on Oracle9i or higher, ANSI full outer joins are supported.
You can use the Joiner operator to create inner joins, outer joins, equijoins, and non- equijoins. You can also create self joins by using a Filter operator as described in "Adding Self Joins in a Mapping".
For all Joiners, you must set a join condition, as described in "Join Conditions".
For Joiners that define outer joins, you must use one of two methods to specify the outer join type:
Insert Oracle SQL outer join operators (+) in the join condition, as described in "Join Conditions".
Set joiner input roles on the input groups, as described in "Join Input Roles and Inner and Outer Joins".
Note:
You cannot use both joiner input role settings and join conditions to specify outer joins.
Operators placed between data sources and a Joiner can generate complex SQL or PL/SQL.
Nested Joiners with no intervening operators that generate a subquery (for example, an aggregator) are generally consolidated into a single join in the generated code. You may notice this in reviewing generated code for a mapping that uses multiple nested join operators.
The Join Condition property of a Joiner determines the join condition in the generated code for the Joiner. By inserting the outer join operator (+), you can also use the join condition to create inner, left outer, right outer, or full outer joins.
The relational operator in a join condition is not restricted to equality. You can also use other operators such as, >, <, !=, >=, <= . Aggregation functions are not supported in join conditions.
If two tables in a join query do not have a join condition specified, the Cartesian product of the two tables is returned.
If the input row sets are related through foreign keys, that relationship can be used to form a default join condition.
Note:
Oracle Warehouse Builder can only create a default join condition for you if you have mapped your sources to the input groups of the Joiner operator before editing the join condition.You can use this default condition or you can modify it further. If the sources are not related through foreign keys, then you must define a join condition manually.
If the default foreign keys result in duplicate WHERE clauses, the Joiner operator removes the duplicate clauses when creating the default join condition. This can happen if the join condition references several foreign keys. For example, if table T1 has a foreign key FK1 pointing to unique key UK1 in table T2 and table T2 has a foreign key FK2 pointing to unique key UK2 in T1, the resulting join condition
T1.A = T2.A AND T1.B = T2.B
        /*All instances of FK1 -> UK1 are reduced to one WHERE clause*/
      AND T2.B = T1.B AND T2.C = T1.C
        /*All instances of FK2 -> UK2 are reduced to one WHERE clause */
is generated by the Joiner operator as
T2.A = T2.A AND T1.B = T2.B AND T2.C = T1.C
In a join condition using Oracle SQL, you can use the outer join operator (+) to create an outer join in the generated SQL.
Note:
Join input roles provide an alternative to use of outer join operators for controlling outer join behavior in a Joiner, and may be more maintainable than using outer join operators in a complex join expression with multiple input groups.See "Join Input Roles and Inner and Outer Joins" for details.
For example:
SELECT ...
FROM A, B
WHERE A.key = B.key (+);
This example creates a left outer join.
If your target is based on Oracle9i or later, the Joiner operator also supports full outer joins using the join condition. To specify a full outer join condition, you must place the outer join operator on both sides of a relational operator. For example:
T1.A (+) = T2.B (+)
The code generated for the above join expression is:
SELECT ...
FROM T1 FULL OUTER JOIN T2 ON (T1.A = T2.B);
Note:
Although Oracle Warehouse Builder enables a full outer join to be specified by using the "(+)" notation on both sides of the condition predicate, this construct is actually invalid Oracle SQL syntax. Therefore, during code generation, Oracle Warehouse Builder translates any such join condition into ANSI SQL syntax.When creating a full outer join from the join condition, note the following:
The ANSI join syntax is generated only if you specify a full outer join condition in the joiner. Otherwise, the following Oracle SQL join syntax is generated:
SELECT ...
FROM T1, T2
WHERE T1.A = T2.B;
You can specify both full outer join and join conditions in the same joiner. However, if both conditions are specified for the same sources, the more restrictive join type is used for generating code. For example, if you specify:
T1.A(+) = T2.A(+) and T1.B = T2.B
Oracle Warehouse Builder generates an inner join statement instead of a full outer join because T1.B = T2.B is more restrictive than the full outer join condition between T1 and T2.
You cannot specify a full outer join and partial outer join condition in the same joiner. If you specify a full outer join, then you cannot specify a partial outer join anywhere in the join condition. For example, T1.A (+) = T2.A (+) and T2.B = T3.B (+) is not valid.
To create a full outer join in Oracle8i, you must use multiple SQL statements.
The Expression Builder enables the following syntax for a full outer join:
TABLE1.COL1 (+) = TABLE2.COL2 (+)
The code generator translates the preceding expression into an ANSI SQL 1999 full outer join statement, similar to:
SELECT ...
FROM table1 FULL OUTER JOIN table2 ON (table1.col1 = table2.col2)
This syntax is not supported in Oracle8i. Specifying a full outer join to an Oracle8i database results in a validation error.
Oracle Warehouse Builder 10.2 uses the ANSI syntax to convert the full outer join whereas, Oracle Warehouse Builder 11.2 omits the condition clause and forms a cross join giving the following validation error message.
VLD - 1526: A predicate in the join condition of operator {0} has two columns from different tables with "(+)". This is only supported when using ANSI SQL syntax. When ANSI SQL Syntax configuration is set to false, a predicate may reference only one outer-joined table. Either change the join condition or set ANSI SQL Syntax to true.
When you create a join between more than two tables containing multiple conditions, you must clearly indicate which conditions should be grouped.
Follow these guidelines while defining joins that contain multiple conditions:
Use parentheses in the join condition to force clauses to be combined into one single condition.
For example, if the join condition is specified as:
A.ID = B.ID AND (B.ID (+) = C.ID (+) AND B.ID > 10)
Oracle Warehouse Builder generates the following code (in this example assume ANSI code generation is specified):
SELECT ...
FROM
    "A"  "A"
 JOIN   "B"  "B" ON ( ( "A"."ID" = "B"."ID" ) )
 FULL OUTER JOIN   "C"  "C" ON ( "B"."ID" = "C"."ID"  )  WHERE
  ( "B"."ID" > 10 )
The last clause, B.ID (+) > 10, is not included in any join condition but is treated as a WHERE clause.
If you use parentheses to group the clauses as follows:
A.ID = B.ID AND (B.ID (+) = C.ID (+) AND B.ID > 10)
Oracle Warehouse Builder generates the following code:
SELECT ...
FROM
    "A"  "A"
 JOIN   "B"  "B" ON ( ( "A"."ID" = "B"."ID" ) )
 FULL OUTER JOIN   "C"  "C" ON ( ( "B"."ID" = "C"."ID" and "B"."ID"  > 10 )/*
OPERATOR JOINER JOIN CONDITION */ )
The clause B.ID (+) > 10 is now included in the FULL OUTER JOIN condition.
You can use the outer join condition sign (+) to force Warehouse Builder to generate a condition within the join.
For example, in the join condition
A.ID = B.ID AND B.ID (+) = C.ID (+) AND B.ID (+) > 10
the presence of the outer join operator in the clause B.ID (+) > 10 forces Oracle Warehouse Builder to include the condition B.ID > 10 in the join, instead of generating a separate WHERE clause.
Note:
The use of the (+) operator to force grouping in this manner is a behavior specific to Oracle Warehouse Builder code generation and may not yield the same results as the same expression in standard Oracle SQL in some cases.The generated code is:
SELECT ...
FROM
    "A"  "A"
 JOIN  ( SELECT
/* B.INOUTGRP1 */
  "B"."ID" "ID",
  "B"."NAME" "NAME",
  "B"."ATTR" "ATTR"
FROM
  "B"  "B" ) "B" ON ( ( ( "A"."ID" = "B"."ID" ) ) AND ( ( "B"."ID" > 10 ) ) )
 FULL OUTER JOIN   "C"  "C" ON ( "B"."ID" = "C"."ID"  )
In this case, since parenthesis is not used, the single condition B.ID (+) > 10 is moved into the first ON clause.
Note:
When you configure ANSI SQL code generation for a mapping containing a Joiner operator, it is recommended that you inspect the generated code to verify that the conditions are grouped as intended. Sometimes, because of ambiguous conditions, the generated code may group conditions differently from what you expected.You can force grouping of join conditions using one of the following techniques:
You can use multiple nested Joiner operators in a mapping, with each operator having two input groups. This makes explicit the handling of join conditions and grouping.
Alternatively, you can set the ANSI SQL Syntax parameter to false. This generates the WHERE clause exactly as specified by the Join Condition property.
For code template mappings, if you do not follow either of the guidelines listed above, a validation warning is displayed and one of the following actions is performed:
If the condition listed last cannot be combined with the condition adjacent to it, the last condition is moved to the WHERE clause.
Consider the condition C.ENAME = A.ENAME AND A.DEPTNO = B.DEPTNO AND C.SAL (+) > 1000. The condition C.SAL (+) > 1000 can be paired with C.ENAME = A.ENAME. However, its placement is not consistent with such a pairing and so a validation warning is displayed.
If the condition listed last can be combined with the condition adjacent to it, a combined group condition is formed.
Consider the condition A.DEPTNO = B.DEPTNO AND C.ENAME = A.ENAME AND C.SAL (+) > 1000. The condition C.SAL (+) > 1000 can be paired with C.ENAME = A.ENAME. Thus it is included as part of the combined condition C.ENAME = A.ENAME AND C.SAL (+) > 1000.
By default, the order of input groups in a joiner is used as the join order.
When generating ANSI SQL syntax, you can force a different join order by using a specific order in the join condition. Consider the following example:
SELECT ...
      FROM T1 FULL OUTER JOIN T2 ON (T1.A=T2.A)
                         JOIN T3 ON (T2.A=T3.A);
If you create input groups in another order, such as T1, T3, T2. Oracle Warehouse Builder generates the following:
SELECT ...
      FROM T1 JOIN T3 ON (1=1)
              JOIN T2 ON (T1.A=T2.A and T2.A=T3.A);
When T1 and T3 are joined, there is no join condition specified. Oracle Warehouse Builder fills in a condition 1=1 (essentially a boolean true) and the two conditions you specified are used to join (T1 JOIN T3) with T2.
Now consider an example where the input groups are created in the order T1, T3, T2, but you want the generated FROM clause order to be T1, T2, T3 as in the first example. Then create the join condition so that the sources appear in the order that they should appear in the generated code, like this:
T1.A(+) = T2.A(+) AND T2.A = T3.A
The filter condition is applied after join. For example, consider the following join:
Input1.c --- +
Input2.c --- +---> Joiner
Input3.c --- +
with the following conditions:
Condition 1: Input1.c (+) = Input2.c (+)
Condition 2: Input2.c = Input3.c
Condition 3: Input1.c is not null
The first two conditions are true joins while the third is a filter condition. If ANSI code is to be generated, then the join condition is interpreted as
SELECT ...
FROM Input1 FULL OUTER JOIN Input2 ON (Input1.c = Input2.c)
JOIN Input3 ON (Input2.c = Input3.c)
WHERE Input1.c IS NOT NULL;
Join input roles on joiner input groups provide flexible control of the use of inner and outer joins on the input data flows.
Possible join input roles for an input group are: Standard (the default), Outer Join and Full Outer Join. Oracle Warehouse Builder can generate ANSI SQL or Oracle SQL for inner joins, left and right outer joins, and full outer joins based on these settings. Use the order of input groups and the input role settings on each input group to specify the type of join to create.
Note:
If using outer join operators in join expression to control outer joins, set the join input roles for all groups to Standard.When considering two adjacent input groups, the join relationship between them in the generated code is determined by the join role property setting of the two groups. Assume that input group INGRP1 is connected to source table T1 and input group INGRP2 is connected to source table T2. The join relationship is determined by the following rules (in order of precedence):
Table 26-1 Join Input Roles and Resulting Join Types
| Input Roles | Resulting Join Operation |
|---|---|
|
Both roles set to Standard (default) |
Inner join T1 JOIN T2 |
|
Either role set to Full Outer |
Full outer join T1 FULL OUTER JOIN T2 |
|
INGRP1 role set to Standard INGRP2 role set to Outer |
Left outer join T1 LEFT OUTER JOIN T2 |
|
INGRP1 role set to Outer INGRP2 role set to Standard |
Right outer join T1 RIGHT OUTER JOIN T2 |
|
Both roles set to Outer |
See "Outer Join Input Roles with More than Two Input Groups" |
When there are more than two input groups, Oracle Warehouse Builder iterates over the input groups, and generates a series of joins linking the input tables.
If one or the other input group has the input role Standard or Full Outer Join, then the join generated is determined using the rules described in Table 26-1, "Join Input Roles and Resulting Join Types".
However, if two consecutive input groups both have the input role Outer Join, then the join generated may be a left outer join or a right outer join, depending upon the previous join generated. The rules for determining the join type to generated are in Table 26-2, "Join Generated for Consecutive Outer Join Input Roles". In this table, assume that INGRP1, INGRP2 and INGRP3 are associated with tables T1, T2 and T3 respectively.
Table 26-2 Join Generated for Consecutive Outer Join Input Roles
| Input Roles | Resulting Join Operation |
|---|---|
|
The two input groups are the first two input groups INGRP1 = Outer INGRP2 = Outer |
Right outer join T1 RIGHT OUTER JOIN T2 |
|
The preceding join generated was a Left Outer Join INGRP1 = Standard INGRP2 = Outer INGRP3 = Outer |
Left outer join T1 LEFT OUTER JOIN T2 LEFT OUTER JOIN T3 |
|
The preceding join generated was not a Left Outer Join INGRP1 = Outer INGRP2 = Outer INGRP3 = Outer |
Right outer join T1 RIGHT OUTER JOIN T2 RIGHT OUTER JOIN T3 |
To add a Joiner operator to a mapping:
Drag and drop the Joiner operator onto the Mapping Editor canvas.
You must join more than two sources, right-click the Joiner operator and select Open Details.
Oracle Warehouse Builder displays the Joiner Editor.
On the Groups tab, create more input groups as needed.
To create an input group, click the empty cell under the Group column and enter the new group name. The default direction assigned to the new group is Input.
Click OK after adding your input groups.
For each input group, connect an output group from a source to the desired Joiner input group.
Output attributes are created with data types matching the corresponding input data types.
If necessary, change the Input Role for each source.
Select the Joiner operator header.
The Property Inspector displays the properties of the Joiner operator.
Click the Ellipsis button to the right of the Join Condition property.
The Expression Builder dialog box is displayed.
Define the join condition.
See "Join Conditions".
Click OK to close the Expression Builder.
Map the attributes of the output group of the Joiner operator to the target.
Example: Using the Joiner Operator
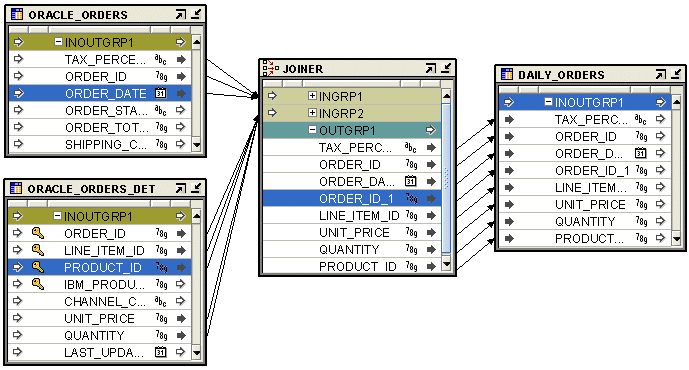
Figure 26-9 shows a mapping that contains a Joiner operator. The two source tables ORACLE_ORDERS and ORACLE_ORDER_LINES are joined to combine the data from these tables into one table. The output of the Joiner operator is passed to the target table DAILY_ORDERS.
Use the LCR Cast operator to expand an LCR (Logical Change Record) object into its constituent columns. It enables you to update the target object with insert, update, or delete operations contained in the LCR. Typically, the LCR Cast operator is used just after a Queue operator in a real-time mapping that publishes source changes to target objects.
The LCR Cast operator must be bound to the table for which it stores change records. It contains one input group and one output group, both of which are non-editable. You cannot add groups to this operator, but you can rename the existing input or output group. The input group contains an attribute Event, of type SYS.LCR$_ROW_RECORD, that stores the LCRs. You must connect a SYS.ANYDATA attribute to the input group. The output group contains the columns of the tables to which the LCR Cast operator is bound.
To add an LCR Cast operator to a mapping:
Drag and drop a LCR Cast operator onto the Mapping Editor canvas.
Oracle Warehouse Builder displays the Add LCR Cast dialog box.
Select the table to which the LCR Cast operator must be bound.
Connect the output attribute of a source operator to the input group of the LCR Cast operator.
Connect the attributes of the output group in the LCR Cast operator to the target table to which you want to publish the changes contained in the LCR.
Figure 26-10 describes an example of using the LCR Cast operator in a mapping. The Queue operator ADVANCED_QUEUE represents the advanced queue that stores the change records for the source table. The LCR Cast operator is bound to the target table into which the changed records from the source should be transferred.
The AQ contains a payload that is represented by the PAYLOAD attribute. The payload stores change data in the form of LCRs. Map the PAYLOAD attribute the LCR Cast operator to expand the LCR into the columns contained in the target table that is bound to the LCR Cast operator. You then map the output attributes of the LCR Cast operator to the target table ORDERS.
Figure 26-10 Mapping that Uses an LCR Cast Operator
Use the LCR Splitter operator to direct changes to different tables along data flow paths.
The LCR Splitter contains one input group and one output group. Both groups contain one attribute called Event of type SYS.LCR$_ROW_RECORD. The input group represents the represents the LCR object. You cannot add input or output groups.
Use the Lookup operator to lookup data from a table, view, cube, or dimension. For example, use the Lookup operator when you define a mapping that loads a cube or when you define surrogate keys on the dimension.
You can use the same Lookup operator to lookup data from multiple objects.
See Also:
Oracle Warehouse Builder Concepts for information about surrogate identifiers.The key that you look up can be any unique value. It need not be a primary or unique key, as defined in an RDBMS. The Lookup operator reads data from a lookup table using the key input you supply and returns exactly one matching row. This operator returns a row for each input key. You can have multiple Lookup operators in the same mapping.
The output of the Lookup operator corresponds to the columns in the lookup object. In case multiple records are returned by the lookup operation, you can specify which of these records is selected.
The Lookup Wizard contains one input group and one output group. You can create additional input and output groups. The attributes in each input group must be connected from the same data source. Each output group is bound to one lookup object. Each lookup uses attributes from only one input group as search values. That is, each output group is associated with only one input group. The tooltip for each output group displays the input group associated with it and the lookup condition used.
Since an output group is bound to an object, its attributes are the columns in the object. You can create additional output attributes, that are derived from the object columns, by using the Expression property of the output attribute.
Each output attribute for the lookup has a property called DEFAULT VALUE. The DEFAULT VALUE property is used instead of NULL in the outgoing row set if no value is found in the lookup table for an input value. The generated code uses the NVL function. The Lookup always results in an outer-join statement.
The table, view, or dimension from which the data is being looked up is bound to the Lookup operator. You can synchronize a Lookup operator with the workspace object to which it is bound. But you cannot synchronize the workspace object with the Lookup operator. For more information about synchronizing operators, see "Synchronizing Operators and Workspace Objects".
Points to Keep In Mind while Using the Lookup Operator
The Lookup operator returns only one row. When the result of the lookup returns multiple rows, you must specify which of the rows must be used as the return value. You can select either the first row or the last row from the returned rows.
Since you are selecting the first or last row, the order in which the lookup results are returned is important. Since SQL queries do not guarantee repeatable order, you must specify the appropriate ORDER BY clause to sort lookup results. To eliminate non-determinism, ensure that you specify a detailed ordering clause that ensures that the desired record is picked as the lookup result.
Figure 26-11 shows a mapping that is used to load a cube. Data from four source tables is joined using a Joiner operator. But the data in the source tables only contains a channel name. To load the cube, we need the value of the surrogate identifier. A Lookup operator is used to lookup the surrogate identifier of the CHANNELS dimension and then load this value into the cube.
Figure 26-11 Lookup Operator in a Mapping
You have the following options for using a Lookup operator:
Define a new Lookup operator: Drag a Lookup operator from the Palette onto the mapping. The Mapping Editor displays a wizard.
Edit an existing Lookup operator: Right-click the Lookup operator and select Open Details.
Whether you are using the operator wizard or the operator editor, complete the following pages:
Use the Name page or Name tab to specify a name and optional description for the Lookup operator.
Use the Groups page to specify one input and one output group.
In a Lookup operator, the input group represents the data from the source that is contained across multiple attributes. The output group represents that data transformed into rows.
You can rename and add descriptions to the default input and output groups. You can also create additional input and output groups that you require. To create an input or output group, specify a name for the group, select the direction (Input or Output), and provide an optional description.
Every output group is associated with a lookup table. Use the Lookup Tables page or the Lookup Tables tab to select the lookup table that must be associated with each output group.
The Group field displays all the output groups defined for the Lookup operator. Select an output group and specify the lookup table to which the output group is bound. To select the lookup table, click the list in the section below the Group field. The objects from which you can perform a lookup are listed in the tree displayed. Select the lookup object.
Repeat this step for all the output groups in the Lookup operator.
Use the Input Attributes page to define the input attributes of each input group.
The Group field lists all the input groups defined for the Lookup operator. Select an input group, and create the attributes for that group. Each input attribute contains a field called Default Value. Use this field to specify a default value for the input attribute.
Use the Output Attributes field to create output attributes in each output group. Since each output group is bound to a lookup object, the columns from the bound lookup object are automatically listed as output attributes for the group. Create any additional output attributes that are required. These could be values that are derived from the existing attributes using expressions.
The Groups list lists the output groups defined for the Lookup operator. Select an output group to display the attributes in this group. To create an output attribute, click a blank cell in the Name field and enter the attribute name. Then specify the additional parameters of the attribute such as data type, default values, description, and so on.
Output attributes have an additional parameter called Expression. Use this column to specify the expression used to determine the value of the output attribute. You can enter the expression directly in the Expression column. Or, click the Ellipsis button to the right of the Expression column to display the Expression Builder interface. Use this interface to define the expression.
Use the Lookup page to provide details about the object on which the lookup is being performed. This object is referred to as the lookup result. You can perform a lookup on any table, view, or dimension that belongs to the current project.
On the Lookup page, also associate each output group with its corresponding input group. Each output group must be bound to one input group. This input group provides the values that are searched for in the lookup table represented by the output group.
The Output field lists the output groups and the Input field lists the input groups of the Lookup operator. Select and output group and from the Input list, select the input group to which it is bound. Repeat this process for all output groups.
Once the output groups are bound to the corresponding input groups, you must map the output attributes and the input attributes that must be compared to perform the lookup. Select the output group in the Output field and use the area at the bottom of this page to specify the lookup condition. The contents displayed in this area depend on whether you choose Simple Editing or Freestyle Editing.
If you selected Simple Editing, a table with two columns is displayed. Use the Lookup Table Column to select the column from the lookup table with which the attribute selected in the Input Attribute column is compared.
If you select Freestyle Editing, an interface similar to the Expression Builder is displayed. Use this to define the condition that is used as the lookup condition. You can use an equality or a non-equality condition as the lookup condition.
If you select a dimension level for the lookup, the options displayed are the surrogate and business identifier of the dimension level and the primary key of the database table that stores the dimension data.
Use the Multiple Match Rows page to define which row from the lookup result should be selected as the lookup result if the lookup returns multiple rows. Multiple rows are returned if the lookup condition specified matched multiple record.
For each output group, you must define the action to be taken if multiple rows are returned by the lookup operation.
Select an output group in the Output Group field and then specify values for this group as described in the following sections.
Selecting the Action to Perform When Multiple Rows are Returned
Select one of the following options:
Error: multiple rows cause mapping to fail
Select this option to indicate that when the mapping that contains this Lookup operator is run, if the lookup operation for the selected output group returns multiple row, the mapping execution fails.
All Rows (number of result rows may differ from the number of input rows)
Select this option to indicate that when the Lookup operator returns multiple rows for the selected output group, all the rows should be returned as the lookup result.
Select single row
Select this option to specify that when the Lookup operator returns multiple rows for the selected output group, only one row from the returned rows must be selected as the lookup result. When you select this option, the fields contained in the section below this option are enabled. Use these fields to specify which row from the lookup result set should be selected as the lookup result.
Specifying the Row to Select as the Lookup Result
You must select the one row that should be selected from the multiple rows produced by the lookup operation only if you selected the Select single row option in the previous section.
For each output group, specify the following information about the row that must be selected from the multiple rows returned from the lookup operation.
Row Position: Select one of the following options:
Any row
Any one row among the result set returned by the Lookup operator is selected as the lookup result.
First row
The first row from the result set returned by the Lookup operator is selected as the lookup result.
Last row
The first row from the result set returned by the Lookup operator is selected as the lookup result.
Nth row
The nth row from the result set returned by the Lookup operator is selected as the lookup result. Click the list on the Nth Row field to specify the values of n.
Order Result Set By
Use this section to specify how the rows in the result set (containing multiple rows) should be ordered. Ordering columns is important when you select the first, last, or nth row from the result set as the lookup result. Ensure that you specify ordering conditions such that the row you want returned is selected.
The Available section lists the lookup table columns for the output group selected in the Output Group field. Select the columns to use to order rows in the lookup result set and use the arrow to move them to the Selected section. In the Selected section, ensure that the columns are listed in the same order (from top to bottom) in which you want the result set to be ordered. For example, to implement an ordering such as ORDER BY attr2, attr3, and then attr1, the attributes should be listed in the same order in the Selected section. You can use the arrows to the right of the Selected section to change the position of selected columns.
Use the No-match Rows page to indicate the action to be taken when there are no rows that satisfy the lookup condition specified on the Lookup page. You must specify an action for all the output groups.
Select an output group in the Output Group field and then choose one of the following options:
Return no row
This option does not return any row when no row in the lookup result satisfies the matching condition.
Return a row with the following default values
This option returns a row that contains default values when the lookup condition is not satisfied by the lookup result. Use the table below this option to specify the default values for each lookup column.
Use this page only if you selected a Type 2 SCD as the lookup result on the Lookup page. When the lookup result is a Type 2 SCD, you must specify which version of a particular record is to be used as a lookup.
For each output group that you bound to a Type 2 SCD, select the group in the Output Group field and then choose one of the following options:
Use the most current record
This option returns the current record that corresponds to the attribute being looked up using the lookup condition. The current record is the one with the latest timestamp.
Specify the historic date as a constant value
This option returns the record that contains the constant value that is specified using the Date and Time lists.
Choose an input attribute that holds the historic value
This option enables you return records that pertain to a date and time that is contained in one of the input attributes. Use the Input Attribute list to select the attribute that contains the historic value.
The Pivot operator enables you to transform a single row of attributes into multiple rows.
Use this operator in a mapping when you want to transform data that is contained across attributes instead of rows. This situation can arise when you extract data from non-relational data sources such as data in a crosstab format.
The external table SALES_DAT contains data from a flat file. There is a row for each sales representative and separate columns for each month.
See Also:
Oracle Warehouse Builder Sources and Targets Guide for more information about external tables.Figure 26-12 displays the flat file SALES_DAT.
Table 26-3 shows a sample of the data after a pivot operation is performed. The data that was formerly contained across multiple columns (M1, M2, M3...) is now contained in a single attribute (Monthly_Sales). A single ID row in SALES_DAT corresponds to 12 rows in pivoted data.
| REP | MONTH | MONTHLY_SALES | REGION |
|---|---|---|---|
|
0675 |
Jan |
10.5 |
4 |
|
0675 |
Feb |
11.4 |
4 |
|
0675 |
Mar |
9.5 |
4 |
|
0675 |
Apr |
8.7 |
4 |
|
0675 |
May |
7.4 |
4 |
|
0675 |
Jun |
7.5 |
4 |
|
0675 |
Jul |
7.8 |
4 |
|
0675 |
Aug |
9.7 |
4 |
|
0675 |
Sep |
NULL |
4 |
|
0675 |
Oct |
NULL |
4 |
|
0675 |
Nov |
NULL |
4 |
|
0675 |
Dec |
NULL |
4 |
To perform the pivot transformation in this example, create a mapping like the one shown in Figure 26-13.
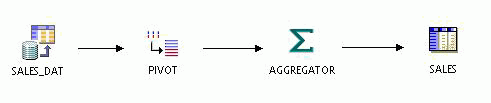
In this mapping that performs the pivot transformation, the data is read from the external table once, pivoted, aggregated, and written it to a target in set-based mode. It is not necessary to load the data to a target directly after pivoting it. You can use the Pivot operator in a series of operators before and after directing data into the target operator. You can place operators such as filter, joiner, and set operation before the Pivot operator. Since pivoted data is not a row-by-row operation, you can also run the mapping in set-based mode.
In the Pivot operator, the row locator is an output attribute that you create to correspond to the repeated set of data from the source. When you use the Pivot operator, a single input attribute is transformed into multiple rows and generates values for a row locator. In this example, since the source contains attributes for each month, you can create an output attribute named 'MONTH' and designate it as the row locator. Each row from SALES_DAT then yields 12 rows of pivoted data in the output.
Table 26-4 shows the data from the first row from SALES_DAT after the data is pivoted with 'MONTH' as the row indicator.
You have the following options for using a Pivot operator:
Define a new Pivot operator: Use the Pivot Wizard to add a new Pivot operator to a mapping. Drag a Pivot operator from the Palette onto the mapping. The Mapping Editor displays the Pivot Wizard.
Edit an existing Pivot operator: Use the Pivot Editor to edit a Pivot operator you previously created. Right-click the Pivot operator and select Open Details. The Mapping Editor opens the Pivot Editor.
Whether you are using the Pivot Wizard or the Pivot Editor, complete the following pages:
Use the General page to specify a name and optional description for the Pivot operator. By default, the wizard names the operator "Pivot".
Use the Groups page to specify one input and one output group.
In a Pivot operator, the input group represents the data from the source that is contained across multiple attributes. The output group represents that data transformed into rows.
You can rename and add descriptions to the input and output groups. Since each Pivot operator must have exactly one input and one output group, the wizard prevents you from adding or removing groups or changing group direction.
Use the Input Connections page to copy and map attributes into the Pivot operator. The attributes you select become mapped to the pivot input group. The left side of the page displays a list of all the operators in the mapping.
Figure 26-14 shows a group from the external table SALES_DAT selected as input for the Pivot operator.
Figure 26-14 Pivot Operator Input Connections Tab

To complete the Input Connections page for a Pivot operator:
Select complete groups or individual attributes from the left panel.
To search for a specific attribute or group by name, type the text in Search for and select Go. To find the next match, select Go again.
Press the Shift key to select multiple attributes. To select attributes from different groups, then you must first combine the groups with a Joiner or Set operator.
Use the right arrow button in the middle of the page to move your selections to the right side of the wizard page.
Use the left arrow to remove groups or attributes from the input connections list. Oracle Warehouse Builder removes the selection from the input group and removes the data flow connection between the source operator and the Pivot operator.
Figure 26-15 shows a group from SALES_DAT copied and mapped into the PIVOTSALES operator.
Figure 26-15 Attributes Copied and Mapped into Pivot In Group

Use the Input Attributes page to modify the attributes you selected in the Input Connections tab or wizard page.
You can perform the following tasks from the Input Attributes page:
Add attributes: Enter the attribute name and other attribute details in an empty row on this page.
Change attribute properties: You can change the attribute name, data type, length, precision, and scale.
Add an optional description: Type a description for the input attributes.
Designate attribute keys: As an option, use the Key check box to indicate an attribute that uniquely identifies the input group.
Use the Output Attributes page to create the output attributes for the Pivot operator. If you designated any input attributes as keys on the Input Attributes tab or wizard page, then those input attributes are displayed as output attributes that you cannot edit or delete.
Figure 26-16 displays the output attributes with MONTH selected as the row locator.
You can perform the following tasks from the pivot Output Attributes Page:
Change attribute properties: Except for attributes you designated as keys on the previous tab or wizard page, you can change the attribute name, data type, length, precision, and scale.
Add an optional description: Type a description for the output attributes.
Designate a row locator: Although you are not required to designate a row locator for the Pivot operator, it is recommended. When you identify the row locator on the Output Attributes page or tab, it is easier for you to match your output data to the input data.
In the Pivot operator, the row locator is an output attribute that corresponds to the repeated set of data from the source. For example, if the source data contains separate attributes for each month, create an output attribute 'MONTH' and designate it as the row locator.
Use the Pivot Transform page to write expressions for each output attribute.
By default, two rows are displayed. Use Add to specify how many rows of output you want from a single row in the source. For example, if your source contains an attribute for each quarter in a year, you can specify 4 rows of output for each row in the source. If the source data contains an attribute for each month in the year, then you can specify 12 rows of output for each row in the source.
Figure 26-17 shows the Pivot Transform tab with the pivot expressions defined for a source with an attribute for each month.
Write pivot expressions based on the following types of output:
Row locator: Specify a name for each row where the name is a value you want to load into the table. For example, if the row locator is 'MONTH', type 'Jan' for the first row.
Pivoted output data: Select the appropriate expression from the list box. For example, for the row you define as 'Jan', select the expression that returns the set of values for January.
Attributes previously specified as keys: Defines the expression for you.
Unnecessary data: If the Pivot Transform page contains data that you do not want as output, use the expression 'NULL'. Oracle Warehouse Builder outputs a repeated set of rows with no data for attributes you define as 'NULL'.
When using the wizard to create a Pivot operator, click Finish when you want to close the wizard. The Mapping Editor displays the operator you defined.
When using the Pivot Editor to edit an existing Pivot operator, click OK when you have finished editing the operator. The Mapping Editor updates the operator with the changes you made.
Use a Post-Mapping Process operator to define a procedure to be run after running a PL/SQL mapping. For example, you can use a Post-Mapping Process operator to reenable and build indexes after a mapping completes successfully and loads data into the target.
The Post-Mapping Process operator calls a function or procedure after the mapping is run. The output parameter group provides the connection point for the returned value (if implemented through a function) and the output parameters of the function or procedure. There are no restrictions on the connections of these output attributes
The Post-Mapping Process operator contains groups corresponding to the number and direction of the parameters associated with the selected PL/SQL procedure or function. This list of groups and attributes can only be modified through synchronization with workspace objects.
You can map constants, data generators, mapping input parameters, and output from a Pre-Mapping Process into a Post-Mapping Process operator. The Post-Mapping Process operator is not valid for an SQL*Loader mapping.
After you add a Post-Mapping Process operator to the Mapping Editor, use the operator properties dialog box to specify run conditions in which to run the process.
To use a Post-Mapping Process operator in a mapping:
Drag and drop a Post-Mapping Process operator onto the Mapping Editor canvas.
Oracle Warehouse Builder displays the Add Post-Mapping Process dialog box.
Use the Add Post-Mapping Process dialog box to select or create a transformation. For more information about how to use the Add Post-Mapping Process dialog box, see "Using the Add Operator Dialog Box to Add Operators".
Connect the output attribute of a source operator to the I/O group of the Post-Mapping Process operator.
Set the run conditions for the operator.
To set run conditions for a Post-Mapping Process operator:
From the mapping canvas, select a Post-Mapping Process operator.
The Property Inspector displays the properties of the Post-Mapping Process operator.
Click Post-Mapping Process Run Condition and select one of the following run conditions:
Always: The process runs regardless of errors from the mapping.
On Success: The process runs only if the mapping completes without errors.
On Error: The process runs only if the mapping completes with errors exceeding the number of enabled errors set for the mapping.
On Warning: The process runs only if the mapping completes with errors that are less than the number of enabled errors set for the mapping.
If you select On Error or On Warning and the mapping runs in row-based mode, you must verify the Maximum Number of Errors set for the mapping. To view the number of enabled errors, right-click the mapping in the Projects Navigator, select Configure, and expand Runtime Parameters.
Use a Pre-Mapping Process operator to define a procedure to be run before running a mapping.
For example, you can use a Pre-Mapping Process operator to truncate tables in a staging area before running a mapping that loads tables to that staging area. You can also use a Pre-Mapping Process operator to disable indexes before running a mapping that loads data to a target. You can then use a Post-Mapping Process operator to reenable and build the indexes after running the mapping that loads data to the target.
The Pre-Mapping Process operator calls a function or procedure whose metadata is defined before executing a mapping. The output attribute group provides the return value (if implemented as a function) and the output parameters of the function or procedure. You can connect these attributes to any other operators downstream, and they do not have the connection restrictions that apply to the Post-Mapping Process operator.
When you drop a Pre-Mapping Process operator onto the Mapping Editor canvas, a dialog box opens displaying the available libraries, categories, functions, and procedures. After you select a function or procedure from the tree, the operator displays the attributes that correspond to the selected function or procedure.
The Pre-Mapping Process operator contains groups corresponding to the number and direction of the parameters associated with the selected PL/SQL procedure or function.
After you add a Pre-Mapping Process operator to the Mapping Editor, use the Property Inspector to specify the Run condition of the mapping.
To use a Pre-Mapping Process operator in a mapping:
Drag and drop a Pre-Mapping Process operator onto the Mapping Editor canvas.
The Add Pre-Mapping Process dialog box is displayed.
Use the Add Pre-Mapping Process dialog box to select or create a transformation. For more information about how to use this dialog box, see "Using the Add Operator Dialog Box to Add Operators".
Connect the output attribute of the Pre-Mapping Process operator to the input group of a target operator.
Set the run conditions for the operator.
To set run conditions for a mapping with a Pre-Mapping Process operator:
In the mapping canvas, select the Pre-Mapping Process operator.
The Property Inspector displays the properties of the Pre-Mapping Process operator.
Click Mapping Run Condition and select one of the following run conditions:
Always: Runs the mapping after the process completes, regardless of the errors.
On Success: Runs the mapping only if the process completes without errors.
On Error: Runs the mapping only if the process completes with errors.
Set operations combine the results of two component queries into a single result.
While a Joiner operator combines separate rows into one row, Set Operation operators combine all data rows into one output rowset using one of the various set operation conditions. In Set Operation operators, although the data is added to one output, the column lists are not mixed to form one combined column list.
The Set Operation operator enables you to use following set operations in a mapping:
By default, the Set Operation operator contains two input groups and one output group. You can add input groups by using the operator editor. The number of attributes in the output group matches the number of attributes in the input group containing the most number of attributes.
To use the Set Operation operator, all sets must have the same number of attributes and the data types of corresponding attributes must match. Corresponding attributes are determined by the order of the attributes within an input group. For example, attribute 1 in input group 1 corresponds to attribute 1 in input group 2.
You must apply the set operation in top-down order. The order of the input groups determines the execution order of the set operation. This order only affects the minus operation. For example, A minus B is different from B minus A. The order of the attributes within the first input group determines the structure of a set. For example, {empno, ename} is different from {ename, empno}.
To use the Set Operation operator in a mapping:
Drag and drop a Set Operation operator onto the Mapping Editor canvas.
Connect source attributes to the Set Operation operator groups.
Select the Set Operation operator header.
The Property Inspector displays the properties of the Set Operation operator.
Click the list on the Set Operation property and select an operation from the list.
Connect the Set Operation output group to a target input group.
The Set Operation operator in the Mapping Editor assists you in matching attributes between two data streams. To match attributes from two data streams in a mapping, define the data streams as input groups into the Set Operation operator. On the Input Attributes tab, click Synchronize from <Input Group Name>. The synchronize operation rearranges and adds attributes to the target group such that the target group most closely matches the source group. The synchronize operation uses the following rules to find or create a match in the target:
Looks for an existing attribute in the target that matches name and data type.
Looks for an existing attribute in the target whose description matches the source name, and the data type matches source data type.
If (1) and (2) fail, then a new attribute is created with the source name and data type, and is inserted in the correct matching position. Any unmatched target group attributes are indicated by UNMATCHED in the attribute description.
To force a target attribute to match a specified source attribute, type the source group attribute as the target attribute description.
You can produce a sorted row set using the Sorter operator.
The Sorter operator enables you to specify which input attributes are sorted and whether the sorting is performed in ascending or descending order. Oracle Warehouse Builder sorts data by placing an ORDER BY clause in the code generated by the mapping.
The Sorter operator has one I/O group. You can use the Sorter operator to sort data from any relational database source. You can place any operator after the Sorter operator.
The Sorter operator contains the Order By clause. This clause is an ordered list of attributes in the I/O group to specify that sorting is performed in the same order as the ordered attribute list. You can set ascending or descending sorting for each attribute.
Most data in warehouses is loaded in batches. There can be some problems with the loading routines. For example, a batch of orders might contain a single order number multiple times with each order line representing a different state of the order. The order might have gone from status 'CREATED' to 'UPDATED' to 'BOOKED' during the day.
Because a SQL statement does not guarantee any ordering by default, the inserts and updates on the target table can take place in the wrong order. If the 'UPDATED' row is processed last, then it becomes the final value for the day although the result should be status 'BOOKED'. Oracle Warehouse Builder enables you to solve this problem by creating an ordered extraction query using the Sorter operator. The ORDER BY clause can use the last updated attribute. This ensures that the records appear in the order in which they were created.
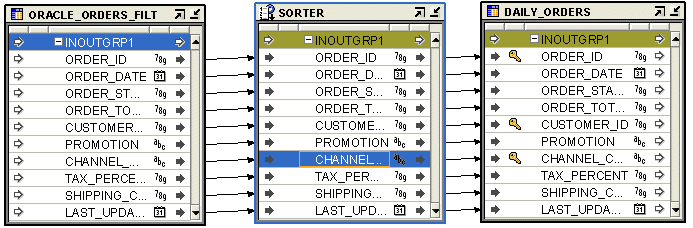
Figure 26-18 shows a mapping that uses the Sorter operator to sort the records from the ORACLE_ORDERS table. Use the Order By Clause property of the Sorter operator to sort the input records on the ORDER_ID and the LAST_UPDATED attributes.
Figure 26-18 Sorter Operator in a Mapping
To use the Sorter operator in a mapping:
Drag and drop the Sorter operator onto the Mapping Editor canvas.
Connect a source operator group to the Sorter I/O group.
Select the Sorter operator header.
The Property Inspector displays the properties of the operator.
Click the Ellipsis button in the Order By Clause field.
The Order By Clause dialog box is displayed.
Select the attributes you want to sort.
Select an attribute from the Available Attributes list and click the right arrow button. Or, click the double right arrow button to select all of the Available Attributes.
Apply an ORDER BY clause to the attribute.
Select the attribute in the ORDER BY Attributes list and select ASC (ascending) or DESC (descending) from the ASC/DESC list.
Click OK.
Connect the output of the Sorter operator to the target.
You can use the Splitter operator to split data from one source to several targets.
The Splitter operator splits a single input row set into several output row sets using a boolean split condition. Each output row set has a cardinality less than or equal to the input cardinality. This is useful when you want to move data to different targets based on a data driven condition. Instead of moving the data through multiple filters, you can use a splitter.
As an option, you can optimize mappings that split data from one source to multiple targets for improved performance. For more information, see "Example: Creating Mappings with Multiple Targets".
The Splitter operator contains one input group and three output groups. The output groups are OUTGRP1, OUTGRP2, and REMAINING_ROWS. You can create additional output groups, if required. You can delete the REMAINING_ROWS output group, but you cannot edit it.
In most cases, the output group REMAINING_ROWS contains all input rows that are not included in any output group. However, when the split condition contains an attribute whose value is null, the corresponding rows are not moved to the REMAINING_ROWS output group.
The Splitter operator contains the split condition. For code generation, the source columns are substituted by the input attribute names in the expression template. The expression is a valid SQL expression that can be used in a WHERE clause.
Figure 26-19 shows the mapping that uses the Splitter operator to split customer data from the source table CUSTOMERS into two separate tables. One table contains only the customer addresses and the other table contains the remaining customer details. Use the Split Condition property of each output group in the Splitter operator to specify which data should be moved to a particular target table.
Figure 26-19 Splitter Operator in a Mapping
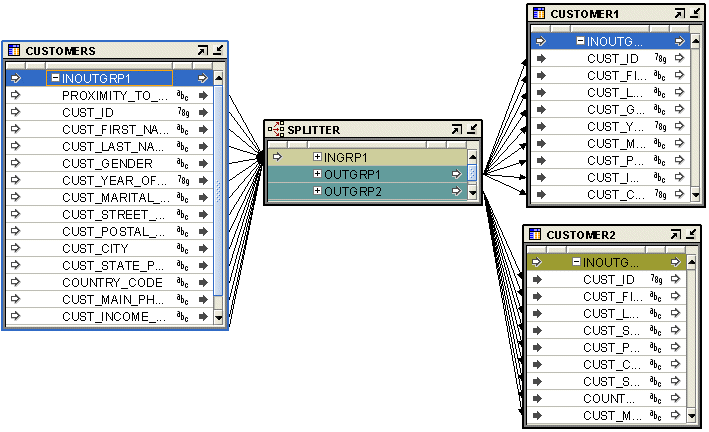
To use the Splitter operator in a mapping:
Drag and drop the Splitter operator onto the Mapping Editor canvas.
Connect a group from a source operator to the input group of the Splitter operator.
The output attributes are created with data types matching the corresponding input data types.
Select the output group of the Splitter operator.
The Property Inspector displays the properties of the output group.
Click the Ellipsis button to the right of the Split Condition field.
The Expression Builder dialog box is displayed.
Define the split condition.
For example, the split condition can be UPPER(INGRP1.OR_CHANNEL) = 'DIRECT'.
Define expressions for the split condition of each output group except the REMAINING ROWS group.
Connect the output groups to the targets.
When you design a mapping with multiple targets, you have the option to optimize for improved performance. You may decide to not optimize if you require accurate auditing details for the mapping. If you decide to not optimize, then separate insert statements for each target are generated.
To optimize a multiple target mapping, you must take additional steps to generate a single insert statement for all targets combined. In this case, a multitable INSERT SQL statement is generated that takes advantage of parallel query and parallel DML services available in versions Oracle9i and higher of the Oracle Database server.
To optimize a mapping with multiple targets:
Define a mapping in an Oracle target module configured to generate Oracle9i or higher SQL.
Right-click the target module on the Projects Navigator and select Configure. Under Deployment System Type and PL/SQL Generation Mode, select Oracle9i or higher.
In the Mapping Editor, design a mapping with a single source, a Splitter operator, and multiple targets.
For the mapping to be optimized, the targets must be tables, not views or materialized views. Each target table must have less than 999 columns. Between the Splitter operator and the targets, do not include any operators that change the cardinality.
For example, you can place a Filter between the Splitter and the targets as shown in Figure 26-20, but not a Joiner or Aggregator operator. These restrictions only apply if you choose to optimize the mapping.
Figure 26-20 Example Mapping with Multiple Targets
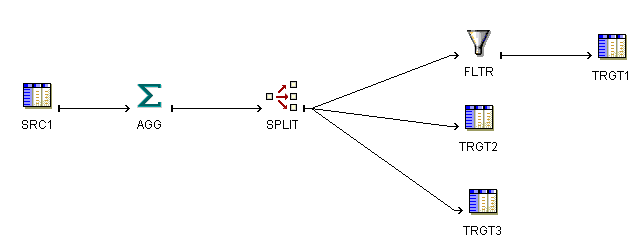
From the Projects Navigator, select the mapping and select Design from the menu bar, and select Configure. You can also right-click the mapping you want to configure and select Configure.
Oracle Warehouse Builder displays the configuration properties dialog box for a mapping.
Expand Runtime Parameters and set Default Operating Mode to Set based.
Expand Code Generation Options and set Optimized Code to True.
When you run this mapping and view the generation results, one total SELECT and INSERT count for all targets is returned.
The Subquery Filter operator enables you to filter rows based on the results of a subquery. The conditions that you can use to filter rows are EXISTS, NOT EXISTS, IN, and NOT IN.
For example, the EMP table contains employee data. You can use a subquery to fetch a set of records from another table and then filter rows from the EMP table by using one of the conditions EXISTS, NOT EXISTS, IN, or NOT IN.
The Subquery Filter operator contains one input group INGRP1 and one I/O group INOUTGRP1. INGRP1 is mapped from the object that represents the subquery used to filter source data. The default condition used for filtering data is EXISTS, which is indicated by an "E" displayed to the left of INGRP1. You can change this condition based on your requirement. The group INOUTGRP1 is mapped from the source data set that must be filtered. The filtered data is available as an output of this group.
To create a mapping with a Subquery Filter operator:
Drag and drop a Subquery Filter operator onto the mapping canvas.
Connect the source attributes to filter to the I/O group INOUTGRP1 of the Subquery Filter operator.
Connect the required attributes from the object to use as a subquery to the group INGRP1 of the Subquery Filter operator.
Select the Subquery Filter operator header.
The Property Inspector displays the properties of the Subquery Filter operator.
If the Property Inspector is not visible in the Design Center, select Property Inspector from the View menu.
In Subquery Filter Input Role field, select the condition to use to filter input rows. The available options are: Exists, In, Not Exists, or Not In.
If a filter condition is required, click the Ellipsis button on the Subquery Filter Condition field to display the Expression Builder. Use this interface to specify the filter condition used to compare the input rowset and the rowset returned by the subquery.
A filter condition is not required if the input role is IN or NOT IN. For filter roles EXISTS and NOT EXISTS, you must specify a filter condition that relates the source query to EXISTS filtering subquery.
If the input role is IN or NOT IN, edit the properties of each input attribute and select the matching attribute from the I/O group of the subquery. This relates an input attribute from the source input query to each subquery group attribute, thus relating the source query to the filtering subquery.
Connect the I/O group of the Subquery Filter operator to the target.
Figure 26-21 displays a simple example of a Subquery Filter operator. In this mapping, orders data relating to customers whose credit limit is above a certain value is loaded into a target table called CUST_TGT. Order data is stored in the ORDERS and ORDERS_ITEMS tables. A Joiner operator is used to combine orders data from these tables. Use a Subquery Filter operator to filter order data based on the results of a subquery on the CUSTOMERS table.
The attributes, in the CUSTOMERS table, required for comparison are mapped to the input group of the Subquery Filter operator. The orders data, represented by the result of the Joiner operator, are mapped to the Input/Output group of the Subquery Filter operator. The Subquery Filter Condition property of the Subquery Filter operator is set to represent the condition used compare rows. In this example, the following condition was specified for the Subquery Filter Condition:
INGRP1.CUSTOMER_ID = INOUTGRP1.CUSTOMER_ID AND INGRP1.CREDIT_LIMIT >= 75000
Figure 26-21 Subquery Filter Operator in a Mapping
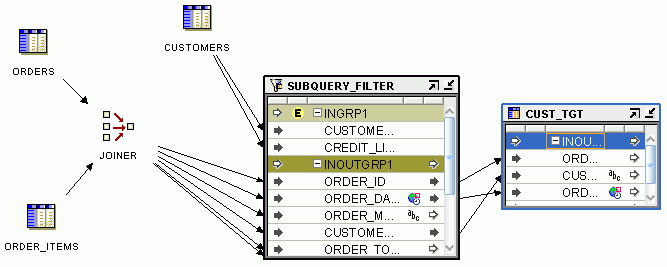
Following is the code generated by Oracle Warehouse Builder for the Subquery Filter operator used in the mapping displayed in Figure 26-21.
SELECT
 "ORDERS"."ORDER_ID" "ORDER_ID",
  "ORDERS"."CUSTOMER_ID" "CUSTOMER_ID",
  "ORDERS"."ORDER_DATE" "ORDER_DATE"
FROM
     "OE"."ORDERS"@"ORA11@OE_SRC_LOCATION"  "ORDERS"
   JOIN
     "OE"."ORDER_ITEMS"@"ORA11@OE_SRC_LOCATION"  "ORDER_ITEMS" ON
          ( ( "ORDERS"."ORDER_ID" = "ORDER_ITEMS"."ORDER_ID" ) )
WHERE
  (EXISTS
    (SELECT  1
     FROM "OE"."CUSTOMERS"@"ORA11@OE_SRC_LOCATION"  "CUSTOMERS"
     WHERE
       ( "CUSTOMERS"."CUSTOMER_ID"  =  "ORDERS"."CUSTOMER_ID" )  AND
          ( "CUSTOMERS"."CREDIT_LIMIT"  >= 75000)
    )
  );
Use Table Function operators to represent a table function in a mapping. Table function operators enable you to manipulate a set of input rows and return another set of rows of the same or different cardinality.
While a regular function only works on one row at a time, a table function enables you to apply the same complex PL/SQL logic on a set of rows and increase your performance. Unlike conventional functions, table functions can return a set of output rows that can be queried like a physical table.
The execution of the table function can also be parallelized where the returned rows are streamed directly to the next process without intermediate staging. Rows from a collection returned by a table function can also be pipelined or output one by one, as they are produced, instead of being output in a batch after processing of the entire table function input is completed.
Using table functions can greatly improve performance when loading your data warehouse.
A Table Function operator contains one input group and one output group.
To define a Table Function operator in a mapping:
Drag and drop a Table Function operator onto the canvas.
The Add Table Function Operator dialog box is displayed.
Use an existing table function to transform data by choosing Select from existing repository object and bind and then selecting the table function from the tree.
The Table Function operator is added to the canvas. The input group INGRP1 contains the input parameters defined for the table function.
Map the operator that contains the input to the used by the table function to the parameters in the input group.
Typically one or more of the input parameters are collection types. In such cases, if the source object does not contain collection types, use a Construct Object operator to create a collection type using the individual source attributes.
Map the Return group of the Table Function operator to the operator representing the transformation target.
Figure 26-22 shows a mapping that uses a Table Function operator to load data into a table.
Figure 26-22 Table Function Operator in a Mapping
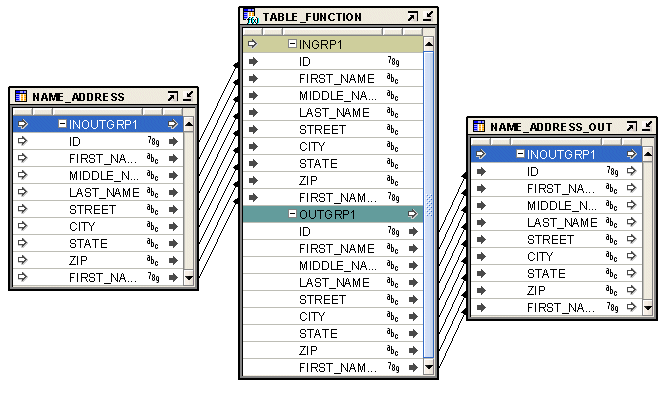
Characteristics of Table Functions
They do not support the passing of parameters by name.
If the return type is TABLE of PLS Record, the name you select must match the name of PLS Record field. It is possible to select only one subset of the fields of the PLS Record in the select list.
If the return type is TABLE of T1%ROWTYPE, the name you select must match the name of the columns of the table T1.
If the return type is TABLE of Object Type, the name you select list must match the name of Object Type attribute.
If the return type is TABLE of Scalar (like TABLE of NUMBER), only Select COLUMN_VALUE can be used to retrieve the scalar values returned by the table function.
Before you can use the Table Function operator in a mapping, create the table function in your target schema, external to Oracle Warehouse Builder. The table functions in the database that are supported by the unbound Table Function operator must meet the following requirements:
Ref Cursor returning PLS Record (the fields of the PLS Record) must be supported scalar data types (0..n).
There must be at least one input parameter.
PLS Record (the fields of the PLS Record should be scalar data types supported by Oracle Warehouse Builder.
Object Type (the attributes of the Object Type should be supported scalar data types).
Supported scalar data types.
ROWTYPE
For a Table Function operator in a mapping:
You must add one parameter group for each ref cursor type parameter.
Multiple scalar parameters can be part of a single scalar type parameter group.
The parameter groups and the parameters in a group can be entered in any order.
The positioning of the parameters in the Table Function operator must be the same as the positioning of the parameters in the table function created in your target warehouse.
You access the Table Function operator properties using the Property Inspector. The Property Inspector displays the properties of the object selected on the canvas. For example, when you select the input group of the Table Function operator, the Property Inspector displays the properties of the input parameter group.
The Table Function operator has the following properties.
Table Function Name: Represents the name of the table function. The name specified here must match the actual name of the table function.
Table Function is Target: Select this option to indicate that the table function is a target. By default, this property is selected.
Bound Name: Name of the table function in the repository to which the Table Function operator is bound.
Parameter Position: The position of the parameter in the table function signature. This property is only applicable to scalar parameters.
Return Table of Scalar: This property specifies whether the return of the table function is a TABLE of SCALAR or not. This information is required because the select list item for TABLE of SCALAR must be Select COLUMN_VALUE while in the other cases it should be an appropriate name.
Use the Transformation operator to transform the column value data of rows within a row set using a PL/SQL function, while preserving the cardinality of the input row set.
The Transformation operator must be bound to a function or procedure contained by one of the modules in the workspace. The inputs and outputs of the Transformation operator correspond to the input and output parameters of the bound workspace function or procedure. If the Transformation operator is bound to a function, then a result output is added to the operator that corresponds to the result of the function. The bound function or procedure must be generated and deployed before the mapping can be deployed, unless the function or procedure exists in the target system.
Oracle Warehouse Builder provides pre-defined PL/SQL library functions in the run time schema that can be selected as a bound function when adding a Transformation operator onto a mapping. In addition, you can choose a function or procedure from the public Oracle Custom library.
The Transformation operator contains the following properties:
Function Call: The text template for the function call that is generated by the code generator with the attribute names listed as the calling parameters. For the actual call, the attribute names are replaced with the actual source or target columns that are connected to the attributes.
Function Name: The name of the function or procedure, to which this operator is bound.
Procedure: A boolean value indicating, if true, that the bound transformation is a procedure rather than a function with no returned value.
Data Type: Indicates the data type of the input, output, or result parameter of the bound function that corresponds to the given attribute. If the output of a mapping transformation is of CHAR data type, then an RTRIM is applied on the result before moving the data to a target. This ensures that no extra spaces are contained in the output result.
Default Value: The default value (blank if none) for the given attribute.
Optional Input: A boolean value indicating, if true, that the given attribute is optional. If the attribute is optional, then it need not be connected in the mapping.
Function Return: A boolean value indicating, if true, that the given output attribute is the result attribute for the function. The result attribute is a named result. Use this property if another output is a named result, or if you change the name of the result output.
To use a Transformation operator in a mapping:
Drag and drop a Transformation operator onto the Mapping Editor canvas.
The Add Mapping Transformation dialog box is displayed.
Use the Add Mapping Transformation dialog box to create a transformation or select one or more transformations. For more information about these options, see "Using the Add Operator Dialog Box to Add Operators".
Connect the source attributes to the inputs of the Transformation operator.
Select an input attribute. If the Procedure property is set to True, then do not connect the input parameter.
Connect the Transformation operator output attributes to the target attributes.
Note:
If the signature of a transformation is very long (exceeds the length of the Design Center window), you may not be able to drag and drop this transformation from the Projects Navigator onto the Mapping Editor canvas. In such cases, you can add the transformation to your mapping by using the Component Palette.The Unpivot operator converts multiple input rows into one output row.
The Unpivot operator enables you to extract from a source once and produce one row from a set of source rows that are grouped by attributes in the source data. Like the Pivot operator, the Unpivot operator can be placed anywhere in a mapping.
Table 26-5 shows a sample of data from the SALES relational table. In the crosstab format, the MONTH column has 12 possible character values, one for each month of the year. All sales figures are contained in one column, MONTHLY_SALES.
Table 26-5 Data in a Crosstab Format
| REP | MONTH | MONTHLY_SALES | REGION |
|---|---|---|---|
|
0675 |
Jan |
10.5 |
4 |
|
0676 |
Jan |
9.5 |
3 |
|
0679 |
Jan |
8.7 |
3 |
|
0675 |
Feb |
11.4 |
4 |
|
0676 |
Feb |
10.5 |
3 |
|
0679 |
Feb |
7.4 |
3 |
|
0675 |
Mar |
9.5 |
4 |
|
0676 |
Mar |
10.3 |
3 |
|
0679 |
Mar |
7.5 |
3 |
|
0675 |
Apr |
8.7 |
4 |
|
0676 |
Apr |
7.6 |
3 |
|
0679 |
Apr |
7.8 |
3 |
Figure 26-23 depicts data from the relational table SALES after unpivoting the table. The data formerly contained in the MONTH column (Jan, Feb, Mar...) corresponds to12 separate attributes (M1, M2, M3...). The sales figures formerly contained in the MONTHLY_SALES are now distributed across the 12 attributes for each month.
Figure 26-23 Data Unpivoted from Crosstab Format

When you use the Unpivot operator, multiple input rows are transformed into a single row based on the row locator. In the Unpivot operator, the row locator is an attribute that you must select from the source to correspond with a set of output attributes that you define. A row locator is required in an Unpivot operator. In this example, the row locator is the MONTH column from the SALES table and it corresponds to attributes M1, M2, M3... M12 in the unpivoted output.
You have the following options for using an Unpivot operator:
Define a new Unpivot operator: Drag an Unpivot operator from the Palette onto the mapping. The Mapping Editor displays a wizard.
Edit an existing Unpivot operator: Right-click the Unpivot operator and select Open Details. The Mapping Editor opens the Unpivot Editor.
Whether you are using the Unpivot Wizard or the Unpivot Editor, complete the following pages:
Use the General page to specify a name and optional description for the Unpivot operator. By default, the wizard names the operator "Unpivot".
Use the Groups page to specify one input and one output group.
In an Unpivot operator, the input group represents the source data in crosstab format. The output group represents the target data distributed across multiple attributes.
You can rename and add descriptions to the input and output groups. Since each Unpivot operator must have exactly one input and one output group, the wizard prevents you from adding or removing groups or changing group direction.
Use the Input Connections page to select attributes to copy and map into the Unpivot operator.
To complete the Input connections page for an Unpivot operator:
Select complete groups or individual attributes from the left panel.
To search for a specific attribute or group by name, type the text in Search for and click Go. To find the next match, click Go again.
Hold the Shift key down to select multiple groups or attributes. To select attributes from different groups, then you must first combine the groups with a Joiner or Set operator.
Use the left to right arrow button in the middle of the page to move your selections to the right side of the wizard page.
You can use the right to left arrow to move groups or attributes from the input connections list. Oracle Warehouse Builder removes the selection from the input group and removes the data flow connection between the source operator and the Unpivot operator.
Use the Input Attributes page to modify the attributes you selected in the Input Connections tab or wizard page.
You can perform the following tasks from the Unpivot Input Attributes page:
Add attributes: Enter the attribute name and other attribute details in an empty row on the page.
Change attribute properties: You can change the attribute name, data type, length, precision and scale.
Add an optional description: Type a description for the input attributes.
Designate key attribute(s): You must designate one or more key attributes for Unpivot operators. Use the Key check box to indicate the attribute(s) that uniquely identifies the input group. Input rows with the same value in their key attribute(s) produce one unpivoted output row.
Use the Row locator page to select a row locator and assign values to the distinct values contained in the row locator.
Figure 26-24 shows the attribute MONTH selected as the row locator with values such as 'Jan', 'Feb', or 'Mar'.
To complete the Unpivot Row Locator page:
Select an attribute from the Row locator list box.
In the Unpivot operator, the row locator is the attribute from the source data that corresponds to a set of output attributes.
Use Add to specify the number of distinct values that exist in the row locator.
For each row locator value, type in the value as it appears in your source data set.
For string values, enclose the text in single quotes. For example, if the row locator is MONTH, there would be a total of 12 distinct values for that attribute. Click Add to add a row for each distinct value. For row locator values, type values exactly as they appear in the source data set. For instance, the row locator values as shown in Table 26-5 are 'Jan', 'Feb', and 'Mar.'
Use the Output Attributes tab to create the output attributes for the Unpivot operator.
Figure 26-25 displays the Output Attributes tab.
Figure 26-25 Unpivot Output Attributes Page
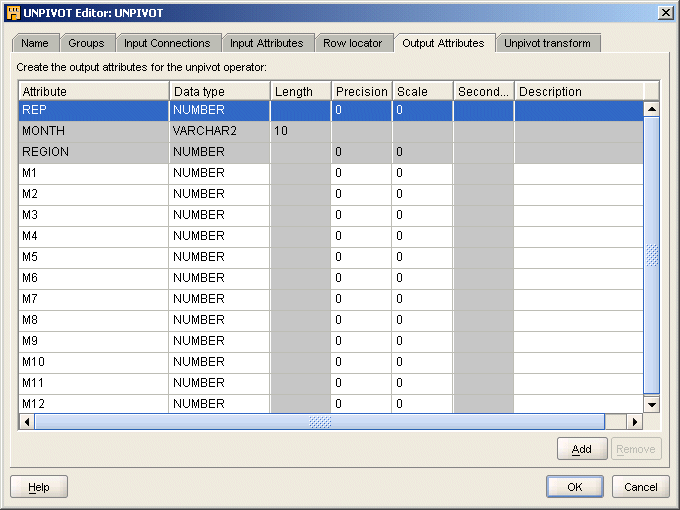
If you designated any input attributes as keys on the Input Attributes tab or wizard page, those input attributes are displayed as output attributes that you cannot edit or remove.
You can perform the following tasks from the Unpivot Output Attributes page:
Add attributes: To increase the number of output attributes to accommodate the rows you specified on the Row locator tab or wizard page, enter the attribute details in an empty cell of the page. If you specified 12 rows, then specify 12 output attributes plus attributes for any other input attributes that you did not designate as a key.
Change attribute properties: Except for attributes you designated as keys on the Input Attributes tab or wizard page, you can change the attribute name, data type, length, precision, and scale.
Add an optional description: Type a description for the output attributes.
Use the Unpivot Transform tab to write expressions for each output attribute.
Figure 26-26 displays the Unpivot Transform tab.
For attributes you designated as keys, the matching row and expression is defined for you. Oracle Warehouse Builder displays the first row as the match for a key attribute. For all other output attributes, specify the matching row and the expression.
Matching row: Select the appropriate option from the list box. For example, for the attribute you define as the first month of the year, 'M1', select 'Jan' from the list box.
Expression: Select the appropriate expression from the list box. For all the new attributes you created to unpivot the data, select the same input attribute that contains the corresponding data. For example, the unpivot attributes M1, M2, M3... M12 would all share the same expression, INGRP1.MONTHLY_SALES. For all other output attributes, select the corresponding attribute from the list of input attributes.
|
Copyright © 2000, 2011, Oracle and/or its affiliates. All rights reserved. Legal Notices |
|