| Oracle® Warehouse Builder Data Modeling, ETL, and Data Quality Guide 11g Release 2 (11.2) Part Number E10935-05 |
|
|
PDF · Mobi · ePub |
| Oracle® Warehouse Builder Data Modeling, ETL, and Data Quality Guide 11g Release 2 (11.2) Part Number E10935-05 |
|
|
PDF · Mobi · ePub |
Process flows enable you to interrelate Oracle Warehouse Builder objects and external activities, such as e-mail, FTP, or operating system commands, and define flow of control between these different activities. Within a process flow, use Oracle Warehouse Builder activities to represent data objects, external objects, and control constructs. It enables you to accomplish a certain data warehouse task by creating a data flow between various activities.
For more information about Runtime Preferences, see Oracle Warehouse Builder Concepts.
Use this section as a reference for all the process flow activities. This section categorizes activities into the following types:
For detailed descriptions of each activity, see the alphabetical listing in the remainder of this section.
Table 27-1 lists the activities that represent objects that you previously created in Oracle Warehouse Builder. You can specify one or more incoming transitions. For outgoing transitions, you can use the success, warning, error, and unconditional transitions once each, and then also define an unlimited number of complex condition transitions.
Table 27-1 Activities that Represent Objects
| Icon | Activity | Brief Description |
|---|---|---|
|
Adds to the process flow an existing data auditor monitor used in data profiling |
||
|
Adds an existing mapping to the process flow |
||
|
Embeds an existing process flow within the process flow |
||
|
Adds an existing transformation to the process flow |
||
|
|
Adds an existing Web service to the process flow |
When you add activities that represent design objects, the process flow evaluates each of these activities as a separate transaction. For example, when you add mapping activities, the process flow commits and rolls back each mapping independently. In this design, it is not possible to control all the mappings by one commit or roll back statement.
To collectively commit or rollback multiple mappings, consider designing the process flow with a SQL*Plus activity associated with a script that calls each mapping. For instructions, see "Committing Mappings through the Process Flow Editor".
Table 27-2 lists each utility activity and shows the associated icon.
| Icon | Activity | Brief Description |
|---|---|---|
|
Assigns a value to a variable |
||
|
Runs an Enterprise JavaBean from within a process flow |
||
|
Sends an e-mail. For example, send an e-mail message about the status of activities in the process flow |
||
|
Use the File Exists activity to check if a file is located on a specified drive or directory |
||
|
Runs a Java class from within a process flow |
||
|
Halts a process flow and requires manual intervention to resume the process flow |
||
|
Sends an e-mail to a user and enables the user to select from a list of responses that dictates how the process flow proceeds |
||
|
|
Represents an OMB*Plus script in a process flow |
|
|
Interjects a success, warning, or error status |
||
|
Delays the progress of the process flow by a specified amount of time |
Table 27-3 lists the activities that you use to control the process flow. The table shows the associated icon. It also lists the number of incoming and outgoing transitions enabled for each activity.
| Icon | Activity | Brief Description | Incoming Transitions | Outgoing Transitions |
|---|---|---|---|---|
|
Specifies the completion of all incoming activities before starting another activity |
Two or more enabled. The number of incoming transitions must be less than or equal to the number of outgoing transitions from the upstream FORK. |
Unconditional and complex transitions are not enabled. |
||
|
End (successfully) |
Designates a path as being successful |
One or more enabled |
Not enabled |
|
|
End (with errors) |
Designates a path as ending in errors |
One or more enabled |
Not enabled |
|
|
End (with warnings) |
Designates a path as ending with warnings |
One or more enabled |
Not enabled |
|
|
Defines the end of a For Loop or While Loop |
One or more enabled |
One to For Loop or While Loop only |
||
|
Use this activity with an End Loop to define constructs that repeat |
One from End Loop required plus more from other activities |
One Loop condition and one Exit required |
||
|
Starts two or more activities after completing an activity |
One or more enabled |
Two or more unconditional transitions only |
||
|
Starts an activity after the completion of any of two or more specified activities |
Two or more enabled |
One unconditional transition only |
||
|
Defines exclusive OR and if-then-else scenarios |
||||
|
Run other activities while a condition is true |
One from End Loop required plus more from other activities |
One Loop condition and one Exit required |
Table 27-4 lists the Operating System activities that can be initiated by a process flow.
| Icon | Activity | Brief Description |
|---|---|---|
|
Starts a file transfer protocol command during a process flow. For example, use the FTP activity to move data files to the computer where a mapping runs. |
||
|
Runs a SQL*Plus script in a process flow |
||
|
Represents an activity that is not predefined and enables you to incorporate it into a process flow |
Because it is not desirable to enable a user have complete control over Operating System activities, Oracle Warehouse Builder enables you to determine which Operating System activities can be initiated by a process flow. This is primarily achieved by constraining the user's ability to run operating system commands either by granting or revoking direct execution or by mandating that execution be performed through a third party, as described in "Setting a Security Constraint". Further access control can be achieved by using a proxy command and parameters, which can be used to secure all executions.
Setting properties in the Runtime.properties file in the $OWB_HOME/owb/bin/admin directory controls the security feature. The file contains Control Center property values that run the Control Center service. The file is set to read-only at Control Center service startup. If you make changes to the file, then you must restart the Control Center service for the changes to take effect.
By default, security_constraint for each of the Operating System activity commands is set to DISABLED:
property.RuntimePlatform.0.NativeExecution.FTP.security_constraint = DISABLED
property.RuntimePlatform.0.NativeExecution.Shell.security_constraint = DISABLED
property.RuntimePlatform.0.NativeExecution.SQLPlus.security_constraint = DISABLED
To enable an Operating System activity, you must set security_constraint to NATIVE_JAVA or Scheduler.
property.RuntimePlatform.0.NativeExecution.FTP.security_constraint = NATIVE_JAVA
property.RuntimePlatform.0.NativeExecution.Shell.security_constraint = NATIVE_JAVA
property.RuntimePlatform.0.NativeExecution.SQLPlus.security_constraint = NATIVE_JAVA
NATIVE_JAVA enables direct execution by the Control Center service and SCHEDULER forces execution through DBMS_SCHEDULER.
For each activity type, USER DEFINED (Shell), FTP, and SQLPlus, there are two properties: the proxy_command property and the proxy_parameter_list property (optional).
If a proxy command is specified, then that command is run instead of the user's specified command and parameters. The user-specified command and parameters are passed as parameters to the proxy command following the proxy parameters. The proxy command then becomes the context in which the user's command is run.
The proxy_command property enables the proxy command to be specified.
To set a proxy command for the activities, set the proxy command and the proxy parameter list (optional) using the following command:
property.RuntimePlatform.0.NativeExecution.FTP.proxy_command
property.RuntimePlatform.0.NativeExecution.FTP.proxy_parameter_list
property.RuntimePlatform.0.NativeExecution.Shell.proxy_command
property.RuntimePlatform.0.NativeExecution.Shell.proxy_parameter_list
property.RuntimePlatform.0.NativeExecution.SQLPlus.proxy_command
property.RuntimePlatform.0.NativeExecution.SQLPlus.proxy_parameter_list
For example, to set a proxy command for Shell:
property.RuntimePlatform.0.NativeExecution.Shell.proxy_command = /bin/proxy_sh
 property.RuntimePlatform.0.NativeExecution.Shell.proxy_parameter_list = ?-v?-n?
Note:
Ideally, only Oracle Warehouse Builder administrator must have the rights to modify theRuntime.properties file. The users should be granted read-only permission.Use the AND activity to specify the completion of two or more activities before resuming the process flow.
The AND activity can have two or more incoming transitions. To correctly design process flows with an AND activity, you must place a "FORK" activity upstream of the AND. Also, the number of transitions going into the AND activity must be less than or equal to the number of outgoing transitions from the upstream FORK. The FORK is the only activity that enables you to assign multiple unconditional transitions and therefore ensure the completion of multiple activities as required by the AND activity.
The AND activity enables you to aggregate the outcome of the upstream activities. If all the upstream activities return SUCCESS, then the AND activity returns SUCESSES. If any upstream activity returns an ERROR, then the AND activity returns ERROR; otherwise a WARNING is returned. Any activity that does not have an outcome is considered to have returned SUCCESS. Use the SET_STATUS activity to force an outcome. The feature is particularly useful to test if a set of mappings that run in parallel have all successfully completed.
Figure 27-1 shows the AND and FORK activities in a process flow. In this example, AND_ACTIVITY triggers downstream activities based on the completion of MAP1 and MAP2. The process flow is valid because the FORK activity has three outgoing transitions while AND_ACTIVITY has two incoming transitions. The process flow would also be valid if the transition and activities associated with MAP3 were deleted.
Figure 27-1 AND Activity in a Process Flow
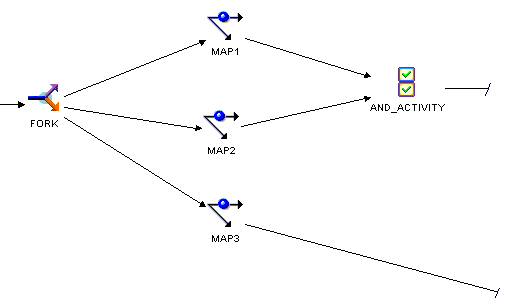
For outgoing conditions, the AND activity can have one, two, or three conditional transitions. This results in three possible paths terminating in success, warning, and error activities.
Use the Assign activity to assign a value to a variable. For example, use this activity to initialize a variable back to zero.
Table 27-5 describes the parameters of the Assign activity.
You can design process flows that proceed based on the results of profiling data. For example, you create logic that runs a mapping only if the quality of data meets a standard as determined by the threshold parameter.
Table 27-6 describes the parameters of the Data Auditor Monitor activity.
Table 27-6 Data Auditor Monitor Activity Parameters
| Parameter | Description |
|---|---|
|
AUDIT_LEVEL |
NONE STATISTICS ERROR_DETAILS COMPLETE |
|
BULK_SIZE |
1+ |
|
COMMIT_FREQUENCY |
1+ |
|
MAX_NO_OF_ERRORS |
Maximum number of errors enabled after which the mapping terminates |
|
OPERATING_MODE |
SET_BASED ROW_BASED ROW_BASED_TARGET_ONLY SET_BASED_FAIL_OVER_TO_ROW_BASED SET_BASED_FAIL_OVER_TO_ROW_BASED_TARGET_ONLY |
Use the Enterprise Java Bean activity type to call Enterprise JavaBeans (EJB) from within a process flow. EJBs are server-side components (managed by the J2EE container) that contain business logic. They enable you to create applications that are scalable, available to multiple clients, and support transactional processing.
Use the Enterprise Java Bean activity type to leverage functionality defined as an EJB within a process flow. For example, you have a suite of EJBs that implements complex business logic. You can directly integrate this business logic into a process flow by using the Enterprise Java Bean activity. Using Enterprise Java Bean activity provides better scalability, performance, and secure transactions.
Note:
To deploy process flows containing an Enterprise Java Bean activity, you must create a URI location that represents the J2EE platform containing the Enterprise JavaBeans.Table 27-7 describes the parameters of the Enterprise Java Bean activity.
Table 27-7 Enterprise Java Bean Activity Parameters
| Parameter Name | Description |
|---|---|
|
CLASS_NAME |
Name of the class that implements the EJB |
|
METHOD_NAME |
Name of the method, within the class, that must be run |
|
RETURN_VALUE |
String representation of the value returned by the method |
|
PARAMETER_LIST |
List of parameters to pass to the Enterprise Java Bean |
You have a suite of Enterprise JavaBeans that implement logic for an Order Processing application. You can leverage this existing functionality in a process flow. The Enterprise Java Bean activity enables you to directly integrate this functionality in your process flow.
The Order Processing application contains an EJB that produces a report of all orders made during any specified day. You want to create a process flow that produces a report of all orders made during the previous day before invoking ETL logic that loads this orders data into your data warehouse.
Figure 27-2 displays the process flow that provides the required functionality. The Enterprise Java Bean activity ORDERS_REPORT leverages the functionality provided as an EJB Order Processing application. LOAD_ORDERS is a mapping that loads orders data into your warehouse after running the report.
Figure 27-2 EJB Activity in a Process Flow
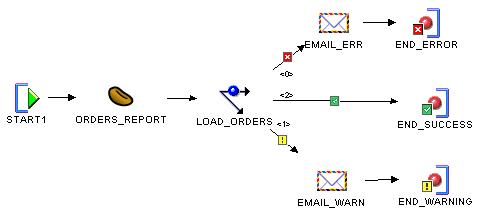
For the ORDERS_REPORT activity, set the following parameter values:
CLASS_NAME: ordersystem.reports
METHOD_NAME: printReport
PARAMETER_LIST: ?ReportName?PrintDevice?
Create two custom parameters, ReportName and PrintDevice, in the ORDERS_REPORT activity by selecting New Process Activity Parameter at the top of the Structure Panel and set their values as specified in Table 27-8.
Table 27-8 Values for Custom Parameters
| ReportName Parameter | PrintDevice Parameter | |
|---|---|---|
|
Direction |
IN |
IN |
|
Literal |
True |
True |
|
Value |
DailyOrders |
lpt1 |
Ensure that the deployed location for the Enterprise Java Bean activity is set to a URI location that points to the J2EE instance containing the application that supports the specified Enterprise Java Bean. For example, the URI location has its URI field set to:
ormi://myhost.example.com:23791/ReportsApp
Your DB2 database contains two tables: Orders and Orders_tgt. You want to use Oracle Warehouse Builder to load data from Orders to Orders_tgt. You have a J2EE application that consists of various table utilities. You use the table utilities to copy data from one table to another.
To leverage the table utility that copies data in your process flow, create an Enterprise Java Bean activity in your process flow. The parameters of the Enterprise Java Bean activity are set as follows:
CLASS_NAME: mydb2.TableHandler
METHOD_NAME: copyTable
PARAMETER_LIST: ?SrcDataSource?TgtDataSource?SrcTable?TgtTable?
Create the following custom parameters:
SrcDatasource: Represents the name of the source data source
TgtDataSource: Represents the name of the target data source
SrcTable: Represents the source table
TgtTable: Represents the target table
Table 27-9 lists the values to set for the custom parameters SrcDataSource, TgtDataSource, SrcTable, and TgtTable.
Table 27-9 Custom Parameter Values for an Enterprise Java Bean Activity
| SrcDataSource | TgtDataTarget | SrcTable | TgtTable | |
|---|---|---|---|---|
|
Direction |
IN |
IN |
IN |
IN |
|
Literal |
True |
True |
True |
True |
|
Value |
|
|
|
|
To deploy this process flow, create a URI location that represents the J2EE container of your table-utilities application and set the Deployed Location of the Enterprise Java Bean as described in "Example: Using an Enterprise Java Bean Activity to Leverage Existing Business Logic from EJBs".
Note:
Because the J2EE platform provides better scalability, performance and security, Oracle recommends that you use EJBs to integrate functionality provided by Java into your process flows.The parameter types supported are as follows:
String
Integer
Float
Date
Boolean
However, arrays of supported types (String, Integer, and so on) are not supported.
Custom parameters with the Direction set to OUT are not supported.
Any exceptions thrown during the execution of the Enterprise JavaBean are available only in the Repository Browser.
You cannot perform the following actions within an Enterprise Java Bean activity:
Redirect input, output and error streams
Create and manage threads
Stop the Java Virtual Machine (JVM)
Load a native library
Listen on, accept connections on, or multicast from a network socket
Directly read or write a file descriptor
Create, modify, or delete files in the file system
You can send e-mail notifications after the completion of an activity in a process flow. You may find this useful, for example, for notifying administrators when activities such as mappings end in errors or warnings.
Table 27-10 lists the parameters that you set for the email activity.
Table 27-10 Email Activity Parameters
| Parameter | Description |
|---|---|
|
SMTP Server |
The name of that outgoing mail server. The default value is |
|
Port |
The port number for the outgoing mail server. The default value is |
|
From_Address |
The e-mail address from which process flow notifications are sent |
|
Reply_To_Address |
The e-mail address or mailing list to which recipients should respond |
|
To_Address |
The e-mail addresses or mailing lists that receive the process flow notification. Use a comma or a semicolon to separate multiple e-mail addresses. |
|
CC_Address |
The e-mail addresses or mailing lists that receive a copy of the process flow notification. Use a comma or a semicolon to separate multiple e-mail addresses. |
|
BCC_Address |
The e-mail addresses or mailing lists that receive a blind copy of the process flow notification. Use a comma or a semicolon to separate multiple e-mail addresses. |
|
Importance |
The level of importance for the notification. Select one of the following options for importance: Normal, High, or Low. |
|
Subject |
The text that appears in the e-mail subject line |
|
Message_Body |
The text that appears in the body of the email. To type in or paste text, select Value at the bottom of the Activity panel. The Process Flow Editor does not limit you on the amount of text that you can enter. |
For e-mail addresses, you can enter an e-mail address with or without the display name. For example, the following entries are correct:
jack.emp@example.com
Jack Emp<jack.emp@example.com>
Jack Emp[jack.emp@example.com]
Jack Emp[jack.emp@example.com],Jill Emp[jill.emp@example.com]
Jack Emp[jack.emp@example.com];Jill Emp[jill.emp@example.com]
To run a process flow with an Email activity, you must access different host systems and ports. New security measures implemented in Oracle Database 11g Release 1 restrict access to hosts and ports. You must explicitly grant access to hosts and ports that the Email activity accesses by using the DBMS_NETWORK_ACL_ADMIN package.
For example, the user OWBSYS must send an e-mail through the mail server mail.example.com using port 25. The database administrator must perform the following steps:
Create an Access Control List (ACL) for the user OWBSYS by using the following command:
EXECUTE DBMS_NETWORK_ACL_ADMIN.CREATE_ACL
        ('acl_for_owb_cc.xml','ACL for Control Center','OWBSYS','CONNECT');
The ACL has no access control effect unless it is assigned to a network target.
Assign the Access Control List (ACL) to a network host, and optionally specify a TCP port range. Use the following command:
EXECUTE DBMS_NETWORK_ACL_ADMIN.ASSIGN_ACL
        ('acl_for_owb_cc.xml','mail.example.com',25)
Commit the changes made by using the COMMIT command.
Every path in the process flow must terminate in an End activity.
When you first create a process flow, a success type End activity is included by default. Use end types to indicate the type of logic contained in a path. Because a given activity such as a mapping has three possible outcomes, the editor includes three ending types, as shown in Table 27-11. You can use these ending types to design error handling logic for the process flow.
Table 27-11 Types of End Activities
| Icon | End Type | Description |
|---|---|---|
|
Success |
Indicates that the path or paths contain logic dependent on the successful completion of an upstream activity |
|
|
Warning |
Indicates that the path or paths contain logic dependent on an upstream activity completing with warnings |
|
|
Error |
Indicates that the path or paths contain logic dependent on an upstream activity completing with errors |
You can design a process flow to include one, two, or all three types of endings. You can use each ending type only once, Duplicate ending types are not enabled. Each End activity can have a single or multiple incoming transitions.
In Figure 27-3, END_SUCCESS has three incoming transitions, each dependent on the successful completion of upstream activities. END_ERROR has one incoming transition from an Email activity that runs when any of the upstream mapping activities completes with errors.
Figure 27-3 End Activities in a Process Flow
By default, every process flow includes an END_SUCCESS. Although you cannot change an End activity to another type, you can add different types of End activity.
To add end activities to a process flow:
From the palette on the Process Flow Editor, drag and drop the desired End icon onto the canvas.
Oracle Warehouse Builder does not enable you to select ending types present in the process flow.
Click OK.
Oracle Warehouse Builder adds the End activity or activities to the canvas.
The editor adds an End Loop for each For Loop and While Loop that you add to the canvas.
The End Loop activity must have a single unconditional outgoing transition to its For Loop or While Loop activity. All the flows that are part of the loop must converge on the End Loop activity to ensure that no parallel flows remain for either the next loop interaction or the exit of the loop.
Use the File Exists activity to verify the existence of a file before running the next activity. In the Activities panel, enter the name of the file.
The File Exists activity checks only once. If the file exists, then the process flow proceeds with the success transition. If the file does not exist, then the process flow proceeds with the warning transition. The File Exists activity triggers the error transition only in a catastrophic failure such as a Tcl error when using OMB*Plus.
The File Exists activity has one parameter called PATH. Specify a fully qualified file name, a directory name, or a semicolon-separated list for this parameter. The paths are normally tested in the same host that is running the Control Center service.
The security constraints of the underlying operating system may not enable access to one or more files, giving the impression that they do not exist. If all the paths exist, then the activity returns EXISTS. If none of the paths exist, then the activity returns MISSING. If some paths exist, then the activity returns SOME_EXIST.
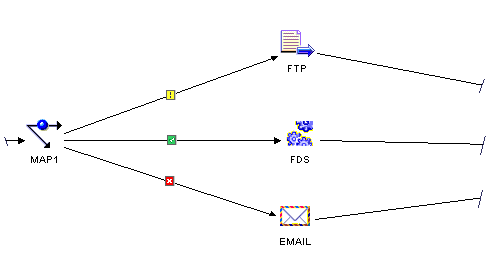
Use the FORK activity to start multiple, concurrent activities after the completion of an activity.
You can assign multiple incoming transitions to a FORK activity. The FORK activity is the only activity that enables you to assign multiple unconditional outgoing transitions for parallel process.
For example, in Figure 27-4, the process flow perform the activities named FTP, FDS, and EMAIL in parallel after completing MAP1.
Figure 27-4 FORK Activity Ensures Parallel Process
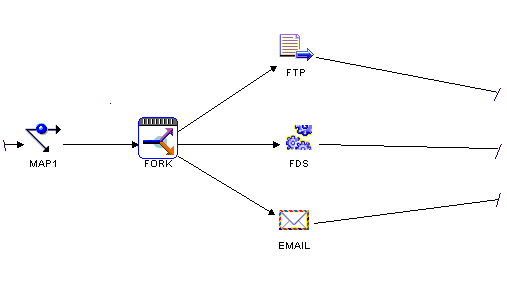
Figure 27-5 shows the same activities without the FORK activity. In this case, only one of the activities runs based on the completion state of MAP1.
Figure 27-5 Absence of FORK Activity Results in Conditional Process
The Process Flow Editor does not limit the number of outgoing transitions or concurrent activities that you can assign from a FORK. When you are designing for concurrent execution, design the FORK based on limitations imposed by the workflow engine or server that you use to run the process flow.
The outgoing FORK activity transition cannot have complex expressions.
Use the For Loop to repeatedly run activities that you include in the loop and then exit and resume the process flow.
When you add a For Loop activity, the editor also adds an End Loop activity and a transition to the End Loop. For outgoing transitions, define one with a loop condition and one with an exit condition. Select an outgoing transition and click Condition in the object details.
Table 27-12 describes the parameters of the For Loop activity.
Table 27-12 For Loop Activity Parameters
| Parameter | Description |
|---|---|
|
Condition |
An expression which when evaluated to true runs the loop transition; otherwise it runs the exit transition |
|
Variable |
Bound to a variable or parameter, its value is incremented every iteration. |
|
Initial_Value |
The initial value of the variable on entering the loop. By default, you must enter an expression. |
|
Next_Value |
The next value of the variable. By default, you must enter an expression. |
Use the FTP activity to transfer files from one file location to another based on a script of FTP commands that you provide. The FTP activity is a specialization of the User Defined activity. The difference between these two is that the FTP activity should be configured with the remote file location.
For the process flow to be valid, the FTP commands must involve transferring data either from or to the server with the Control Center Service installed. To move data between two computers, neither of which hosts the Control Center Service, first transfer the data to the Control Center Service host computer and then transfer the data to the second computer.
Before you design a process flow with an FTP activity, ensure that the sources and destinations have defined locations.
The FTP activity relies on a script of FTP commands that you provide. You have a choice of either writing that script within Oracle Warehouse Builder or directing Oracle Warehouse Builder to a file containing the script. Choose one of the following methods:
Choose this method when you want to maintain the script of FTP commands in Oracle Warehouse Builder or when password security to servers is a requirement.
For this method, in the COMMAND parameter of the FTP activity, enter the path to the FTP executable. The parameters for the FTP parameter are displayed in the Structure tab of the Design Center. Also, for file transfer protocols other than UNIX, enter additional parameters for the protocol in the PARAMETER_LIST parameter. Enter a script in the VALUE property of the SCRIPT parameter.
Table 27-13 lists the parameters that you set for the FTP activity when writing the script within Oracle Warehouse Builder.
Table 27-13 FTP Activity Parameters for a Script in Oracle Warehouse Builder
| Parameter | Description |
|---|---|
|
COMMAND |
Enter the path to the file transfer protocol command such as |
|
PARAMETER_LIST |
This is a list of parameters that is passed to the command. Parameters are separated from one another by a token. The token is taken as the first character on the parameter list string, and the string must also end in that token. Oracle Warehouse Builder recommends the '?' character, but any character can be used. For example, to pass 'abc,' 'def,' and 'ghi' you can use the following equivalent: ?abc?def?ghi? or !abc!def!ghi! or |abc|def|ghi| If the token character or '\' must be included as part of the parameter, then it must be preceded with '\'. For example '\\'. If '\' is the token character, then '/' becomes the escape character. Enter any additional parameters necessary for the file transfer protocol. For Windows, enter ?"-s:${Task.Input}"? The ${Task.Input} token prompts Oracle Warehouse Builder to store the script in a temporary file and replaces the token with the name of the temporary file. The script is therefore not passed on as standard input. Note: The -s parameter is set for the Windows FTP command because it cannot be used with standard input except from a file. For UNIX, you should leave this value blank. In general, UNIX FTPs read from standard input and therefore do not require any other parameters. |
|
RESULT_CODE |
An integer output of the activity type that indicates if the activity completed successfully. |
|
SUCCESS_THRESHOLD |
Designates the FTP command completion status.Enter the highest return value from the operating system that indicates a successful completion. When the operating system returns a higher value, it indicates that the command failed. The default value is |
|
SCRIPT |
You can type the required script for FTP in this parameter. To enter or paste text, select the SCRIPT parameter in the Structure tab and, in the Property Inspector, click the arrow on the property Value. The Edit Property dialog box is displayed, in which you enter the script. The Process Flow Editor does not limit the amount of text you can enter. Each carriage return in the script is equivalent to pressing the Enter key. The script should end with bye or quit followed by a carriage return to ensure that the FTP command is terminated. |
The following is an example script that is entered in the Value property of the SCRIPT parameter in an FTP activity.
open ${Remote.Host}
${Remote.User}
${Remote.Password}
lcd ${Working.RootPath}
cd ${Remote.RootPath}
get salesdata.txt
quit
Notice that the example script includes ${Remote.User} and ${Remote.Password}. These are substitution variables. See "Using Substitution Variables" for more details.
Substitution variables are available only when you write and store the FTP script in Oracle Warehouse Builder.
Use substitution variables to prevent having to update FTP activities when server files, accounts, and passwords change. For example, consider that you create 10 process flows that use FTP activities to access a file on salessrv1 under a specific directory. If the file is moved, without the use of substitution variables, then you must update each FTP activity individually. With the use of substitution variables, you need only update the location information.
Substitution variables are also important for maintaining password security. When an FTP activity is run with substitution variables for the server passwords, it resolves the variable to the secure password that you entered for the associated location.
Table 27-14 lists the substitute variables that you can enter for the FTP activity. Working refers to the computer hosting the Control Center Service, the local computer in this case study. Remote refers to the other server involved in the data transfer. You designate which server is remote and local, when you configure the FTP activity, as described in "Configuring Process Flows Reference".
Table 27-14 Substitute Variables for the FTP Activity
| Variable | Value |
|---|---|
|
${Working.RootPath} |
The root path value for the location of the Control Center Service host |
|
${Remote.Host} |
The host value for the location involved in transferring data to or from the Control Center Service host |
|
${Remote.User} |
The user value for the location involved in transferring data to or from the Control Center Service host |
|
${Remote.Password} |
The password value for the location involved in transferring data to or from the Control Center Service host |
|
${Remote.RootPath} |
The root path value for the location involved in transferring data to or from the Control Center Service host |
|
${Task.Input} |
The Working and Remote location are set for the FTP activity when configuring a Process Flow. |
|
${parameter_name} |
The values of custom parameters can be substituted into the script and parameter using ${parameter_name} syntax. |
All custom parameters are imported into the command's environment space. For example, by defining a custom parameter called PATH it is possible to change the search path used to locate operating system executables (some JAVA VMs may prevent this).
If password security is not an issue, you can direct Oracle Warehouse Builder to a file containing a script including the FTP commands and the user name and password.
To call a file on the file system, enter the appropriate command in PARAMETERS_LIST to direct Oracle Warehouse Builder to the file. For a Windows operating system, enter the following:
?"-s:<file path\file name>"?
For example, to call a file named move.ftp located in a temp directory on the C drive, enter the following:
?"-s:c:\temp\move.ftp"?
Leave the SCRIPT parameter blank for this method.
Table 27-15 lists the parameters that you set for the FTP activity when the FTP script resides in a file on your system.
Table 27-15 FTP Activity Parameters for Script Outside of Oracle Warehouse Builder
| Parameter | Description |
|---|---|
|
Command |
Leave this parameter blank. |
|
Parameter List |
Enter the path and name of the file for the FTP script. The Process Flow Editor interprets the first character that you type to be the separator. For example, the Process Flow Editor interprets the following entry as two parameters,
Use the backslash as the escape character. For example, the Process Flow Editor interprets the following entry as three parameters:
|
|
RESULT_CODE |
An integer output of the activity type that indicates if the activity completed successfully. |
|
Success Threshold |
Designates the FTP command completion status.Enter the highest return value from the operating system that indicates a successful completion. When the operating system returns a higher value, it indicates that the command failed. The default value is |
|
Script |
Leave this parameter blank. |
Use the Java Class activity type to represent a Java class or a Java Bean within a process flow. Java Beans are reusable software components that you can manipulate visually in a builder tool.
The Java Class activity enables you to leverage functionality that was defined using Java Beans or as a Java class.
Table 27-16 describes the parameters for the Java Class activity.
Table 27-16 Java Class Activity Parameters
| Parameter Name | Description |
|---|---|
|
CLASSPATH |
Represents the |
|
CLASS_NAME |
Name of the class to invoke from the process flow. |
|
JAVA_OPTIONS |
Represents any options to be passed to the JVM. |
|
PARAMETER_LIST |
Represents the parameters to pass to the Java class or Java Bean. |
|
RESULT_CODE |
Represents the value returned by the exit code for this Java class. |
|
RUN_DIRECTORY |
Represents the name of the working directory when the Java Virtual Machine (JVM) is invoked. |
You do not need a special location to deploy process flows that contain a Java Class activity.
Note:
Due to the following reasons, it is recommended not to use the Java Class activity type:A single Java Virtual Machine (JVM) is used to run each activity.
There could be security issues with passwords because Oracle Warehouse Builder does not provide a secure way to pass parameters to activities.
The reporting functionality described in "Example: Using an Enterprise Java Bean Activity to Leverage Existing Business Logic from EJBs" can be implemented by a Java Class rather than by an EJB. In this case, you add a Java Class activity and set the following values for its parameters:
CLASSPATH: home/reports/reports.jar
CLASS_NAME: ordersystem.reports
JAVA_OPTIONS: Xmx768M -DDIR=d:\\temp\\
PARAMETER_LIST: ?ReportName?PrintDevice?
RUN_DIRECTORY: /home/work
ReportName and PrintDevice are custom parameters that you create with the following properties:
Direction is set to IN for both parameters.
Literal is set to True for both parameters.
The value for the parameter ReportName is set to DailyOrders.
The value for the parameter PrintDevice is lpt1.
By default, a Java Class activity is run by an operating system process that invokes the Java executable from the Control Center Service path. You can override this by setting the following property: property.RuntimePlatform.0.NativeExecution.JavaOSProcess.executable
Set this property in the file OWB_HOME/bin/admin/Runtime.properties.
For example, use the following steps to run the Java activities by a specific JDK.
In the OWB_HOME/owb directory, create my_java.sh to contain the following:
#!/bin/sh
echo $* >> /tmp/out.log
/usr/local/packages/jdk14/jre/java $*
To the OWB_HOME/bin/admin/Runtime.properties file, add the following:
property.RuntimePlatform.0.NativeExecution.JavaOSProcess.executable=/oracle/owb/my_java.sh
Make my_java.sh executable by the Oracle user.
Use the Manual activity to halt a process flow.
Once the process flow halts, a user must intervene through the Control Center or Repository Browser to resume the process flow.
Consider using this activity to enable you to design a process to restart or recover ETL processes.
The Manual activity is similar to the Notification activity except that it does not require you to implement Oracle Workflow and therefore does not send an email. To achieve the same results as the Notification activity without interacting with Oracle Workflow, consider using the Email activity followed by a Manual activity.
Table 27-17 describes the parameters of the Manual activity.
Table 27-17 Manual Activity Parameters
| Parameter | Description |
|---|---|
|
Performer |
The name of the person or group that can resume the process flow |
|
Subject |
Enter the subject of the activity |
|
Text_body |
Enter special instructions to be performed before resuming the process flow |
|
Priority |
Set a priority. The options are: 1= high, 50=medium, and 99=low. |
Use the Mapping activity to add an existing mapping that you defined and configured in the Mapping Editor.
You can assign multiple incoming transitions to a Mapping activity. For outgoing transitions, assign one unconditional transition or up to one of each of the unconditional transitions.
When you add a mapping to a process flow, you can view its configuration properties in the Activities panel. The Mapping activity in the Process Flow Editor inherits its properties from the mapping in the Mapping Editor. In the Process Flow Editor, you cannot change a property data type or direction.
You can, however, assign new values that affect the process flow only and do not change the settings for the mapping in the Mapping Editor. For example, if you change the operating mode from set-based to row-based in the Process Flow Editor, the process flow runs in row-based mode. The original mapping retains set-based mode as its operating mode. To change the properties for the underlying mapping, see "Configuring Mappings Reference".
If a mapping contains a Mapping Input Parameter operator, specify a value according to its data type. The Process Flow Editor expects to receive a PL/SQL expression when you add a Mapping Input Parameter operator to a mapping. If the Mapping Input Parameter is a string, then enclose the string in double quotation marks.
To update a process flow with changes that you made to a mapping in the Mapping Editor, delete the Mapping activity from the process flow and add the Mapping activity again.
Table 27-18 and Table 27-19 list the different mapping parameters in PL/SQL and SQL*Loader.
Table 27-18 describes the PL/SQL mapping parameters.
Table 27-18 Mapping parameters for PL/SQL
| Parameter | Valid Values |
|---|---|
|
AUDIT_LEVEL |
NONE STATISTICS ERROR_DETAILS COMPLETE |
|
BLUK_SIZE |
1+ |
|
COMMIT_FREQUENCY |
1+ |
|
MAX_NO_OF_ERRORS |
Maximum number of errors enabled after which the mappings terminate with an error |
|
OPERATING_MODE |
SET_BASED ROW_BASED ROW_BASED_TARGET_ONLY SET_BASED_FAIL_OVER_TO_ROW_BASED SET_BASED_FAIL_OVER_TO_ROW_BASED_TARGET_ONLY |
Table 27-19 lists the SQL*Loader mapping parameters.
The Notification activity enables you to design a process to restart or recover ETL processes. This activity works with Oracle Workflow. To implement notifications, you must also implement Workflow notifications in Oracle Workflow. Alternatively, you could use an "Email" activity followed by a "Manual" activity. Oracle Workflow subsystem decides how the message is sent.
To use the Notification activity, first define the parameters listed in Table 27-20. Define a conditional outgoing transition based on each response that you define. For example, if the value of response_type is yes, no and default_response is yes, define two outgoing transitions. Right-click each transition and select Condition to view a list of conditions. In this example, you create one outgoing transition with condition set to yes and another set to no.
Table 27-20 Parameters for the Notification Activity
| Parameter | Description |
|---|---|
|
Performer |
Enter the name of a role defined by the Oracle Workflow administrator. |
|
Subject |
Enter the subject of the e-mail. |
|
Text_body |
Enter instructions for the performer. Explain how their response affects the process flow and perhaps explain the default action if they do not respond. |
|
Html_body |
Use html in addition to or instead of text. Content that you enter in html_body is appended to text_body. |
|
Response_type |
Enter a comma-delimitedlist of values from which the performer selects a response. Each entry corresponds to one outgoing transition from the activity. |
|
Default_response |
Enter the default response. |
|
Priority |
Set a priority for the e-mail of either 1 (high), 50 (medium), or 99 (low). |
|
Timeout |
The number of seconds to wait for response. If this is set, then a #TIMEOUT transition is required. |
|
Response_processor |
Oracle Workflow notification response processor function. For more information, see the Oracle Workflow documentation. |
|
Expand_roles |
Used for notification voting. Set this value to TRUE or FALSE. When set to TRUE, a notification is sent to each member of a group rather then a single shared message to the group. For more information, see the Oracle Workflow documentation. |
Note:
Due to an Oracle Workflow restriction, only the performer, priority, timeout, and customer parameter values can be changed at run time.Custom parameters can be added to the Notification activity to pass and retrieve data from the user through the notification. IN parameters can be substituted into the message using SQL and appropriate syntax. For example, for a custom parameter called NAME, the text &NAME is replaced with the parameter's value. You are also prompted to enter values for the OUT parameters.
Use the OMBPlus activity to represent an OMB*Plus script in a process flow. It enables you to start OMB*Plus while running a process flow, to perform an OMB function or call an expert.
This is particularly useful when you use mappings within a process flow. You must not deploy maps before you start a process flow. You can now deploy them using the OMBPlus activity as part of the process flow.
For example, you create a process flow that runs two mappings, each of which loads a target table. You can now deploy the mappings as part of the process flow.
Figure 27-6 displays a mapping that provides this functionality.
Figure 27-6 OMBPlus Activity in a Mapping
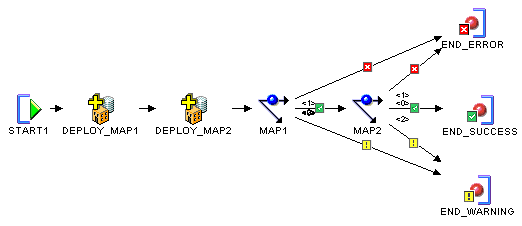
Table 27-21 describes the parameters of the OMBPlus activity.
Table 27-21 OMBPlus Activity Parameters
| Parameter Name | Description |
|---|---|
|
PARAMETER_LIST |
Defines a list of parameters, separated by a repetition of the first character. For example, /VALUE1/VALUE2/VALUE3/, where the "/" character is used as a separator. The separator must appear after the list and at the front. |
|
RESULT_CODE |
An integer output of the activity types that indicates if the activity completed successfully. |
|
SCRIPT |
Represents the OMB*Plus script to be run. This parameter can only be used to enter the script body that is to be run. To refer to an existing script, then specify the script in the PARAMETER_LIST. For example, |
|
SUCCESS_THRESHOLD |
Designates the OMB*Plus script completion status.Enter the highest return value from the script execution that indicates a successful completion. When a higher value is returned, it indicates that the command failed. The default value is |
You can enter an OMB*Plus script to run or point to an existing script on the file system. To enter a script, expand the activity node in the Structure panel and select Script. In the Value field of the Property Inspector, click the Ellipsis button, enter the script in the Edit Property dialog box, and click OK. To point to an existing script on a file system, go to the parameter_list parameter and enter the at sign, @, followed by the full path.
Execution Mode for a Process Flow Containing an OMBPlus Activity
The OMBPlus activity can be run in one of several modes:
Control Center internal (NATIVE JAVA)
Database (Scheduler)
Disabled
The property setting "property.RuntimePlatform.0.NativeExecution.OMBPlus.security_constraint" that is set in owb/bin/admin/Runtime.properties controls this behavior.
Use the OR activity to start an activity based on the completion of one or multiple number of upstream activities. You can assign multiple incoming transitions and only one unconditional outgoing transition to an OR activity.
The OR activity has similar semantics to the AND activity, except that the OR activity propagates the SUCCESS, WARNING, or ERROR outcome of the first upstream activity that is completed.
An OR activity in a process flow ensures that downstream activities are triggered only once for each run of a process flow.
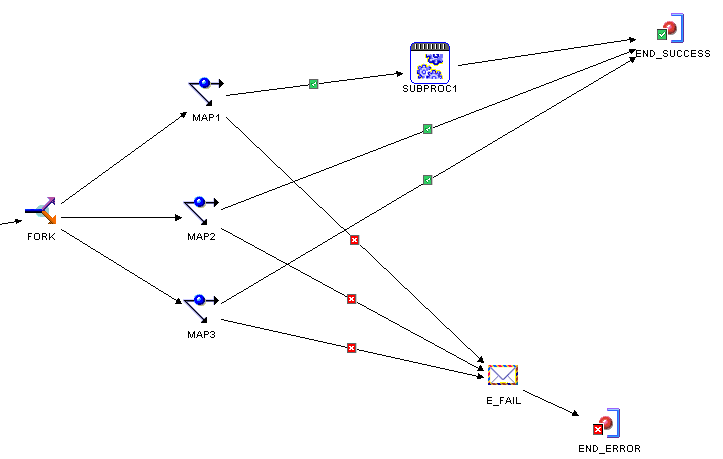
Figure 27-7 displays the process flow containing an OR activity.
Figure 27-7 The OR activity in a Process Flow
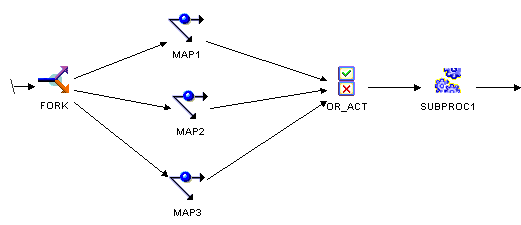
The Process Flow Editor enables you to omit the OR activity and assign transitions from each of the three Mapping activities to Subprocess activity SUBPROC1. However, this logic would start SUBPROC1 three times within the same run of a process flow. Avoid this by using an OR activity.
Use the Route activity to route the outcome of an activity to specific results based on a condition that you define. It enables you to define exclusive OR and if-the-else scenarios.
A Route activity has no operation and therefore you use to place a bend in a transition. Like any other activity, you can add outgoing complex condition transitions to the Route activity. But because the activity has no operation, the condition may only refer to the process flow's parameters and variables.The inclusion of a Route activity can affect the outcome of an AND or OR activity. Because the Route activity has no outcome of its own, it is considered to have completed as SUCCESS.
This activity does not have any parameters.
Use the Set Status activity to interject a success, warning, or error status.
You can use the Set Status activity for overriding the behavior of the "AND" activity. Recall that if any of the activities immediately preceding an AND return an error, the AND activity resolves to an error. If you want the AND to resolve to success regardless of the result of a preceding activity, then insert between that activity and the AND activity a Set Status activity.
Use a SQL*PLUS activity to introduce a script into the process flow.
To paste or type in a script, select the activity on the canvas. In the Structure panel, expand the process flow node, then the Activities node, then the SQL*PLUS node, and select SCRIPT. The Property Inspector displays the properties of the Script parameter. In the Value field of the Property Inspector, paste or enter the script. Or, to point to an existing script on a file system, go to parameter_list and type the at sign, @, followed by the full path.
Although you can use this activity to accomplish a broad range of goals, one example is to use a SQL*PLUS activity to control how multiple mappings are committed in a process flow as described in "Committing Mappings through the Process Flow Editor".
The process flow in SQL*PLUS activity is performed by the configuration item in the Deployed Location.
To set the location that runs the SQL*PLUS activity:
In the Projects Navigator, expand the Process Flow module.
Right-click the process flow and select Configure.
The Configuration tab for the process flow is displayed.
In the Configuration tab, expand the SQL*PLUS Activities node.
Select SQLPLUS.
Under Path Settings, set the Deployed Location option to the location that runs the SQL*Plus activity.
The SQL*Plus activity is similar to the User Defined activity with the following differences:
The COMMAND parameter cannot be specified as it is automatically derived.
If the ${Task.Input} substitution variable is used then the temporary file that is created, ends in .sql.
It has a different set of substitution variables. The activity should be configured with a Deployed database location.
The substitution variables are similar to FTP. It uses the following location instead of the remote location as it is connecting to an Oracle Database and not FTP server:
Working location as the local location
Deployed location as the target location
Table 27-23 SQL*PLUS Substitution Variables
| Substitution Variable | Description |
|---|---|
|
${Working.RootPath} |
The local working directory |
|
${Task.Input} |
A temporary file create from the SCRIPT parameter |
|
${Target.Host} |
Host name of the target location |
|
${Target.Port} |
Target port of the target location |
|
${Target.Service} |
Target service of the target location |
|
${Target.TNS} |
TNS of the target location |
|
${Target.Schema} |
Target schema of the target location |
|
${Target.User} |
User of the target location |
|
${Target.Password} |
Password of the target location |
|
${Target.URL} |
Connection descriptor of the target location |
If the PARAMTER_LIST is empty then one of the following parameter list is used depending on the Deployed location parameters:
?${Target.User}/${Target.Password}@${Target.TNS}?@${Task.Input}?
?${Target.User}/${Target.Password}@${Target. URL}?@${Task.Input}?
?${Target. Schema}/${Target.Password}@${Target.TNS}?@${Task.Input}?
?${Target. Schema}/${Target.Password}@${Target. URL}?@${Task.Input}?
The SQL*Plus command cannot be entered directly to the FTP User Defined activities. It is either loaded from the home directory or its location is predefined by the workspace administrator.
The Sql*Plus execution location is determined from the following platform properties in the following order:
property.RuntimePlatform.0.NativeExecution.SQLPlus.sqlplus_exe_10g
property.RuntimePlatform.0.NativeExecution.SQLPlus.sqlplus_exe_9i
property.RuntimePlatform.0.NativeExecution.SQLPlus.sqlplus_exe_8i
property.RuntimePlatform.0.NativeExecution.SQLPlus.sqlplus_exe_default
The Oracle home is determined in a similar way from the following platform properties:
property.RuntimePlatform.0.NativeExecution.SQLPlus.oracle_home_10g
property.RuntimePlatform.0.NativeExecution.SQLPlus.oracle_home_9i
property.RuntimePlatform.0.NativeExecution.SQLPlus.oracle_home_8i
property.RuntimePlatform.0.NativeExecution.SQLPlus.oracle_home_default
By default, each process flow includes one Start activity. You can set input parameters for the Start activity that become the input parameters for the complete process flow.
To add parameters to a Start activity:
In the Projects Navigator, double-click the Process Flow to open the Process Flow Editor.
In the Structure panel, expand the Activities node.
If the Structure tab is not displayed, select Structure from the View menu.
Select the Start activity and click New Process Activity Parameter (the tiny green "Plus" button at the top) on the Structure tab.
A new parameter is added under the Start activity.
Select the new parameter and, in the Property Inspector, set the properties for this parameter.
Change the parameter name and data type as necessary. You cannot alter its direction. The direction is IN, indicating that the parameter is an input parameter only. For value, type the parameter value. You can overwrite this value at runtime.
You can now use the parameter as input to other activities in the process flow.
Use a Subprocess activity to start a previously created process flow. From one process flow, you can start any other process flow that is contained within the same or any other process flow package.
Once you add a Subprocess activity to a process flow, use it in your design in a way similar to any other activity. You can assign multiple incoming transitions. For outgoing transitions, assign either one unconditional outgoing transition or up to three outgoing conditional transitions.
The END activities within the subprocess apply to the Subprocess activity only and do not function as a termination point in the process flow.
An important difference between a Subprocess activity and other activities is that you can view the contents of a subprocess, but you cannot edit its contents in the parent process flow. To edit a subprocess, open its underlying process flow from the Projects Navigator. With the exception of renaming a process flow, the Process Flow Editor propagates changes from child process flows to its parent process flows.
Note:
Use caution when renaming process flows. If you rename a process flow referenced by another process flow, then the parent process flow becomes invalid. You must delete the invalid subprocess and add a new subprocess associated with the new name for the child process flow.To add Subprocess activity to a process flow:
From the palette in the Process Flow Editor, drag and drop the Subprocess activity icon onto the canvas.
Oracle Warehouse Builder displays a dialog box to select and add a process flow as a subprocess.
Expand the process flow module and select a process flow from the same process flow package as the parent process flow.
Oracle Warehouse Builder displays the process flow as a Subprocess activity on the parent process flow.
To view the contents of the subprocess, right-click the subprocess and select Expand Node.
The Process Flow Editor displays the graph for the subprocess surrounded by a blue border.
When a function transform is dropped onto the canvas, the return parameter is created as a new parameter with the same name as the transform. When you add transformations from the transformation library to a process flow using the Transform activity, the Process Flow Editor displays the parameters for the transformation in the Activity panel.
You can specify one or more incoming transitions to start a Transform activity. For outgoing transitions, you can either specify one unconditional transition or one of each of the three conditional transitions.
If you specify conditional outgoing transitions, you can configure the activity to base its status on its return value. For more information about Use Return as Status, see "Configuring Process Flows Reference".
To update a process flow with changes that you made to a transformation, delete the Transform activity from the process flow and add the Transform activity again.
For transforms that are not deployed, such as the public transformations, the activity must be configured with a Deployed location value.
The User Defined activity enables you to incorporate into a process flow an activity that is not defined within Oracle Warehouse Builder.
You can specify one or more incoming transitions to start a User Defined process activity. For outgoing transitions, you can either specify one unconditional transition or one of each of the three conditional transitions.
If you specify conditional outgoing transitions, you can configure the activity to base its status on its return value. For more information about Use Return as Status, see "Configuring Process Flows Reference".
Table 27-24 lists the parameters you set for the User Defined activity.
Table 27-24 User Defined Activity Parameters
| Parameter | Description |
|---|---|
|
Command |
The command to perform the user defined process that you defined. Enter the path and file name such as |
|
Parameter List |
The list of parameters to be passed to the user defined process. Enter the path and file name such as The Process Flow Editor interprets the first character you type to be the separator. For example, the Process Flow Editor interprets the following entry as
Use the backslash as the escape character. For example, the Process Flow Editor interprets the following entry as
You can also enter the substitution variables listed in Table 27-25. |
|
Success Threshold |
Designates the completion status.Enter the highest return value from the operating system that indicates a successful completion. When the operating system returns a higher value, it indicates that the command failed. The default value is |
|
Script |
You can enter a script here or enter a file name for a script. If you enter a file name, then use the ${Task.Input} variable in the parameter list to pass the file name. To enter or paste text, select Value at the bottom of the Activity panel. The Process Flow Editor does not limit the amount of text you can enter. Each carriage return in the script is equivalent to pressing the Enter key. Therefore, end the script with a carriage return to ensure that the last line is sent. |
Table 27-25 lists the substitute variables you can enter for the FTP activity.
Table 27-25 Substitute Variables for the User Defined Process Activity
| Variable | Value |
|---|---|
|
${Working.Host} |
The host value for the location of the Control Center Service host |
|
${Working.User} |
The user value for the location of the Control Center Service host |
|
${Working.Password} |
The password value for the location of the Control Center Service host |
|
${Working.RootPath} |
The local working directory |
|
${Task.Input} |
A temporary file created from the SCRIPT parameter Enter the Task.Input variable to direct Oracle Warehouse Builder to the script that you write in the SCRIPT parameter. On Windows, enter into Parameter_List ?"-s:${Task.Input}"? and on UNIX, enter into Parameter_List ?"${Task.Input}"? where the question mark as the separator. |
Use the Wait activity to interject a delay in the process flow.
Table 27-26 describes the parameters of the Wait activity.
Use the While Loop to run one or more activities only when a condition that you define evaluates to true.
Typically, you associate a While Loop with "Assign" activities that enable you to define the while condition. At least one Assign activity initializes the data and at least one Assign activity increments or modifies the data again to the end of a loop iteration.
When you add a While Loop activity, the editor also adds an End Loop activity and a transition to the End Loop. Create transitions from the While Loop activity to each activity you want to include in the loop. For each outgoing transition that you add, apply either an EXIT or LOOP condition to the transition by selecting the transition and clicking on Condition in the object details.
To define the while condition that governs whether to run the loop, in the Structure panel, expand the process flow node, then the Activities node, then the WHILE_LOOP node, and select Condition. The Property Inspector displays the parameters for the Condition.
Table 27-27 describes the parameters of the While Loop activity.
Use the Web Service activity to add an existing Web service to a process flow. The Web services must be defined under the Application Servers node of the Projects Navigator or the Public application Server node of the Globals Navigator.
The Web Service activity enables you use the operations defined in the Web service in your process flow. When you add a Web Service activity to a process flow, it contains multiple operations. You are prompted to select the operation you want to use.
The parameters for a Web Service activity depend on the type of operations performed by the Web service. Thus, different operations can have different parameters. Table 27-28 describes the parameters of the runCCJob operation of the default Web service AgentWebService.
Table 27-28 Parameters for Web Service Activities
| Parameter | Description |
|---|---|
|
Username |
The name of the workspace user executing the process flow |
|
Password |
The password of the user specified in the username field |
|
Workspace |
The name of the workspace in which the Web service execution job should be run. If the user executing the Web service is not the workspace owner, then prefix the workspace name with the user name. For example, |
|
Location |
The physical name of the location to which the operation is deployed |
|
Task_type |
The type of operation. Use one of the following values: PLSQL, SQL_LOADER, PROCESS, SAP, or DATA_AUDITOR. |
|
Task_name |
The physical name of the process flow. Qualify the process flow name with the name of the process flow package to which it belongs. For example, |
|
Connection_string |
The connection information of the system that runs the Control Center Manager |
|
System_params |
The values of the mapping execution parameters, if any, such as Bulk Size, Audit Level, or Operating Mode. |
|
Custom_params |
The values for the input parameters for the mapping on which the Web service is based |
To use a Web Service activity in a process flow:
Open the process flow in which you want to add Web Service activity by double-clicking the process flow in the Projects Navigator.
The process flow is displayed in the editor.
From the Projects Navigator, drag and drop the Web service you want to add.
The Web Service Operation dialog box is displayed.
If the Web service selected in the previous step contains multiple operation, select the operation within the Web service to add to the process flow and click OK.
The Web service operation is added to the process flow.
Set the parameters for the Web Service activity.
|
Copyright © 2000, 2011, Oracle and/or its affiliates. All rights reserved. Legal Notices |
|