| Oracle® Warehouse Builder Concepts 11g Release 2 (11.2) Part Number E10581-04 |
|
|
PDF · Mobi · ePub |
| Oracle® Warehouse Builder Concepts 11g Release 2 (11.2) Part Number E10581-04 |
|
|
PDF · Mobi · ePub |
Oracle Warehouse Builder provides a dynamic workspace for your projects and one, common look-and-feel for all editors, including automatic layout, dockable panels, and zoom capabilities. The Property Inspector standardizes the properties inspection interface for all objects. This section introduces the general user interface elements that are essential to using Oracle Warehouse Builder.
This section contains these topics:
A workspace resides within Oracle Warehouse Builder repository on Oracle Database. Oracle Warehouse Builder repository can contain one or more workspaces, depending on how you want to organize your users and functional areas. The first step in building a new workspace is to assign it a name and to specify the path and directory where its source files are saved. Oracle Warehouse Builder organizes your workspace into projects and creates and organizes many of the configuration files required by the type of data system you are creating. For a description of projects, see "Projects".
The workspace is hosted on an Oracle database. As a general user, you do not have full access to all the workspaces. Instead, you can access those workspaces to which you have been granted access and privileges. You log in to a workspace by starting the Design Center, which is the primary graphical user interface. The Design Center is used to import source objects, design ETL processes such as mappings, and ultimately define the integration solution. For information about the Design Center, see "Design Center".
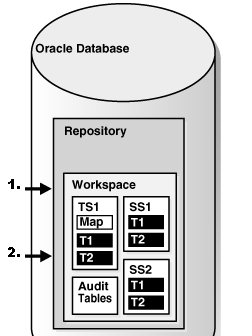
Figure 3-1 shows a representation of the Oracle Warehouse Builder repository in Oracle Database. Within the repository, at least one workspace containing one project exists. In the figure, numeral 1. points to a workspace and numeral 2. points to several projects within that workspace. Multiple workspaces can reside within Oracle Warehouse Builder repository.
Figure 3-1 Oracle Database with a Workspace Contained within the OWB Repository
The project is the highest-level and largest object in Oracle Warehouse Builder workspace. Each project acts as the container for all objects in the data system that contains the sources and targets. The work you do on your data system is done in relation of a project. Projects store and organize related metadata definitions. You should include all the objects in a project that you think can or share information. These definitions include data objects, mappings, and transformation operations. The definitions are organized into folders within the project. By creating multiple projects, you can organize the design and deployment of a large system.
You can create projects according to functional areas like Sales, HR, Customer Service, and so forth. Projects are organized in tree hierarchies with modules for specialized types of metadata and Oracle Warehouse Builder objects. Multiple users can concurrently access an Oracle Warehouse Builder project. Changes and updates are managed through a locking mechanism to ensure data integrity.
Projects contain these main structures, which are described in this section:
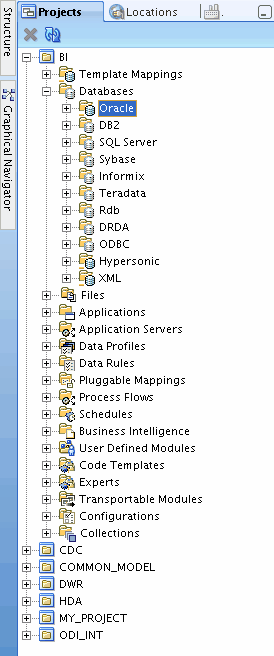
Figure 3-2 shows projects in a workspace as they are displayed by the Projects Navigator in a tree hierarchy.
Figure 3-2 Projects As They Appear in the Projects Navigator
In the Project Navigator, right-click a project, such as MY_PROJECT, and select New.
The Create Project dialog box is displayed.
Click Help for additional instructions.
Each Oracle Warehouse Builder workspace has a default project called MY_PROJECT. You can rename MY_PROJECT, or you can delete it after you create other projects. However, a workspace must contain at least one project.
Because projects are the main design component in Oracle Warehouse Builder, some restrictions are enforced to prevent you from deleting them unintentionally. You cannot delete:
The currently active or expanded project.
The only project in a workspace.
In the Project Navigator, collapse the project to delete. You cannot delete the project when it is expanded.
Select and expand any other project.
Highlight the project you want to delete and, from the Edit menu, select Delete.
or
Right-click the project and select Delete.
The Oracle Warehouse Builder Warning dialog box provides the option of putting the project in the recycle bin.
Click OK to delete the project.
A module is a container for actions that appears in the Projects Navigator, and that corresponds to a specific location in the Locations Navigator. A single location can correspond to one or more modules. However, a given module can correspond to only one metadata location and data location at a time. You can create a new module from the Projects Navigator.
The association of a module to a location enables you to perform certain actions more easily. For example, group or batch actions such as creating snapshots, copying, validating, generating, deploying, and so on, can be performed on all the objects within a module by selecting an action on the context menu when the module is selected.
To define the target schema, begin by creating a module. The Oracle target module is the first of several modules you create in Oracle Warehouse Builder.
See Also:
"Creating Modules" in Oracle Warehouse Builder Sources and Targets Guideand "Configuring Target Modules" in Oracle Warehouse Builder Data Modeling, ETL, and Data Quality Guide.You can create folders to organize all or some objects in a target module based on specific object characteristics. Related tables and views that must be generated or deployed can be placed under a common folder. For example, you may create user folders to group tables based on their functionality (sales, marketing, administration and so forth).
See Also:
These topics in Oracle Warehouse Builder Sources and Targets Guide:Collections are structures in Oracle Warehouse Builder that store the metadata you want to export to other tools and systems. Collections enable you to perform the following tasks:
Organize a large logical warehouse
Validate and generate a group of objects
When you create a collection, you do not create new objects or copies of existing objects. You create shortcuts pointing to objects existing in the project. You can use a collection to quickly access a base object and make changes to it.
You can define multiple collection within a project and an object can be referenced by multiple collection. For example, each user that accesses a project can create his own collection of frequently used objects. The users can also add the same objects (such as mappings, tables, or process flows) to their separate collections.
Each user can also delete either the shortcut or the base object. Shortcuts to deleted objects are deleted in the collection. When you open an object in a collection, you obtain a lock on that object. Oracle Warehouse Builder prevents other users from editing the same object from another collection.
Use the Create Collection Wizard to define a collection as follows.
Select and expand a project node in the Projects Navigator.
Right-click the Collections node and select New Collection.
Oracle Warehouse Builder displays the Create Collection dialog box.
In the Name field, enter a name for the collection.
The name should be unique within the module. In physical naming mode, type a name between 1 to 200 characters. Spaces are not allowed. In logical mode, the maximum number of characters is 200 and spaces are allowed.
In the Description field, enter an optional description for the collection.
Click OK to create the collection.
To add references to objects in the collection
In the Projects Navigator, select the object to include in the collection.
Select multiple objects by holding down the Shift key while selecting the objects.
Right-click the selected object, select Add to Collection, and then select the name of the collection to which the select object should be added.
If you selected multiple objects, ensure that you hold down the Shift key while right-clicking the objects.
The selected objects are listed under the collection in the Projects Navigator.
The Design Center is the primary place for designing, managing, and building your data integration solution. You access all other tools from this central user interface and perform all commands for selected objects from here. The navigators in the Design Center are tree structures from which you select and manipulate projects and the different kinds of objects such as data locations, relational and dimensional data objects, flat files, ETL mappings to move and transform data, process flows to coordinate sequences of tasks, data profiles, rules and auditors for managing data quality, and so on. The Design Center also serves as a way for you to learn about the various kinds of components you may use in your projects, and also enables you to easily start wizards to create most of the common object types.
Design Center hosts multiple specific editors and tools for working with the different objects. Most tools feature contextual linking, so that as you are working on an object such as a process flow, you can easily open the relevant editors on objects such as ETL mappings referenced in the process flow.
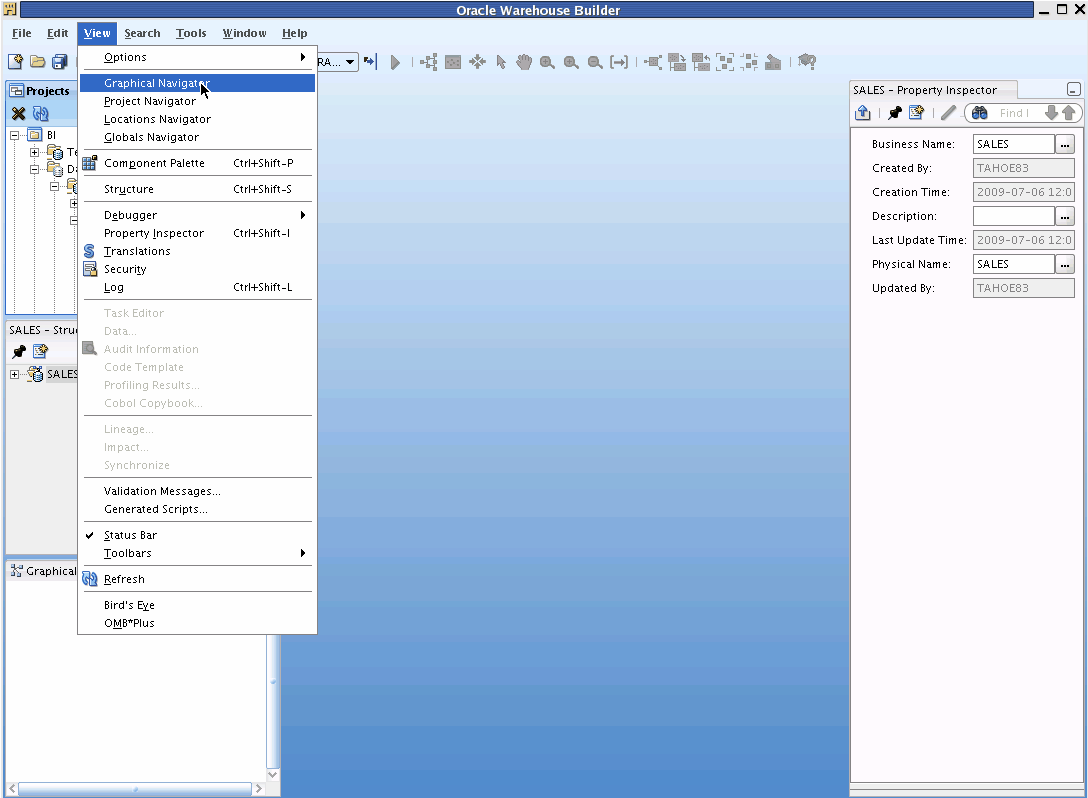
Figure 3-3 shows the Design Center canvas laid out as it usually appears the first time you start using Oracle Warehouse Builder. In this figure, the Start Page has been closed and the View menu is open to show some options for adding to the canvas.
Common Look and Feel with Oracle Application Development Framework
The Design Center user interface uses the Fusion Client Platform, the same core Integrated Development Environment (IDE) platform as Oracle JDeveloper and SQL Developer. The Design Center takes full advantage of usability research behind the Fusion Client Platform and provides developers with an environment that is consistent with other Oracle products.
Some productivity features of the Design Center and Java development environment are:
Global Search: You can use a Global Search field to search across the entire Design Center IDE and your project for a word or phrase.
Go to File: In addition to Go to Java Class (Alt+Minus), there is an option to Go to File (Ctrl+Alt+Minus) to enable you to quickly navigate to any file visible from your project.
Gallery: You can store global objects in named collections, called galleries. You can create new galleries as needed.
Accessing Commands for Selected Objects in the Design Center
The Design Center provides several ways of accessing commands for selected objects:
Right-click and select a command from the menu.
Select a command from one of the menus on the menu bar.
Click an icon on the toolbar.
Note:
After starting the Design Center, if classes cannot be found in their nominated directories, then the Messages area have an Extended tab in addition to the Log tab. This tab lists as warning those particular "errant" or missing classes. Two of these classes listed as missing can always be ignored:help-share and ohj.The Design Center contains the following menus:
Note:
Many of the commands available on the menu bar are also available on popup menus that you can access by right-clicking an object.The Design menu provides commands for creating a new object, and for configuring and editing parameters for the selected object. From this menu you import and export metadata to and from locations, objects, or folders. You validate the design of one or more selected objects. This menu provides commands for generating PL/SQL code and for deploying the PL/SQL code for one or more selected objects.
The Save command on the Design menu saves your changes to the workspace. The Revert to Saved command discards changes to the workspace.
See Also:
The Design Center Edit menu contains commands as follows.
Open Editor: Opens the editor for the selected object.
Add/Remove Experts Here: Displays the Add/Remove Experts dialog box, which you use to add the name of an expert to the menu. This command is displayed only to administrative users.
Cut: Deletes an object as part of a cut-and-paste operation.
Copy: Copies an object as part of a copy-and-paste operation.
Paste: Pastes a cut or copied object into a new folder. For example, an administrator can cut an expert from the Expert folder in the Project Navigator to the Public Experts folder in the Global Navigator.
Delete: Deletes one or more selected objects. A warning message provides the option of moving the object to the recycle bin.
Rename: Enables you to edit the name of an object.
Find: Displays the Find dialog box, which you use to search for an object within the current project. Searches are case-sensitive, and find only the objects that are visible (that is, in an expanded folder).
Properties: Displays the Properties dialog box for the selected object.
The Design Center View menu contains the following commands:
Refresh: Refreshes the objects displayed in the Project Navigator with the objects in the workspace. In a multiple user environment, this tool updates the Design Center with changes that other users have saved.
Expand: Displays the folders or objects in the selected folder.
Expand All: Displays all folders, subfolders, and objects in the selected folder.
Collapse: Hides all folders and objects in the selected folder, but does not collapse the subfolders. The next time the folder is expanded, the subfolders are either collapsed or expanded, as they were before.
Collapse All: Hides all folders and objects in the selected folder, and collapses any subfolders. The next time the folder is expanded, all of the subfolders are collapsed.
Data: Displays the Data Viewer for a deployed and executed data object.
Profiling Results: Displays the profile for the selected data object. You must have created the profile.
Lineage: Opens the Metadata Dependency Manager with the lineage analysis of the selected object.
Impact: Opens the Metadata Dependency Manager with the impact analysis of the selected object.
Synchronize: Updates an external table with any changes to its source file.
Validation Messages: Displays the Validation Results dialog box with the results from validating the selected object.
Generated Scripts: Displays the Generated Scripts dialog box with the results from generating the selected object.
Messages Log: Displays the message log for the current session. The messages log area includes an Extensions tab when any extensions that are loaded into the ADF cause an error to occur. The Extensions tab only appears if there are errors; otherwise, no extensions tab appears. Click the Extensions tab (if it appears) to see any errors.
The Design Center Tools menu contains the following commands:
Control Center Manager: Displays the Control Center Manager, from which you can deploy objects, start ETL jobs, and view the logs of previous jobs.
Job Monitor: Displays the Control Center Jobs window for the selected Control Center or configuration.
Change Manager: Displays the Metadata Change Management window, from which you can manage snapshots.
Metadata Dependency Manager: Displays the Metadata Dependency Manager, from which you can evaluate the impact of changes to one or more objects on other objects in your data warehouse.
Repository Browser: Displays the Repository Browser in your default Web browser, from which you can view reports about the repository or the Control Center. The browser listener must be running.
Optimize Repository: Refreshes the statistics for the database schema where the repository is located. This refresh improves the execution time of the SQL commands that the product sends to the database, and thereby improves Oracle Warehouse Builder performance. You should optimize the repository after importing or creating a large amount of metadata.
J2EE User Management: Opens the J2EE User Management window, from which a user with administrative privileges can manage J2EE users.
Recycle Bin: Opens the recycle bin, from which you can restore deleted objects.
Clipboard: Displays the Clipboard Contents window, which displays information about the object currently cut or copied to the clipboard.
Preferences: Displays the preferences associated with your login name.
The Design Center Window menu contains commands for displaying and hiding the navigators and OMB*Plus.
See Also:
The Design Center Help menu provides access to the online help and other resources. Refer to "Getting Help for Oracle Warehouse Builder" for a description.
The Design Center toolbar provides easy access to the most commonly used commands, which are also available from the menu bar and on popup menus that you can access by right-clicking an object.
OMB*Plus is an optional panel that is available from the Design Center. You can display or hide it by choosing OMB*Plus from the main menu. The OMB*Plus command window enables you to manage objects in the design workspace using the OMB*Plus scripting language.
With the OMB*Plus scripting language you can:
Perform complex actions.
Define sets of routine operations.
See Also:
Oracle Warehouse Builder API and Scripting Reference for complete information about OMB*Plus, and Chapter 10, "Scripting and Automation" in this guide.You use the Control Center Manager to deploy design objects and subsequently execute the generated code. This is the client interface that interacts with the target schema through the Control Center Service, and provides access to the information stored in the active Control Center. As soon as you define a new object in the Design Center, the object is listed in the Control Center Manager under its deployment location. The Control Center Manager enables you to view and manage all aspects of deployment and execution, including status and results.
Oracle Warehouse Builder uses only one Control Center Manager and corresponding Control Center Service for each database instance.
See Also:
These topics in Oracle Warehouse Builder Data Modeling, ETL, and Data Quality Guide :"Deploying Objects" for procedures on using the Control Center Manager for deployment.
"Starting ETL Jobs" for procedures on using the Control Center Manager to execute generated code.
The Design Centers provides navigators to organize your workspace into categories that helps to find what you are looking for. Collapsible panels put common elements within easy reach. Objects and files that comprise a composite node are exposed by clicking on the composite node.
The Navigator area in the Design Center contains the following tabs:
The Projects Navigator provides a tree that organizes the various object categories in the workspace into folders or containers. Database sources and targets, flat files, external tables, ETL mappings, process flows, data rules, data auditors, and so forth are listed in the order in which they appear in a project. Within the workspace you can have one or more projects, and within each project are various categories of objects. When you select an object, you can create a new one like it, or edit, validate, and deploy it.
Every workspace must have at least one project, which initially is named MY_PROJECT. You can rename this project or use it as a template to create additional projects. When you create a new project, the Project Welcome page provides a guide for configuration. The Projects Navigator can be restored from the View Menu.
Use the Locations Navigator to manage locations, connectors, and control centers for the entire workspace from one central location. You can display or hide it by choosing Locations Navigator from the View menu.
You can create locations and control centers while defining other objects. When you create a module, you can define its location. When you create a configuration, you can define a control center. You can create modules and configurations in the Projects Navigator. In contrast to these objects, you can only create a connector in the Locations Navigator.
The Globals Navigator provides users access to a set of shared objects:
Public Transformations
Public Application Servers
Public Code Templates
Public Experts
Public User Defined Modules
Public Data Rules
Configuration Templates
Icon Sets
Security
Users with administrative rights can create a new object or edit an existing one most easily by right-clicking the object or object folder, then choosing a command from the menu. They can also copy objects from the Projects Navigator and paste them into an appropriate folder in the Globals Navigator. In this way, any user can develop an object for use by the team, and an administrator can publish it in the Globals Navigator.
The Security folder is displayed only to administrative users. It enables them to manage the access rights of all workspace users to objects in the workspace.
The Globals Navigator is an optional panel in the Design Center. You can display or hide it by choosing Globals Navigator from the View menu.
Oracle Warehouse Builder provides contextual, JDev-style editors for accessing and editing the different types of data objects and document objects. Editors in Oracle Warehouse Builder use one common look and feel across all objects, including automatic layout, dockable panels, and zoom capabilities. Many editors for components are fully-integrated, modeless editors. These appear in the editor area along with the other editors, and enable more productive navigation. Additionally, the property inspector standardizes the properties interface for all objects. The property inspector categories are used consistently throughout Oracle Warehouse Builder to make using it more predictable.
The first time you open an editor, it displays with a menu bar, multiple tool bars, multiple windows along the left side, and a canvas or document area on the right.
See Also:
"Overview of the Mapping Editor" in Oracle Warehouse Builder Data Modeling, ETL, and Data Quality Guide and Appendix B, "Object Editors"In addition to the items listed in this section, editors typically contain Naming Mode, Rename Mode, Read/Write, and Validation Mode. The percent zoom and navigation mode are also indicated. You find that editors are contextual and they can be customized. This section describes how editors appear when you first start using the Design Center, which is the main graphical user interface in Oracle Warehouse Builder.
The following items are common to most editors in Oracle Warehouse Builder:
Title Bar: At the top of the editor, the title bar displays the name of the object, for example a mapping, and the access privileges you have on the object.
Menu Bar: Below the title bar, the menu bar provides access to the editor commands. You can access the menu bar by clicking on one of its options or by using hot keys. For example, to access the Mapping menu, press Alt +M.
Toolbar: Below the menu bar, the toolbar provides icons for commonly used commands.
Canvas: The canvas provides the document area where you design and modify mappings.
Indicator Bar: Along the lower edge of the editor there are mode icons, indicators, and descriptions.
You can resize a window by placing your mouse on the border of the window, pressing the mouse button when the double sided arrow appears, and dragging your mouse to indicate the desired size. You can move a window by placing the mouse on the Title Bar, and dragging the mouse to the desired location. To show or hide windows, select Window from the menu bar and either activate or deactivate the check mark corresponding to the window.
When you first start an editor, Oracle Warehouse Builder displays a navigator in the upper left corner. The navigator provides a tree of all the activities on the canvas and their parameters. When you select an activity on the canvas, Oracle Warehouse Builder goes to the activity on the navigator tree.
When you first start an editor, Oracle Warehouse Builder displays the properties inspector in the lower left corner. The properties inspector displays the properties for the object, its operators, and attributes in the operators. Also, when you select an object either from the canvas or the navigator, Oracle Warehouse Builder displays the properties in the properties inspector.
When you right-click an object, a wizard is invoked that guides you to make this object globally available in the object gallery for the JDev-based IDE. It presents a series of panels that capture the necessary information to create the object's component type. It enables you to specify the component name for the new component and to select the package into which you'd like to organize the component. If the package does not yet exist, the new component becomes the first component in that new package. When you click Finish, Oracle Warehouse Builder creates a new JDeveloper-type component by saving its XML component definition file. If you have set your Java generation options to generate classes by default, Oracle Warehouse Builder also creates the initial custom Java class files.
When you first start an editor, Oracle Warehouse Builder displays a palette along the left side that contains activity icons you can drag and drop onto the canvas. The operator palette features collapsible panels and divider sections to organize related operators. A quick search field is provided to help locate operators. You can add commonly-used operators to your Favorites list for easier access later, and another panel keeps track of your recently used ones. You can relocate the palette anywhere on the editor. You can choose to hide or display the palette by clicking on Operator Palette listed under View in the menu bar.
Editors typically provide the following task-oriented toolbars: general, graphic, generation, and palette. With the exception of the palette, the editor by default displays the toolbars below the menu bar. You can move, resize, or hide each of the toolbars.
General Toolbar: Use this toolbar to call common operations such as save all, exporting diagram, validating, generating, and printing.
Diagram Toolbar: Use this toolbar to navigate the canvas and change the zoom level of objects on the canvas.
Debug Toolbar: Use this toolbar to call commands for debugging a mapping, for example.
Palette Toolbar: The palette contains operator icons. To include an operator, drag an operator icon onto the editor canvas. As Oracle Warehouse Builder includes over 50 operators, you may want to sort and display the operators based on type.
You can control how an editor displays objects on the canvas by selecting View from the menu bar and selecting Options.
Use the F1 key to see help for each of the options. You can either select or deselect any of the options.
The Generation panel displays the generation and validation results for a data object. This panel is hidden when you first open the editor window. It appears the first time you generate or validate a data object.
The Generation window contains Script and Message tabs. The Script tab displays the generated scripts to implement the data object selected in the canvas. The Message tab displays the validation messages for the selected data object. Double-click a message to view the complete message text.
Oracle Warehouse Builder provides wizards to guide you in making numerous design decisions in defining objects and operators. Each wizard begins with a welcome page that provides an overview of the steps you must perform, and each wizard concludes with a summary page listing your selections.
See Also:
"About Operator Wizards" in Oracle Warehouse Builder Data Modeling, ETL, and Data Quality Guide and these topics in Oracle Warehouse Builder Sources and Targets Guide:The Repository Browser provides Web-based access to workspaces to view design details and metadata properties, and to generate reports about workspace objects and data.
With the Repository Browser you can also view reports for both high-level and detailed ETL run time information as follows:
Deployment information to manage separate target environments.
Note:
To open the Repository Browser, you must have theACCESS_PUBLICVIEW_BROWSER system privilege. You automatically have this privilege when you are the owner of the repository to browse. If you are not the owner of the repository, then you must contact your database administrator to have this privilege set.See Also:
"About the Repository Browser" in Oracle Warehouse Builder Data Modeling, ETL, and Data Quality Guide.
"Configuring the Repository Browser Environment" in Oracle Warehouse Builder Installation and Administration Guide.
|
Copyright © 2000, 2011, Oracle and/or its affiliates. All rights reserved. Legal Notices |
|