| Oracle® Warehouse Builder Sources and Targets Guide 11g Release 2 (11.2) Part Number E10582-05 |
|
|
PDF · Mobi · ePub |
| Oracle® Warehouse Builder Sources and Targets Guide 11g Release 2 (11.2) Part Number E10582-05 |
|
|
PDF · Mobi · ePub |
You can use flat files as either source files or target files within mappings in Oracle Warehouse Builder.
This chapter describes the use of flat files as sources and targets in Oracle Warehouse Builder. It contains the following topics:
When using flat files as sources:
You can read from character data set files or binary flat files.
You can read from delimited files, fixed length files, or XML files.
You can use flat file operators in SQL*Loader mappings to read from flat files directly, or you can add an external table and access the flat file data in a mapping using SQL and PL/SQL.
You can also add flat file operators in code template based mappings and leverage code templates that are specifically constructed for files or the generic SQL code templates which leverages a built-in JDBC driver for files.
When using flat files as targets:
You can use only character data set files. Binary flat files are not supported as targets.
You can write to delimited files and fixed length files.
You can use flat file operators to write data to flat files.
Note:
The same flat file can act as a source and a target file.File metadata describes the structure of data records in the file, including column names and data types. Before you use a flat file as source, it is desirable to define the metadata of that flat file.
You can import flat file metadata from several sources:
For character files with displayable data, you can use the Flat File Sample Wizard to view and analyze the flat file contents and deduce metadata from them.
For COBOL copybooks, you can import metadata definitions directly from the copybook file.
For binary files, files that are too complex for the Flat File Sample Wizard, and for target files for which no sample is available yet, you can explicitly define metadata for your flat file using the Create Flat File Wizard.
You can create flat file modules in your project that store metadata for source and target files. Each flat file module must be associated with a metadata and data location. When you specify a location for a module, both metadata location and data location point to the same location. You can specify different locations for the metadata and the data by editing the module.
The usual cycle, when working with a flat file as a source or target, is to:
Ensure that the location where the flat file stored is accessible from the host on which the mappings accessing the flat file is deployed.
Create a flat file module and associate it with the flat file module location. See "Creating Flat File Modules".
Define the flat file and specify its structure, based on whether its a character file, binary file, or a COBOL copybook. See "Using the Flat File Sample Wizard" for details of Flat File wizard. See "Using the Create Flat File Wizard" for details of creating a flat file for a binary file. See "Importing Metadata Definitions from COBOL Copybooks" for details of importing metadata from COBOL copybooks.
Select the type of mapping to use to extract data from the file. Consider whether you want to use flat file operators or external tables. See "Choosing Between External Table and Flat File Operators". If using a PL/SQL mapping, create external tables to represent the file contents as database tables.
Design your PL/SQL or SQL*Loader ETL mapping using the flat files as a source or target. See Oracle Warehouse Builder Data Modeling, ETL, and Data Quality Guide for details of creating mappings.
To use a flat file as a source, first define the metadata structure of the flat file and then import metadata into it.
You can import metadata from various types of files including character data set files and COBOL copybooks.
To define flat file metadata, complete the following steps:
Create a flat file module.
Create a module for each unique directory or path in your file system from which you want to import file metadata. See "Creating Flat File Modules".
Define the structure of the file.
The Flat File Sample Wizard enables you to view a sample of the flat file and to define record organization and file properties. The wizard enables you to sample and define common flat file formats such as string and ASCII. See "Using the Flat File Sample Wizard".
For files with complex record structures, the Flat File Sample Wizard may not be suitable for sampling the data. In such cases, you must create a flat file and define its structure accordingly. See "Using the Create Flat File Wizard" for creating and defining the structure of a flat file.
For COBOL copybooks, use the COBOL import dialog box to import metadata from copybooks. You can also set the import options depending on the copybook. See "Importing Metadata Definitions from COBOL Copybooks" for more details.
An external table is a read-only table that is associated with a single record type in a flat file. External tables represent data from a non-relational source in a relational table format. When you use an external table in a mapping, column properties are based on the SQL properties defined when importing the flat file. For more information about SQL properties for flat files, see "SQL Properties".
When you use an external table as a source table in a mapping, you can use it as a regular source table. Oracle Warehouse Builder generates PL/SQL code to select rows from the external table. You can also get parallel access to the file through the table. You also have access to additional relational function operators.
Note:
You can use external tables only for source tables.You can either import an existing external table from another database as described in"Importing an External Table" or define a new external table as described in "Creating a New External Table Definition".
You can introduce source data from a flat file into a mapping either through an external table or a flat file operator. In general, external tables are the preferred method of loading large volumes of data from flat files.
Note the following details when comparing external tables and flat files:
External table operators and PL/SQL mappings provide for maximum performance, including exploitation of database parallelism during load. The full range of transformation operators is available, because the mappings are PL/SQL mappings. Over time, ETL mappings built with external tables takes advantage of further performance improvements at the database level.
Flat file operators and SQL*Loader mappings are a fully supported method of loading flat files. Oracle Warehouse Builder generates native SQL*Loader code for a SQL*Loader mapping. A more limited range of operators is supported in SQL*Loader mappings. You must stage data in an intermediate table and then use a PL/SQL mapping to transform it further before loading into a final target.
For more information about differences between external tables and SQL*Loader (flat file operators), see Oracle Database Utilities.
For more information about different types of mappings, see Oracle Warehouse Builder Data Modeling, ETL, and Data Quality Guide.
When you use a flat file as a target, it is desirable to define the metadata but is not necessary. For example, while using unbound flat file operators in mappings, the metadata for the flat file might not be defined before using it in the mapping. However, in practice, it might be more convenient to define the metadata definitions of a target file rather than to use an existing file as a target.
Creating a New Flat File as a Target
Create a flat file and define its structure before loading data into it.
To design a new flat file, complete the following steps:
Create a module for the flat file. See "Creating Flat File Modules".
Use the Create Flat File Wizard to design the metadata structure of the flat file. See "Using the Create Flat File Wizard".
Note:
You can also create a target flat file in a mapping. Add an unbound flat file operator to a mapping, then map from the source table or operator to the flat file. Finally, do a Create and Bind for the flat file operator. For more information about mappings, see Oracle Warehouse Builder Data Modeling, ETL, and Data Quality Guide.Flat files are stored within modules that enable you to group multiple flat files.
To create a flat file module:
Right-click the Files node in the Projects Navigator and select New Flat File Module.
Oracle Warehouse Builder displays the Welcome page for the Create Module Wizard.
Define the module in the following steps:
The Finish page summarizes the information you provided on each of the wizard pages. When you click Finish, the wizard creates the flat file module and inserts it under Files in the Projects Navigator.
After creating a flat file module, you can either define a new flat file, as described in "Using the Create Flat File Wizard", import existing flat files into this module as described in "Using the Flat File Sample Wizard", or import a COBOL file as described in "Importing a Copybook".
Enter a name and an optional description for the flat file module on the Name and Description page.
Locations for flat file modules identify the paths in the file system from which you sample existing files or to which you create new files. You can define a new location or select an existing location on the Connection Information page.
Flat file modules have metadata and data locations. When you specify a location for a module, both metadata location and data location point to the same location. You can specify different locations for the metadata and the data by editing the module.
To import metadata from flat files located in different directories or paths in the system then for ease of use, create separate Oracle Warehouse Builder modules for each path. For example, suppose the files are located at the following paths, c:\folder1 and c:\folder1\subfolder. You can create two file modules C_FOLDER1 and C_FOLDER1_SUBFOLDER and associate them with the corresponding paths. However, associating a module with a path does not restrict you from importing metadata definitions of files residing in a different path. You can define a path as the default, and later import files from a different path.
A data location identifies only a folder in the file system and does not include subfolders.
The Connection page is displayed with a default location name that is based on the module name that you entered in the Name and Description page. If you do not want to create a location, then select from the list of existing locations.
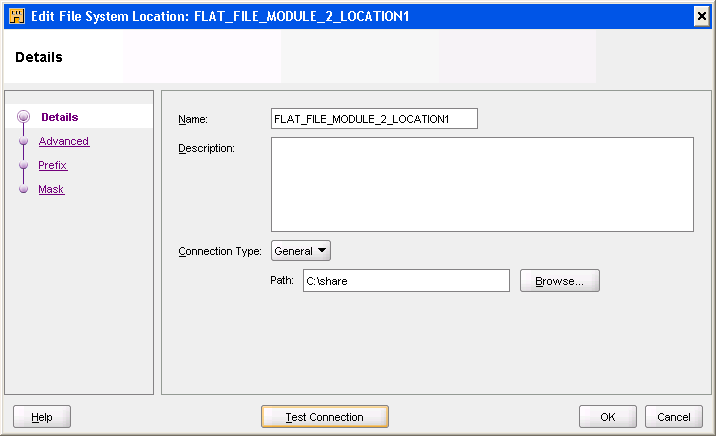
On the Connection Information page, click Edit to open the "Edit File System Location Dialog Box" and specify the location details. This location becomes the metadata and data location.
On the Edit File System Location dialog box, enter the fully qualified directory, including the drive letter.
Figure 3-1 shows the Edit Location dialog box.
Figure 3-1 Edit File System Location Dialog Box
Use the Create Flat File Wizard to design the structure of a new flat file in Oracle Warehouse Builder. This could be the case when you must define binary files and using the Flat File Sample wizard is not a viable solution. You can also use this wizard to create a flat file for use as a target in a mapping.
To use the Create Flat File wizard, right-click the flat file module and select New Flat File.
The Create Flat File Wizard guides you in completing the following steps:
Use the Name and Description page to provide a name for the flat file and to specify general properties associated with it.
Name: This name uniquely identifies the file within the module. Enter a name that does not include a space or any punctuation. You can include an underscore. You can use uppercase and lowercase letters. Do not start the name with a digit. Do not start a name with the reserved prefix OWB$.
Default Physical File Name: A physical file name may be specified. This name can be altered at any time using configuration properties. If you are creating a new file, you can leave this name blank. If you are defining an existing binary file, enter the name of the file. Do not include the file path.
Character set: Select a character set or accept the default character set defined for the system on which Oracle Warehouse Builder resides. For complete information about NLS character sets, see Oracle Database Globalization Support Guide.
Description: You can enter an optional description for the file.
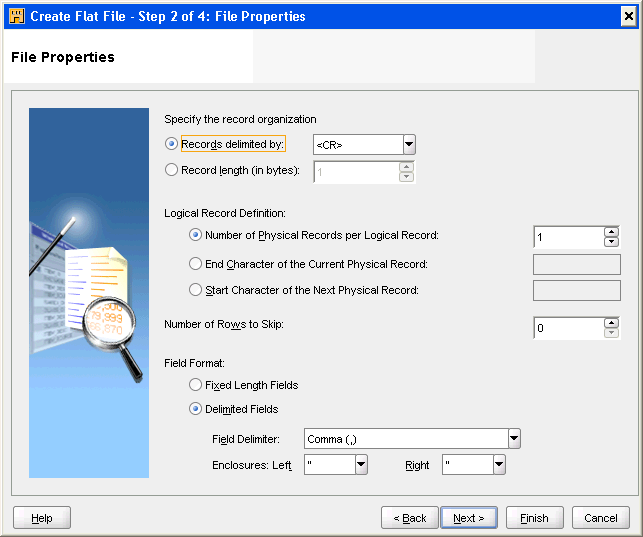
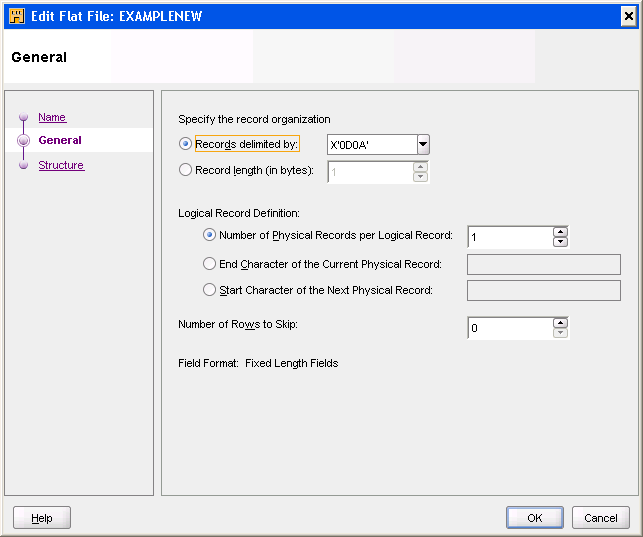
Use the File Properties page to specify Record Organization, Logical Record Definition, Number of Rows to Skip, and the Field Format for the flat file as shown in Figure 3-2.
Use the file properties page to specify Record Organization, Logical Record Definition, Number of Rows to Skip, and the Field Format for the flat file.
Indicate how to organize the records in the file. Select between the two options to indicate how the length of each record in the file is determined:
Records delimited by: Select this option to designate the end of each record by a delimiter. Then specify that record delimiter. You can accept the default record delimiter, new line (\n), or you can enter a new value. You can provide multiple characters and hexadecimal characters as a record delimiter. The hexadecimal character format is x'<hexadecimal string>' or X'<hexadecimal string>'. Using hexadecimal characters is useful if the delimiter character is not a new line character (\n) or carriage return<CR>. For example, to specify the pipe symbol (|) as the delimiter, use its hexadecimal value x'7C'.
Record length (in characters): Select this option to create a file with all records having the same length. Then specify the number of characters in each record. For files with multibyte characters, count a multibyte character as one character.
By default, the wizard creates a file in which each physical record corresponds to one logical record. You can override the default to create a file composed of logical records that correspond to multiple physical records.
Number of physical records for each logical record: The data file contains a fixed number of physical records for each logical record.
PHYSICAL_RECORD1
PHYSICAL_RECORD2
PHYSICAL_RECORD3
PHYSICAL_RECORD4
In the preceding example, if the number of physical records for each logical record is 2, then PHYSICAL_RECORD1 and PHYSICAL_RECORD2 form one logical record and PHYSICAL_RECORD3 and PHYSICAL_RECORD4 form the second logical record.
End character of the current physical record: The data file contains a variable number of physical records with a continuation character at the end that signifies that the record is continued in the next physical record.
In the following example, the continuation character is a percentage sign (%) after the record.
PHYSICAL_RECORD1%
PHYSICAL_RECORD2       end log rec 1
PHYSICAL_RECORD3%
PHYSICAL_RECORD4       end log rec 2
Start character of the next physical record: The data file contains a variable number of physical records with a continuation character at the beginning of each physical record that signifies that the record continues from the previous physical record.
The following example shows two logical records with a continuation character at beginning of the record.
PHYSICAL_RECORD1
%PHYSICAL_RECORD2      end log rec 1
PHYSICAL_RECORD3
%PHYSICAL_RECORD4      end log rec 2
More than two records can be joined with this technique. The following example shows four physical records for each logical record using continuation at beginning.
PHYSICAL_RECORD1
%PHYSICAL_RECORD2
%PHYSICAL_RECORD25
%PHYSICAL_RECORD26   end log record 1
PHYSICAL_RECORD3
%PHYSICAL_RECORD4
%PHYSICAL_RECORD45
%PHYSICAL_RECORD46 end log record 2
When defining an existing file, indicate the number of records to skip at execution time in Skip rows. This is useful for skipping over header and field name records.
When creating a new target file, you can leave this value blank.
Select between Fixed Length and Delimited formats for the file.
To create a delimited file, specify the following properties:
Field delimiter: Field delimiters designate where one field ends and another begins. You can enter a field delimiter or select one from the list. The list displays common field delimiters. However, you may enter any character as a delimiter except the ones used for enclosures. The default is the comma (,). You can provide multiple characters and hexadecimal characters as a delimiter. The hexadecimal character format is x'<hexadecimal string>' or X'<hexadecimal string>'. For example, to specify the pipe symbol (|) as the delimiter, use its hexadecimal value x'7C'.
Enclosures (Left and Right): Some delimited files contain enclosures that denote text strings within a field. If the file contains enclosures, enter an enclosure character in the text box or select one from the list. The list displays common enclosures. However, you may enter any character. The default for both the left and right enclosure is the double quotation mark ("). You can specify multiple characters and hexadecimal characters as field enclosures.
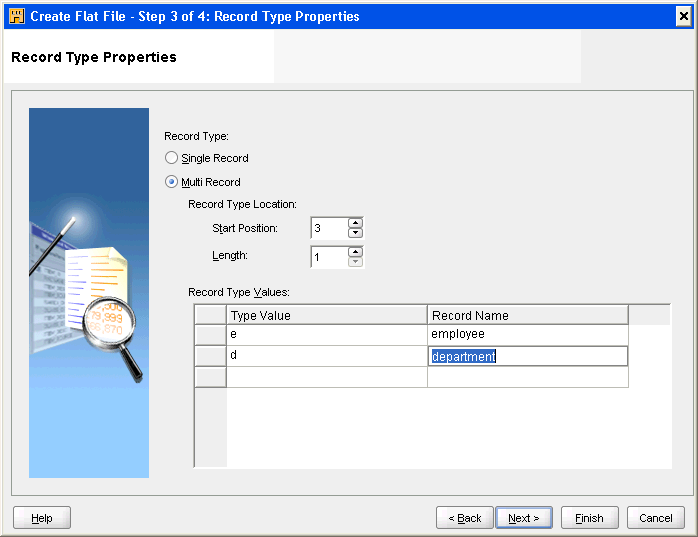
Indicate whether the file you create is to contain a single record type or multiple record types. The default is set to Single Record.
If the file contains multiple record types, select Multi Record. For each record type you want to create, specify values under Record Type Location and then its type value and record name.
Valid entries for Record Type Location depend on the field format you selected on the File Properties page, fixed length or delimited fields.
For example, if you specify the fields as delimited, then indicate the field position as shown in Figure 3-3.
For fixed-length files, the page displays two fields, Start Position and Length, under Record Type Location. Indicate the start position and the length of the field.
Use the Field Properties page to define properties for each field.
Since you can use a flat file in a mapping either directly as a source or a target, or indirectly through an external table, the Field Properties page shows both "SQL*Loader Properties" and "SQL Properties". Use the scroll bar to scroll to the right and view all the properties.
The first set of properties the wizard displays are for the SQL*Loader utility. When you use the flat file directly as a source in a mapping, SQL*Loader and the properties you set here are used. SQL*Loader properties include details of how the following are mapped to a relational table: "Type", "Length", "Precision", "Scale", "Mask", "NULLIF", and "DEFAULTIF". See Oracle Database Concepts for more details.
Describes the data type of the field for SQL*Loader. You can use the wizard to import many data types such as CHAR, DATE, DECIMAL EXTERNAL, FLOAT EXTERNAL, INTEGER EXTERNAL, ZONED, and ZONED EXTERNAL. For complete information about SQL*Loader field and data types, see Oracle Database Utilities.
For delimited files, specifies the maximum field length to be used by SQL* Loader.
Specifies the number of digits for certain data types such as Zoned and Float. See Oracle Database Utilities for more details.
Specifies the number of decimal digits for certain data types such as Zoned and Float. See Oracle Database Utilities for more details.
SQL*Loader uses DD-Mon-YY as its default date mask. You can override this default by entering a valid date mask when you describe the file. For example, if the input data has the format DD-Mon-YYYY rather than SQL*Loader default, you can enter the true format as a mask.
You can override the default action of SQL*Loader by placing a NULLIF condition on a field. For example, when a character field contains all blanks, you can direct SQL*Loader to mark the field as null rather than storing the blanks. Valid syntax for this field includes =BLANKS, ='quoted string', =X'ff' to indicate hexadecimal values, and != for 'not equal to' logic.
You can override the default action of SQL*Loader by placing a DEFAULTIF condition on a field. For example, when a numeric or DATE field contains all blanks, SQL*Loader rejects the entire record. To override this action, type =BLANKS in the DEFAULTIF property. When SQL*Loader evaluates this condition, it sets the numeric field to zeros and loads the record. Valid syntax for this field includes =BLANKS, ='quoted string', =X'ff' to indicate hexadecimal values, and != for 'not equal to' logic.
These properties specify how the fields in a flat file translate to the columns in a relational table. They are used to define the characteristics of an external table. They are also used to automatically generate fields for mapping to relational operators. Similarly, if the flat file is used as a target, then these properties are used to generate the PL/SQL code.
The SQL properties you set here have the following implications for mapping design, validation, and generation:
External table: If you create an external table based on a single flat file record type, the columns properties are based on the SQL properties you defined for the flat file. For more information about external tables, see "Using External Tables".
Populating an Empty Mapping Object: In a mapping, if you populate an empty relational object with the metadata, then the object inherits the SQL properties you defined for the flat file source.
Flat file target: If you use the flat file as a target in a mapping, the target does not inherit the SQL properties. Instead, all fields inherit the default SQL*Loader data type.
Oracle Warehouse Builder supports many SQL data types such as CHAR, DATE, FLOAT, and BLOB.
The wizard assigns a default value for the SQL type based on SQL*Loader properties you set. If you accept the default SQL type, the type is updated if you later change SQL*Loader properties. However, if you override the SQL type by selecting a new SQL type from the list, it then becomes independent of the flat file SQL*Loader data type.
This property defines the length for the SQL column, if appropriate.
This property defines the precision for the SQL column, if appropriate. For example, when defining NUMBER and FLOAT fields, the precision may be set.
This property defines the scale for the SQL column, if appropriate. For example, when defining NUMBER and FLOAT fields, the scale may be set.
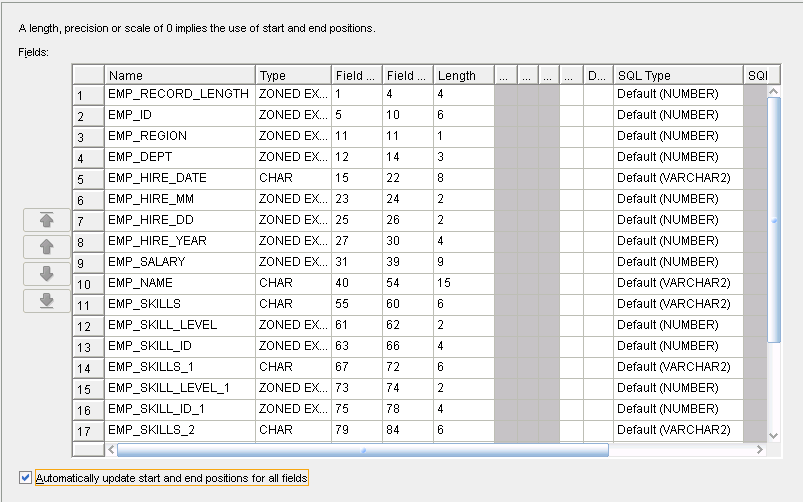
Select Automatically update start and end positions for all fields if you want all the field positions to be automatically recalculated based on changes made to any field.
Once you define the metadata of the new flat file, you can use it as a source or target file, or create an external table using a record from the file.
If you have existing flat files to use as sources, then you can import and sample the metadata from these flat files. Use the File Import dialog box to import metadata from flat files. This metadata must be imported into an existing file module.
To use the Flat File Sampling Wizard:
Establish connectivity to the files you want to import.
Because the Flat File Sample Wizard runs on the host running the Design Center client, ensure that the files to be sampled are accessible from that host. You can either mount a remote file system across your network using a method such as network file system (NFS) or Windows file sharing, or copy the files, or a representative section of the files, to a file system on or accessible from the Design Center client host.
Create a flat file module that contains the imported flat file definitions. See "Creating Flat File Modules" for details.
Either create a module for each folder in the file system from which you want to import files or use the same module to import file definitions from multiple folders.
When you create a flat file module, the location corresponding to this module is a path in the file system which acts as the metadata and data location. Use the Connection Information Page of the Create Module Wizard to specify this path.
A flat file location does not include subfolders of the specified folder.
Right-click the flat file module and select Import, Flat File. Alternatively, select the flat file module, and then from the main menu, select File, Import, Flat File.
The File Import dialog box is displayed.
Click Add Sample File, and select the files to import.
You can add single or multiple files into a module. All the files you add are listed under Sample File. If you specify a file in the Same As field, then the definition of the sampled file is based on the definition of the file specified in the Same As field.
Click Import. The Flat File Sample wizard is started. The files are sampled in the order they were listed under Sample File.
The Flat File Sample wizard enables you to view a sample of the flat file while you are defining it. Each step of the wizard enables you to design the definition and verify that the definition is correct. See "Using the Flat File Sample Wizard" for more information.
For binary files, you may prefer using the Create Flat File wizard. See "Using the Create Flat File Wizard".
The wizard creates definitions for the files, stores the definitions in the flat file module, and inserts the file names under the flat file module in the Projects Navigator.
Use the Flat File Sample Wizard as an aid in defining metadata for flat files.
This wizard samples delimited and fixed format files. It does not sample multibyte character file with a fixed record format. For these and other files containing non-displayable data, such as binary files, see "Using the Create Flat File Wizard".
After you complete the Flat File Sample Wizard, the metadata is defined in the workspace and you can use the flat files as source or target operators in a mapping. For more information about mappings, see the Oracle Warehouse Builder Data Modeling, ETL, and Data Quality Guide.
For simple flat files that are delimited and contain a single record type, the Flat File wizard guides you through the following tasks:
Use the Name page to describe the flat file you are sampling.
Name: This name uniquely identifies the file in the module. By default, the wizard creates a name based on the name of the source file by replacing invalid characters with an underscore. For example, if the file name is myfile.dat, the wizard assign the workspace name myfile_dat.
If you rename the file, do not include a space or any punctuation in the name. You can include an underscore. You can use uppercase and lowercase letters. Do not start the name with a digit. Do not start a name with the reserved prefix OWB$.
Description: You can enter an optional description for the file.
Character set: Character sets determine what languages can be represented in database objects and files. The default Globalization Support character set matches the character set defined for the computer hosting Oracle Warehouse Builder. If the character set differs from that of the source file, the data sample might appear unintelligible. You can display the data sample in the character set native to the source by selecting it from the list. For complete information about NLS character sets, see Oracle Database Globalization Support Guide.
Number of characters to sample: This value specifies the number of characters that is read and displayed. The number of characters that is read cannot be canceled, so ensure that you pick a reasonable number of characters. If you are sampling a multi-record file, then ensure that the sample is large enough to include at least one of each type. By default, the wizard samples the first 10000 characters. To determine an optimum value for this field, see "Example: Flat File with Multiple Record Types".
Advanced: Do not click the Advanced button for simple flat files. The advanced option is required only for complex flat files as described in "Flat File Wizard For Complex Flat Files".
Click Next to continue with "Specifying the Record Organization". At all steps, the wizard updates the sample displayed at the bottom of the wizard page. You can use the scroll bars to see the sample data.
Specify the following properties:
Records delimited by: Select this option if the end of each record is designated by a delimiter. Then specify that record delimiter. You can accept the default record delimiter, carriage return (<CR>), or you can enter a new value. For symbols other than \n and <CR>, specify the hexadecimal value of the character used as the delimiter.
Record length (in characters): Select this option if each record in the file is the same length. Then specify the number of characters in each record. For files with multibyte characters, count a multibyte character as one character.
Field delimiter: Field delimiters designate where one field ends and another begins. You can enter a field delimiter or select one from the list. The list displays common field delimiters. However, you may enter any character as a delimiter except the ones used for enclosures. The default is the comma (,). You can also specify multiple characters and hexadecimal characters as a field delimiter.
Enclosures (Left and Right): Some delimited files contain enclosures that denote text strings within a field. If the file contains enclosures, enter an enclosure character in the text box or select one from the list. The list displays common enclosures. However, you may enter any character. The default for both the left and right enclosure is the double quotation mark ("). Multiple characters and hexadecimal characters can be specified as field enclosures.
Use the Field Properties page in the Flat File Sample Wizard to define properties for each field. The wizard assigns a name to each field. It assigns 'C1'to the first field, 'C2' to the second, and so on. To rename fields, click a field and enter a new name.
For single record file types, you can instruct the wizard to use the first record to name the fields. Indicate this by selecting the Use the first record as the field names box.
The Field Properties page shows both "SQL*Loader Properties" and "SQL Properties". Use the scroll bar to scroll to the right and view all the properties.
The wizard deactivates properties that do not apply to a given data type. For example, you can edit the length for a CHAR, but precision and scale are not available. Deactivated properties are grayed out.
The first set of properties the wizard displays are for the SQL*Loader utility. When you use the flat file directly as a source in a mapping, SQL*Loader and the properties you set here are used. SQL*Loader properties include details of how the following are mapped to a relational table: "Type", "Length", "Precision", "Scale", "Mask", "NULLIF", and "DEFAULTIF". See Oracle Database Concepts for more details.
The second set of properties are the SQL properties that include mapping details for "SQL Type", "SQL Length", "SQL Precision", and "SQL Scale". These properties specify how the fields in a flat file translate to the columns in a relational table. See "SQL Properties" for more details.
For complex files, the Flat File wizard guides you through the following tasks. The advanced mode enables you to define files with fixed length fields (in addition to delimited), files that contain multiple record types, or files that use logical records (multiple physical records per logical record).
Use the Name page to describe the flat file you are sampling.
Name: This name uniquely identifies the file in the workspace. By default, the wizard creates a name based on the name of the source file by replacing invalid characters with an underscore. For example, if the file name is myfile.dat, the wizard assign the workspace name myfile_dat.
If you rename the file, do not include a space or any punctuation in the name. You can include an underscore. You can use uppercase and lowercase letters. Do not start the name with a digit. Do not start a name with the reserved prefix OWB$.
Description: You can enter an optional description for the file.
Character set: Character sets determine what languages can be represented in database objects and files. The default Globalization Support character set matches the character set defined for the computer hosting Oracle Warehouse Builder. If the character set differs from that of the source file, the data sample might appear unintelligible. You can display the data sample in the character set native to the source by selecting it from the list. For complete information about NLS character sets, see Oracle Database Globalization Support Guide.
Number of characters to sample: You can indicate the number of characters for the wizard to sample from the data file. By default, the wizard samples the first 10000 characters. To determine an optimum value for this field, see "Example: Flat File with Multiple Record Types".
Click Advanced to continue with "Selecting the Record Organization". At all steps, the wizard updates the sample displayed at the bottom of the wizard page. You can use the scroll bars to see the sample data.
Use the Record Organization page to indicate how records are organized in the file you are sampling. Select between the two options to indicate how the length of each record in the file is determined:
Records delimited by: If the end of each record is designated by a delimiter, then specify that record delimiter. You can accept the default record delimiter, carriage return (<CR>), or enter a new value. You can specify multiple characters and hexadecimal characters as a record delimiter. If the delimiter is a symbol other than \n or <CR>, then specify the hexadecimal character of the symbol. The hexadecimal character format is x'<hexadecimal string>' or X'<hexadecimal string>'.
Record length (in characters): Select this option if each record in the file is the same length. Then specify the number of characters in each record. For files with multibyte characters, count a multibyte character as one character.
The Flat File Sample Wizard enables you to sample files composed of logical records that correspond to multiple physical records. If the file contains logical records, select File contains logical records. Then select one of the options to describe the file.
The wizard updates the display of the logical record in the lower panel to reflect your selection. The default selection is one physical record for each logical record.
Number of physical records for each logical record: The data file contains a fixed number of physical records for each logical record.
PHYSICAL_RECORD1
PHYSICAL_RECORD2
PHYSICAL_RECORD3
PHYSICAL_RECORD4
In the preceding example, if the number of physical records for each logical record is 2, then PHYSICAL_RECORD1 and PHYSICAL_RECORD2 form one logical record and PHYSICAL_RECORD3 and PHYSICAL_RECORD4 form a second logical record.
End character of the current physical record: The data file contains a variable number of physical records with a continuation character at the end that signifies that the record is continued in the next physical record.
In the following example, the continuation character is a percentage sign (%) after the record.
PHYSICAL_RECORD1%
PHYSICAL_RECORD2       end log rec 1
PHYSICAL_RECORD3%
PHYSICAL_RECORD4       end log rec 2
Start character of the next physical record: The data file contains a variable number of physical records with a continuation character at the beginning of each physical record that signifies that the record is a continuation of the previous physical record.
The following example shows two logical records with a continuation character at beginning of the record.
PHYSICAL_RECORD1
%PHYSICAL_RECORD2      end log rec1
PHYSICAL_RECORD3
%PHYSICAL_RECORD4      end log rec 2
More than two records can be joined with this technique. The following example shows four physical records for each logical record using continuation at beginning.
PHYSICAL_RECORD1
%PHYSICAL_RECORD2
%PHYSICAL_RECORD25
%PHYSICAL_RECORD26   (end log record 1)
PHYSICAL_RECORD3
%PHYSICAL_RECORD4
%PHYSICAL_RECORD45
%PHYSICAL_RECORD46 (end log record 2)
After you complete the logical record information, click Next to continue with the wizard.
Use the File Format page to select between Fixed Length and Delimited formats for the fields in the file. The Flat File Sample Wizard does not sample multibyte character files with a fixed record format. For such files, use the Create Flat File wizard. For more details, see "Using the Create Flat File Wizard".
When you select a file format, the wizard updates the sample displayed at the bottom of the wizard page. You can use the scroll bars to navigate the sample data.
Fields in a file can either be of fixed length or delimited.
For fixed length fields, select Fixed Length. If you select this option then you must define the field lengths in the Field Lengths page. See "Specifying Field Lengths (Fixed-Length Files Only)".
When the fields are delimited, specify the following properties:
Field delimiter: Field delimiters designate where one field ends and another begins. You can enter a field delimiter or select one from the list. The list displays common field delimiters. However, you may enter any character as a delimiter except the ones used for enclosures. The default is the comma (,). You can also specify multiple characters and hexadecimal characters as a field delimiter. The hexadecimal character format is x'<hexadecimal string>' or X'<hexadecimal string>'.
Enclosures (Left and Right): Some delimited files contain enclosures that denote text strings within a field. If the file contains enclosures, enter an enclosure character in the text box or select one from the list. The list displays common enclosures. However, you may enter any character. The default for both the left and right enclosure is the double quotation mark ("). Multiple characters and hexadecimal characters can be specified as field enclosures.
Click Next to continue with the wizard.
Use the File Layout page to specify the number of rows to skip and to select between a single record type versus multiple record types.
Indicate the number of records to skip in Skip rows. This is useful for skipping over unwanted header information. If one of the records includes field names, skip the preceding header records so that the record containing field names is displayed as the first record in the file. Later in the wizard, on the Field Properties page, you can instruct the wizard to use that record for field names if you are defining a single record file type.
Indicate whether the file contains a single record type or multiple record types. Later in the wizard you can instruct the wizard to scan the file for the record types. For more information about multiple record types, see "Selecting Record Types (Multiple Record Type Files Only)".
Use the Record Types wizard page to scan the flat file for record types, add or delete record types, and assign type values to the record types.
Note:
This step in not used for files with a single record type. If the data file has a single record type and fixed length file format, proceed to "Specifying Field Lengths (Fixed-Length Files Only)" . If the data file has a single record type and delimited file format, proceed to "Specifying Field Properties".In files with multiple record types, one of the fields distinguishes one record type from the next. When you use the Flat File Sample Wizard, you instruct the wizard to scan a specified field of every record for the record type values.
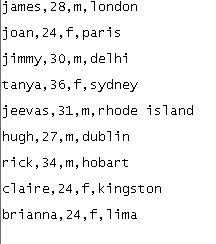
Figure 3-4 shows an example of a comma delimited file with two record types, "m" and "f". In this case, instruct the wizard to scan the third field. The wizard returns "m" and "f" as the type values.
When you use the wizard to sample flat files with multiple record types, ensure that the sample size you specified on the Name page is large enough to include each record type at least once. The default is 10000 characters.
If you do not see all of the required record types in the display area, you must specify a larger sample size on the Name page. Ensure that the sample size is large enough to include all record types. If all record types do not appear within a reasonable number of characters, you can mock up a sample file with rows selected from different parts of the master file to provide a representative set of data. If you know the record layout well, you can scan a representative sample and then manually add new record types.
When a delimited flat file contains several different types of records, you can use the scanning feature within the Flat File Sample Wizard to search and label record types.
To complete the Records Type page for a delimited file:
Select the one field that identifies the record types in the file.
The wizard displays all the fields in a sample in the lower panel of the page. In the Field position, you can enter the position as it appears in the sample. Unless you specify otherwise, the wizard defaults to the first field in the file.
If you click Scan, then the wizard scans the file for the field and displays the type values. The wizard assigns default record names (RECORD1, RECORD2...) to each type value.
You can edit the record names and the type value.
Click a record name to rename it or select a different record name from the list. You cannot associate a record name with multiple record type values.
Click Next to continue with the wizard.
When a fixed-length flat file contains several different types of records, you can use the scanning feature within the Flat File Sample Wizard to search for record types and assign a type value to each record type.
To complete the Records Type page for a fixed-length file:
Specify the one field that identifies the record types in the file. Use the ruler or enter values for the Start position and End position. To scan for records based on the first field, enter 0 for Start Position.
The wizard indicates the selected field with a red check mark in the ruler in the file sample in the lower panel of the page.
Click Scan.
The wizard scans the file field and displays the type values. The wizard assigns default record names (RECORD1, RECORD2...) to each type value.
You can edit the record names and type value.
Click a record name to rename it or select a different record name from the list. You cannot associate a record name with multiple record type values.
Click Next to continue with the wizard.
When you use the Flat File Sample Wizard to define a fixed-length flat file, you must define the length of each field in the file.
Note:
This step is not necessary for delimited files. Proceed to "Specifying Field Properties".You can define field lengths by entering in the field lengths or by using the ruler.
If you know the length of each field, enter the field length in Field Lengths. Separate each length by commas. The wizard displays the changes to the sample at the bottom of the wizard page.
To use the ruler, click any number or hash mark on the ruler. The wizard displays a red check mark on top of the ruler and marks the boundary with a red line. If you make a mistake, double-click the marker to delete it or move the marker to another position. Use the ruler to create markers for each field in the file.
You can select the record type by name from Record Name. Or, you can select Next Record Type from the lower right corner of the wizard page. The number of records with unspecified field lengths is indicated on the lower left corner of the wizard page.
If the flat file contains multiple record types, the wizard prompts you to specify field lengths for each record type before continuing.
Use the Field Properties page in the Flat File Sample Wizard to define properties for each field. The wizard assigns a name to each field. It assigns 'C1'to the first field, 'C2' to the second, and so on. To rename fields, click a field and enter a new name.
For single record file types, you can instruct the wizard to use the first record in the file to name the fields. Indicate this by selecting the Use the first record as the field names box.
The Field Properties page shows both "SQL*Loader Properties" and "SQL Properties". Use the scroll bar to scroll to the right and view all the properties.
The wizard deactivates properties that do not apply to a given data type. For example, you can edit the length for a CHAR, but precision and scale are not available. Deactivated properties are grayed out.
The first set of properties the wizard displays are for the SQL*Loader utility. When you use the flat file directly as a source in a mapping, SQL*Loader and the properties you set here are used. SQL*Loader properties include "Type", "Length", "Precision", "Scale", "Mask", "NULLIF", and "DEFAULTIF". See "SQL*Loader Properties" for more details.
The second set of properties are the SQL properties that include "SQL Type", "SQL Length", "SQL Precision", and "SQL Scale". These properties specify how the fields in a flat file translate to the columns in a relational table. See "SQL Properties" for more details.
COBOL programmers create files by defining the physical files and the logical records that is used to build those files. The records may be defined within the COBOL program itself, but are usually defined in separate files, called copybooks. These copybooks specify the layout and format of the user data, but do not specify the physical characteristics of the file itself. The physical characteristics of the file identify how the file is organized and accessed. For example, whether records are terminated with CR or CR/LF, is not part of the user data definition and is therefore not included in the record definition.
With Oracle Warehouse Builder, you can import metadata from COBOL copybooks. Oracle Warehouse Builder automatically manages the following operations:
Defining the fields for data storage
Calculating the data positions
Transforming COBOL data characteristics to the appropriate data type definitions in SQL*Loader
COBOL records are defined as a set of data elements and groups. A data element is an atomic data item. A group is a container for data elements. Each item defined in a COBOL record is called a field whether it is a group or an elementary item. Each field definition contains a level number which reflects the hierarchy of the data within the record. Groups can contain other groups or elementary items. Items contained in a group are called subordinate elements. Field definitions for elementary items contain complete metadata for the item primarily specified in picture and usage clauses. A group inherits characteristics from its subordinate elements and does not generally contain metadata specification details. An example of a simple copybook is given in Example 3-1.
01 EMPLOYEE-RECORD.
   05 EMP-ID PIC 9(6).
   05 EMP-REGION PIC 9.
   05 EMP-DEPT PIC 999.
   05 EMP-HIRE-DATE.
      10 EMP-HIRE-DATE-MM PIC 99.
      10 EMP-HIRE-DATE-DD PIC 99.
      10 EMP-HIRE-DATE-YYYY PIC 9999.
   05 EMP-SALARY PIC 9(9).
   05 EMP-NAME PIC X(15).
The above example shows the definition of EMPLOYEE-RECORD. It contains 6 fields defined at the 05 Level. All of the fields except EMP-HIRE-DATE are elementary items. The elementary items contain picture clauses that define their data-characteristics. EMP-HIRE-DATE is a group field with subordinate elements at the 10 level. Each 10 level field is an elementary item that contains a picture clause defining its data characteristics. The date can be referenced as a whole by using the EMP-HIRE-DATE group field. This field includes the month, day, and year elements. Each subordinate field can also be referenced individually, allowing access to just the year for example.
The USAGE and PICTURE clauses are used to define the format and characteristics of data elements. If a USAGE clause is not specified, the data is in DISPLAY format, either external numeric or external character. When considered, the picture and usage identify the data type. Detailed information concerning COBOL data types and how they are mapped to relational data types is described inTable 3-1.
COBOL provides support for both arrays and varying arrays. These complex structures are identified by the use of an OCCURS clause. Varying arrays are defined with the additional specification of a DEPENDING ON clause. For arrays, the OCCURS clause indicates the number of elements in the array. For varying arrays, the occurs specification includes a range of elements from x TO y and the DEPENDING ON clause identifies a field that contains the actual number of elements in the array. An array or a varying array can be defined on an elementary field or a group. Example 3-2 provides an example of an array defined on elementary fields.
Example 3-2 Arrays Defined on Elementary Fields
01 EMPLOYEE-RECORD.
   05 EMP-ID PIC 9(6).
   05 EMP-REGION PIC 9.
   05 EMP-DEPT PIC 999.
   05 EMP-HIRE-DATE.
      10 EMP-HIRE-DATE-MM PIC 99.
      10 EMP-HIRE-DATE-DD PIC 99.
      10 EMP-HIRE-DATE-YYYY PIC 9999.
   05 EMP-SALARY PIC 9(9).
   05 EMP-NAME PIC X(15).
   05 EMP-SKILL-LEVEL PIC 99 OCCURS 4 TIMES.
   05 EMP-SKILL-ID PIC 9(4) OCCURS 4 TIMES.
Two independent arrays are defined, one on EMP-SKILL_LEVEL and one on EMP-SKILL_ID. In this example, the record contains four occurrences of EMP-SKILL-LEVEL, followed by four occurrences of EMP-SKILL-ID. In the file, each record is constructed as: EMP_SKILL_LEVEL, EMP_SKILL_LEVEL, EMP_SKILL_LEVEL, EMP_SKILL_LEVEL, EMP_SKILL_ID, EMP_SKILL_ID, EMP_SKILL_ID, EMP_SKILL_ID.
Example 3-3 provides an example of a varying array defined on elementary fields.
Example 3-3 Varying Array Defined on Elementary Fields
01 EMPLOYEE-RECORD.
   05 EMP-ID PIC 9(6).
   05 EMP-REGION PIC 9.
   05 EMP-DEPT PIC 999.
   05 EMP-HIRE-DATE.
      10 EMP-HIRE-DATE-MM PIC 99.
      10 EMP-HIRE-DATE-DD PIC 99.
      10 EMP-HIRE-DATE-YYYY PIC 9999.
   05 EMP-SALARY PIC 9(9).
   05 EMP-NAME PIC X(15).
   05 EMP-SKILL-COUNT PIC 99.
   05 EMP-SKILL-LEVEL PIC 99 OCCURS 1 TO 4 TIMES.
      DEPENDING ON EMP-SKILL-COUNT.
   05 EMP-SKILL-ID PIC 9(4) OCCURS 1 TO 4 TIMES.
      DEPENDING ON EMP-SKILL-COUNT.
Two independent arrays are defined, one on EMP-SKILL_LEVEL and one on EMP-SKILL_ID. In this example, the value in EMP-SKILL-COUNT determines the number of occurrences in both arrays. In the file, a record with EMP_SKILL_COUNT equal to one is constructed as: EMP_SKILL_LEVEL, EMP_SKILL_ID. If the value of EMP-SKILL-COUNT is two, then two occurrences of EMP-SKILL-LEVEL are followed by two occurrences of EMP-SKILL-ID. In the file, a record with EMP_SKILL_COUNT equal to two is constructed as: EMP_SKILL_LEVEL, EMP_SKILL_LEVEL, EMP_SKILL_ID, EMP_SKILL_ID.
Example 3-4 provides an example of an array defined on a group field.
Example 3-4 Array Defined on a Group Field
01 EMPLOYEE-RECORD.
   05 EMP-ID PIC 9(6).
   05 EMP-REGION PIC 9.
   05 EMP-DEPT PIC 999.
   05 EMP-HIRE-DATE.
      10 EMP-HIRE-DATE-MM PIC 99.
      10 EMP-HIRE-DATE-DD PIC 99.
      10 EMP-HIRE-DATE-YYYY PIC 9999.
   05 EMP-SALARY PIC 9(9).
   05 EMP-NAME PIC X(15).
   05 EMP-SKILLS OCCURS 4 TIMES.
      10 EMP-SKILL-LEVEL PIC 99.
      10 EMP-SKILL-ID PIC 9(4).
In this example an array is defined with four elements. Each element contains one occurrence of each field: EMP_SKILL_LEVEL and EMP_SKILL_ID. In the file, each record is constructed as: EMP_SKILL_LEVEL, EMP_SKILL_ID, EMP_SKILL_LEVEL, EMP_SKILL_ID, EMP_SKILL_LEVEL, EMP_SKILL_ID, EMP_SKILL_LEVEL, EMP_SKILL_ID.
Example 3-5 provides an example of a varying array defined on a group field.
Example 3-5 Varying Array Defined on a Group Field
01 EMPLOYEE-RECORD.
   05 EMP-ID PIC 9(6).
   05 EMP-REGION PIC 9.
   05 EMP-DEPT PIC 999.
   05 EMP-HIRE-DATE.
      10 EMP-HIRE-DATE-MM PIC 99.
      10 EMP-HIRE-DATE-DD PIC 99.
      10 EMP-HIRE-DATE-YYYY PIC 9999.
   05 EMP-SALARY PIC 9(9).
   05 EMP-NAME PIC X(15).
   05 EMP-SKILL-COUNT PIC 99.
   05 EMP-SKILLS OCCURS 4 TIMES DEPENDING ON EMP-SKILL-COUNT.
     10 EMP-SKILL-LEVEL PIC 99.
     10 EMP-SKILL-ID PIC 9(4).
In this example, one array is defined with up to four elements. The value in EMP-SKILL-COUNT defines the number of occurrences of the array. Therefore, if the value of EMP-SKILL-COUNT is set as one, then there is one occurrence of EMP_SKILLS. In the file, a record with EMP_SKILL_COUNT equal to one is constructed as: EMP_SKILL_LEVEL, EMP_SKILL_ID.
If the value of EMP-SKILL-COUNT is two, then there are two occurrences of EMP-SKILLS. In the file, a record with EMP_SKILL_COUNT equal to two is constructed as: EMP_SKILL_LEVEL, EMP_SKILL_ID, EMP_SKILL_LEVEL, EMP_SKILL_ID.
In COBOL, data in a record may have multiple definitions. You can use any one of these definitions to access the data. There are three methods for getting multiple definitions:
COBOL generated files can contain multiple record types. Whenever there is multiple level 01 item in a file definition, each level 01 provides a separate definition of the data record area. Only one record is kept in the data record area at a time, so only one level 01 definition is used at a time. For example, a file may contain two types of records, department records and employee records. Level 01 items are defined for both department and employee records. The hierarchy for each record immediately follows the level 01 item for that record and provides the definitions for the entire record. Each record contains a field that identifies the record type. This record type is at the same position for all record definitions.
In the following example, the record type is in the first position:
As seen in the section on Data Hierarchy, fields can be organized in groups. These groups actually provide an additional definition of the fields and are used to access the data.
COBOL provides the ability to redefine a field or a group. Redefinition does not define data at a new location, but instead provides an additional definition of data characters that have been previously defined.
Example 3-7 Redefining a Field
01  EMPLOYEE-RECORD.
   05 EMP-ID PIC 9(6).
   05 EMP-ID-R REDEFINES EMP-ID.
      10 EMP-ID-GROUP PIC 99.
      10 EMP-ID-NUM PIC 9999.
   05 EMP-REGION PIC 9.
   05 EMP-DEPT PIC 999.
In the above example, the EMP-ID field is defined as a 6 digit numeric field. A redefinition is provided dividing the field into two fields: EMP-ID-GROUP is defined as the first two digits of the EMP-ID field. EMP-ID-NUM is defined as the last four digits of the EMP-ID field. EMP-ID-NUM and EMP-ID-GROUP both begin at position 1 in the record.
Example 3-8 Redefining a Group
01 EMPLOYEE-RECORD.
05 EMP-ID PIC 9(6).
05 EMP-ID-R REDEFINES EMP-ID.
10 EMP-ID-GROUP PIC 99.
10 EMP-ID-NUM PIC 9999.
05 EMP-REGION PIC 9.
05 EMP-DEPT PIC 999.
05 EMP-HIRE-DATE.
10 EMP-HIRE-DATE-MM PIC 99.
10 EMP-HIRE-DATE-DD PIC 99.
10 EMP-HIRE-DATE-YYYY PIC 9999.
05 EMP-SALARY PIC 9(9).
05 EMP-NAME PIC X(15).
05 EMP-SKILLS OCCURS 4 TIMES.
10 EMP-SKILL-LEVEL PIC 99.
10 EMP-SKILL-ID PIC 9(4).
05 EMP-SKILLS-R REDEFINES EMP-SKILLS.
10 EMP-SKILL-LEVEL1 PIC 99.
10 EMP-SKILL-ID1 PIC 9(4).
10 EMP-SKILL-LEVEL2 PIC 99.
10 EMP-SKILL-ID2 PIC 9(4).
10 EMP-SKILL-LEVEL3 PIC 99.
10 EMP-SKILL-ID3 PIC 9(4).
In the above example, the EMP-SKILL array has been redefined so that each element is expanded providing a field for each element. As in the previous example, the definitions for EMP-SKILLS-R is defining the same data area as EMP-SKILLS. The first occurrence of EMP-SKILL-LEVEL is at the same position in the record as EMP-SKILL-LEVEL1.
COBOL programs can create files of different organization. These include the following:
Line Sequential: Line sequential files are generally known as text files because the primary use of this file type is for display data. The records in these files can only be accessed in the order they were written. Line sequential files contain variable length records. A record delimiter separates each record in the file. The record delimiter that is used is operating system dependent and is inserted after the last character in each record.
Record Sequential: Record sequential files are also accessed in the order they were written. This file organization is more flexible than line sequential. Records can be of fixed or variable length. The record sequential organization is used for sequential files that contain binary or packed data, or any data that may have other non-printable characters. In fixed length files, every record that is written to the file is the same length. If necessary, the record is padded with blanks to ensure uniform length. With variable length records, each record is written based on the actual size of the record. A Record Descriptor Word (RDW) is inserted at the beginning of each record. The RDW contains the actual length of the record. It is not considered part of the record and is not included in the data definition. In general, variable length records are used when there are many small records and few large records. Variable length records must be converted before they can be imported.
Relative Files: Relative files can be accessed randomly in the order they are written. Records can be declared as variable, but they are written as fixed. The random access is not by key, but is instead by relative record number. Relative files must be converted to sequential before they can be imported.
Indexed Files: Indexed files can be accessed by key field(s) in the order they are written. Records in indexed files can be fixed or variable. Indexed files consist of two physical files, one containing the data and the other containing the index. Indexed files are converted to sequential before they are imported.
The file format used for data storage is determined by the COBOL application. This information is not defined in the copybook.
As you consider importing COBOL files into a relational database, you must plan how the data should be mapped into the relational database.
At the highest level, each record type, level 01 structure, is considered mapping to a table. Records in files are often designed to be independent sources of information. This is a large difference between files and tables. Tables are generally designed to hold information that is closely related. When you consider the records in your file, you should consider if it would be better to define multiple tables for the information. Groups that are used to organize related information are often good candidates for independent tables. For example, you may have a group that is defined for address information, which might naturally fit into a name and address table. Similarly, arrays, whether varying or not, are also often good candidates for independent tables.
In order to define arrays, Oracle Warehouse Builder normalizes the array by specifying each element in the array independently. This technique is also used for defining varying arrays. Not all varying arrays can be loaded using SQL*Loader. When the varying array is after the record, SQL*Loader may be able to load it. Records with embedded varying arrays are not necessarily physically stored as variable, therefore you may be able to use this technique for loading these records also. See "Example: Extracting Data from a Single Record Type Varying Array COBOL File".
Mapping COBOL Data Types to SQL Data Types
The USAGE and PICTURE clauses are used to define the format and characteristics of data elements. Together the picture and usage identify the scalar data type, length, precision and scale. Table 3-1 shows data element definitions that apply to COBOL files. It describes the representation of each data type and identifies how that data type is mapped to SQL*Loader data type definitions. The PICTURE represents a mask that describes the data. The values identified within the parentheses are multiplication factors for the preceding picture element. So when n = 5, X(n) indicates that there are 5 characters of type X (alphanumeric data).
Table 3-1 COBOL Data Types and the Equivalent SQL *Loader Data Types
| COBOL Data Type | SQL Loader Data Type | Description |
|---|---|---|
|
X(n) |
|
Alphanumeric data. Each X identifies one allowable character from the specified character set. |
|
A(n) |
CHAR(n) |
Alphabetic data. Each A identifies any letter of the alphabet or space. |
|
9(n) |
|
Numeric data. Each 9 identifies one digit. |
|
+- mantissa +- exponent |
FLOAT EXTERNAL (length) |
External floating point data. |
|
S9(n)v9(m) SIGN TRAILING |
ZONED(precision, scale) where precision = n+m and scale = m |
Numeric data. Each 9 identifies one digit. The v indicates the implied decimal position. The sign is carried in the last byte. |
|
9(n)v9(m) |
ZONED(precision, scale) where precision = n+m and scale = m |
Numeric data. Each 9 identifies one digit. The v indicates the implied decimal position. |
|
9(n)v9(m) S9(n)v9(m) |
SMALLINT INTEGER(length 2,4,or 8) May use SIGNED| UNSIGNED May require BYTEORDER clause Scale handled with an expression |
Internal format data with a radix of 2. The size of the field varies with the value m. n+m = 1-4, length = 2 n+m = 5-9, length = 4 n+m = 10-18, length =8 |
|
Not allowed |
FLOAT May require BYTEORDER clause. |
Single-precision floating point number, 4 bytes long |
|
Not allowed |
DOUBLE May require BYTEORDER clause. |
Double-precision floating point number, 8 bytes long |
|
9(n)v9(m) S9(n)v9(m) |
DECIMAL (precision, scale) where precision = n+m and scale = m |
Internal format numeric data with a radix of 10. The clause indicates that each digit must use the minimum storage possible. Generally, each byte contains two digits with the last half-byte containing the sign. |
|
X(n) 9(n)v9(m) S9(n)v9(m) |
Not commonly used |
The internal format of the data is not defined. It is often stored the same as BINARY, however the radix may be reversed. |
|
G(n) |
GRAPHIC(n) |
Graphic data that does not contain Shift In and Shift Out characters |
|
05 V 49 V-LN PIC S9(4) COMP 05 V-DATA PIC X(n) |
VARCHAR(max length), can only be loaded correctly between systems where SMALLINT is the same size |
Variable length character field |
|
05 V 49 V-LN PIC S9(4) COMP 05 V-DATA PIC G(n) |
VARGRAPHIC(max length), can only be loaded correctly between systems where SMALLINT is the same size. |
Variable length Graphic data that does not contain Shift In and Shift Out characters |
To import metadata from COBOL, you must create a flat file module and then import the metadata definitions from a Cobol copybook.
To import metadata from a COBOL copybook:
Create a flat file module as described in "Creating Flat File Modules". Provide the location details of the COBOL copybook.
Right-click the newly created module and select Import, Cobol.
The Cobol Import dialog box is displayed.
An alternative way to open the Cobol Import dialog box is to select the newly created module and then select File, Import, Cobol.
Click Add Copybook to browse for the copybook you must import.
You can add multiple copybooks simultaneously. When you add a copybook, the Copybook field of the Import Copybooks spread table displays the directory path of the copybook. Use the File field to edit the name of the imported copybook. Use the Description field to add an optional description for the imported copybook.
Click View Copybook to view the metadata structure of the copybook being imported.
Click Session Options to open the Import Cobol Session Options dialog box. For details of values to be specified in this dialog box, see "Import Cobol Session Options".
Click OK and on the Cobol Import window, click Import.
You can use this dialog box to specify a template file and other properties. Based on the copybook you are importing, determine if the default physical file properties are acceptable. Or else, select a template file from which the physical characteristics are imported. You can edit some physical properties of the file after the import as well.
To specify a template file, select a file from the Copy Flat File Properties From list.
If you retain the Default Properties option from the Copy Flat File Properties From list, the file is defined as fixed format (not delimited) with the following properties:
Skip 0 records
Use first row as column name set to false
Record delimiter set to \n
One physical record for each logical record
If you import a multi-record copybook, then it is set to multi record.
If you select a file from the Copy Flat File Properties From list, then the physical characteristics of this file are used for the newly imported copybook.
Do Not Import Groups: To suppress the definition of group items. This ensures that only the subordinate items get imported. For example, if you have the following fields:
05  EMP-HIRE-DATE.
    10 EMP-HIRE-MONTH PIC 99.
    10 EMP-HIRE-DAY PIC 99.
    10 EMP-HIRE-YEAR PIC 9999.
When you select the Do Not Import Groups option, only three fields are created, EMP-HIRE-MONTH, EMP-HIRE-DAY, and EMP-HIRE-YEAR. When the option is not selected, then four fields, EMP-HIRE-DATE, EMP-HIRE-MONTH, EMP-HIRE-DAY, EMP-HIRE-YEAR are created at the time of import.
Do Not Import Redefines: To avoid import of redundant redefined fields. For example, if you have the following copybook definition:
05 HIRE_DATE.
10 HIRE_MONTH PIC 99.
10 HIRE_DAY PIC 99.
10 HIRE_YEAR PIC 9999.
05 HIRE_DATE_ALPHA REDEFINES HIRE_DATE.
10 HIRE_MONTH PIC XX.
10 HIRE_DAY PIC XX.
10 HIRE_YEAR PIC XXXX.
To import all the fields, clear the Do Not Import Redefinitions option. When the option is selected, only the first four fields, HIRE_DATE, HIRE_MONTH, HIRE_DAY, HIRE_YEAR are imported.
At the time of importing the metadata, it is recommended that you inspect the copybook for unnecessary metadata including grouped fields and redefined fields. You can also edit the file later to remove unnecessary definitions.
To extract data from a COBOL data file, you must first import the corresponding copybook. Consider the following copybook for import:
01  EMPLOYEE-RECORD.
    05  EMP-RECORD-LENGTH PIC 9(4).
    05  EMP-ID PIC 9(6).
    05  EMP-REGION PIC 9.
    05  EMP-DEPT PIC 999.
    05  EMP-HIRE-DATE.
        10 EMP-HIRE-MM PIC 99.
        10 EMP-HIRE-DD PIC 99.
        10 EMP-HIRE-YEAR PIC 9999.
    05  EMP-SALARY PIC 9(9).
    05  EMP-NAME PIC X(15).
    05  EMP-SKILLS OCCURS 4 TIMES.
        10 EMP-SKILL-LEVEL PIC 99.
        10 EMP-SKILL-ID PIC 9999.
Import the copybook as described in "Importing a Copybook".
To set the file properties of the imported copybook, right-click the file on the Projects Navigator and click Open. On the Edit Flat File dialog box, define the file properties as given in "Defining the File Properties".
Use the Name, General, and Structure tabs to specify the file properties.
Use the Name tab to specify the character set. This is an EBCDIC file, so the character must be set to WE8EBCDIC500.
Use the General tab to set the following file properties.
Record Delimiter: The record delimiter for this file must be set to the binary value X'0D0A'.
Logical Record Definition: In this example, there is one logical record per physical record.
Field Format: Each field in this record is at a constant position. Therefore, the Fixed Length Fields option is selected by default.
Record Type: This copybook contains a single type of record. Therefore, the Single Record option is selected by default.
The field properties are as shown in Figure 3-5.
Figure 3-5 The Field Properties of the Imported Cobol File
Use the Structure tab to review the field properties and make changes if required.
The structure of the imported file is as shown in Figure 3-6.
Figure 3-6 Structure of the Imported Cobol File
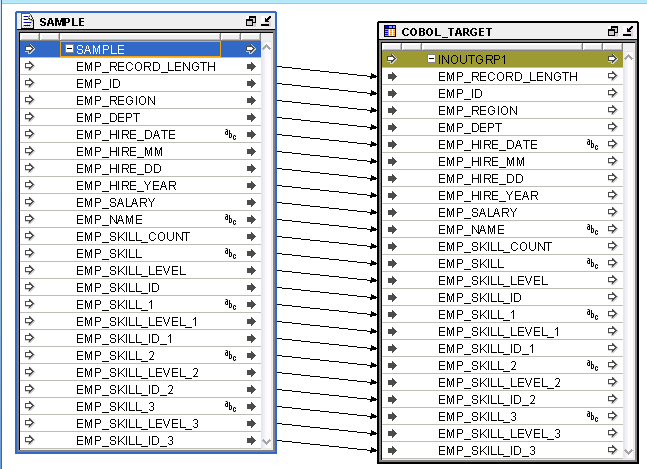
Create a mapping with the imported COBOL file as the source. Insert an unbound table operator in the mapping and map the desired fields from the COBOL file to the table operator.
Figure 3-7 Mapping a Flat File to a Table
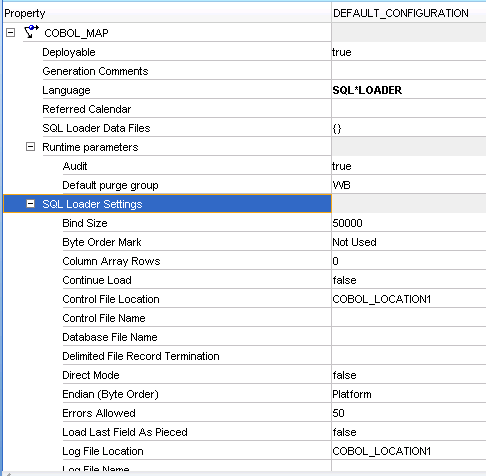
Right-click the mapping and click Configure to open the Configuration Properties dialog box. Select SQL*LOADER as the language for code generation. Tune any of the other SQL*Loader settings.
Figure 3-8 Configuration Properties Dialog Box
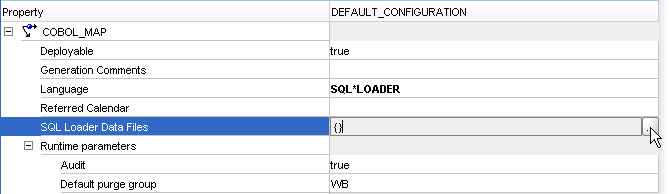
Click Sql Loader Data Files and then click the ellipsis as shown in Figure 3-9 to open the SQL Loader Data Files dialog box.
Figure 3-9 Configuration Properties for the Mapping
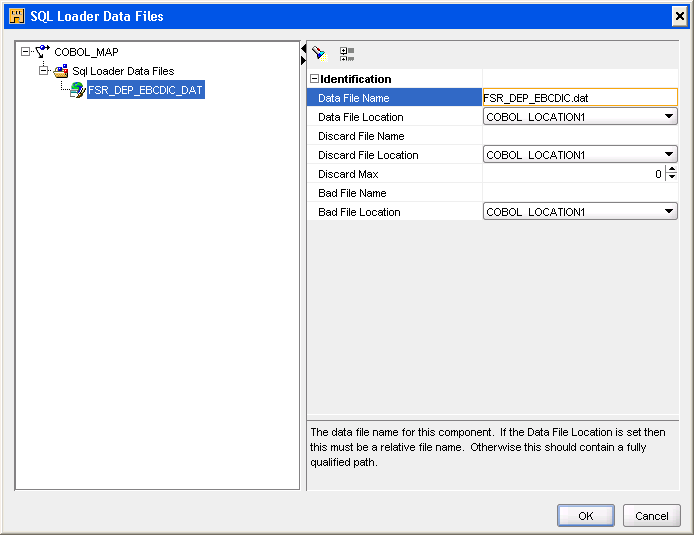
On the SQL Loader Data Files dialog box, right-click SQL Loader Data Files and select Create. A new data file node is added under Sql Loader Data Files.
Provide the data file name and select the data file location from where data is to be loaded. Specify a bad file to store those records that are not loaded into the target table due to error in the data. Specify a discard file to store those records that are not loaded due to SQL*Loader loading checks.
Figure 3-10 SQL Loader Data Files Dialog Box
After you have defined the configuration properties for the mapping, you can deploy the table and the mapping and then start the mapping to load the COBOL data into the target table.
To deploy the mapping, right-click the mapping and select Deploy. After deploying the mapping, start the mapping. Right-click the mapping and select Start. When you run the mapping, the data is read from the data file you provided while configuring the mapping, and loaded into the target table.
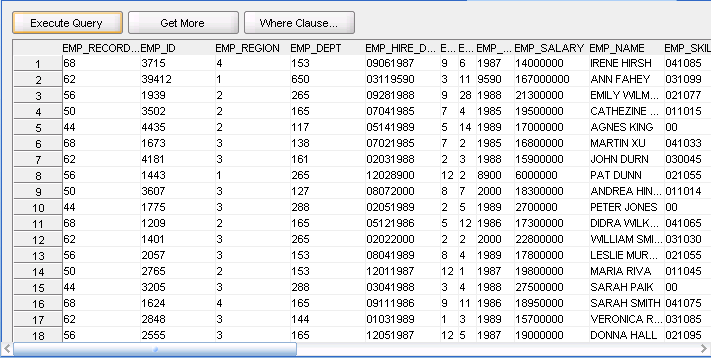
To view the data in the target table, right-click the table, and select Data. Figure 3-11 shows the data in the table.
You can view and edit the definition of a file by using the Edit Flat File dialog box.
To update a file definition:
Select the file definition in the Projects Navigator.
Right-click the file and select Open.
Oracle Warehouse Builder displays the Edit Flat File dialog box with the following tabs:
Name Tab: Use this tab to edit the name and descriptive for the file.
General Tab: Use this tab to change the general file properties, such as the physical record size, the number of physical records for each logical record, and the delimiter and enclosure characters.
Record Tab: This tab is available only for flat files with multiple record types. Use this tab to change the record type position or add, delete, or edit record types.
Structure Tab: Use this tab to edit field level attributes, SQL Loader and SQL Properties.
Use this tab to edit the name, default physical file name, description, and character set for the file. See "Describing a Flat File" for more details.
Use this tab to change the general properties, such as the physical record size, the number of physical records for each logical record, the delimiter and enclosure characters, the number of rows to skip, and the field format. See "Defining File Properties for a Flat File" for more details about the general properties.
If the file contains multiple record types, then specify the field position that determines the record type in Record Type Location.
Field Position: This field displays the column that contains the record type indicator. You can change this value. For example, if you have a flat file with two record types that are distinguished from each other by the content of the third column as shown in the following list, then the value in this field is 3.
Record Type 1: 2002 0115 E 4564564
Record Type 2: 2003 1231 D 659871 Q HKLIH
Record type values: This table displays each record type, the value that distinguishes it from the other record types, and the name you have given to the record type. Table 3-2 shows an example of what the record type values for the two sample records earlier might be:
To add new record types, click New and enter a Type Value and a Record Name describing the record type.
To delete record types, select the field to the left of each record type you want to remove and click Delete.
For fixed length files containing multiple record types, Record Type Location consists of two fields to determine the record type indicator:
Start Position: The starting position of the field that specifies the record type.
Length: The length of the field.
Use the Structure tab to edit a field name, data type, mask, "SQL*Loader Properties" and "SQL Properties". You can add or delete a field. You can also add a field mask, NULLIF condition, or DEFAULTIF condition.
If the file contains multiple record types, you can select each record type from the Record Name field. Oracle Warehouse Builder displays the field properties for the selected record. See "Defining Field Properties for a Flat File" for more details.
External tables are database objects available in Oracle Database9i, and higher.
External tables are tables that represent data from flat files in a relational format. They are read-only tables that act like regular source tables. When you create and define an external table, the metadata for the external table is saved in the workspace. You can load data from flat files to external tables, transform the data using mappings, and load the transformed data to target tables.
The following sections provide information about external tables:
Each external table you create corresponds to a single record type in an existing flat file. Before you begin, first define the file within the workspace as described in "Defining Character Data Files".
To create a new external table definition:
From the Projects Navigator, expand the Databases node and then the Oracle node.
Expand the module where you want to create the external table.
Right-click External Tables and select New External Table.
Oracle Warehouse Builder displays the Welcome page of the Create External Table Wizard. Use the wizard to complete the following pages:
Use the Name page to define a name and an optional description for the external table. Enter the name in the Name field. In the physical naming mode, you must enter a name between 1 and 200 valid characters. Spaces are not allowed in physical mode. In the logical mode, you can enter a unique name up to 4000 characters in length. The external table name must be unique within the module. Spaces are allowed in the logical naming mode.
Use the Description field to enter an optional description for the external table.
The wizard displays the File Selection page. The wizard lists all the flat files available in the workspace. Select a file on which to base the external table. To search through long lists of files, type the first few letters of the file name and click Go.
If you select a file that contains multiple record types, you must also select the record type name at the bottom of the File Selection page. An external table can represent only one record type.
You have the option of not specifying the file at this stage. If you do not specify a file in the wizard, you can later specify information such as record type, access parameters, and data files on the external table properties sheet.
You can select a location from the list of flat file locations. Alternatively, you can leave the location unspecified. If you do not specify a location in the wizard, you can later specify a location on the external table properties sheet.
Note:
The location associated with an external table must be deployed before the external table itself can be deployed.You can create an external table from a flat file, or import an existing external table into Oracle Warehouse Builder.
To import an external table:
On the Projects Navigator, right-click External Tables, and select Import.
Specify to import a database object or an Oracle Warehouse Builder metadata file.
Use the External Table editor to edit an external table definition. To open the editor, right-click the name of the external table from the Projects Navigator and select Open Editor. The Edit External Table dialog box is displayed. The tabs and properties that you can edit depend on how you defined the external table in the workspace.
The External Table Properties window displays with the following tabs:
Use the Name tab to rename the external table. The same rules for renaming tables apply to external tables. For more information, see Oracle Warehouse Builder Data Modeling, ETL, and Data Quality Guide.
Use the Columns tab to add or edit columns. The same rules for adding columns to tables apply to external tables. For more information, see Oracle Warehouse Builder Data Modeling, ETL, and Data Quality Guide.
Use the File tab to view the name of the flat file that provides the metadata for the external table. If the source flat file has multiple record types, the File tab also displays the record name associated with the external table. You can update this relationship or change it to a different file and record by reconciling the external table. For more information, see "Synchronizing an External Table Definition with a Record in a File".
The File tab displays under the following conditions:
You used the New External Table Wizard to create the external table and you specified a file name.
You did not specify a file name in the New External Table Wizard, but you reconciled the external table definition with a file and record.
Use the Location tab to view or change the flat file location. The Location list displays the available locations. Select a location from this list.
Use the Data Rules tab to define data rules for the external table. For more information about using data rules, see Oracle Warehouse Builder Data Modeling, ETL, and Data Quality Guide.
Access parameters define how to read from the flat file when a file has not been specified for the external table. In some cases, the External Table editor displays the Access Parameters tab instead of the File tab.
The tab for the access parameters displays under the following conditions:
You imported an external table from another workspace. In this case, you can view and edit the access parameters.
You created an external table in an Oracle Database and imported its definition. In this case, you can view and edit the access parameters.
You use the Create External Table Wizard to create an external table and do not specify a reference file. The access parameters are empty. Before generating the external table, you must reconcile the external table definition with a flat file record or manually enter your own access specifications.
The access parameters describe how fields in the source data file are represented in the external table as columns. For example, if the data file contained a field emp_id with a data type of INTEGER(2), the access parameters could indicate that the field be converted to a character string column in the external table.
Although you can make changes to the access parameters that affect how the external table is generated and deployed, it is not recommended. Oracle Warehouse Builder does not validate the changes. For more information about external tables and the access parameters, see Oracle Database Utilities.
Note:
When an external table is imported into Oracle Warehouse Builder, the access parameter definition of the table is truncated to 4000 characters. This can potentially cause DDL generation errors.Oracle Warehouse Builder enables you to update the external table definition with the metadata changes made to the file associated with the external table. You do this by synchronizing the external table with the source file.
To synchronize an external table definition with a record in a file:
In the Projects Navigator, right-click the external table to synchronize and select Synchronize.
Oracle Warehouse Builder displays the Synchronize dialog box.
Use the Select the Object to synchronize list to specify the flat file with which the external table is to be synchronized.
By default, the flat file that was used to create the external table is displayed in this list. Expand the list to see a list of flat file modules and the flat files they contain.
Use the Matching Strategy list to specify how the search is performed for matches and the external table with the information from the flat file is updated. The options for match strategy are:
Match By Object ID: This strategy compares the field IDs of that the external table columns references with the field IDs in the flat file.
Match By Object Name: This strategy compares the physical names in the external table with the physical names in the flat file.
Match By Object Position: This strategy matches by position, regardless of physical names and IDs. The first external table attribute is reconciled with the first record in the file, the second with the second, and so on. Use this strategy when you want to reconcile the external table with a new record.
Use the Synchronize Strategy list to indicate how differences in metadata between the existing external table definition and the record you specified are handled:
Merge: The metadata from the existing external table definition and the record you specified is combined.
Replace: Existing record metadata is deleted from the external table definition and the new file record metadata is added to the external table.
Click View Synchronization Plan to open the Synchronization Plan dialog box.
You can view the actions performed during synchronization.
Select a new strategy and then click Refresh Plan.
On the spread table, expand the Source node to view the action performed on each column.
Click OK to complete synchronizing the external table definition.
Configure the following properties for an external table:
Note:
When you import an external table into the workspace and when you manually define access parameters for an external table, some external table configuration properties are overruled by settings on the Access Parameters tab in the External Table Properties window.To configure the physical properties for an external table:
Select an external table from the Projects Navigator.
From the Edit menu, select Configure. You can also click the Configure icon from the toolbar.
The Configuration Property window is displayed.
To configure a property, click the white space and make a selection from the list.
Under Access Specification, you can indicate the following file names and locations that Oracle Warehouse Builder uses to load the external table through SQL*Loader.
Bad File: If you specify a name and location for a bad file, Oracle Database is directed to write to that file all records that were not loaded due to errors. For example, records written to the bad file include those not loaded due to a data type error in converting a field into a column in the external table. If you specify a bad file that exists, the existing file is overwritten.
Discard File: If you specify a name and location for a discard file, Oracle Database is directed to write to that file all records that were not loaded based on a SQL*Loader load condition placed on the file. If you specify a discard file that exists, the existing file is overwritten.
Log File: If you specify a name and location for a log file, then Oracle Database is directed to log messages related to the external table to that file. If you specify a log file that exists, new messages are appended.
For each of these files, you can either specify a file name and location, select Do not use, or select Use default location.
Under Reject, you can indicate how many rejected rows to allow. By default, the number of rejected rows allowed is unlimited. If you set Rejects are unlimited to false, enter a number in Number of rejects allowed.
Parallel: Enables parallel processing. If you are using a single system, set the value to NONPARALLEL to improve performance. If you are using multiple systems, accept the default PARALLEL.The access driver attempts to divide data files into chunks that can be processed separately. The following file, record, and data characteristics make it impossible for a file to be processed in parallel:
Sequential data sources (such as a tape drive or pipe).
Data in any multibyte character set whose character boundaries cannot be determined starting at an arbitrary byte in the middle of a string. This restriction does not apply to any data file with a fixed number of bytes for each record.
Records with the VAR format
If you imported the external table into the workspace or created the external table without specifying a source file, do not configure these properties. Data characteristics properties are overruled by settings on the Access Parameters tab in the External Table Properties window.
Under Data Characteristics you can set the following properties:
Endian: The default for the Endian property is Platform. This indicates that it is assumed that the endian of the flat file matches the endian of the platform on which it resides. If the file resides on a Windows platform, the data is handled as little-endian data. If the file resides on Sun Solaris or IBM MVS, the data is handled as big-endian. If you know the endian value for the flat file, you can select big or little-endian. If the file is UTF16 and contains a mark at the beginning of the file indicating the endian, then that endian is used.
String Sizes in: This property indicates how data with multibyte character sets, such as UTF16, is handled. By default, the lengths for character strings in the data file are assumed to be in bytes. You can change the selection to indicate that strings sizes are specified in characters.
If you imported the external table into the workspace or created the external table without specifying a source file, do not configure these properties. Field editing properties are overruled by settings on the Access Parameters tab in the External Table Properties window.
Under Field Editing, you can indicate the type of whitespace trimming to be performed on character fields in the data file. The default setting is to perform no trim. All other trim options can reduce performance. You can also set the trim option to trim blanks to the left, right, or both sides of a character field.
Another option is to set the trim to perform according to SQL*Loader trim function. If you select SQL*Loader trim, fixed-length files are right trimmed and delimited files specified to have enclosures are left trimmed only when a field is missing an enclosure.
You can indicate how to handle missing fields in a record. If you set the option Trim Missing Values Null to true, fields with missing values are set to NULL. If you set the property to false, fields with missing values are rejected and written into the specified bad file.
See Oracle Warehouse Builder Data Modeling, ETL, and Data Quality Guide for details.
If a file is associated with an external table, and it has a file name specified, that name is used. The user can configure if a different file must be specified or if multiple files must be specified.
To add a data file:
Right-click the Data Files node and select Create.
Enter a name for the data file such as DATAFILE1. Your entry displays as a new node in the right panel of the Configuration Properties dialog box.
Enter the following values for each data file you define:
Data File Location: Location for the flat file.
Data File Name: The name of the flat file including its extension. For example, enter myflatfile.dat.
|
Copyright © 2000, 2011, Oracle and/or its affiliates. All rights reserved. Legal Notices |
|