The tree view holds the data to be displayed in the tree.
Creating a Custom View
So far, we have only been using the built-in content tree view. In this section, we will look at creating a custom view. This is necessary when the page has a lot of data or that data is highly nested. For instance, 5000 rows of treeitems would load too slowly. You might also implement a custom view when you want to perform computations on the data to be displayed. Since the view can store and retrieve the data in the most suitable manner for the kind of data used, the tree can be used even when there are hundreds of thousands of rows to be displayed.
To implement a custom view, you will need to create an object which implements the nsITreeView interface. You can create these objects in JavaScript, but you will need a separate object for each tree. Naturally, since a custom tree view is being used, the content tree view will not be used, so the treeitemtreerowtreecelltreechildren
<tree id="my-tree" flex="1">
  <treecols>
    <treecol id="namecol" label="Name" flex="1"/>
    <treecol id="datecol" label="Date" flex="1"/>
  </treecols>
  <treechildren/>
</tree>
To assign data to be displayed in the tree, the view object needs to be created which is used to indicate the value of each cell, the total number of rows plus other optional information. The tree will call methods of the view to get the information that it needs to display.
In general, although the tree view has thirty or so functions that may be implemented, you only need to implement the ones that the tree will call. Three methods that you should implement are listed below.
- rowCount
- This property should be set to the total number of rows in the tree.
- getCellText( row , column )
- This method should return the text contents at the specified row and column. This will be called to display data for each cell. The rows are supplied as numeric values starting at 0. The columns are
TreeColumnobjects. In the older versions of Mozilla (before Firefox 1.5 or Mozilla 1.8), the columns are supplied as the values of the id attribute on the columns. If you need a id attribute like older versions, theidproperty ofTreeColumncan be used. - setTree( tree )
- This method is called once to set the tree element on the view.
Here is an example of defining such as object, which can be called whatever you want:
//Moz 1.8
var treeView = {
    rowCount : 10000,
    getCellText : function(row,column){
      if (column.id == "namecol") return "Row "+row;
      else return "February 18";
    },
    setTree: function(treebox){ this.treebox = treebox; },
    isContainer: function(row){ return false; },
    isSeparator: function(row){ return false; },
    isSorted: function(){ return false; },
    getLevel: function(row){ return 0; },
    getImageSrc: function(row,col){ return null; },
    getRowProperties: function(row,props){},
    getCellProperties: function(row,col,props){},
    getColumnProperties: function(colid,col,props){}
};
The functions in the example not described above do not need to perform any action, but they must be implemented as the tree calls them to gather additional information.
This example can be used for a tree with 10,000 rows. The contents of the cells in the first column will be set to the text 'Row X' where X is the row number. The contents of the cells in the second column will be set to 'February 18'. The if statement in the function getCellText() compares the id property of the column argument to the text 'namecol'. This text 'namecol' corresponds to the id of the first treecol
The final step is to associate the view object with the tree. The tree has a property view, which can be assigned to the view object declared above. We can assign a value to this property at any time to set or change the view.
function setView(){
    document.getElementById('my-tree').view = treeView;
}
The following presents the example together. An inline script has been used here to simplify the example. Normally, you would put the script in an external script file.
Example custom tree

<?xml version="1.0"?>
<?xml-stylesheet href="chrome://global/skin/" type="text/css"?>
<window title="Tree Example" id="tree-window"
   xmlns="http://www.mozilla.org/keymaster/gatekeeper/there.is.only.xul"
   onload="setView();">
<script>
//Moz 1.8
var treeView = {
    rowCount : 10000,
    getCellText : function(row,column){
      if (column.id == "namecol") return "Row "+row;
      else return "February 18";
    },
    setTree: function(treebox){ this.treebox = treebox; },
    isContainer: function(row){ return false; },
    isSeparator: function(row){ return false; },
    isSorted: function(){ return false; },
    getLevel: function(row){ return 0; },
    getImageSrc: function(row,col){ return null; },
    getRowProperties: function(row,props){},
    getCellProperties: function(row,col,props){},
    getColumnProperties: function(colid,col,props){}
};
function setView(){
    document.getElementById('my-tree').view = treeView;
}
</script>
<tree id="my-tree" flex="1">
  <treecols>
    <treecol id="namecol" label="Name" flex="1"/>
    <treecol id="datecol" label="Date" flex="1"/>
  </treecols>
  <treechildren/>
</tree>
</window>
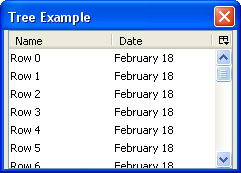
In the image, you can see two columns, each with data taken from the getCellText() function. The setView() function has been called in the onload() handler for the window, but you could also set the view later if you wish. You can change the view at any time.
One thing to note is that the getCellText() function is only called when necessary to display the contents. In the 10,000 row example above, getCellText() is only called for the cells that are currently displayed. In the image, only seven rows are displayed, the last only partially, so getCellText() will be called only 14 times, one for each row and column. It is called for other rows when the user scrolls through them. This makes the tree much more efficient.
Note that the view object is also available for trees using the built-in content view. You can use this to get the cell labels and other information.
The nsITreeView interface lists all of the properties and methods that you can implement for the tree view. We'll look at more of these in the next section.
Next, we'll look at more features of tree views.