# Modes of Operation
- Regular (the default)
- Transparent
- WireGuard
- Reverse Proxy
- Upstream Proxy
- SOCKS Proxy
- DNS Server
Now, which one should you pick? Use this flow chart:

# Regular Proxy
Mitmproxy’s regular mode is the simplest and the easiest to set up.
- Start mitmproxy.
- Configure your client to use mitmproxy by explicitly setting an HTTP proxy. By default, mitmproxy listens on port 8080.
- Quick Check: You should already be able to visit an unencrypted HTTP site through the proxy.
- Open the magic domain mitm.it and install the certificate for your device.
If you are proxying an external device, your network will probably look like this:
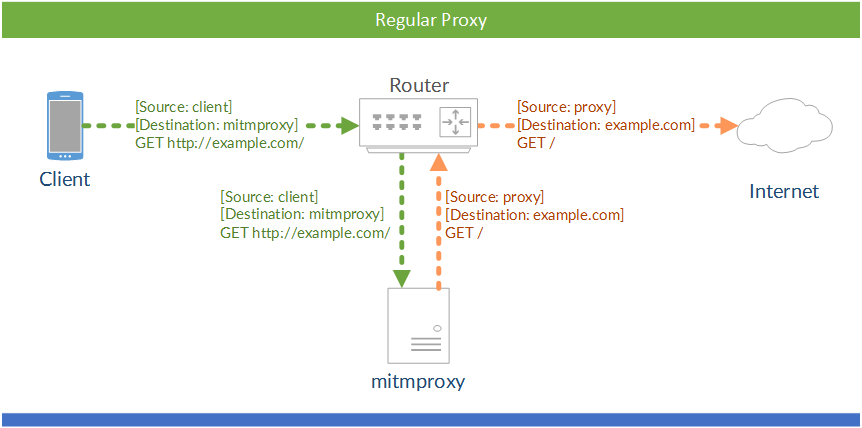
The square brackets signify the source and destination IP addresses. Your client explicitly connects to mitmproxy and mitmproxy explicitly connects to the target server.
# Transparent Proxy
mitmdump --mode transparent
In transparent mode, traffic is directed into a proxy at the network layer, without any client configuration required. This makes transparent proxying ideal for situations where you can’t change client behaviour. In the graphic below, a machine running mitmproxy has been inserted between the router and the internet:
The square brackets signify the source and destination IP addresses. Round brackets mark the next hop on the Ethernet/data link layer. This distinction is important: when the packet arrives at the mitmproxy machine, it must still be addressed to the target server. This means that Network Address Translation should not be applied before the traffic reaches mitmproxy, since this would remove the target information, leaving mitmproxy unable to determine the real destination.
# Common Configurations
There are many ways to configure your network for transparent proxying. We’ll look at two common scenarios:
- Configuring the client to use a custom gateway/router/“next hop”
- Implementing custom routing on the router
In most cases, the first option is recommended due to its ease of use.
# (a) Custom Gateway
One simple way to get traffic to the mitmproxy machine with the destination IP intact, is to simply configure the client with the mitmproxy box as the default gateway.
In this scenario, we would:
- Configure the proxy machine for transparent mode. You can find instructions in the transparent section.
- Configure the client to use the proxy machine’s IP as the default gateway.
- Quick Check: At this point, you should already be able to visit an unencrypted HTTP site over the proxy.
- Open the magic domain mitm.it and install the certificate for your device.
Setting the custom gateway on clients can be automated by serving the settings out to clients over DHCP. This lets set up an interception network where all clients are proxied automatically, which can save time and effort.
# Troubleshooting Transparent Mode
Incorrect transparent mode configurations are a frequent source of error. If it doesn’t work for you, try the following things:
- Open mitmproxy’s event log - do you see clientconnect messages? If not, the packets are not arriving at the proxy. One common cause is the occurrence of ICMP redirects, which means that your machine is telling the client that there’s a faster way to the internet by contacting your router directly (see the transparent section on how to disable them). If in doubt, Wireshark may help you to see whether something arrives at your machine or not.
- Make sure you have not explicitly configured an HTTP proxy on the client. This is not needed in transparent mode.
- Re-check the instructions in the transparent section. Anything you missed?
If you encounter any other pitfalls that should be listed here, please let us know!
# (b) Custom Routing
In some cases, you may need more fine-grained control of which traffic reaches the mitmproxy instance, and which doesn’t. You may, for instance, choose only to divert traffic to some hosts into the transparent proxy. There are a huge number of ways to accomplish this, and much will depend on the router or packet filter you’re using. In most cases, the configuration will look like this:
# WireGuard (transparent proxy)
mitmdump --mode wireguard
The WireGuard mode works in the same way as transparent mode, except that setup and routing client traffic to mitmproxy are different. In this mode, mitmproxy runs an internal WireGuard server, which devices can be connected to by using standard WireGuard client applications:
- Start
mitmweb --mode wireguard. - Install a WireGuard client on target device.
- Import the WireGuard client configuration provided by mitmproxy.
No additional routing configuration is required for this mode, since WireGuard operates by exchanging UDP packets between client and server (with encrypted IP packets as their payload) instead of routing IP packets directly. Additionally, the WireGuard server runs entirely in userspace, so no administrative privileges are necessary for setup or operation of mitmproxy in this mode.
# Configuration
# WireGuard server
By default, the WireGuard server will listen on port 51820/udp, the default
port for WireGuard servers. This can be changed by setting the listen_port
option or by specifying an explicit port (--mode wireguard@51821).
The encryption keys for WireGuard connections are stored in
~/.mitmproxy/wireguard.conf. It is possible to specify a custom path with
--mode wireguard:path. New keys will be generated automatically if the
specified file does not yet exist. For example, to connect two clients
simultaneously, you can run
mitmdump --mode wireguard:wg-keys-1.conf --mode wireguard:wg-keys-2.conf@51821.
# WireGuard clients
It is possible to limit the IP addresses for which traffic is sent over the
WireGuard tunnel to specific ranges. In this case, the AllowedIPs setting
in the WireGuard client configuration can be changed from 0.0.0.0/0 (i.e
“route all IPv4 traffic through the WireGuard tunnel”) to the desired ranges
of IP addresses (this setting allows multiple, comma-separated values).
For more complex network layouts it might also be necessary to override the
automatically detected Endpoint IP address (i.e. the address of the host on
which mitmproxy and its WireGuard server are running).
# Limitations
# Transparently proxying mitmproxy host traffic
With the current implementation, it is not possible to proxy all traffic of the host that mitmproxy itself is running on, since this would result in outgoing WireGuard packets being sent over the WireGuard tunnel themselves.
# Limited support for IPv6 traffic
The WireGuard server internal to mitmproxy supports receiving IPv6 packets from
client devices, but support for proxying IPv6 packets themselves is still
limited. For this reason, the AllowedIPs setting in generated WireGuard client
configurations does not list any IPv6 addresses yet. To enable the incomplete
support for IPv6 traffic, ::/0 (i.e. “route all IPv6 traffic through the
WireGuard tunnel”) or other IPv6 address ranges can be added to the list of
allowed IP addresses.
# Reverse Proxy
mitmdump --mode reverse:https://example.com
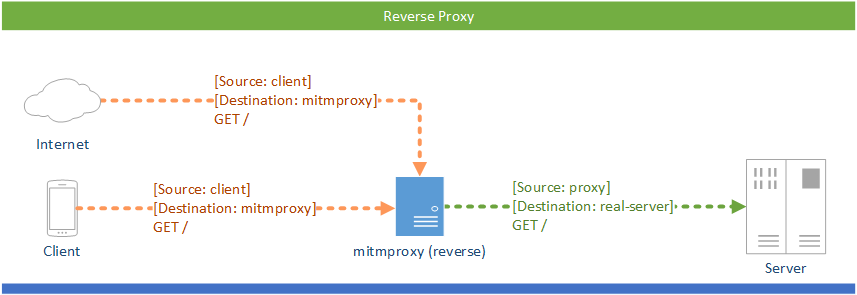
mitmproxy is usually used with a client that uses the proxy to access the Internet. Using reverse proxy mode, you can use mitmproxy to act like a normal HTTP server:
Locally, reverse mode instances will listen on the same port as their regular
equivalent, which is 8080 by default (except for DNS, which uses port 53).
To specify a different port, append “@” followed by the number to the mode.
For example, to listen on port 8081 for HTTP proxy request use
--mode reverse:https://example.com@8081.
There are various use-cases:
- Say you have an internal API running at http://example.local/. You could now set up mitmproxy in reverse proxy mode at http://debug.example.local/ and dynamically point clients to this new API endpoint, which provides them with the same data and you with debug information. Similarly, you could move your real server to a different IP/port and set up mitmproxy in the original place to debug and or redirect all sessions.
- Say you’re a web developer working on http://example.com/ (with a development version running on http://localhost:8000/). You can modify your hosts file so that example.com points to 127.0.0.1 and then run mitmproxy in reverse proxy mode on port 80. You can test your app on the example.com domain and get all requests recorded in mitmproxy.
- Say you have some toy project that should get SSL support. Simply set up
mitmproxy as a reverse proxy on port 443 and you’re done (
mitmdump -p 443 --mode reverse:http://localhost:80/). Mitmproxy auto-detects TLS traffic and intercepts it dynamically. There are better tools for this specific task, but mitmproxy is very quick and simple way to set up an SSL-speaking server. - Want to add a non-SSL-capable compression proxy in front of your server? You
could even spawn a mitmproxy instance that terminates SSL (
--mode reverse:http://...), point it to the compression proxy and let the compression proxy point to a SSL-initiating mitmproxy (--mode reverse:https://...), which then points to the real server. As you see, it’s a fairly flexible thing. - Want to know what goes on over (D)TLS (without HTTP)? With mitmproxy’s raw
traffic support you can. Use
--mode reverse:tls://example.com:1234to spawn a TCP instance that connects toexample.com:1234using TLS, and--mode reverse:dtls://example.com:1234to use UDP and DTLS respectively instead.
Incoming client connections can either use (D)TLS themselves or raw TCP/UDP. In case you want to inspect raw traffic only for some hosts and HTTP for others, have a look at the tcp_hosts and udp_hosts options. - Say you want to capture DNS traffic to Google’s Public DNS server? Then you
can spawn a reverse instance with
--mode reverse:dns://8.8.8.8. In case you want to resolve queries locally (ie. using the resolve capabilities provided and configured by your operating system), use DNS Server mode instead.
# Host Header
In reverse proxy mode, mitmproxy automatically rewrites the Host header to match
the upstream server. This allows mitmproxy to easily connect to existing
endpoints on the open web (e.g. mitmproxy --mode reverse:https://example.com). You can
disable this behaviour with the keep_host_header option.
However, keep in mind that absolute URLs within the returned document or HTTP redirects will NOT be rewritten by mitmproxy. This means that if you click on a link for “http://example.com” in the returned web page, you will be taken directly to that URL, bypassing mitmproxy.
One possible way to address this is to modify the hosts file of your OS so that “example.com” resolves to your proxy’s IP, and then access the proxy by going directly to example.com. Make sure that your proxy can still resolve the original IP, or specify an IP in mitmproxy.
# Caveat: Interactive Use
Reverse Proxy mode is usually not sufficient to create a copy of an interactive website at different URL. The HTML served to the client remains unchanged - as soon as the user clicks on an non-relative URL (or downloads a non-relative image resource), traffic no longer passes through mitmproxy.
# Upstream Proxy
mitmdump --mode upstream:http://example.com:8081
If you want to chain proxies by adding mitmproxy in front of a different proxy appliance, you can use mitmproxy’s upstream mode. In upstream mode, all requests are unconditionally transferred to an upstream proxy of your choice.

mitmproxy supports both explicit HTTP and explicit HTTPS in upstream proxy mode. You could in theory chain multiple mitmproxy instances in a row, but that doesn’t make any sense in practice (i.e. outside of our tests).
# SOCKS Proxy
mitmdump --mode socks5
In this mode, mitmproxy acts as a SOCKS5 proxy. This is similar to the regular proxy mode, but using SOCKS5 instead of HTTP for connection establishment with the proxy.
# DNS Server
mitmdump --mode dns
This mode will listen for incoming DNS queries and use the resolve
capabilities of your operation system to return an answer.
By default port 53 will be used. To specify a different port, say 5353,
use --mode dns@5353.
Since the lookup API is limited to turning host names into IP addresses
and vice-versa, only A, AAAA, PTR and CNAME queries are supported.
You can, however, use reverse mode to specify an upstream server and
unlock all query types. For example, to use Google’s Public DNS server
specify --mode reverse:dns://8.8.8.8.