2.8 Collecting and Consuming Health Check Data
Oracle Health Check Collections Manager for Oracle Application Express 4.2 provides you an enterprise-wide view of your health check collection data.
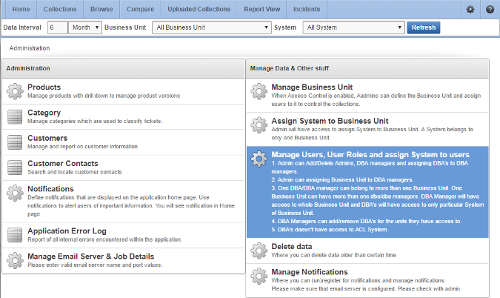
- Selectively Capturing Users During Login
Configure Oracle Health Check Collections Manager to capture user details and assign the users Oracle Health Check Collections Manager roles. - Bulk Mapping Systems to Business Units
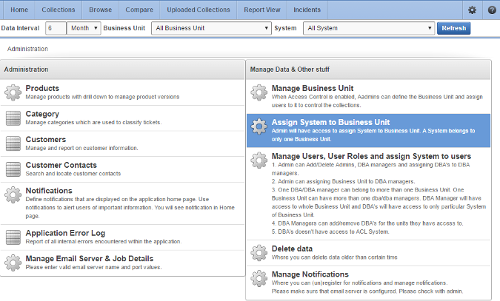
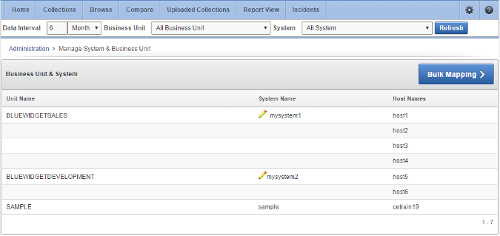
Oracle Health Check Collections Manager provides an XML bulk upload option so that you can quickly map many systems to business units. - Adjusting or Disabling Old Collections Purging
Modify or disable the purge schedule for Oracle Health Check Collections Manager collection data. - Uploading Collections Automatically
Configure Oracle ORAchk and Oracle EXAchk to upload check results automatically to the Oracle Health Check Collections Manager database. - Viewing and Reattempting Failed Uploads
Configure Oracle ORAchk and Oracle EXAchk to display and reattempt to upload the failed uploads. - Authoring User-Defined Checks
Define, test, and maintain your own checks that are specific to your environment. - Finding Which Checks Require Privileged Users
Use the Privileged User filter in the Health Check Catalogs to find health checks that must be run by privileged users, such asroot. - Creating or Editing Incidents Tickets
Create or edit incident tickets for individual checks or for an entire collection. - Viewing Clusterwide Linux Operating System Health Check (VMPScan)
On Linux systems, view a summary of the VMPScan report in the Clusterwide Linux Operating System Health Check (VMPScan) section of the Health Check report.
Related Topics
Parent topic: Analyzing Risks and Complying with Best Practices
2.8.1 Selectively Capturing Users During Login
Configure Oracle Health Check Collections Manager to capture user details and assign the users Oracle Health Check Collections Manager roles.
Automatically capturing users during login automates user management. You need not create users manually.
-
Captures details of users that are logging in with LDAP authentication
-
Assigns them Oracle Health Check Collections Manager roles, for example, DBA role.
Note:
The Oracle Health Check Collections Manager roles are specific to Oracle Health Check Collections Manager and do not equate to system privileges. For example, the DBA role is not granted SYSDBA system privilege.
However, you can disable automatic capture and re-enable anytime later. If you disable, then you must manually create users and assign them roles.
To enable or disable capturing user details automatically:
Parent topic: Collecting and Consuming Health Check Data
2.8.2 Bulk Mapping Systems to Business Units
Oracle Health Check Collections Manager provides an XML bulk upload option so that you can quickly map many systems to business units.
To bulk map systems to the business units:
Parent topic: Collecting and Consuming Health Check Data
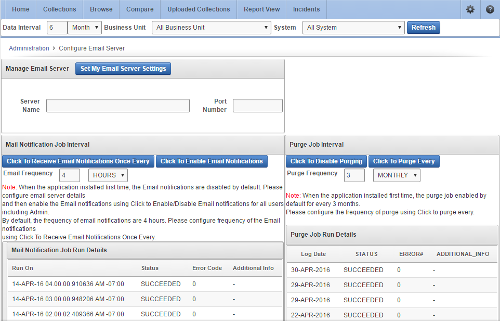
2.8.3 Adjusting or Disabling Old Collections Purging
Modify or disable the purge schedule for Oracle Health Check Collections Manager collection data.
By default, Oracle Health Check Collections Manager purges collections older than three months.
To adjust or disable the collection purging frequency:
Parent topic: Collecting and Consuming Health Check Data
2.8.4 Uploading Collections Automatically
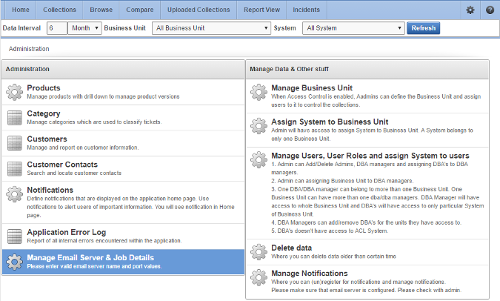
Configure Oracle ORAchk and Oracle EXAchk to upload check results automatically to the Oracle Health Check Collections Manager database.
To configure Oracle ORAchk and Oracle EXAchk to upload check results automatically:
Example 2-1 Checking Oracle ORAchk and Oracle EXAchk Check Result Uploads
$ ./orachk -checkdbupload

Configuration is good to upload result to database.
At the end of health check collection, Oracle ORAchk and Oracle EXAchk check if the required connection details are set (in the wallet or the environment variables). If the connection details are set properly, then Oracle ORAchk and Oracle EXAchk upload the collection results.
To configure many Oracle ORAchk and Oracle EXAchk instances:
-
Create the wallet once with the
-setdbupload alloption, then enter the values when prompted. -
Copy the resulting wallet directory to each Oracle ORAchk and Oracle EXAchk instance directories.
You can also set the environment variable RAT_WALLET_LOC to point to the location of the wallet directory.
-
RAT_UPLOAD_USER: Controls which user to connect as (default isORACHKCM). -
RAT_UPLOAD_TABLE: Controls the table name to store non-zipped collection results in (not used by default). -
RAT_PATCH_UPLOAD_TABLE: Controls the table name to store non-zipped patch results in (not used by default). -
RAT_UPLOAD_ORACLE_HOME: ControlsORACLE_HOMEused while establishing connection and uploading.By default, the
ORACLE_HOMEenvironment variable is set to the Oracle Grid Infrastructure Grid home that Oracle ORAchk and Oracle EXAchk discover.
RCA13_DOCS: Not configurable to use Oracle Health Check Collections Manager because RCA13_DOCS is the table Oracle Health Check Collections Manager looks for.
RAT_UPLOAD_TABLE and RAT_PATCH_UPLOAD_TABLE: Not used by default because the zipped collection details are stored in RCA13_DOCS.
Configure RAT_UPLOAD_TABLE and RAT_PATCH_UPLOAD_TABLE environments variables if you are using your own custom application to view the collection results.
You can also set these values in the wallet.
$ ./orachk -setdbupload all$ ./exachk -setdbupload allThis prompts you for and set the RAT_UPLOAD_CONNECT_STRING and RAT_UPLOAD_PASSWORD, then use
$ ./orachk -setdbupload RAT_PATCH_UPLOAD_TABLE,RAT_PATCH_UPLOAD_TABLE$ ./exachk -setdbupload RAT_PATCH_UPLOAD_TABLE,RAT_PATCH_UPLOAD_TABLENote:
Alternatively, set all values set in the wallet using the environment variables. If you set the values using the environment variable RAT_UPLOAD_CONNECT_STRING, then enclose the values in double quotes.
export RAT_UPLOAD_CONNECT_STRING="(DESCRIPTION=(ADDRESS=(PROTOCOL=TCP)(HOST=myserver44.example.com)(PORT=1521))(CONNECT_DATA=(SERVER=DEDICATED)(SERVICE_NAME=orachkcm.example.com)))"Parent topic: Collecting and Consuming Health Check Data
2.8.5 Viewing and Reattempting Failed Uploads
Configure Oracle ORAchk and Oracle EXAchk to display and reattempt to upload the failed uploads.
The tools store the values in the collection_dir/outfiles/check_env.out file to record if the previous database upload was successful or not.
DATABASE_UPLOAD_SETUP=1
DATABASE_UPLOAD_STATUS=0
To view and reattempt failed uploads:
Parent topic: Collecting and Consuming Health Check Data
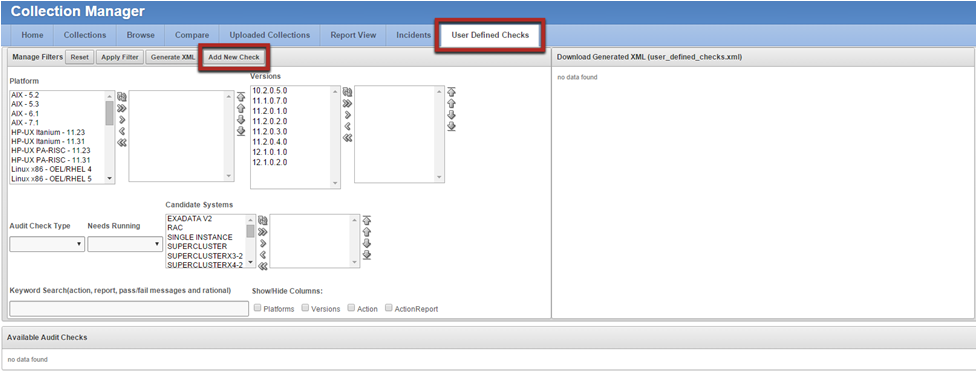
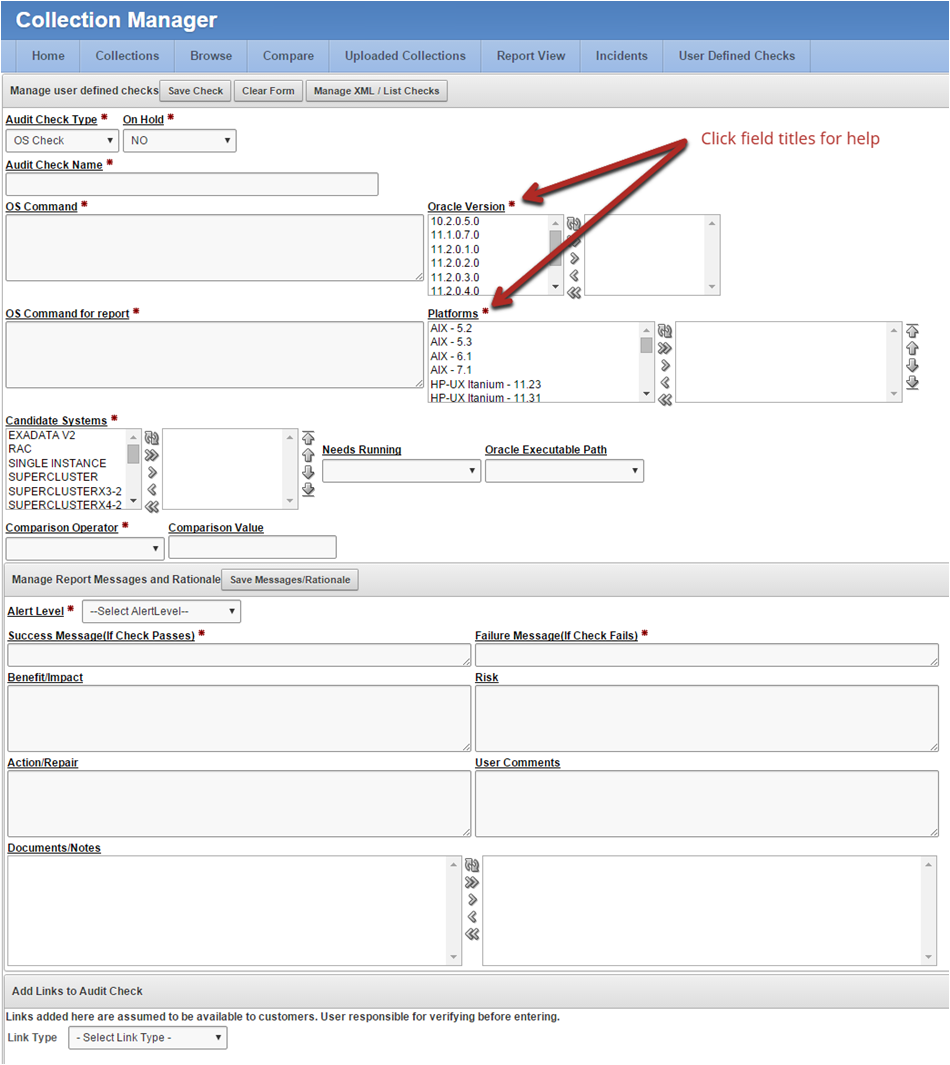
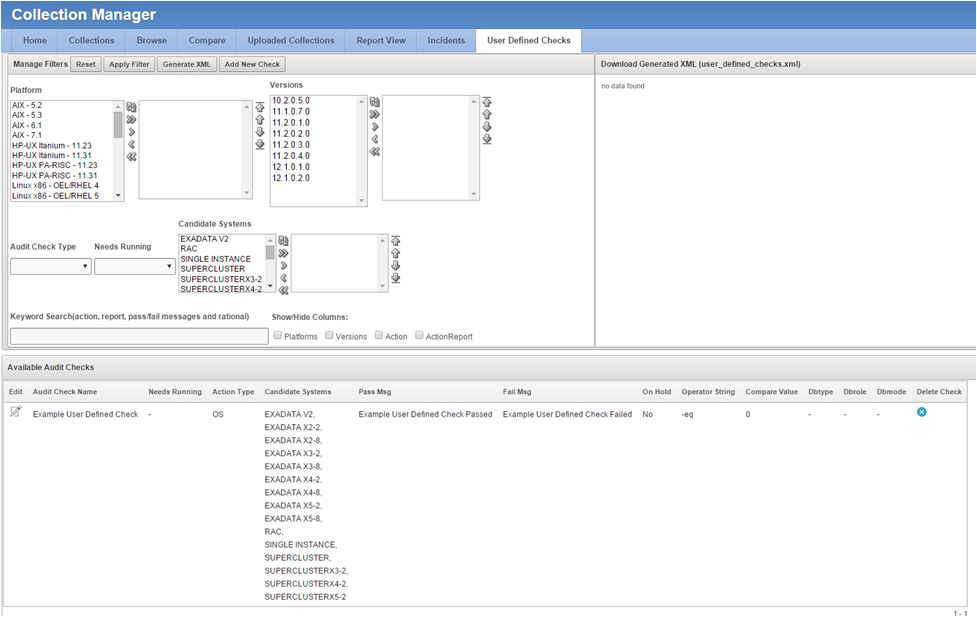
2.8.6 Authoring User-Defined Checks
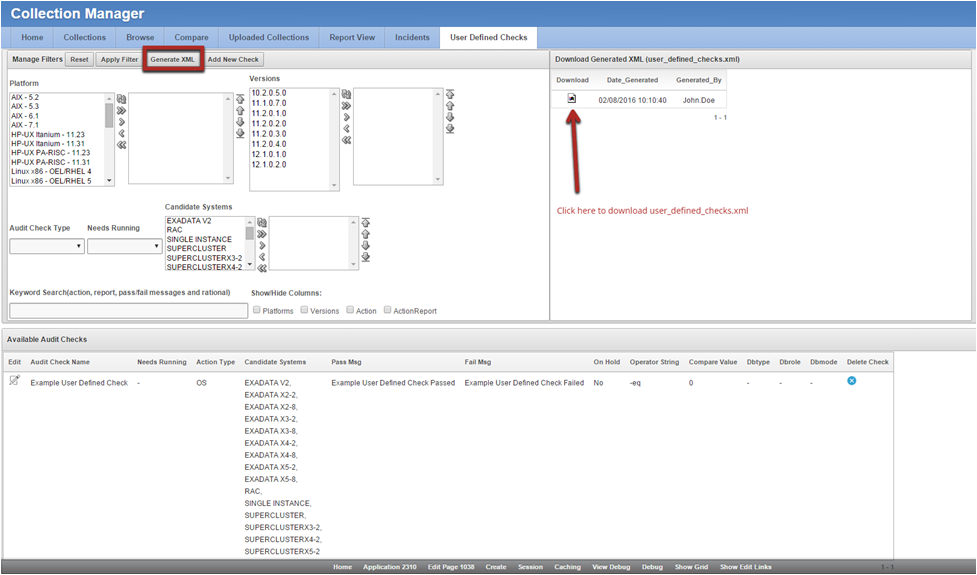
Define, test, and maintain your own checks that are specific to your environment.
Oracle supports the framework for creating and running user-defined checks, but not the logic of the checks. It is your responsibility to test, verify, author, maintain, and support user-defined checks. At runtime, Oracle ORAchk and Oracle EXAchk script run the user-defined checks and display the results in the User Defined Checks section of the HTML report.
The user-defined checks are stored in the Oracle Health Check Collections Manager schema and output to an XML file, which is co-located with the ORAchk script. When run on your system, ORAchk 12.1.0.2.5 and later tries to find the XML file. If found, then Oracle ORAchk runs the checks contained therein and includes the results in the standard HTML report.
To author user-defined checks:
Parent topic: Collecting and Consuming Health Check Data
2.8.7 Finding Which Checks Require Privileged Users
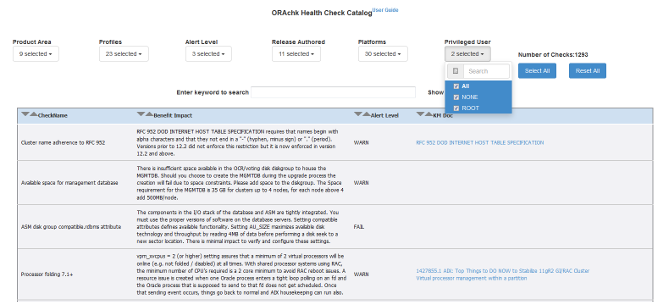
Use the Privileged User filter in the Health Check Catalogs to find health checks that must be run by privileged users, such as root.
To filter health checks by privileged users:
Related Topics
Parent topic: Collecting and Consuming Health Check Data
2.8.8 Creating or Editing Incidents Tickets
Create or edit incident tickets for individual checks or for an entire collection.
Oracle Health Check Collections Manager represents the statuses of each ticket with different colored icons. To act upon the tickets, click the icons.
Parent topic: Collecting and Consuming Health Check Data
2.8.8.1 Creating Incident Tickets
To create incident tickets:
- Click the Delta (Δ) symbol colored RED.
- Add your ticket details.
- Click Next.
- Select the Product and Product Version.
- Click Next.
- Select the Urgency of the ticket.
- Select the Severity of the ticket.
- Select the Status of the ticket.
- Select the Category of the ticket.
- Enter a summary and description of the incident.
- Click Create Ticket.
Parent topic: Creating or Editing Incidents Tickets
2.8.8.2 Editing Incident Tickets
To edit incident tickets:
- Click the Incident tab.
- Click Open Tickets.
- Click the ticket.
- Click Edit Ticket.
- Alter required details, click Apply Changes.
Note:
Click the delta symbol colored GREEN in the Collections or Browse tabs to edit incident tickets.Parent topic: Creating or Editing Incidents Tickets
2.8.9 Viewing Clusterwide Linux Operating System Health Check (VMPScan)
On Linux systems, view a summary of the VMPScan report in the Clusterwide Linux Operating System Health Check (VMPScan) section of the Health Check report.
The full VMPScan report is also available within the collection/reports and collection/outfiles/vmpscan directory.
Figure 2-22 Clusterwide Linux Operating System Health Check (VMPScan)
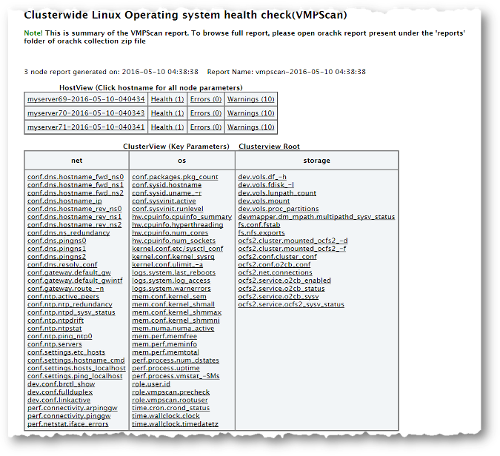
Description of "Figure 2-22 Clusterwide Linux Operating System Health Check (VMPScan)"
Note:
The VMPScan report is included only when Oracle ORAchk is run on Linux systems.
Parent topic: Collecting and Consuming Health Check Data
