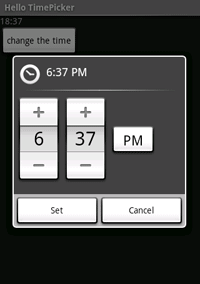
To provide a widget for selecting a time, use the TimePicker
widget, which allows the user to select the hour and minute in a familiar interface.
In this tutorial, you'll create a TimePickerDialog, which presents the
time picker in a floating dialog box at the press of a button. When the time is set by
the user, a TextView will update with the new date.
- Start a new project named HelloTimePicker.
- Open the
res/layout/main.xmlfile and insert the following:<?xml version="1.0" encoding="utf-8"?> <LinearLayout xmlns:android="http://schemas.android.com/apk/res/android" android:layout_width="wrap_content" android:layout_height="wrap_content" android:orientation="vertical"> <TextView android:id="@+id/timeDisplay" android:layout_width="wrap_content" android:layout_height="wrap_content" android:text=""/> <Button android:id="@+id/pickTime" android:layout_width="wrap_content" android:layout_height="wrap_content" android:text="Change the time"/> </LinearLayout>This is a basic
LinearLayoutwith aTextViewthat will display the time and aButtonthat will open theTimePickerDialog. - Open
HelloTimePicker.javaand insert the following class members:private TextView mTimeDisplay; private Button mPickTime; private int mHour; private int mMinute; static final int TIME_DIALOG_ID = 0;This declares variables for the layout elements and time fields. The
TIME_DIALOG_IDis a static integer that uniquely identifies the dialog. - Now insert the following code for the
onCreate()method:@Override protected void onCreate(Bundle savedInstanceState) { super.onCreate(savedInstanceState); setContentView(R.layout.main); // capture our View elements mTimeDisplay = (TextView) findViewById(R.id.timeDisplay); mPickTime = (Button) findViewById(R.id.pickTime); // add a click listener to the button mPickTime.setOnClickListener(new View.OnClickListener() { public void onClick(View v) { showDialog(TIME_DIALOG_ID); } }); // get the current time final Calendar c = Calendar.getInstance(); mHour = c.get(Calendar.HOUR_OF_DAY); mMinute = c.get(Calendar.MINUTE); // display the current date updateDisplay(); }First, the content is set to the
main.xmllayout and then theTextViewandButtonare captured withfindViewById(int). Then anView.OnClickListeneris created for theButton, so that when clicked, it will callshowDialog(int), passing the unique integer ID for the time picker dialog. UsingshowDialog(int)allows theActivityto manage the life-cycle of the dialog and will call theonCreateDialog(int)callback method to request theDialogthat should be displayed (which you'll define later). After the on-click listener is set, a newCalendaris created to get the current hour and minute. Finally, the privateupdateDisplay()method is called in order to fill theTextViewwith the current time. - Add the
updateDisplay()andpad()methods:// updates the time we display in the TextView private void updateDisplay() { mTimeDisplay.setText( new StringBuilder() .append(pad(mHour)).append(":") .append(pad(mMinute))); } private static String pad(int c) { if (c >= 10) return String.valueOf(c); else return "0" + String.valueOf(c); }The
updateDisplay()method uses the member fields for the time and inserts them in themTimeDisplayTextView. Thepad()method returns the appropriate string representation of the hour or minute—it will prefix a zero to the number if it's a single digit. - Add a class member for a
TimePickerDialog.OnTimeSetListenerthat will be called when the user sets a new time:// the callback received when the user "sets" the time in the dialog private TimePickerDialog.OnTimeSetListener mTimeSetListener = new TimePickerDialog.OnTimeSetListener() { public void onTimeSet(TimePicker view, int hourOfDay, int minute) { mHour = hourOfDay; mMinute = minute; updateDisplay(); } };When the user is done setting the time (clicks the "Set" button), the
onTimeSet()method is called and it updates the member fields with the new time and updates the layout'sTextView. - Add the
onCreateDialog(int)callback method:@Override protected Dialog onCreateDialog(int id) { switch (id) { case TIME_DIALOG_ID: return new TimePickerDialog(this, mTimeSetListener, mHour, mMinute, false); } return null; }This is an
Activitycallback that is passed the identifier you passed toshowDialog(int), in theButton's on-click listener. When the ID matches, this initializes theTimePickerDialogwith the member variables initialized at the end ofonCreate()and theTimePickerDialog.OnTimeSetListenercreated in the previous step. - Run the application.
When you press the "Change the time" button, you should see the following:

