| Oracle® Database Quality of Service Management User's Guide 11g Release 2 (11.2) Part Number E24611-02 |
|
|
PDF · Mobi · ePub |
| Oracle® Database Quality of Service Management User's Guide 11g Release 2 (11.2) Part Number E24611-02 |
|
|
PDF · Mobi · ePub |
This chapter describes the basic administrative tasks you perform when using Oracle Database QoS Management to manage performance of your Oracle RAC cluster. This chapter includes the following sections:
Oracle Database QoS Management can be enabled at three different levels: the cluster, server pool, and database. If you have multiple databases within the same Oracle RAC cluster, they might not all be managed by Oracle Database QoS Management.
To determine if your database is managed by Oracle Database QoS Management, perform the following steps:
Log in to DB Control as the database administrator user.
On the Database Home page, at the bottom of the General section, click the link View All Properties.
On the cluster database properties page, check the value for Configuration Type. It should say Policy Managed. The value for Server Pool(s) should show the name of the server pool for your database, for example, ora.test_rac.
Using Oracle Enterprise Manager Database Control, you can determine whether Oracle Database QoS Management is enabled for your cluster.
To determine if a cluster is managed by Oracle Database QoS Management, perform the following steps:
Log in to Oracle Enterprise Manager Database Control as the CRS Administrator.
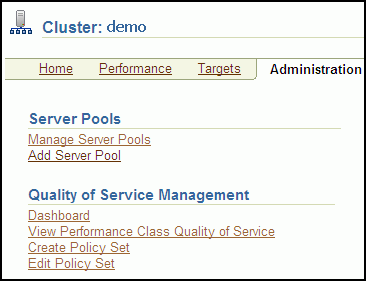
Go to the cluster Administration page.
In the Quality of Service Management section, click Dashboard.
Log in as the QoSAdmin user, if needed.
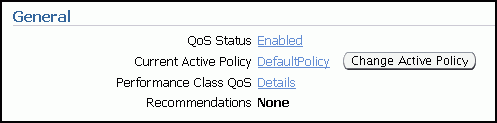
On the Dashboard, in the General section, check the value for QoS Status. If the status value is Enabled, then the cluster is being managed by Oracle Database QoS Management.
After you have enabled Oracle Database QoS Management and created a default policy set, as described in "Enabling Oracle Database QoS Management", you can start to use Oracle Database QoS Management to monitor the performance of your system. In measure-only mode, all the Performance Classes in user-defined Performance Policies have the measure-only box checked and the Performance Objectives are not set. In measure-only mode, Oracle Database QoS Management continuously monitors the system, adapting automatically to changes in workload and hardware configuration. Running Oracle Database QoS Management in measure-only mode allows you to understand how various workloads perform when sharing resources. Measure-only mode assists you in determining the baseline Performance Objectives to use for each Performance Class. You can also use this mode to identify performance bottlenecks in your system. In Measure-Only mode, the Memory Guard feature is active and manages memory pressure automatically.
The Oracle Database QoS Management Dashboard (the Dashboard) provides an easy to use interface for managing the Oracle Database QoS Management system.
This section describes how to perform the following tasks:
To access the Dashboard, perform the following steps:
Log in to Oracle Enterprise Manager Database Control as the CRS Administrator user. Click the Cluster tab, if not selected.
Go to the Administration page, then click the Dashboard link under the heading Quality of Service Management to open the login screen for Oracle Database QoS Management.
A login screen appears, prompting you for the Oracle Database QoS Management administrator (QoSAdmin) credentials. After typing in the username and password, click Login.

The Quality of Service Management Dashboard page is displayed after the correct credentials are entered.
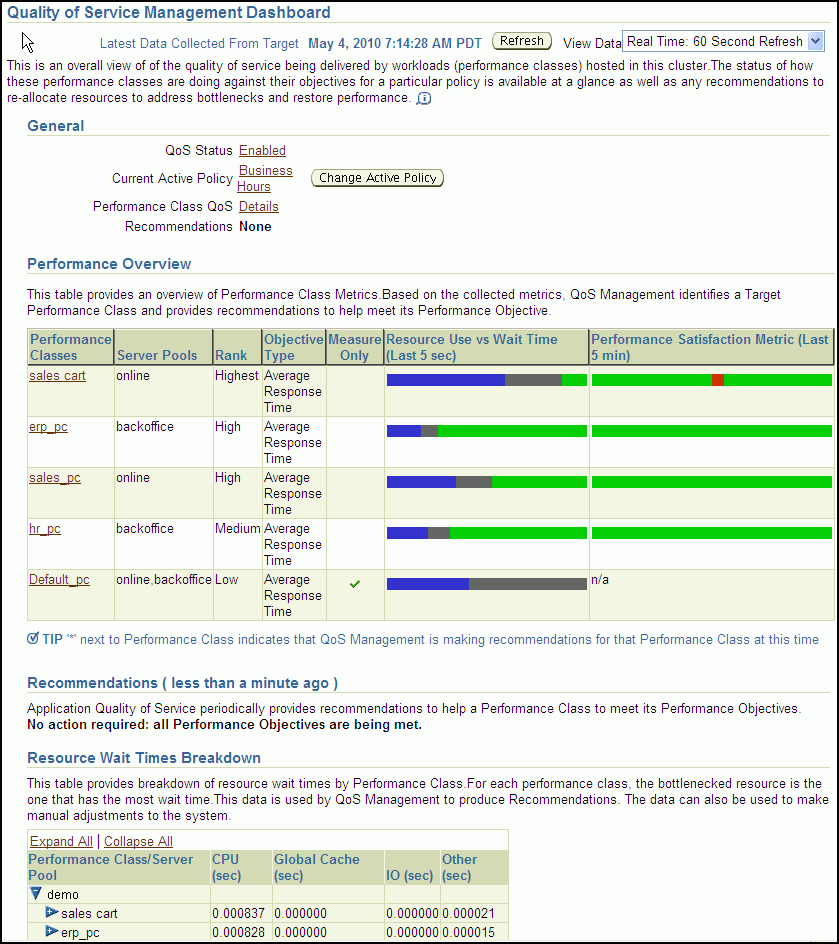
The Dashboard has four main sections:
General
Performance Overview
Recommendations
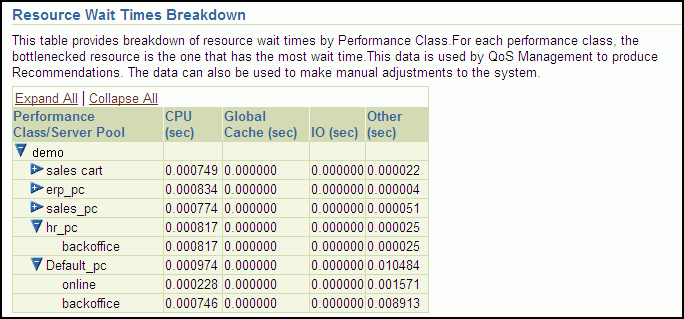
Resource Wait Time Breakdown
The General section of the Dashboard gives you a quick overview of the system. This section lists the QoS Status (Enabled or Disabled), the Current Active Policy, a link for checking the Performance Class details, and a notification for available recommendations. There is also a button that enables you to quickly change the current active policy.
In the Performance Overview section, there is a table that lists the Performance Classes, the server pools where work is occurring, their rank, the Performance Objective being measured, and whether the Performance Objectives are being monitored only, or are being monitored and managed. For each Performance Class there are bar graphs that provide an overview of the Performance Class metrics. See "Interpreting the Performance Overview Graphs" for more information.
In the Recommendation section you can view the recommendations that are available when a Performance Class is not meeting its Performance Objectives. You can also view any violations that prevent the recommendations from being made.
At the bottom of the Dashboard is the Resource Wait Times Breakdown section. This section contains a table that provides a breakdown of resource wait times by Performance Class. For each Performance Class, the bottlenecked resource is the one that has the most wait time. This data is used by QoS Management to produce Recommendations. The data can also be used to make manual adjustments to the system. If you expand each Performance Class listed in the table, then you can see the server pools for that Performance class, and the resource wait times for each server pool.
To enable Oracle Database QoS Management for a cluster:
On the Dashboard, in the General section, next to QoS Status, click Disabled.
On the Enable / Disable Quality of Service Management page, click Enable QoS Management.
To disable Oracle Database QoS Management for a cluster:
On the Dashboard, in the General section, next to QoS Status, click Enabled.
On the Enable / Disable Quality of Service Management page, click Disable QoS Management.
A Performance Policy is a collection of Performance Objectives, one for each Performance Class, that are in force at the same time.
To change the Performance Policy that is currently in effect:
On the Dashboard page, in the General section, click the button Change Active Policy.
On the Set Policy page, select the Performance Policy you want to use, then click OK.
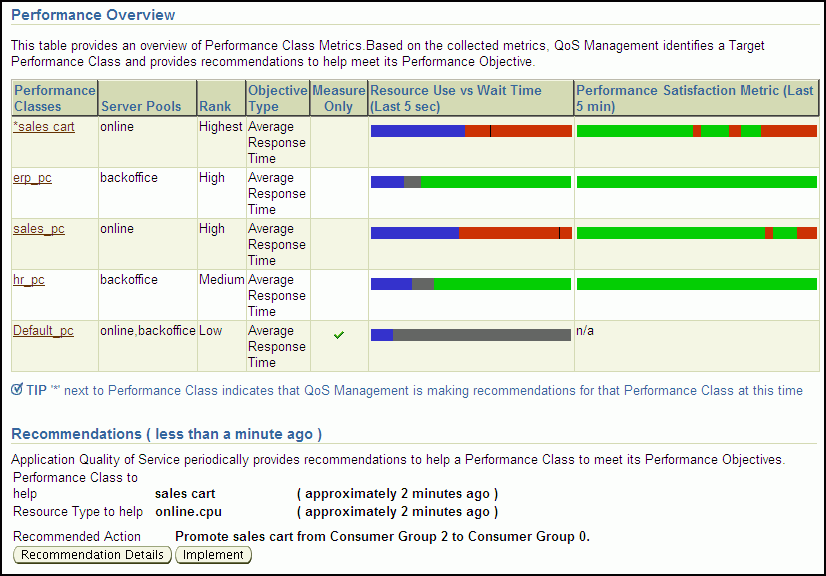
On the Dashboard, in the Performance Overview section, there is a list of the current Performance Classes, some basic information about each Performance Class, and two bar graphs that show the most recent trend for the performance metrics for that class, as shown in Figure 4-1.
Figure 4-1 Example of the Performance Overview Charts
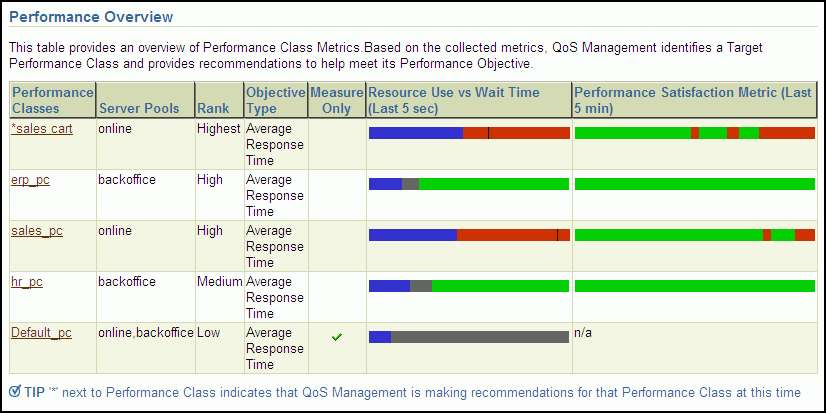
In Figure 4-1, there are bar graphs for the sales_cart, erp_pc, sales_pc, hr_pc, and Default_pc Performance Classes. There are two bar graphs displayed for each Performance Class. The two bar graphs are titled Resource Use vs. Wait Time (Last 5 sec.) and Performance Satisfaction Metric (Last 5 min.). The Resource Use vs. Wait Time bar graph has three sections of varying size that illustrate the resource use, wait and headroom portions of the Performance Objective. The Performance Satisfaction Metric bar graph is displayed as a single bar, growing from left to right, with the green and red segments representing the five second time slices that were exceeding or violating the Performance Objective respectively. If you place your cursor over a section of the bar graph, then a description of that measurement appears by your cursor.
In Figure 4-1, there is no Performance Satisfaction Metric bar graph displayed for the Default_pc Performance Class because the Default_pc Performance Class is only monitored. Oracle Database QoS Management does not calculate the performance satisfaction metrics for Performance Classes that are marked as Measure Only.
The Resource Use vs. Wait Time chart is refreshed only when you refresh the page contents. In this chart:
The blue section represents the portion of the average time spent for all database requests by that Performance Class using resources in the last five seconds
The gray section represents the portion of the average time spent for all database requests by that Performance Class waiting on resources in the last five seconds
The green section represents the headroom for that Performance Class (proportion of the average time for all database requests below the specified Performance Objective) in the last five seconds
If a Performance Class is not meeting its Performance Objectives, then the gray and green sections disappear and the resource wait time is shown in red with a line to indicate where the Performance Objective is relative to the actual response time.
If you place your mouse cursor over any section of this bar graph, then the actual values of Use, Wait and Headroom are displayed
The point between the gray and the green sections of the bar is the Performance Objective value. If you set this value below the resource use time, then you will never meet that objective. When configuring the Performance Objectives for a Performance Class, you must set the Performance Objective high enough to produce sufficient headroom (shown in green) to be able to share resources between Performance Classes to meet service levels as demand changes.
If red appears in this chart for a Performance Class, then you know that the Performance Class is not meeting its Performance Objectives. Oracle Database QoS Management issues a recommendation and an action to implement, if possible, to correct the problem. The recommendations generated by Oracle Database QoS Management occur once each minute, so they correspond to an earlier time than the current Performance Overview charts.
Performance Satisfaction Metric
The Performance Satisfaction Metric chart changes to show red and green lines for specific five second samples. Using this chart you can spot trends in the performance of your system.
For the Performance Satisfaction Metric bar graph:
The red section represents the periods of time the Performance Class was not meeting its Performance Objectives during the sampling period
The green section represents the periods of time the Performance Class was meeting its Performance Objectives during the sampling period
If the Performance Classes are meeting their Performance Objective, then a recommendation is displayed which states "No action required: all Performance Objectives are being met." If Oracle Database QoS Management determines that a Performance Class is not meeting its Performance Objective and has a recommended action for improving performance, then the Dashboard places an asterisk ('*') in front of the Performance Class name in the Performance Overview chart and displays a Recommended Action. If more than one Performance Class is not meeting its Performance Objective as shown in Figure 4-1, then only the target Performance Class displays an asterisk and a recommendation. If the recommendation has an associated action, then an Implement button appears, which you can click to have the action implemented.
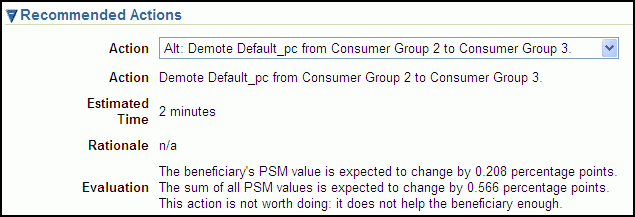
If there are no recommended actions, then you can click the Details button to view the results of the latest analysis. Oracle Database QoS Management shows what possible actions could be taken, and why these actions were not chosen.
If Oracle Database QoS Management has generated a recommendation, then you can click the Details button to view more information about why the recommendation was made, and the expected performance improvements to be gained if you implement the recommendations.
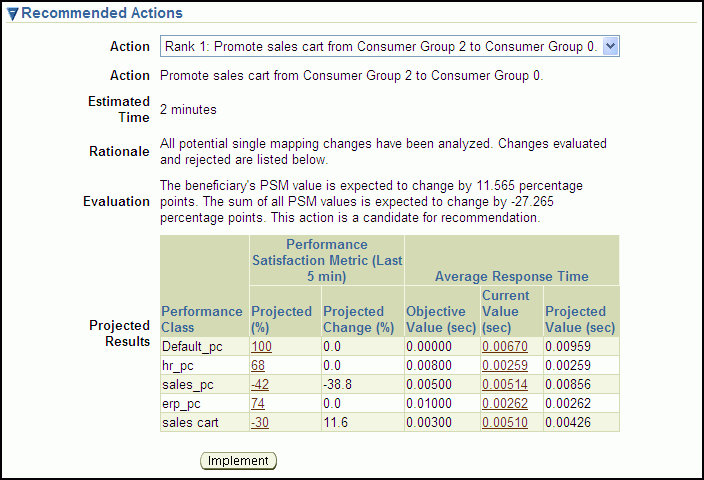
You can select different recommendations using the Action drop-down list. Oracle Database QoS Management tries to provide the best recommendation to the QoS administrator, but you might decide that a different action would produce better results. If you select a different action, then the information in the Recommendation Actions and the Situation Analysis sections are updated to reflect the impact of the alternate recommendation. You cannot implement an alternate recommendation if that recommendation has been rejected by the Oracle Database QoS Management System for not providing enough benefit to the system as a whole.
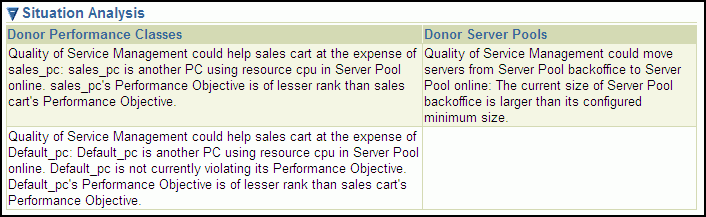
The Recommended Actions page also has a section called Situation Analysis. If you display the output in this section, then you can see a description the projected impact implementing the Recommendation will have on the Performance Classes and the server pool, as shown in the following screenshot.
If there is a Recommended Action, and you decide to implement the action, then simply click the Implement button on the Dashboard or the Details page.
After you have implemented a recommendation, the display on the Dashboard changes to show that there is an action in progress. No new recommendations are displayed until the system has settled after the resource change. You can determine the amount of time you have to wait before any new recommendations are made available by viewing the Details page before you implement a recommendation.
After implementing a Recommended Action, view the Performance Overview charts on the Dashboard to determine if the Performance Class is now meeting its Performance Objectives.
Whether you are configuring the Oracle Database QoS Management system for the first time, or want to create a new Policy Set, you use the Create Policy Set wizard to create your Policy Set. You use the Edit Policy Set wizard to modify your existing Policy Set.
Note:
If you decide to create a new Policy Set, then all existing Performance Policies and user-added Performance Classes must be re-created. The changes you make to the stored Policy Set are not saved until you click Submit Policy Set in the last page of the Policy Set wizard.This section covers the following topics:
To modify an existing Policy Set, perform the following steps:
On the cluster Administration page, in the Quality of Service Management section, click the Edit Policy Set link.
The Policy Set Editor wizard is started.
On the first page of the Policy Set Editor wizard you can view the current server pool settings.
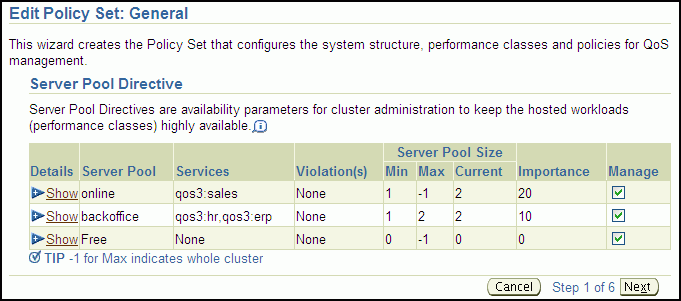
This page lets you specify which server pools are managed by Oracle Database QoS Management. If the Manage box for a server pool is unchecked, then none of the servers, databases or workloads that use that server pool are displayed or managed by Oracle Database QoS Management. The Details column displays any configuration violation details and the corrective action to take to enable the server pool to be managed.
When finished, click Next. The Policy Set Editor: Performance Classes page appears.
The second page enables you to create, edit, rename, or delete Performance Classes for the system. You can create a new Performance Class, or use the Edit Performance Class button to modify the classifiers for an existing Performance Class.
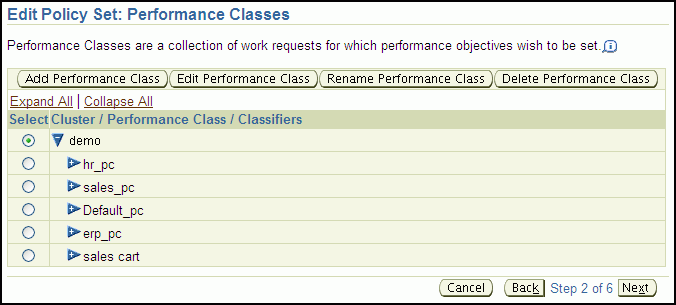
You can use the Expand All link to show the classifiers for each Performance Class, or expand an individual Performance Class entry to show the classifiers for only that Performance Class.
Select the Performance Class you want to edit, and then click the appropriate action button (Edit, Rename, or Delete). If you want to create a Performance Class for this Policy Set, then click the Add Performance Class button. See "Creating a Performance Class" for more information on creating a Performance Class.
When you have finished, click Next.
After creating or modifying the Performance Classes, the next step is to set the order in which the classifiers are evaluated.
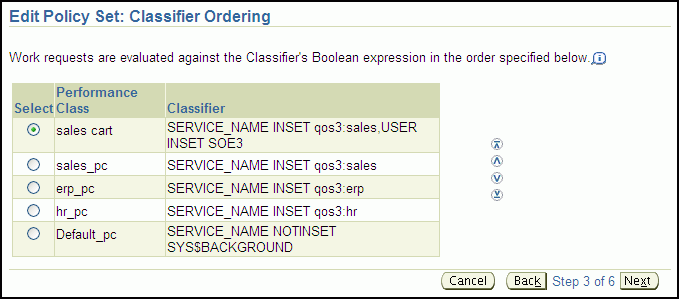
This step is very important, because the classifiers determine which Performance Class a work request is placed into. Select a Performance Class and use the arrow keys to the right of the classifiers to move the entries up and down in the list.
As a work request enters the system, the work request is evaluated against the classifiers. The first expression that evaluates to TRUE determines which Performance Class the work request belongs to. You should put the more fine-grained classifiers at the top, and the more generic classifiers at the bottom of the list.
After you have set the order for your Performance Classes, the next step is to edit the Performance Policies and set the Performance Objectives.
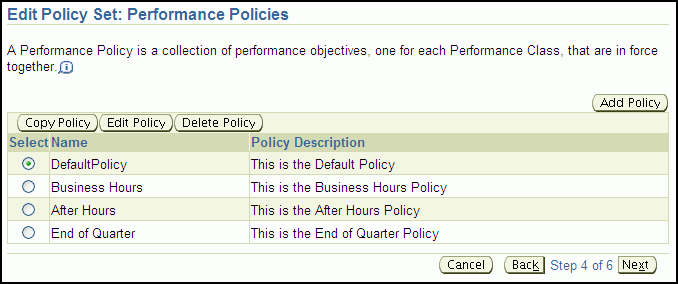
On this page you can:
Create a new Performance Policy
Edit, copy, or delete an existing Performance Policy
Note:
The DefaultPolicy Performance Policy cannot be modified, but the policy can be copied and used as the basis for a new Performance Policy.Refer to the section "Managing Performance Policies" for details on how to perform the tasks on this page.
After you have configured the Performance Policies, you must choose which one to put into effect immediately after the Policy Set is submitted.
Select the preferred Performance Policy, then click Set Policy. When finished, click Next.
Before you submit a Policy Set to the Oracle Database QoS Management system, you are asked to review the Policy Set configuration. If the changes are what you intended, then click Submit Policy Set. If you must modify any of the displayed settings, then click the Back or Cancel button.
After clicking Submit Policy Set, you are returned to the Dashboard.
Caution:
By default, any named user may create a server pool. To restrict the operating system users that have this privilege, Oracle strongly recommends that you add specific users to the CRS Administrators list. See Oracle Clusterware Administration and Deployment Guide for more information about adding users to the CRS Administrators list.Server pools are created by the cluster or database administrator, using either Oracle Enterprise Manager Database Control or Server Control (SRVCTL). You cannot create server pools using the Oracle Database QoS Management Server interface. Refer to Oracle Clusterware Administration and Deployment Guide for instructions on how to create a server pool.
After the CRS Administrator has created a server pool, you can add the server pool to the Oracle Database QoS Management system. See "Creating a Performance Policy and Specifying Performance Objectives".
See Also:
Oracle Clusterware Administration and Deployment Guide for more information about modifying the size of a server pool
Oracle Real Application Clusters Administration and Deployment Guide for more information about configuring a recently allocated server to be a part of an existing Oracle RAC database.
To modify the server pool settings, you configure a server pool directive override for a Policy Set. When you configure server pool directive overrides, the new parameters you specify for the server pool are used instead of the parameters specified at the time of server pool creation.
Note:
You can change the minimum and maximum settings for the listed server pools, but you cannot create additional server pools using this interface. Any changes made here, after they are submitted, alter the current server pool properties set in the Manage Server Pools section of Oracle Enterprise Manager Database Control.You can modify the server pool parameters manually using the Manage Server Pool pages of Enterprise Manager Database Control or SRVCTL, but you should not use this method of altering the server pool configuration when you have Oracle Database QoS Management enabled. If you use both server pool directive overrides and manually change the server pool configuration, then the server pool directive overrides specified for the current Policy Set will override the manual settings and can result in confusion.
By creating additional services, you can monitor your workload performance at a finer level, by limiting use of the new services to specific applications or users. To add database services to a Policy Set, you must create or modify Performance Classes for each new database service.
To add new database services to the Policy Set:
The DBA uses SRVCTL or Oracle Enterprise Manager Database Control to create database services that are managed by Oracle Clusterware. You can use the Availability page on the Database tab of Oracle Enterprise Manager Database Control to create services for an Oracle RAC database.
See Also:
Oracle Database 2 Day + Real Application Clusters Guide for more information on using Oracle Enterprise Manager Database Control to create servicesThe QoS Administrator adds one or more Performance Classes to the Policy Set or modifies the existing Performance Classes to include the new database services
Note:
Database services appear in Oracle Database QoS Management asdb_name:service_name, so the service names must be unique within a database.If a new policy-managed database is added to your cluster, you might want Oracle Database QoS Management to manage or monitor the workload on this database.
To create a database and add it to the Policy Set:
The DBA first requests servers to host the cluster database from the cluster or system administrator.
The cluster or database administrator creates the new server pools with the specified minimum number of nodes. The cluster or database administrator could also decide to grant access to existing server pools instead of creating new ones.
The DBA creates a new database on the allocated server pools. The DBA must ensure that the new database is configured correctly for management by Oracle Database QoS Management. See "Supported Database Configurations" for details.
The DBA uses SRVCTL or Oracle Enterprise Manager Database Control to create database services that are managed by Oracle Clusterware for the new database.
The DBA enables the database for Oracle Database QoS Management from the Database Tab of Oracle Enterprise Manager Database Control.
Using the Edit Policy Set link in Oracle Enterprise Manager Database Control, the QoS Administrator adds the new server pools to the Policy Set, adds one or more Performance Classes to the Policy Set, or modifies the existing Performance Classes to include the new database services. See "Editing a Policy Set" for more information about editing a policy set.
After you successfully submit the new Policy Set, the new database will be monitored and managed by Oracle Database QoS Management.
This section covers the following topics:
To create or edit the Performance Classes and the classifiers they use, perform the following tasks:
Start the Policy Set Editor wizard using the Edit Policy Set link in Oracle Enterprise Manager Database Control.
Go to the second screen in the wizard.
On the Edit Policy Set: Performance Classes page, the available Performance Classes are displayed. If this is the first time configuring the system, then a Performance Class for each database service is shown along with a Default Performance Class.
To specify a classifier for a work request, you must specify at least one service name. If you specify multiple services, then use a comma-delimited list. Optionally, you can also specify any of the following filters:
A comma-delimited list of module names and whether the work request uses a module in this list
A comma-delimited list of actions, and whether the work request performs an action in this list
A comma-delimited list of user names, and whether the work request uses a user name in this list
A comma-delimited list of programs, and whether the work request is running a program in this list
Click Add Performance Class, and the Performance Class creation page is displayed. In the Performance Class Name text field, enter a name for the Performance Class.

In the Classifiers section, enter information to define a rule for classifying work requests. First select a database service, then specify matching values (In Set) for the module, action, UserName, or program name that is associated with the work request using the specified database service. You can also specify exclusion values (Not In Set) for these attributes.
If you want to add multiple classifiers for the Performance Class, then click the Add Classifier button and enter in the appropriate information.
Note:
When evaluating a classifier for a Performance Class, all of the specified values are compared to the work request attributes using an AND operation; if you specify multiple classifiers for the Performance Class, then the results of each classifier evaluation for that Performance Class are combined using an OR operation.After you have defined all the classifiers for the Performance Class, click the Next button until you reach the end of the wizard. Review the information you specified, then click Submit Policy Set.
You can delete a Performance Class by selecting a Performance Class and clicking Delete Performance Class. Advance to the end of the Edit Policy Set wizard, and click Submit Policy Set to make the change permanent.
You can rename a Performance Class by selecting a Performance Class and clicking Rename Performance Class. On the Rename Performance Class page, enter the new name of the Performance Class, then click OK. Advance to the end of the Edit Policy Set wizard, and click Submit Policy Set to make the change permanent.
To edit an existing Performance Policy, on the Edit Policy Set: Performance Policies page, select the Performance Policy you want to modify and click Edit Policy.
On the Edit Policy page, you can change the rank of each Performance Class, the objective value for each Performance Class, or the Measure Only setting for a Performance Class. You can also set server pool directive overrides.
If you want to add a classifier to a Performance Class, then perform the following steps:
Start the Policy Set Editor wizard.
Go to the second screen in the wizard, the Edit Policy Set: Performance Classes page.
Select the Performance Class to modify, then click Edit Performance Class.
In the Classifiers section on the Edit Performance Class page, click the Add Classifier button and enter in the appropriate information. When finished, click OK.
You then advance to the end of the Edit Policy Set wizard, and click Submit Policy Set to make the change permanent.
If you want to modify one or more classifiers for a Performance Class, then perform the following steps:
Start the Policy Set Editor wizard.
Go to the second screen in the wizard, the Edit Policy Set: Performance Classes page.
Select the Performance Class for which you want to change the classifiers, then click Edit Performance Class.
In the Classifiers section on the Edit Performance Class page, modify the classifier information, then click OK.
You then advance to the end of the Edit Policy Set wizard, and click Submit Policy Set to make the change permanent.
To delete one or more classifiers for a Performance Class, perform the following steps:
Start the Policy Set Editor wizard.
Go to the second screen in the wizard, the Edit Policy Set: Performance Classes page.
Select the Performance Class for which you want to delete the classifiers, then click Edit Performance Class.
In the Classifiers section on the Edit Performance Class page, select the classifiers you want to delete, then click Delete Classifiers. When finished, click OK.
You then advance to the end of the Edit Policy Set wizard, and click Submit Policy Set to make the change permanent.
The classifiers generate Boolean expressions that are evaluated each time a work request enters the system. The first classifier that evaluates to TRUE determines the Performance Class for that work request. To ensure that the work requests are put in the correct Performance Classes, you must be careful in specifying the order in which the classifiers are evaluated.
To set the order of evaluation for the classifiers, perform the following steps:
Start the Policy Set Editor wizard.
Proceed to the third page in the wizard, which is titled Edit Policy Set: Classifier Ordering.
Use the arrow keys to the right of a classifier to move the classifier up or down in the list. The classifiers for the Performance Classes at the top of the list are evaluated first. If the work request does not match the classifiers for that Performance Class, then evaluation continues with the next Performance Class in the list, until there are no further evaluations to be made. If a work request matches the classifiers for a Performance Class, then the work request is associated with that Performance Class and evaluation stops.
For proper classification of work requests, you should put the Performance Classes with the strictest classifiers at the top of the list, and the Performance Classes with most lax classifiers near the bottom of the list. The Default_pc Performance Class, which has the most general classifiers, should always be at the bottom of the list.
You then advance to the end of the Edit Policy Set wizard, and click Submit Policy Set to make the change permanent.
This section contains the following tasks:
To create and configure a Performance Policy, perform the following steps:
Start the Policy Set Editor wizard.
Proceed to the fourth page in the wizard, which is titled Edit Policy Set: Performance Policies.
Click the Add Policy button to create a Performance Policy. The Create Policy page appears.
For each Performance Policy you must specify a unique name. You can also provide a description of the policy and its intent. Then you must configure the Performance Classes for the policy.
To configure the Performance Classes, you must do the following:
Set the rank for each Performance Class, from highest to lowest. A higher rank gives that Performance Class higher priority when there is contention for resources.
Tip:
A measure-only Performance Class is effectively not ranked because there is no Performance Objective and thus Oracle Database QoS Management cannot calculate the Performance Satisfaction Metric (PSM) for that Performance Class.Specify a value for the Performance Objective.
The Performance Objective value is the appropriate length of time in seconds in which the work request, or database request, should complete, for example, 0.008 seconds, or eight milliseconds.
Note:
You should not use the service-level agreements (SLAs) or target response times as the Performance Objective values. Instead, choose a value that is reasonable, sustainable, and greater than your target response time. Using a higher value gives you time to implement the recommendations from Oracle Database QoS Management regarding the allocation of resources before the Performance Objective is exceeded.You can also select whether the Performance Class is only monitored, not managed. If you select Measure Only, then Oracle Database QoS Management monitors the Performance Class, but does not provide any recommendations for improving performance.
(Optional) Configure server pool directive overrides. See "Setting Server Pool Directive Overrides".
Advance to the end of the Edit Policy Set wizard. Click Submit Policy Set to make the change permanent.
To edit an existing Performance Policy, on the Edit Policy Set: Performance Policies page, select the Performance Policy you want to modify and click Edit.
On the Edit Policy page, you can change the rank of each Performance Class, or change the Measure Only setting for a Performance Class. You can also set server pool directive overrides.
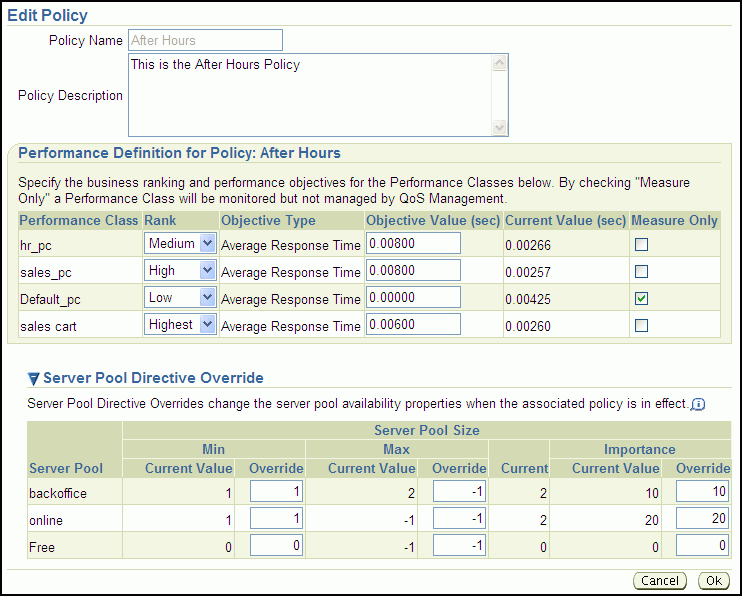
Specify the new ranks or objective values for the Performance Classes, or enable or disable the Measure Only setting for a Performance Class. When you have finished making your changes, click OK to return to the Policy Set Editor wizard. Then click Next until you reach the end of the wizard. Review your changes, then click Submit Policy Set.
See Also:
"Setting Server Pool Directive Overrides" for more information on server pool directive overrides
Instead of creating a new Performance Policy, you can instead copy an existing Performance Policy. A copied Performance Policy is identical to the original Performance Policy. You can then simply rename and edit the copy instead of re-creating all the details in a new Performance Policy.
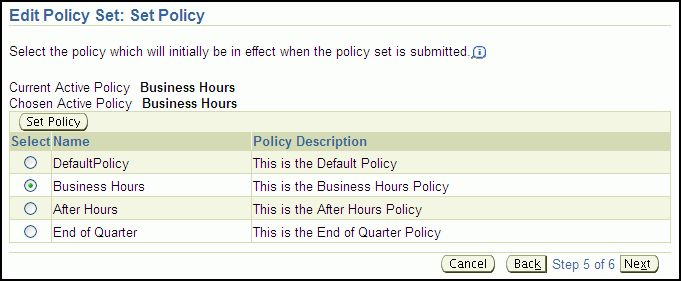
You can change the Performance Policy that will be active when you submit the Policy Set to Oracle Database QoS Management.
To set the current Performance Policy, perform the following steps:
Start the Policy Set Editor wizard.
Proceed to the fifth page in the wizard, which is titled Edit Policy Set: Set Policy.
Select the Performance Policy you want enforced, and click Set Policy.
At the end of the Policy Set Editor wizard, you can review the settings you specified, then click Submit Policy Set to configure Oracle Database QoS Management.
To delete a Performance Policy, perform the following steps:
Start the Policy Set Editor wizard.
Proceed to the fourth page in the wizard, which is titled Edit Policy Set: Performance Policies.
Click the Delete Policy button to delete a Performance Policy.
You then advance to the end of the Edit Policy Set wizard, and click Submit Policy Set to make the change permanent.
A server pool directive override gives you the ability to enforce different settings for server pool sizes, or change the importance of server pools. For example, if you are expecting a surge in demand, such as during an advertised sale period, then you could use a server pool directive override to allocate more resources to the accounting applications.
Server pool directive overrides should be used only when necessary. Instead of using a server pool directive override, you should monitor the system over time and modify the server pool settings as needed. Using a server pool directive override can result in unexpected changes in resource allocations. For example, assume you have server pools named webapps, HR, and payroll. You create a server pool directive override to increase the minimum server pool size for the payroll server pool. When the server pool directive override is active, a server might be removed from the HR or webapps server pool to satisfy the higher minimum server requirement of the payroll server pool.
See Also:
"Modifying Server Pool Settings" for more information about configuring the server pool settingsTo configure a server pool directive override, perform the following steps:
Start the Policy Set Editor wizard.
Proceed to the fourth page in the wizard, which is titled Edit Policy Set: Performance Policies.
Click the Edit Policy button to edit a Performance Policy. The Edit policy page appears.
Expand the Server Pool Directive Override section, if necessary.
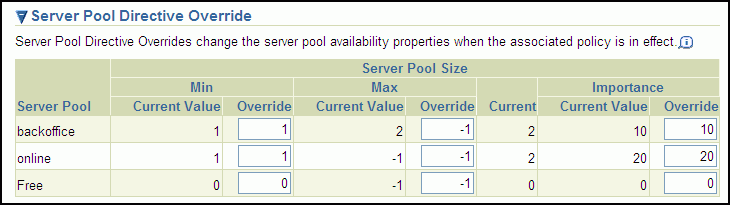
To set server pool directive overrides, perform the following:
To override the current value for the minimum number of servers in a server pool, enter a new value in the Min:Override field for that server pool. Valid values are 0 to the maximum number of servers in that server pool.
To override the current value for the maximum number of servers in a server pool, enter a new value in the Max:Override field for that server pool. Valid values are from the minimum number of servers in that server pool to the size of the cluster.
To override the current value for the Importance of the server pool, enter a new value in the Importance:Override field for that server pool. Valid values are 0 to 1000; higher values indicate greater importance.
After you have finished entering the server pool directive override values, click OK to implement the changes.
You then advance to the end of the Edit Policy Set wizard, and click Submit Policy Set to make the change permanent.
You can view a variety of performance metrics for the Oracle Database QoS Management system as a whole, or for individual Performance Classes.
After you have configured Oracle Database QoS Management, a short period of time is required for Oracle Database QoS Management to gather performance data and evaluate the performance of the system. After this period of time has passed, you can view the performance metrics for your system. To view the current performance metrics, perform the following steps:
Log in to Oracle Enterprise Manager Database Control as the CRS Administrator. Select the Cluster tab, if necessary.
Go to the Administration page.
In the section Quality of Service Management, click View Performance Class Quality of Service.
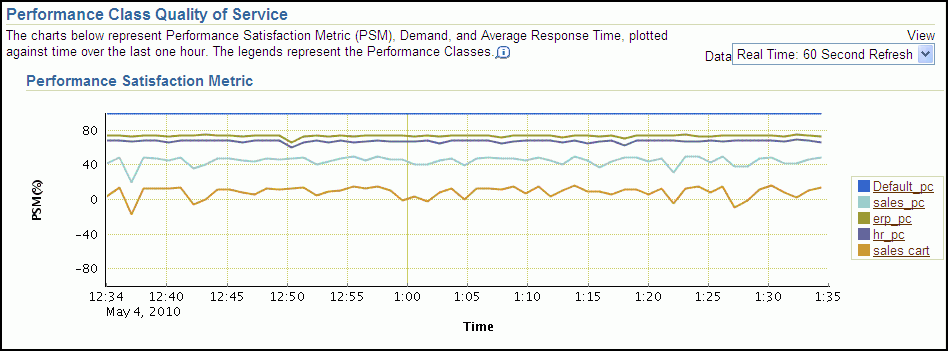
The Performance Class Quality of Service page displays three charts measuring the current performance of each Performance Class that is being monitored.
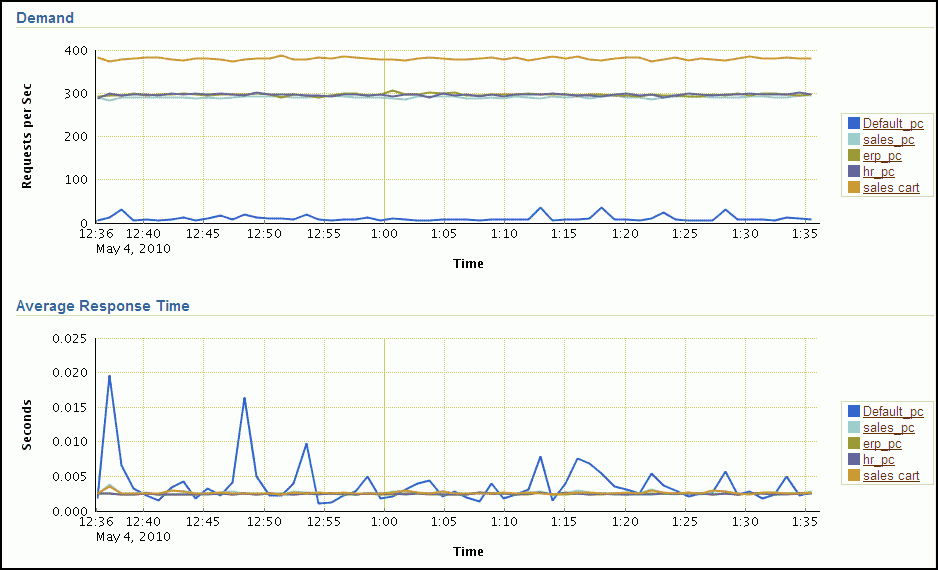
After you have configured Oracle Database QoS Management, and a short period of time has passed, you can view the performance metrics for a specific Performance Class. To view the current performance metrics for a Performance Class, perform the following steps:
Log in to Oracle Enterprise Manager Database Control as the CRS Administrator or SYSDBA user. Select the Cluster tab, if necessary.
Go to the Administration page.
In the section Quality of Service Management, click View Performance Class Quality of Service.
On the right-hand side of any graph, in the legend box, click the link that corresponds to the Performance Class for which you want to view the performance metrics.
At the bottom of the Dashboard is the Resource Wait Times Breakdown table. This table provides breakdown of resource wait times by Performance Class. For each Performance Class, the bottlenecked resource is the one that has the most wait time. This data is used by Oracle Database QoS Management to produce recommendations. You can also use this data to make manual adjustments to your system.
Oracle Database QoS Management provides a command line utility named QOSCTL to help you manage users. This utility is installed on each node of the cluster but runs properly only if executed as the Oracle Clusterware administrator user on the same node on which the Oracle Database QoS Management server (the OC4J container) is running. The correct node to run the utility on can be determined by issuing the following command:
srvctl status oc4j
The QOSCTL utility supports the creation of Oracle Database QoS Management administrative users. The account information is stored in the local system-jazn-data.xml file with encrypted credentials. The account information is also stored in the Oracle Clusterware Repository (OCR) to support failover of the Oracle Database QoS Management Server.
The following code example shows the general format of QOSCTL commands:
qosctl [admin_user] command
In place of the admin_user argument, you would put the user name of an OC4J administrator user. When configuring the initial accounts for your Oracle Database QoS Management system, you use the default username of qosadmin, and the default password oracle112.
When you enter a user name, you do not include the password. When you have submit the command for execution, you are prompted for the password associated with the specified admin_user.
Depending on the command type, you may be required to provide additional arguments. The following table lists the available commands for the QOSCTL utility:
Table 4-1 Summary of Commands for the QOSCTL Utility
| Command Syntax | Description |
|---|---|
|
|
Adds the specified user with associated password. This user is automatically granted the role required to use the Oracle Database QoS Management application and execute any of these commands. |
|
|
Enables a specified user to check whether a specified password is valid |
|
|
Lists the users that are authorized to run the Oracle Database QoS Management application |
|
|
Removes the specified user account and all associated permissions Note: This command is not recoverable. Use caution, because you can delete your own account. |
|
|
Updates the password of a specified user. You must supply the correct value for the old password to change the password for a user. If the password for a user has been forgotten or lost, then you should remove the user account and create a new account for the user, with a new password. |
|
|
Displays the syntax for QOSCTL commands. |
|
Copyright © 2010, 2012, Oracle and/or its affiliates. All rights reserved. Legal Notices |
|