| Oracle® Database 2 Day DBA 11g Release 2 (11.2) Part Number E10897-10 |
|
|
PDF · Mobi · ePub |
| Oracle® Database 2 Day DBA 11g Release 2 (11.2) Part Number E10897-10 |
|
|
PDF · Mobi · ePub |
This chapter describes how to install Oracle Database software and create a database.
If you are using an earlier release of Oracle Database and want to install a later release of the Oracle Database software, then you can upgrade your existing Oracle Database and use it with the new release of the database software. See "Upgrading a Database".
This chapter contains the following sections:
To install your Oracle Database software, use Oracle Universal Installer (OUI). OUI is a graphical user interface utility that enables you to install new Oracle Database software. Online Help is available to guide you through the installation process.
During the installation process, you are given the opportunity to create a database. If you choose to do so, then OUI automatically starts Oracle Database Configuration Assistant (DBCA) to guide you through the process of creating and configuring a database.
Before you start the installation process, see the following sections for information about prerequisites and installation choices:
If you do not create a database during installation, then you must run DBCA at some point after installation to create a database.
Note:
After you create a database, either during installation or as a standalone operation, you do not have to create another. Each Oracle instance works with a single database only. Rather than requiring that you create multiple databases to accommodate different applications, Oracle Database uses a single database, and accommodates multiple applications by enabling you to separate data into different schemas within the single database. See "About User Accounts" for more information about schemas.Before installing the software, OUI performs several automated checks to ensure that your computer fulfills the basic hardware and software requirements for an Oracle Database installation. If your computer does not meet a requirement, then an error message is displayed. The requirements may vary depending upon the type of computer and operating system you are using, but some prerequisites include:
Sufficient paging space is available.
The appropriate service packs or patches for your operating system are installed.
An appropriate file system format is being used.
See Also:
Oracle Database Installation Guide for your platform for more information about exact requirements
Oracle Universal Installer guides you through an interview phase where you specify your choices for installation and database creation. The exact sequence of steps depends on your operating system. As you progress through the installation, you are presented with choices on how to configure the database.
You can choose to create and configure a database, or to only install the database software.
You can create a preconfigured database or a custom-configured database during installation. If you choose not to create a database during installation, then you must run DBCA after installation to create a database.
Preconfigured databases are based on templates that Oracle provides or that you create. Each Oracle-provided template is optimized for a particular workload type. See Table 2-2, "Oracle-Provided DBCA Templates and Their Corresponding Workloads" for information about the types of preconfigured databases.
If you choose to use the Desktop Class installation method, then the general purpose database template is used. To create a custom database in which you configure your own database structure, see "About Advanced Installation".
|
Note: If you must create a new database, then Oracle recommends that you install a preconfigured database, which is faster and easier. You can customize the database after it has been created. |
The installation methods are divided into Desktop Class and Server Class:
Desktop Class—This installation class is most appropriate for laptop or desktop computers. It includes a starter database and requires minimal configuration.
Server Class—This installation class is for servers, such as you would find in a data center, or used to support enterprise-level applications. Choose this installation class if you need access to advanced configuration options.
During a Desktop Class installation, you make only basic choices. For a Server Class installation, you choose either typical installation (where you make only basic choices) or advanced installation.
During a Desktop Class or a typical installation, Oracle Database automatically installs the sample schemas.
When you install Oracle Database during basic and advanced installations, you need answers for the questions listed in this section. OUI provides default values for every choice.
What type of database edition installation do you want to perform?
Your choices are:
Enterprise Edition—This installation type is the full-featured Oracle Database product that provides data management for enterprise-level applications. It is intended for mission-critical, high-security online transaction processing (OLTP) and data warehousing environments.
Standard Edition—This installation type is suitable for workgroup or department-level applications, and for small to medium-sized enterprises. It provides core relational database management services and options and includes an integrated set of management tools, replication, Web features, and facilities for building business-critical applications.
Standard One Edition—This installation type is suitable for workgroup, department, or web applications. It provides core relational database management services for single-server environments or highly distributed branch environments. Oracle Standard Edition One includes all the facilities necessary to build business-critical applications.
Personal Edition (Microsoft Windows operating systems only)—This installation type installs the same software as the Enterprise Edition, but supports only a single-user, development and deployment environment.
What are your database configuration options?
You must specify the directory in which the Oracle Database software is installed, or the location where the product binary files are copied from the installation media. You must choose a location that has enough disk space to contain the software and is accessible by the operating system user performing the installation.
You also specify the location of the Oracle base directory, which is used by all Oracle software products installed on the server. The first time you install Oracle Database software on a server, you are prompted to specify the location of the inventory directory, called oraInventory. This directory provides a centralized inventory of all Oracle software products installed on the server. You should use the same value for the Oracle inventory directory each time you perform an Oracle software installation on the server.
A database includes several files that store the user data, database metadata, and information required to recover from failures. As an administrator, you decide what kind of storage subsystem to use for these files. You can select from the following options:
File System—This default option creates database files that are managed by the file system of your operating system. You can specify the directory path where database files are to be stored. Oracle Database can create and manage the actual files.
If you are not certain about which option to use, then select File System (the default).
Automatic Storage Management—This option enables you to place your data files in Oracle Automatic Storage Management (Oracle ASM) disk groups. If you choose Oracle ASM, then Oracle Database automatically manages database file placement and naming. For environments with a large number of disks, this option simplifies database administration and maximizes performance. Oracle ASM performs software striping and mirroring at the file level for maximum storage flexibility, performance, and availability.
Oracle ASM uses an Oracle ASM instance, which is distinct from the database instance, to configure and manage disk groups. A single Oracle ASM instance can provide storage for multiple databases on the same server.
For more information, see "About Oracle Automatic Storage Management" and Oracle Automatic Storage Management Administrator's Guide.
Note:
In past releases, Oracle ASM was installed as part of the Oracle Database installation. With Oracle Database 11g release 2 (11.2), Oracle ASM is part of an Oracle grid infrastructure installation.To use Oracle ASM for storing database files, you must have installed Oracle ASM and created one or more disk groups before performing the Oracle Database installation.
These options include your global database name and system identifier (SID). The SID is a unique identifier that is used to distinguish this instance from other Oracle Database instances that you may create later and run concurrently on your system.
The global database name is the full name of the database that uniquely distinguishes it from any other database. The global database name is in the form database_name.database_domain, for example sales.example.com. The database name portion sales is a simple name you call your database. The database domain portion example.com specifies the database domain in which the database is located. Together, the database name and domain form the global database name.
During advanced installations using the Server Class method you are prompted to make the additional choices listed in this section, and the choices for a typical installation. The installation process provides default values for every choice.
This guide describes, but does not document, these additional advanced installation choices. For more information, see Oracle Database Installation Guide for your platform.
You choose which language the software should use after it is installed. You can select multiple languages. The default value is English. If you choose a value other than English, it does not change the language used by the installation.
Database Configuration Type
You select a template to use when configuring the database. You can choose either either General Purpose/Transaction Processing or Data Warehousing.
Database Configuration Options
You can choose how to configure the database created by the installer. You can select the memory size and management options, the character sets used to store data, the security options for database access, and whether the sample schemas should be installed.
To complete the exercises in this guide and related course material, you must install the sample schemas. This data is also used in most examples throughout Oracle Database documentation. Oracle recommends that you install the sample schemas.
This choice is a configuration option only during advanced installation. Sample schemas are installed by default during typical or Desktop class installations.
You specify whether to manage your database centrally or locally using Oracle Enterprise Manager. Central management enables you to manage multiple targets, such as databases and application servers, using a single interface. Using local management you can manage only a single database instance at a time.
To use central management, you must have an Oracle Enterprise Management agent on each host, or computer that has Oracle Database software installed on it. These agents are responsible for monitoring all components on that host. If an agent is not found on the local host, then this option is disabled during installation.
If you are setting up a single database for the first time, then it is recommended that you configure local management with Oracle Enterprise Manager, which is the default. You can later install additional databases and configure central management using Enterprise Manager.
Recovery Options
You specify whether automated backups should be configured for the database. If you choose this option, you must specify whether the recovery area should be stored on the local file system or in an Oracle ASM disk group. You must also specify the operating system credentials the backup job uses when performing backups.
Note:
To use Oracle ASM for recovery area storage, you must have installed Oracle ASM as part of an Oracle grid infrastructure installation and created one or more disk groups before performing the Oracle Database installation.Schema Passwords
When you create a database, certain administrative user accounts are created automatically. You are prompted to enter the passwords for the SYS, SYSTEM, SYSMAN, and DBSNMP accounts, which enable you to manage and administer the database. You can use the same password for each account, or specify passwords for each account individually. If you do not enter a secure password, you will receive a warning message during installation.
Administrative access to the database is granted by membership in certain operating system groups. You can choose the operating system group to be used for SYSDBA access (typically dba) and SYSOPER access (typically oper).
The SYSDBA group identifies operating system user accounts that have database administrative privileges and can log in with SYSDBA access. The SYSOPER group is an optional group for users that should have limited database administrative privileges. See "SYSDBA and SYSOPER System Privileges" for more information about these groups and privileges.
This section briefly describes the steps for a desktop-class installation. Most steps are common to all platforms and involve running the Oracle Universal Installer. Platform-specific steps are noted. For further assistance, consult the online Help or the Oracle Database Installation Guide for your platform.
Note:
The following steps describe the Oracle Universal Installer workflow for a host computer that has no previous Oracle software installed. If your host computer has Oracle software installed, then you may see a different workflow.To perform a basic installation:
Log on to your computer as a member of the administrative group that is authorized to install Oracle Database software and to create and run the database.
Refer to your operating system-specific documentation or contact your system administrator to determine whether you have the necessary privileges and permissions to install new software.
Do one of the following:
If you are installing from distribution media, then insert the distribution media for the database into your computer.
The Autorun feature opens the Select a Product to Install window automatically.
If you downloaded the installation software from the Oracle Web site, then follow the instructions on the site to run the Oracle Universal Installer. Or, see the Oracle Database Installation Guide for your platform.
The first window that appears is the Configure Security Updates window. To receive notifications about security issues via e-mail, enter your e-mail address in the Email text field. To receive security updates from My Oracle Support, enter the e-mail address registered with My Oracle Support, select the I wish to receive security updates... option, and enter your My Oracle Support password.
Click Next to continue.
The Select Installation Option window appears.
Choose the Create and configure a database option. Or, you also have the option of choosing to only install the database software, but then you must create a database in an additional step after the software is installed. If you are currently using a previous version of Oracle Database, choose Upgrade an existing database. After you have chosen an option, click Next.
The System Class window appears.
Choose Desktop Class.
You can choose the Server Class option to customize your installation. For example, you use this method to configure Oracle Automatic Storage Management for your database, install the Sample Schemas, or configure automated backups. Selecting this option guides you through a series of installation steps that are not documented in this guide. For more information about the advanced choices, see "About Advanced Installation". Also see Oracle Database Installation Guide for your platform.
Click Next.
The Typical Install Configuration window appears.
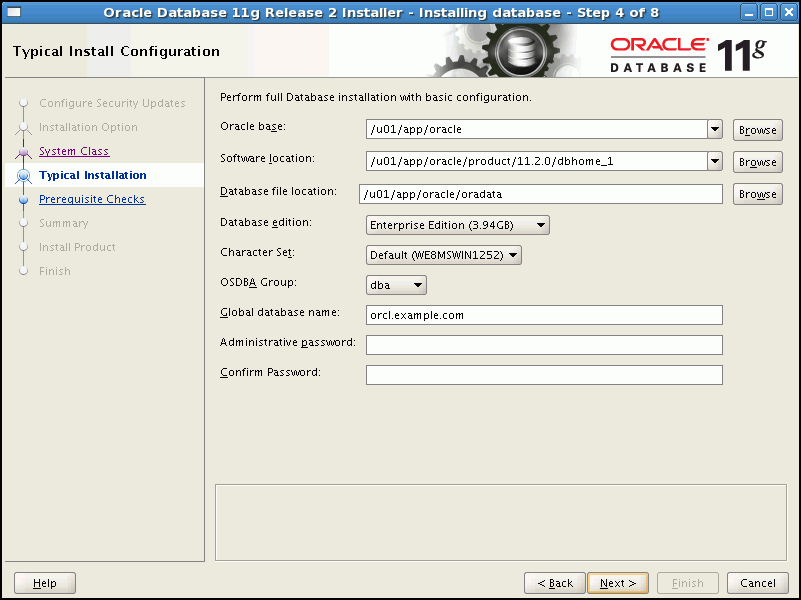
Provide the following configuration details for the database:
Oracle Base Location— The Oracle base directory helps to facilitate the organization of multiple Oracle software installations. See the Oracle Database Installation Guide for your platform for more information about ORACLE_BASE.
If you did not set the ORACLE_BASE environment variable before starting OUI, then the Oracle base directory is created in an app/username/directory on the first existing and writable directory from /u01 through /u09 for UNIX and Linux systems, or on the disk drive with the most available space for Windows systems. If /u01 through /u09 does not exist on the UNIX or Linux system, then the default location is user_home_directory/app/username.
You can click Browse to find the directory you want to act as the Oracle base directory.
Software Location—The software location is the Oracle home for your database. You must specify a new Oracle home directory for each new installation of Oracle Database software. By default, the Oracle home directory is a subdirectory of the Oracle base directory.
You can click Browse to find the directory where you want to install the Oracle Database software.
Database File Location—The database file location is the location where Oracle Database files are stored. By default, this location is Oracle_base/oradata. You can click Browse to select a different location.
Database Edition—Select either Enterprise Edition, Standard Edition, Standard Edition One, or Personal Edition (Microsoft Windows platforms only). See "Installation Type".
Character Set—Choose the character set to use to store the data within the database. You can choose between the Default, which is based on the operating system language settings, or Unicode.
OSDBA Group (Linux and UNIX platforms only)—Specify the operating system DBA group. Host computer users in this group have administrative privileges on the database. This group is typically named dba. Refer to Oracle Database Installation Guide for Linux or for your UNIX platform for more details.
Global Database Name—Enter the fully qualified global database name. See "Installation Type" for more on global database name.
Administrative Password—Specify the initial password for the SYS, SYSTEM, SYSMAN, and DBSNMP administrator accounts. If the password you choose is not a secure password, a warning message will be displayed.
After you enter the required information, click Next.
If Oracle software has not previously been installed on this server, then the Create Inventory window appears. If this is not the first installation attempt on this server, then the Perform Prerequisite Checks window appears.
For first time installations on Linux and UNIX operating systems only, specify a directory for installation files and the name of an operating system group that has write permissions for that directory.
If this is the first time you are installing any Oracle software on this computer, then the Create Inventory Directory window appears. You must specify a local directory for the inventory, which OUI uses to keep track of all Oracle software installed on the computer. This information is used while applying patches or upgrading an existing installation, and while deinstalling Oracle software. Note that this directory is different from the Oracle home directory. The recommended value for the inventory directory is Oracle_base/../oraInventory, or one level above the Oracle base directory, in the oraInventory subdirectory. If your Oracle base directory is /u01/app/oracle, then the Oracle inventory directory defaults to /u01/app/oraInventory.
In this window you can also specify the operating system group that has write permissions on the inventory directory. This prevents other users from writing over the Oracle product installation files. Typically the oinstall group is selected.
After you enter a directory path and optionally specify an operating system group, click Next to continue.
The Perform Prerequisite Checks window appears.
If any checks failed, then take corrective actions.
OUI performs several environment checks and indicates whether the check was a success, or resulted in a warning or failure. Details of the checks are provided in the displayed window. The installation can proceed only when all checks have a status of either Succeeded or Warning. If any of the environment checks failed, then they must be resolved manually. See "Checking Prerequisites" for more information.
If all the prerequisite checks passed, or after you click Next, the Summary window appears,
Review the installation summary, then click Finish to start the installation.
The Install window appears, showing the installation progress. After the installation phase, the Configuration Assistants window appears. This window lists the configuration assistants that are started automatically. If you chose to create a starter database, then Database Configuration Assistant starts automatically in a separate window.
After database creation, a window is displayed that summarizes the database creation.
(Optional) Click Password Management to unlock user accounts to make the accounts accessible to users.
The SYS and SYSTEM accounts are unlocked by default.
Click OK to continue the installation.
For Linux and UNIX operating systems only, run the specified scripts, then click OK.
In the Execute Configuration Scripts window, you are prompted to open a new terminal window, and to run scripts as the root user. After you run the scripts, return to this window and click OK.
Make note of the information in the Finish window, then click Close to exit OUI.
Your installation and database creation is now complete. The Finish window displays one or more important URLs, including one for the Oracle Enterprise Manager Database Control console. (The console is the user interface—the Web application—portion of Oracle Enterprise Manager Database Control.)
You use Oracle Enterprise Manager Database Control to perform common database administration tasks. The URL and port information for Database Control can be found after installation in the Oracle_home/install/portlist.ini file.
You can access this URL with your browser and log in as the SYS user with the associated password, and connect as SYSDBA. See Chapter 3, "Getting Started with Database Administration" for more information about using Database Control.
Unless you specified that only the Oracle Database software should be installed, Oracle Universal Installer automatically runs Database Configuration Assistant (DBCA) after software installation is complete. DBCA then creates a database using the information you provided. If you do not create a starter database and later want to create one, or to create additional databases, use DBCA.
Note:
With Oracle Database, you typically have a single database that hosts multiple applications. You do not need multiple databases to run different applications. Instead, you separate the objects that support each different application into different schemas in the same database. However, there may be situations in which you want to create multiple Oracle databases on the same host computer. When you do this with DBCA, the new databases typically use the same Oracle home directory as the first database, but store database data files separately from those of the first database.DBCA also enables you to modify a database configuration, delete a database, and more. This section describes the following DBCA tasks:
Online Help is available by clicking Help. It provides information that guides you in selecting configuration options.
Follow the steps in this section to start DBCA.
Note:
If you choose to create a starter database while installing the Oracle Database software, then OUI automatically starts DBCA.Log on to your computer as a member of the administrative group that is authorized to install Oracle Database software and to create and run the database.
Do one of the following:
To start DBCA on a Microsoft Windows operating system, click Start, select Programs (or All Programs), then Oracle - HOME_NAME, then Configuration and Migration Tools, and then Database Configuration Assistant.
To start DBCA on UNIX or Linux, or at the command-line prompt on the Windows operating system, enter the following command:
dbca
The dbca utility is typically located in the ORACLE_HOME/bin directory.
Click Next to bypass the Welcome window.
DBCA enables you to create an Oracle database by following a step-by-step guided workflow.
To create a database using DBCA:
Start DBCA as described in "Starting DBCA".
In the Operations window, select Create a Database and click Next to start the guided workflow for creating a database. The workflow requests your input in the following windows:
The following sections provide details on each window. Most windows provide default settings.
This window enables you to select the type of database to create. You can use DBCA to create a database from templates supplied by Oracle or from templates that you create. The templates contain settings optimized for a particular type of workload.
Oracle ships templates for the following two workload types:
General purpose or transaction processing
Data warehouse
Click Show Details to see the configuration for each type of database. Select the template suited to the type of workload your database will support. If you are not sure which to choose, then select the default General Purpose or Transaction Processing template.
For more complex environments, you can select the Custom Database option. This option does not use templates and results in a more extensive interview, which means that it takes longer to create your database.
For more information about using database templates, see "Managing Templates with DBCA".
In the Global Database Name field, enter the database name in the form database_name.domain_name.
In the SID field, enter the system identifier. The SID defaults to the database name and uniquely identifies the instance that runs the database.
Use this window to set up your database so it can be managed with Oracle Enterprise Manager. Oracle Enterprise Manager provides Web-based management tools for individual databases, and central management tools for managing your entire Oracle environment.
Select Configure Enterprise Manager to use Enterprise Manager. Then, select one option:
If the Oracle Management Agent is installed on your host computer, then you can choose central management by selecting Register with Grid Control for centralized management and then selecting the Management Service.
To manage your database locally, select Configure Database Control for local management. You can then optionally configure e-mail notification of database alerts or a daily backup of the database.
In this window, specify the passwords for the administrative accounts such as SYS and SYSTEM.
In this window, specify the type of storage you would like your database to use. For more information, see "About Advanced Installation".
Then specify the locations for the Oracle database files. Select one of the following options:
Use Database File Locations from Template—This option instructs DBCA to use the directory information as specified in the template. Later, you can make modifications to database file names and locations.
Use Common Location for All Database Files—This option requires you to specify a new directory for the Oracle home. All the database files are created in this location. Later, you can make modifications to database file names and locations.
Use Oracle Managed Files—This option instructs Oracle Database to directly manage operating system files comprising an Oracle database. You specify the default location, called a database area, for all your files. Oracle Database thereafter automatically creates and deletes files in this location, as required. You can also create multiple copies of your redo and online log files by selecting Multiplex Redo Logs and Control Files. To learn more about online redo log files and control files, see Chapter 9, "Performing Backup and Recovery".
Selecting this option enables you to delegate the complete management of database files to the database. You no longer have to specify the file names, their location, or their sizes.
When you create a new database, it is important to configure the database so you can recover your data if a system failure occurs. Online redo log files contain a record of changes that were made to data files. Online redo log files are stored in online redo log groups. You must have at least two online redo log groups for your database. After the online redo log files in a group have filled up, the log writer process (LGWR) switches the writing of redo records to a new online redo log group. Oracle Database can automatically save the inactive group of online redo log files to one or more offline destinations, known collectively as the archived redo log (also called the archive log). The process of turning online redo log files into archived redo log files is called archiving.
Archiving can be performed only if the database is running in ARCHIVELOG mode. A group of online redo log files cannot be reused by the log writer (LGWR) process until the group is archived. If the database is running in NOARCHIVELOG mode, then when a group becomes inactive after the LGWR process switches to a new group, the inactive group is available for immediate reuse by the LGWR process.
The NOARCHIVELOG mode protects a database from instance failure but not from media failure. Only the most recent changes made to the database, which are stored in the online redo log files, are available for instance recovery. To restore a database operating in NOARCHIVELOG mode, you can use only entire database backups taken while the database is closed. Therefore, if you operate a database in NOARCHIVELOG mode, then back up the entire database at regular, frequent intervals.
The archiving of online redo log files has the following advantages:
A database backup, with online and archived redo log files, guarantees that you can recover all committed transactions if the operating system or hardware fails.
You can recover the database using a backup that was taken while the database was open and being used, if you have a copy of the archived log files that were written while the database was being backed up.
You can perform online tablespace backups, and use these backups to restore a tablespace following media failure.
You can keep a standby database current with its original database by continuously applying the original archived redo log files to the standby database.
Before you can archive the online redo log files, you must determine the destination to which you want to archive. Oracle recommends that the archive log be stored in a fast recovery area because it can simplify backup and recovery operations for your database. A fast recovery area is a location in which Oracle Database can store and manage files related to backup and recovery. It is distinct from the database area, which is a location for the current database files (data files, control files, and online redo log files).
When creating your database, you can select the following options:
Specify Fast Recovery Area—Select this option to specify a backup and recovery area and its directory location and size. You can use variables to identify standard locations.
Enable Archiving—Select this option to enable the archiving of database online redo log files, which can be used to recover a database. Selecting this option is the same as enabling Archive Log Mode in Oracle Enterprise Manager Database Control or running the database in ARCHIVELOG mode.
Oracle recommends you select Enable Archiving. Selecting this option provides better protection for your database for software or hardware failure. If you do not select this option now, then you can enable ARCHIVELOG mode later. See "Configuring Your Database for Basic Backup and Recovery".
When you create your database, you can load it with data using either of the following methods:
Sample Schemas—Select Sample Schemas to include the Sample Schemas (EXAMPLE) tablespace in your database. Oracle guides and educational materials contain examples based upon the Sample Schemas. Oracle recommends that you include them in your database.
Custom Scripts—In the Custom Scripts subpage, optionally specify one or more SQL scripts to run after your database is created. Scripts are useful for performing postinstallation tasks, such as loading custom schemas. Note that if you choose to run scripts after installation, then your scripts must include a connection string that identifies the database. Click Help for more information.
The links in this window provide access to additional windows that enable you to change the default initialization parameter settings. These parameters fall into the following categories:
You can also click the All Initialization Parameters button at the bottom of the window to display a list of all the database initialization parameters and their current settings.
Use this window to set the initialization parameters that control how the database manages its memory. You can choose from the following methods for memory management:
Typical—This method requires little configuration, and allocates memory as a percentage of total overall physical system memory. Select Typical and enter a percentage value. Click Show Memory Distribution to see how much memory DBCA assigns to the System Global Area (SGA) and the aggregate Program Global Area (PGA). With this setting, the system automatically tunes many of the memory components of the SGA, and allocates memory to individual PGAs as needed. The system can also dynamically decrease or increase the total amount of memory allocated to the SGA or aggregate PGA, depending on processing demands. The total memory used for the database instance never exceeds the amount you specify. This automatic memory tuning for the instance is known as automatic memory management. To learn more about PGA and SGA, see "About Instance Memory Structure".
Custom—This method requires more configuration than the Typical option, but gives you more control over how the database instance uses system memory. This option is meant for more experienced database administrators. You can directly specify memory sizes for the SGA and aggregate PGA and their substructures, such as the shared pool and buffer cache.
Select one of the following options for customized memory management:
Automatic Shared Memory Management to allocate specific amounts of memory to the SGA and aggregate PGA. With this setting, automatic shared memory management is enabled for the SGA, and memory is allocated to the individual PGAs as needed.
Manual Shared Memory Management to enter specific values for each SGA component and the aggregate PGA. This disables automatic shared memory management and enables you to determine how the SGA memory is distributed among the SGA memory components.
See Also:
Chapter 5, "Managing the Oracle Instance" for more information about memory management options
In this tab, you specify the smallest block size and the maximum number of operating system user processes that can simultaneously connect to the database.
Block Size—Use this list to select the block size, or accept the default. Oracle Database data is stored in data blocks of the size specified. One data block corresponds to a specific number of bytes of physical space on disk. Selecting a block size other than the default 8 kilobytes (KB) value requires advanced knowledge and should be done only when absolutely required.
While using predefined templates, this list is not enabled because the database will be created with the default block size of 8 KB. While using the custom option, you can change the block size.
Processes—In this field, specify the maximum number of processes that can simultaneously connect to the database. Enter a number or accept the default value of 150. The default value for this parameter is appropriate for many environments. The value you select should allow for all background processes, user processes, and parallel execution processes.
Use this tab to define the character sets used by your database. Character sets are the encoding schemes used to display characters on your computer screen. The character set determines what languages can be represented in the database.
Oracle recommends using Unicode (AL32UTF8) as the database character set. AL32UTF8 is Oracle's name for the UTF-8 encoding of the Unicode standard. The Unicode standard is the universal character set that supports most of the currently spoken languages of the world. The use of the Unicode standard is indispensable for any multilingual technology, including database processing.After a database is created and accumulates production data, changing the database character set is a time consuming and complex project. Therefore, it is very important to select the right character set at installation time. Even if the database does not currently store multilingual data but is expected to store multilingual data within a few years, the choice of AL32UTF8 for the database character set is usually the only good decision.Even so, the default character set used by Oracle Universal Installer (OUI) and Database Configuration Assistant (DBCA) for the UNIX, Linux, and Microsoft Windows platforms is not AL32UTF8, but a Microsoft Windows character set known as an ANSI code page. The particular character set is selected based on the current language (locale) of the operating system session that started OUI or DBCA. If the language is American English or a Western European language, then the default character set is WE8MSWIN1252. Each Microsoft Windows ANSI Code Page can store data from only one language or a limited group of languages, such as only Western European, or only Eastern European, or only Japanese.A Microsoft Windows character set is the default even for databases created on UNIX and Linux platforms because Microsoft Windows is the prevalent platform for client workstations. Oracle Client libraries automatically perform the necessary character set conversion between the database character set and the character sets used by non-Windows client applications.You may also choose to use any other character set from the presented list of character sets. You can use this option to select a particular character set required by an application vendor, or choose a particular character set that is the common character set used by all clients connecting to this database.
Because AL32UTF8 is a multibyte character set, database operations on character data may be slightly slower when compared to single-byte database character sets, such as WE8MSWIN1252. Storage space requirements for text in most languages that use characters outside of the ASCII repertoire are higher in AL32UTF8 compared to legacy character sets supporting the language. Note that the increase in storage space concerns only character data and only data that is not in English. The universality and flexibility of Unicode usually outweighs these additional costs.
Database Character Set—In this section, select one of the following options:
Use the Default—Select this option to select only the language currently used by the operating system for all your database users and database applications.
Use Unicode (AL32UTF8)—Select this option to support multiple languages for your database users and database applications.
Choose from the list of character sets—Select this option if you want Oracle Database to use a character set other than the default character set used by the operating system.
Note:
AL32UTF8 is a variable-width multibyte character set. Applications connecting to a database that uses AL32UTF8 for character data processing must be correctly programmed to work with such character sets. Always verify the character set requirements of the applications that use the database. Contact the application vendor and ask for a Unicode-capable version, if your current application version does not support the Unicode standard.National Character Set—In this list, select a character set or accept the default. The national character set, also called NCHAR character set, is the character set used to store and process data of data types NVARCHAR2, NCHAR, and NCLOB. These data types allow storing of Unicode characters in a database that does not have a Unicode database character set. Unless installation requirements of any of your applications specify otherwise, accept the default value of AL16UTF16 as the national character set.
Note:
Although this character set is called "national," after the SQL standard (ISO/IEC 9075), it is not better suited to support globalized applications than the database character set. Because working with national character set data requires additional API calls in client applications, and because national character set data is not supported by some database components, such as Oracle Text, Oracle recommends that multilingual applications useVARCHAR2, CHAR, and CLOB data types and an Oracle database with the database character set AL32UTF8.Default Language—In this list, select a default database language or accept the default. The default language determines how the database supports locale-sensitive information such as day and month abbreviations, default sorting sequence for character data, and reading direction (left to right or right to left).
Default Territory—In this list, select the name of the territory whose conventions are to be followed for day and week numbering or accept the default. The default territory also establishes the default date format, the default decimal character and group separator, and the default International Standardization Organization (ISO) and local currency symbols. For example, in the United Kingdom, the default date format is DD-MON-YYYY, where DD is the day of the month (1-31), MON is the abbreviated name of the month, and YYYY is the 4-digit year.
Use this window to select the database mode. You can run the database in either of the following modes:
Dedicated Server Mode—This mode allows a dedicated server process for each user process. Select this option when the number of total clients is expected to be small, for example, 50 or fewer. You might also choose this option when database clients typically make persistent, long-running requests to the database. By default, the database is configured for dedicated server processes.
Shared Server Mode—This mode allows several client connections to share a database-allocated pool of resources. Use this mode in configurations in which client load is expected to cause a strain on memory and other system resources. If you choose shared server mode, then you must indicate the number of server processes you want to create when a database instance is started. For more information about setting this parameter, click Help.
In this window, a navigation tree displays the storage structure of your database (control files, data files, online redo log groups, and so forth). If you are not satisfied with the storage structure or parameters, then you can make changes.
Note that if you selected a preconfigured template for a database, then you cannot add or remove control files, data files, or undo segments.
In this window, select any of the following options for creating the database:
Create Database—Select this option to create your database now.
Save as a Database Template—Select this option to save the database definition as a template to use at a later time.
Generate Database Creation Scripts—Select this option to generate a SQL database creation script that you can run at a later time.
After you make your choice, click Finish. A confirmation window appears after a short period. Review the Create Database Summary information, then click OK to proceed.
You can use DBCA to change the configuration of an existing database. For example, you can:
Register the database with Grid Control
Configure Database Control alert notification via e-mail
Enable daily disk backups to the recovery area
Change default security settings
Change server mode from dedicated to shared, or the reverse
Add database options that were not previously configured (for example, Oracle Label Security or Oracle OLAP)
To change the configuration of a database using DBCA:
Start DBCA as described in "Starting DBCA".
In the Operations window, select Configure Database Options and click Next.
Follow the instructions in the DBCA guided workflow.
You can also use DBCA to delete a database. When DBCA deletes a database, it shuts down the database instance and then deletes all database files. On the Windows platform, it also deletes associated Windows services.
To delete a database using DBCA:
Start DBCA as described in "Starting DBCA".
In the Operations window, select Delete a Database and click Next.
Select the database to delete and click Finish.
DBCA templates are XML files that contain information required to create a database. Templates are used in DBCA to create new databases and duplicate existing databases. The information in templates includes database options, initialization parameters, and storage attributes (for data files, tablespaces, control files, and online redo log files).
Templates can be used just like scripts, but they are more powerful than scripts because you have the option of duplicating a database. Duplication saves time because you copy the files of an existing database, referred to as a seed database, to the correct locations.
Templates are stored in the following directory:
ORACLE_HOME/assistants/dbca/templates
Using templates has the following advantages:
Time saving. If you use a template, then you do not have to define the database.
Easy duplication. By creating a template containing your database settings, you can easily create a duplicate database without specifying parameters twice.
Easy editing. You can quickly change database options from the template settings.
Easy sharing. Templates can be copied from one computer to another.
Templates are divided into the following types:
Seed templates
Nonseed templates
The characteristics of each are shown in Table 2-1.
| Type | File Extension | Includes Data Files | Database Structure |
|---|---|---|---|
|
Seed |
|
Yes |
This type of template contains both the structure and the physical data files of an existing database, referred to as the seed database. Your new database starts as a copy of the seed database, and requires only the following changes:
Other changes can be made after database creation using custom scripts that can be invoked by DBCA, command-line SQL statements, or Oracle Enterprise Manager Database Control. The data files for the seed database are stored in compressed RMAN backup format in a file with a .dfb extension. The seed database control file is stored in a file with .ctl extension. (This file is needed only when storing data files in Oracle Automatic Storage Management (Oracle ASM) disk groups or as Oracle Managed Files.) The .dbc file contains the location of the seed database data files and contains the source database name used to mount the control file. |
|
Nonseed |
|
No |
This type of template is used to create a new database. It contains the characteristics of the database to be created. Nonseed templates are more flexible than their seed counterparts because all data files and online redo log files are created to your specification, and names, sizes, and other attributes can be changed as required. |
Oracle provides the templates shown in Table 2-2.
Table 2-2 Oracle-Provided DBCA Templates and Their Corresponding Workloads
| Template | Workload |
|---|---|
|
Data warehouse |
Users perform numerous, complex queries that process large volumes of data. Response time, accuracy, and availability are key issues. These queries ( |
|
General Purpose or Transaction processing |
Many concurrent users perform numerous transactions that require rapid access to data. Availability, speed, concurrency, and recoverability are key issues. Transactions consist of reading ( |
|
Custom database |
This template allows you maximum flexibility in defining a database because you can change any of the settings for the database being created. |
Follow the instructions in this section to create your own templates.
Start DBCA as described in "Starting DBCA".
In the Operations window, select Manage Templates and click Next.
In the Template Management window, select Create a database template and one of the following options, and click Next.
From an existing template
Using an existing template, you can create a new template based on the predefined template settings. You can add or change any template settings such as initialization parameters, storage parameters, or whether to use custom scripts.
From an existing database (structure only)
You can create a new template that contains structural information from an existing database, including database options, tablespaces, data files, and initialization parameters. User-defined schemas and their data will not be part of the created template. The source database can be either local or remote. Select this option when you want the new database to be structurally similar to the source database, but not contain the same data.
From an existing database (structure as well as data)
You can create a new template that has both the structural information and physical data files of an existing database. Databases created using such a template are identical to the source database. User-defined schemas and their data will be part of the created template. The source database must be local. Select this option when you want a template from which you can create an exact replica of the source database.
When creating templates from existing databases, you can translate file paths into Optimal Flexible Architecture (OFA) or maintain existing file paths. OFA is a set of file naming and placement guidelines for Oracle software and databases. Using OFA is recommended if the target computer on which you plan to create a database using the template has a different directory structure than computer on which the template was defined. Standard file paths can be used if the target computer has a directory structure that is similar to the directory structure on the source computer.
Follow the instructions in the DBCA guided workflow to create your template.
When you delete a template, it is no longer available to create a new database or a new template.
Start DBCA as described in "Starting DBCA".
In the Operations window, select Manage Templates and click Next.
In the Template Management window, select Delete a database template and click Next.
Select the template to delete and click Finish.
Oracle By Example (OBE) has a series on the Oracle Database 2 Day DBA guide. This OBE steps you through the tasks in this chapter and includes annotated screenshots.
To view the Installation OBE, in your browser, enter the following URL:
http://www.oracle.com/webfolder/technetwork/tutorials/obe/db/11g/r2/2day_dba/install/install.htm
|
Copyright © 2004, 2012, Oracle and/or its affiliates. All rights reserved. Legal Notices |
|