| Oracle® Database 2 Day DBA 11g Release 2 (11.2) Part Number E10897-10 |
|
|
PDF · Mobi · ePub |
| Oracle® Database 2 Day DBA 11g Release 2 (11.2) Part Number E10897-10 |
|
|
PDF · Mobi · ePub |
This appendix discusses using Oracle Automatic Storage Management (Oracle ASM). Oracle ASM is Oracle's recommended storage management solution that provides an alternative to conventional volume managers, file systems, and raw devices. This chapter includes the following topics:
See Also:
Oracle Automatic Storage Management Administrator's Guide for more information about Oracle Automatic Storage Management
Oracle Automatic Storage Management (Oracle ASM) is an integrated, high-performance database file system and disk manager. You use Oracle ASM instead of an operating system file system to store your Oracle Database files and, optionally, other files.
Oracle ASM is based on the principle that the database should manage storage instead of requiring an administrator to do it. Oracle ASM eliminates the need for you to manage potentially thousands of database files.
Oracle ASM groups the disks in your storage system into one or more disk groups. You manage a small set of disk groups, and Oracle ASM automates the placement of the database files within those disk groups.
Oracle ASM provides the following benefits:
Striping—Oracle ASM spreads data evenly across all disks in a disk group to optimize performance and utilization. This even distribution of database files eliminates the need for regular monitoring and I/O performance tuning.
For example, if there are six disks in a disk group, then pieces of each Oracle ASM file are written to all six disks. These pieces are known as extents. In this scenario, these pieces come in 1 MB chunks. When a database file is created, it is striped (divided into extents and distributed) across the six disks, and allocated disk space on all six disks increases evenly. When reading the file, file extents are read from all six disks in parallel, greatly increasing performance.
Mirroring—Oracle ASM can increase availability by optionally mirroring any file. Oracle ASM mirrors at the file level, unlike operating system mirroring, which mirrors at the disk level. Mirroring means keeping redundant copies, or mirrored copies, of each extent of the file to help avoid data loss caused by disk failures. The mirrored copy of each file extent is always kept on a different disk from the original copy. If a disk fails, then Oracle ASM can continue to access affected files by accessing mirrored copies on the surviving disks in the disk group.
Oracle ASM supports 2-way mirroring, where each file extent gets one mirrored copy, and 3-way mirroring, where each file extent gets two mirrored copies.
Online storage reconsideration and dynamic rebalancing—Oracle ASM permits you to add or remove disks from your disk storage system while the database is operating. When you add a disk, Oracle ASM automatically redistributes the data so that it is evenly spread across all disks in the disk group, including the new disk. This redistribution is known as rebalancing. It is done in the background and with minimal impact to database performance. When you request to remove a disk, Oracle ASM first rebalances the disk group by evenly relocating all file extents from the disk being removed to the other disks in the disk group.
Managed file creation and deletion—Oracle ASM further reduces administrative tasks by enabling files stored in Oracle ASM disk groups to be Oracle Managed Files. Oracle ASM automatically assigns file names when files are created, and automatically deletes files when they are no longer needed. For information about Oracle Managed Files, see Oracle Database Administrator's Guide.
Oracle recommends that you use Oracle ASM for your database file storage, instead of raw devices or the operating system file system. However, databases can have a mixture of Oracle ASM files and non-Oracle ASM files. Oracle Enterprise Manager includes a wizard that enables you to migrate non-Oracle ASM database files to Oracle ASM.
Oracle ASM is implemented as a special kind of Oracle instance, with its own System Global Area and background processes. The Oracle ASM instance is tightly integrated with the database instance. Every server running one or more database instances that use Oracle ASM for storage has an Oracle ASM instance. In an Oracle Real Application Clusters environment, there is one Oracle ASM instance for each node, and the Oracle ASM instances communicate with each other on a peer-to-peer basis. Only one Oracle ASM instance is required for each node, regardless of the number of database instances on the node.
You administer Oracle ASM with Oracle Enterprise Manager Database Control (Database Control). To administer the Oracle ASM instance and Oracle ASM disk groups, you must connect to the Oracle ASM instance as a user who has been granted the SYSASM system privilege. You can also administer Oracle ASM with Oracle Automatic Storage Management Command Line utility (ASMCMD) and SQL*Plus statements.
When you create the Oracle ASM instance either during installation or using Oracle Automatic Storage Management Configuration Assistant (ASMCA), the SYSASM is granted to the specified Oracle ASM administrator user.
See Also:
Oracle Automatic Storage Management Administrator's Guide for additional information about Oracle ASM
"Accessing the Oracle Automatic Storage Management Home Page"
You configure Oracle ASM by creating disk groups that become the default location for files created in the database. The disk group type determines how Oracle ASM mirrors files. When you create a disk group, you indicate whether the disk group is a normal redundancy disk group (2-way mirroring for most files by default), a high redundancy disk group (3-way mirroring), or an external redundancy disk group (no mirroring by Oracle ASM). You use an external redundancy disk group if your storage system does mirroring at the hardware level, or if you have no need for redundant data. The default disk group type is normal redundancy.
A disk group consists of a grouping of disks that are managed as a unit. These disks are referred to as Oracle ASM disks. An Oracle ASM disk can be a disk device, a partition, or a network-attached file.
When an Oracle ASM instance starts, it automatically discovers all available Oracle ASM disks. Discovery is the process of finding all disks that were prepared for Oracle ASM by your system administrator, examining their disk headers, and determining which disks belong to disk groups and which are available for assignment to disk groups. Oracle ASM discovers disks in the paths that are listed in an initialization parameter, or if the parameter is NULL, in an operating system–dependent default path.
Failure groups define Oracle ASM disks that share a common potential failure mechanism. An example of a failure group is a set of small computer system interface (SCSI) disks sharing the same SCSI controller. Failure groups are used to determine which Oracle ASM disks to use for storing redundant copies of data. For example, if 2-way mirroring is specified for a file, then Oracle ASM automatically stores redundant copies of file extents in separate failure groups. Failure groups apply only to normal and high redundancy disk groups. You can define the failure groups in a disk group when you create or alter the disk group, or let Oracle ASM automatically place each disk into its own failure group. For most systems, the default failure groups work well to prevent data loss.
See Also:
Oracle Automatic Storage Management Administrator's Guide for additional information about failure groups, and for instructions for configuring failure groups
This documentation assumes that Oracle Automatic Storage Management (Oracle ASM) is installed and configured on your single-instance server or on your Oracle Real Application Clusters (Oracle RAC) nodes. For information about installing and initially configuring Oracle ASM, for either a single-instance database or an Oracle RAC database, see Oracle Grid Infrastructure Installation Guide for Linux.
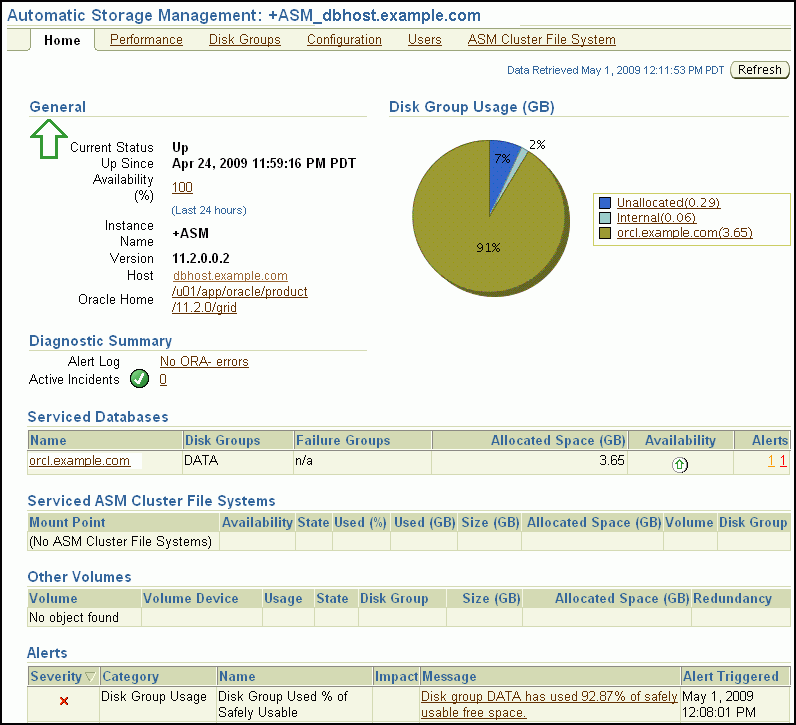
All Oracle Automatic Storage Management (Oracle ASM) administration tasks begin with the Oracle ASM Home page in Database Control. The Oracle ASM Home page displays:
The status of the Oracle ASM instance
A chart that shows the used and free space of each disk group
A list of databases and Oracle ASM Cluster File Systems serviced by the Oracle ASM instance
The procedure for accessing the Oracle ASM Home page differs depending on whether your database is a single-instance database or an Oracle Real Application Clusters database. Details are provided in the following sections:
"Accessing the Oracle ASM Home Page on a Single-Instance System"
"Accessing the Oracle ASM Home Page on an Oracle RAC System"
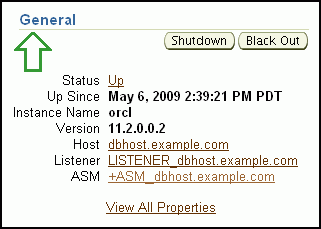
On a single-instance system, you access the Oracle ASM Home page starting from the Database Home page.
To access the Oracle ASM Home page on a single-instance system:
Go to the Database Home page, logging in as any database user.
Under the General heading, click the link next to the label ASM.
If prompted for Oracle ASM login credentials, then enter the user SYS, provide the SYS password that was set for the Oracle ASM instance upon installation, and connect as SYSASM.
On an Oracle RAC system, you access the Oracle ASM Home page starting from the Cluster Database Home page.
To access the Oracle ASM Home page on an Oracle RAC system:
Log in to Oracle Enterprise Manager on any node that is running the Database Control OC4J instance.
The Database Control OC4J instance is automatically started on the node where DBCA was run to create the cluster database. Depending on your configuration, the Database Control OC4J instance may also be running on other nodes.
On the Cluster Database Home page, under the Instances heading, click the link for the desired Oracle ASM instance.
Using Oracle Enterprise Manager, you can monitor the total capacity of your disk groups, including the amount of unused space and the amount of unused space that can be safely utilized after taking mirroring into account.
To view Oracle Automatic Storage Management (Oracle ASM) disk group usage and free space:
Go to the Oracle ASM Home page.
See "Accessing the Oracle Automatic Storage Management Home Page".
Click Disk Groups to view the Disk Groups subpage.
If the Oracle ASM Login page appears, then log in as the SYS user, connecting as SYSASM. Provide the SYS password that was set when the Oracle ASM instance was created.
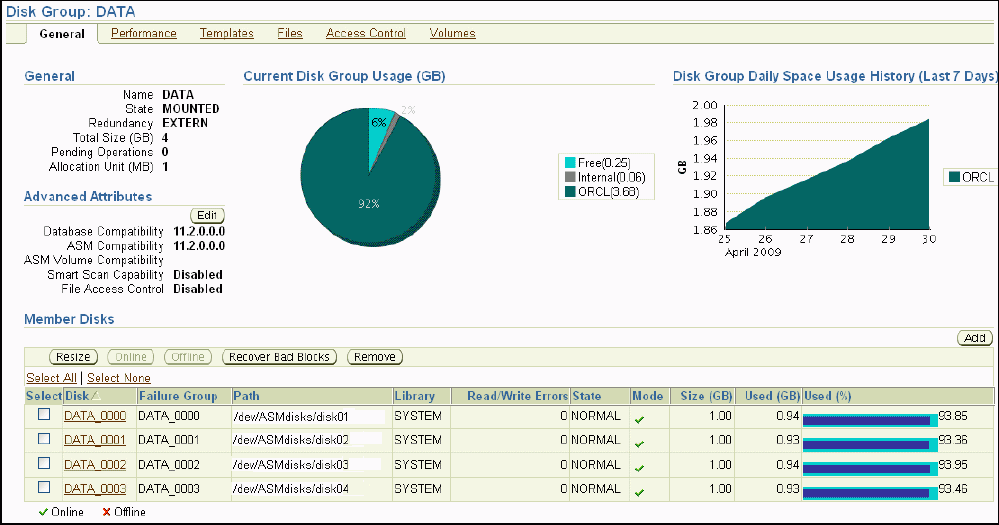
The Disk Groups subpage displays all disk groups with their space usage information.
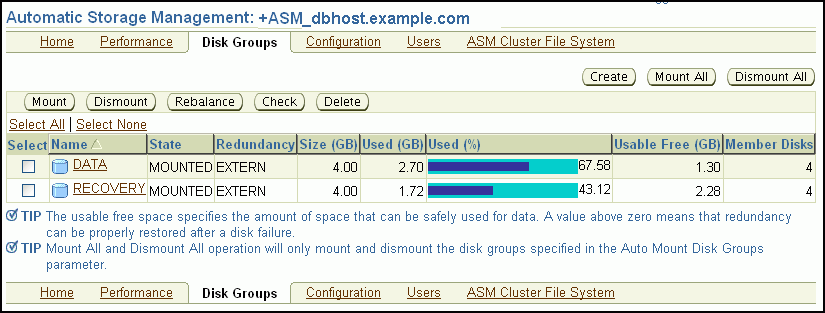
Note:
The Usable Free column displays the space in gigabytes (GB) that is actually available in the disk group. It takes into account the redundancy level of the disk group, and excludes the space that the disk group reserves for restoring full redundancy for all files in the disk group after a disk failure.You may want to create additional Oracle Automatic Storage Management (Oracle ASM) disk groups to do any of the following:
Have disk groups with different redundancy levels (normal, high, or external), depending on availability requirements and storage system capabilities.
Separate different classes of storage (for example, SCSI drives and Serial Advanced Technology Attachment (SATA) drives) into different disk groups. Disks in a disk group should have similar size and performance characteristics.
Store the fast recovery area in a separate disk group from the database.
Go to the Oracle ASM Home page.
See "Accessing the Oracle Automatic Storage Management Home Page".
Click the Disk Groups link to display the Disk Groups subpage.
If the Oracle ASM Login page appears, then log in as the SYS user, connecting as SYSASM. Provide the SYS password that was set when the Oracle ASM instance was created.
Click Create.
The Create Disk Group page appears. It displays a list of Oracle ASM disks that are available to be added to a disk group. You can use the Select Member Disks drop-down list to choose whether All Disks or Only Candidate disks are displayed.
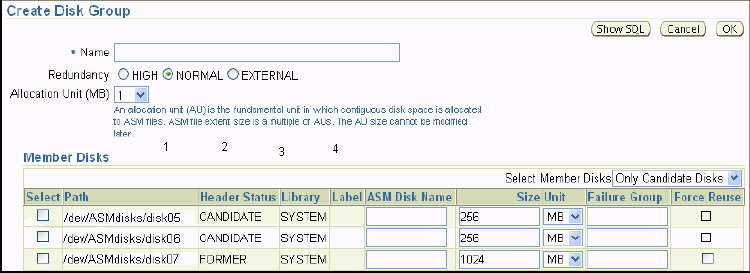
Enter the disk group name, and select redundancy type (high, normal, or external).
Select disks as follows:
Select the check box to the left of each disk to include in the new disk group.
To force the inclusion of a disk in the disk group, select the Force Reuse check box for that disk.
Caution:
The Force Reuse check box causes the disk to be added to the new disk group even if the disk belongs to another disk group and has valid database data. This data will be lost. You must be certain that you are selecting a disk that can legitimately be added to the disk group.Optionally enter an Oracle ASM disk name for each selected disk. (Oracle ASM provides a name if you do not.)
Click OK to create the disk group.
See Also:
Oracle Automatic Storage Management Administrator's Guide for a discussion of the FORCE option
Oracle Database Reference for information about the various header status types of Oracle ASM disks
When you drop a disk group, you delete the disk group, and all of its files. You cannot drop a disk group if any one of its database files is open. After dropping a disk group, you can add its member disks to other disk groups or use them for other purposes.
One reason to drop a disk group is to change redundancy (normal, high, or external). Because you cannot change the redundancy of a disk group, you must drop the disk group and then re-create it with the proper redundancy. In this case, you must back up or move disk group data before you drop the disk group.
Go to the Oracle ASM Home page.
See "Accessing the Oracle Automatic Storage Management Home Page".
Click the Disk Groups link to display the Disk Groups subpage.
If the Oracle ASM Login page appears, then log in as the SYS user, connecting as SYSASM. Provide the SYS password that was set when the Oracle ASM instance was created.
In the Select column, select the name of the disk group to drop.
Click Delete.
A confirmation page appears.
To delete the disk group even if it still contains files, expand Show Advanced Options and ensure that the Including Contents option is selected.
If the disk group contains files and the Including Contents option is not selected, then you cannot drop the disk group.
On the confirmation page, click Yes.
You add disks to a disk group to increase the total amount of storage space in a disk group. You can add one or multiple disks in a single operation. Oracle ASM then rebalances the disk group so that data is evenly distributed on all disks, including the newly added disks.
You can specify a number to control the power of the rebalance operation. (The range of valid values depends upon the Oracle Database release you are using. See Oracle Automatic Storage Management Administrator's Guide.) The higher the number, the faster the rebalance operation completes. Lower numbers cause rebalancing to take longer, but use fewer processing and I/O resources. This leaves these resources available for the database. The default value of 1 minimizes disruption to the database. A value of 0 prevents the rebalance operation from happening. Manual or automatic rebalancing can then occur at a later time. For example, you may want to postpone rebalancing because you want to wait for a time when there are fewer demands on the database, or because you want to add more disks or drop disks later and want the rebalancing to be done only once for all disk group changes.
To add one or more disks to a disk group:
Go to the Oracle ASM Home page.
See "Accessing the Oracle Automatic Storage Management Home Page".
Click the Disk Groups link to display the Disk Groups subpage.
If the Oracle ASM Login page appears, then log in as the SYS user, connecting as SYSASM. Provide the SYS password that was set when the Oracle ASM instance was created.
Click a link in the Name column to select the disk group to which you want to add disks.
The Disk Group page appears, displaying a list of disks that are in the disk group.
Click Add.
The Add Disks page appears. It displays a list of Oracle ASM disks that are available to be added to the disk group. This includes disks with the header status of CANDIDATE, PROVISIONED, or FORMER.
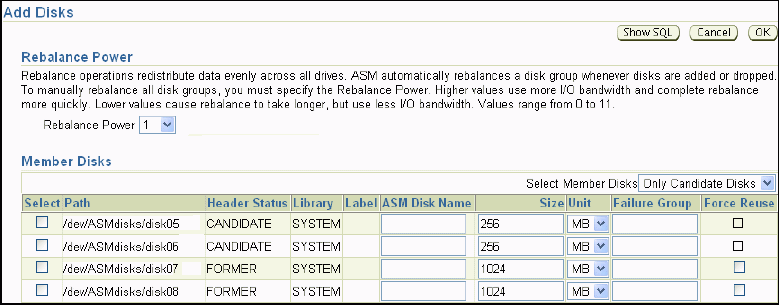
To display not only disks that are available to be added to a disk group, but all Oracle ASM disks, including disks that belong to a disk group (header status = MEMBER), select All Disks from the Select Member Disks list.
The page is refreshed and now displays the complete list of Oracle ASM disks that were discovered by the Oracle ASM instance.
Optionally change the rebalance power by selecting from the Rebalance Power list.
Select disks as follows:
Select the check box to the left of each disk to add to the disk group.
To force the inclusion of a disk in the disk group, select the Force Usage check box at the right.
Caution:
The Force Usage check box causes the disk to be added to the disk group even if the disk belongs to another disk group and has valid database data. This data will be lost. You must be certain that you are selecting a disk that can legitimately be added to the disk group.Optionally enter an Oracle ASM disk name for each disk. (Oracle ASM provides a name if you do not.)
Click OK to add the selected disks.
See Also:
Oracle Automatic Storage Management Administrator's Guide for more information about controlling rebalance operations and about the FORCE option
When you drop a disk from the disk group, the disk group is rebalanced by moving all of the file extents from the dropped disk to other disks in the disk group. Oracle ASM then releases the disk, and you can then add it to another disk group or use it for other purposes. You can drop one or multiple disks in a single operation. You can also optionally set rebalance power for the drop operation.
The following is a list of possible reasons for dropping a disk:
A disk is starting to fail, and you must replace it.
You want to upgrade a disk.
You want to reallocate the disk to a different disk group, or reallocate the disk to a different storage system.
Note:
Dropping disks from a disk group only logically deletes the disks from the disk group. It does not delete the disk contents. However, the contents are lost when you add the disk to a new disk group.To drop one or more disks from a disk group:
Go to the Oracle ASM Home page.
See "Accessing the Oracle Automatic Storage Management Home Page".
Click the Disk Groups link to display the Disk Groups subpage.
If the Oracle ASM Login page appears, then log in as the SYS user, connecting as SYSASM. Provide the SYS password that was set when the Oracle ASM instance was created.
Click a link in the Name column to select the disk group from which you want to drop disks.
The Disk Group page appears.
Under the Member Disks heading, in the Select column, select the check boxes for the disks to drop, and then click Remove.
A confirmation page appears.
To change rebalance power, or to set the FORCE option for dropping disks, do the following:
Expand Show Advanced Options.
Optionally select the Force option or select a value for rebalance power in the Rebalance Power list.
Note:
You may need theFORCE option if Oracle ASM cannot read from or write to the disk.Click Yes to drop the disks.
The Disk Group page returns, and displays a state of DROPPING for each disk being dropped.
Refresh the page until the dropped disks no longer appear in the disk group.
Caution:
You cannot reuse or disconnect the dropped disks until the drop and rebalance operations are complete—that is, until the dropped disks no longer appear in the disk group.See Also:
Oracle Automatic Storage Management Administrator's Guide for more information about droppings disks
Oracle recommends that you use Recovery Manager (RMAN) to back up files managed by Oracle ASM. See Chapter 9, "Performing Backup and Recovery" for the information about using RMAN for performing backups.
Oracle By Example (OBE) has a series on the Oracle Database 2 Day DBA guide. This OBE steps you through the tasks in this appendix and includes annotated screenshots.
To view the Oracle Automatic Storage Management OBE, in your browser, enter the following URL:
http://www.oracle.com/webfolder/technetwork/tutorials/obe/db/11g/r2/2day_dba/asm/asm.htm
|
Copyright © 2004, 2012, Oracle and/or its affiliates. All rights reserved. Legal Notices |
|