| Oracle® Warehouse Builder Data Modeling, ETL, and Data Quality Guide 11g Release 2 (11.2) Part Number E10935-05 |
|
|
PDF · Mobi · ePub |
| Oracle® Warehouse Builder Data Modeling, ETL, and Data Quality Guide 11g Release 2 (11.2) Part Number E10935-05 |
|
|
PDF · Mobi · ePub |
Oracle Warehouse Builder enables you to build and publish an enterprise data warehouse in stages. You can improve the performance and manageability of the data warehouse.
Oracle Warehouse Builder mappings access remote data through database links. Processing overhead and network delays make this data access process slower than local data access by the mappings. You can use one of the following strategies to speed up data access:
Create a transportable module to copy remote objects (tables, views, materialized views, and so on) from a source database into a target database. The mappings in the target data warehouse can then access data locally.
Data can be partially processed in the source database and then the preprocessed data can be copied, using a transportable module, from source to target database for final loading into the data warehouse.
A transportable module functions like a shipping service that moves a package of objects from one site to another at the fastest possible speed.
Note: To use transportable modules, ensure that your organization has licensed the Oracle Warehouse Builder Enterprise ETL Option.
The chapter contains the following topics:
Transportable modules enables you to rapidly copy a group of related database objects from one database to another.
Using the Design Center, you first create a transportable module, and specify the source database location and the target database location. Then, you select the database objects to be included in the transportable module. The metadata of the selected objects are imported from the source database into the transportable module. The metadata is stored in the workspace. To physically move the data and metadata from source into target, you must configure and deploy the transportable module to the target location. During deployment, both data and metadata are extracted from the source database and created in the target database.
A combination of the following technologies enables the movement of data and metadata:
Oracle Data Pump
Transportable Tablespace
DBMS_FILE_TRANSFER
Binary FTP
Local file copy
code generation and deployment
You can configure transportable modules to influence which technologies are used.
You can add the following source objects to transportable modules:
Tablespaces
Schemas
Tables
Views
Sequences
Materialized Views
PL/SQL Functions, Procedures, and Packages
Object Types
Varying Array Types (Varrays)
Nested Table Types
The traditional Extract, Transform, and Load (ETL) process extracts data from remote databases through multiple remote accesses using database links.
Figure 17-1 displays the traditional extraction of data from remote databases.
Figure 17-1 Extraction Of Data From Remote Databases Through Multiple Remote Accesses Using Database Links
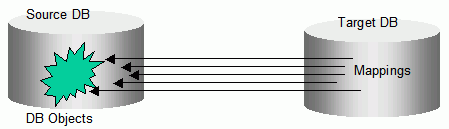
During remote accesses using database links, significant performance degradation occurs due to serial queries and serial DMLs, and network latencies. The performance degradation appears more if the same source tables are accessed multiple times.
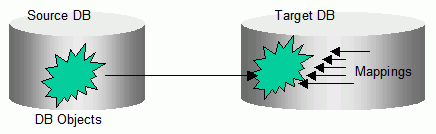
In the transportable module architecture, all the source objects needed by the mappings are bundled and moved to the target during a deployment. The transportable modules deployment uses Oracle Data Pump, FTP, and Oracle transportable table space to achieve very high transportation performance. This transportation absorbs the cost of the network delays. After deployment, mappings access data locally, which can easily benefit from parallel queries and parallel DMLs. Repeated accesses to the same data increases the performance benefit of transportable modules.
Figure 17-2 Transportable Modules Deployment
Using transportable modules, data warehouse loadings become more manageable. The source database must be shut down only for a short period for the transportable module to complete the deployment. Users of the source database do not have to wait until the entire data is loaded into the data warehouse. For example, if you are using the transportable tablespace implementation, transportable modules can copy a tablespace of 20 GB in about five minutes, resulting in a down time of five minutes in the source database.
Data copied into the target database is a snapshot of the information present in the source database. You use the same to create a data versioning system. Advanced users can create streams on the transported tables for capturing real-time changes from the source. The transported tables can also be copied into larger tables as a partition.
In a multidepartmental enterprise environment, the target database may actually be an operational data store that is used for intermediate reporting and updating purposes. This target database could in turn, serve as a source to the next stage of data collection. You can use the transportable modules at multiple stages, along the path on which the data is moved before it is stored in the data warehouse.
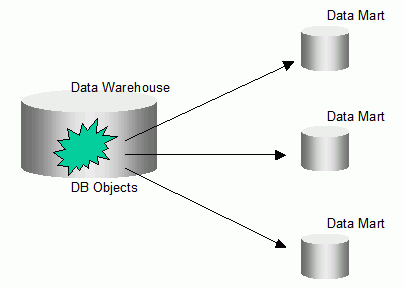
Transportable modules can also be used for publishing data marts. A data mart is normally a portion of a larger data warehouse for single or departmental access. At times, creating a data mart amounts to copying what has been collected and processed in the data warehouse. A transportable module can be created to perform this task. You can also use the same transportable module to deploy a data mart to multiple locations.
Figure 17-3 displays a transportable module used for publishing for data marts.
Figure 17-3 Data Marts in a Data Warehouse
Because a transportable module deploys a snapshot of the source database objects, you use the deployment time to track the version of the data marts.
Transportable modules work by leveraging technology in Oracle Warehouse Builder plus technology in the Oracle Database. A transportable module replicates parts of a source database into a target database. The parts of the source database that can be replicated include tablespaces, tables, indexes, constraints, and other relational objects.
Depending on the database version, the Oracle Database replicates the tablespace. When you transport data between two releases of Oracle8i databases or between two releases of Oracle9i databases, the database calls the Oracle transportable tablespaces functionality. When you transport data between two Oracle 10g databases, the database calls the Oracle Data Pump functionality.
In the case of Oracle Database 10g and Oracle Data Pump, you can transport tables without transporting their tablespaces. For example, if your table is 100 KB and its tablespace size is 10MB, then you can deploy the table without deploying the entire tablespace. Only Oracle Data Pump provides the option to copy an entire schema. For Oracle 10g release database, you specify either data pump or transportable tablespaces during configuration as described in "Configuring a Transportable Module".
Note:
For more information about transportable tablespace and Data Pump, see the Oracle Database 11g documentation.Before the introduction of transportable modules, the most scalable data transportation method relied on moving flat files containing raw data. This method required data to be unloaded or exported into files from the source database, and then these files were loaded or imported into the target database. The transportable modules method entirely bypasses the unload and reload steps and gives you access to the Oracle Database technologies Transportable Tablespaces and Data Pump.
High Performance Data Extraction
Transportable modules reduce the need for mappings to access data remotely. If you have large volumes of data on remote computers, then use transportable modules to quickly replicate the source onto the Oracle target database. Oracle Warehouse Builder mappings can then directly access a local copy of the data. In addition, because the source becomes part of the target, you can perform the ETL operations directly on the source data.
Distribute and Archive Data Marts
A central data warehouse handles ETL processing while dependent data marts are read-only. You can use transportable modules to copy from a read-only data mart to multiple departmental databases. In this way, you can use your central data warehouse to periodically publish new data marts and then replace old data marts by dropping the old tablespace and importing a new one. Because duplication and distribution takes relatively less time, you can publish and distribute a data mart for daily analytical or business operations.
You can set the source tablespaces to read-only mode and then export them to a target. All the data files are copied, creating a consistent snapshot of the source database at a given time. This copy can then be archived. The archived data can be restored in the source and target databases.
Ensure that you can connect to source and target databases as a user with the necessary roles and privileges as described in "Verifying the Requirements for Using Transportable Modules".
Ensure that your organization has licensed the Warehouse Builder Enterprise ETL Option.
To use transportable modules, refer to the following sections:
Note to Database Administrators: Step 1 of these instructions requires some powerful database roles and privileges. Step 3 requires knowledge of schema passwords. Depending on security considerations, you can enable developers to perform Step 3 or restrict it to database administrators only.
"Specifying Locations for Transportable Modules"
Ensure to successfully test these connections before proceeding to the next step.
Designing Mappings that Access Data through Transportable Modules
When creating a Transportable Module source location, the source location user must possess specific roles and/or privileges depending on the version of the source database.
If the source database is earlier than Oracle 10g, then the SYSDBA privilege is required for the source location user.
If the source database is Oracle 10g, then the SYSDBA privilege is not required, but the following must be assigned to the source location user.
CONNECT role
EXP_FULL_DATABASE role
ALTER TABLESPACE privilege
When creating a Transportable Module target location, the target location user must possess specific roles and/or privileges depending on the version of the target database.
If the target database is earlier than Oracle 10g, then the SYSDBA privilege is required for the target location user.
If the target database is Oracle 10g, then the SYSDBA privilege is not required but the following must be assigned to the target location user.
CONNECT role with admin option
RESOURCE role with admin option
IMP_FULL_DATABASE role
ALTER TABLESPACE privilege
EXECUTE_CATALOG_ROLE with admin option
CREATE MATERIALIZED VIEW privilege with admin option
CREATE ANY DIRECTORY privilege
Note:
Transportable Module source and target location users must be assigned many powerful roles and privileges in order for the transportable modules to read objects from the source database and for creating objects in the target database. In a production environment, if necessary, the DBA may choose to create the transportable module source and target locations (using the Locations Navigator) for the data warehouse developers, and conceal the passwords.The following is a SQL script for the DBA to assign source location users the required roles and privileges in the source database:
grant connect to <TM src location user>;
grant exp_full_database,alter tablespace to <TM src location user>;
The following is a SQL script for the DBA to assign target location users the required roles and privileges in the target database:
grant connect,resource to <TM tgt location user> with admin option;
grant imp_full_database,alter tablespace to <TM tgt location user>;
grant execute_catalog_role to <TM tgt location user> with admin option;
grant create materialized view to <TM tgt location user> with admin option;
grant create any directory to <TM tgt location user>;
Before you create a transportable module, first define its source and target locations in the Location Navigator. Each transportable module can have only one source and one target location.
To specify a transportable module location:
In the Locations Navigator, expand the Locations node.
Expand the Databases node.
Right-click either the Transportable Modules Source Locations or Transportable Modules Target Locations node and then select New.
Oracle Warehouse Builder displays a dialog box for specifying the connection information for the source or target location.
The instructions for defining source and target locations are the same except that you do not specify optional FTP connection details for targets. Follow the instructions in "Transportable Module Source Location Information" to specify the connection information and then test the connection.
Oracle Warehouse Builder first uses this connection information to import metadata for the transportable module from the source computer into the workspace. During deployment, the connection information is used to move data from the source to the target.
A name for the location of the source or target database.
An optional description for the location.
Oracle Warehouse Builder uses the database user name and password to retrieve the metadata of the source objects you want to include in the transportable module. Oracle Warehouse Builder also uses this information during deployment to perform transportable tablespace or data pump operations.
To access databases for use with transportable modules, you must ensure that the user has the necessary database roles and privileges as described in "Verifying the Requirements for Using Transportable Modules".
Host name of the computer on which the database is installed.
Port number of the computer on which the database is installed.
Service name of the computer on which the database is installed.
Choose the Oracle Database release number from the list.
FTP User Name/Password (Optional)
Specify FTP account credentials if you intend to use Oracle Transportable Tablespace as the method for transporting data. FTP credentials are not required if you do not plan to configure the Transportable Tablespace method.
You can leave the FTP account credentials blank, if you configure to use the Transportable Tablespace, but both source and target databases are located in the same computer, or both source and target can access shared disk volumes. Without the FTP credentials, an attempt is made to perform a plain copy of the source files from the source directory to target directory.
Click Test Connection to validate the connection information. Oracle Warehouse Builder attempts to connect to the source database and, if applicable, to the FTP service on the source computer. A success message is displayed only after both credentials are validated.
To create a transportable module:
From the Projects Navigator, expand the Databases node.
Right-click the Transportable Modules node and select New.
The Welcome page of the Create Transportable Module Wizard is displayed.
The wizard guides you through the following tasks:
"Describing the Transportable Module"
"Selecting the Source Location"
"Selecting the Target Location"
On the Name and Description page, type a name and optional description for the transportable module.
Although you can create a new source location from the wizard page, it is recommended that you define locations for transportable modules before starting the wizard as described in "Transportable Module Source Location Information".
When you select an existing location, the wizard tests the connection and does not enable you to proceed until you specify a location with a valid connection.
Select a target location from the list. If no target locations are displayed, then click New and define a target location as described in "Transportable Module Source Location Information".
Use the Define Contents page to select tablespaces and schema objects to include in the transportable module. On the left pane, "Available Database Objects" lists all source tablespaces, schemas, and available schema objects. On the right pane, Selected Database Objects displays the objects after you select and move the objects.
Expand the tablespaces to display the schemas in each tablespace and the objects in each schema. Non-tablespace schema objects such as views and sequences are also listed under their respective schema owners, even though these objects are not stored in the tablespace. To select multiple objects at the same time, hold down the Ctrl key while selecting them. You can include the following types of objects in transportable modules:
Tables
Views
Materialized Views
Sequences
PL/SQL Functions, Procedures, and Packages
Object Types, Varray Types, and Nested Tables Types
Select the tablespaces and schema objects from the Available Database Objects field and click the arrow buttons in the center to move the objects to the Selected Database Objects field.
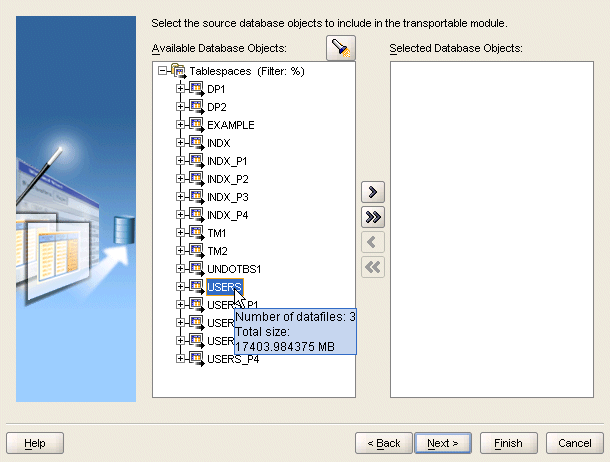
You can view the number of data files and their total size by placing your mouse over a node. The wizard displays the information in a tooltip.
Figure 17-4 displays the wizard with the tooltip.
Figure 17-4 Viewing the Number of Data Files and Total Size
Click the flashlight icon to find source data objects by type or name. In the Object field, type a name or pattern by which to filter your search, using the % character as a wildcard. From the Type list, indicate the object type you are searching. Check the required box to perform the search by name or by description.
For example, type 'T%' in the Object field, select tablespaces from the Type field, and click Find Next. The cursor on the Available Database Objects navigation tree selects the name of the first tablespace that starts with a 'T.' If that is not the tablespace you want to select, then click Find Next to find the next tablespace. During this searching process, the navigation tree expands all the schema names and displays all the tablespaces.
Tip:
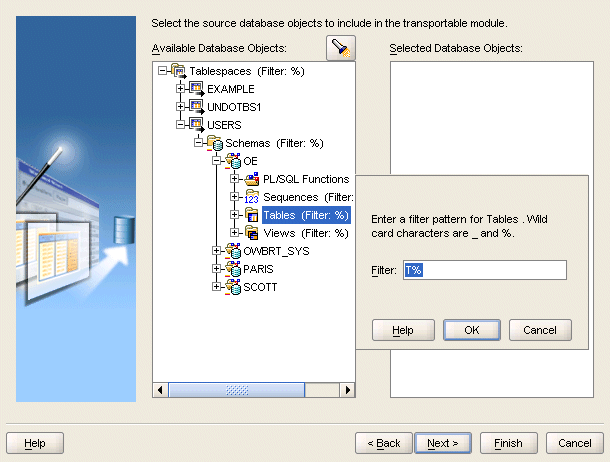
When searching for schema level objects such as tables, it is recommended that you select a tablespace or schema from the navigation tree before starting the search. This prevents a search over all tablespaces and significantly reduces the search time.You can double-click a schema node or any of the nodes in the schema to type in a filter pattern. For example, if you type T% and click OK, the navigation tree displays only those objects that start with the letter T. The filter criteria is displayed with the object name in the navigation tree, providing a helpful hint of which object types have filters applied.
Figure 17-5 displays the Define Contents page with a schema selected.
Figure 17-5 Schema Node Selected on Define Contents Page
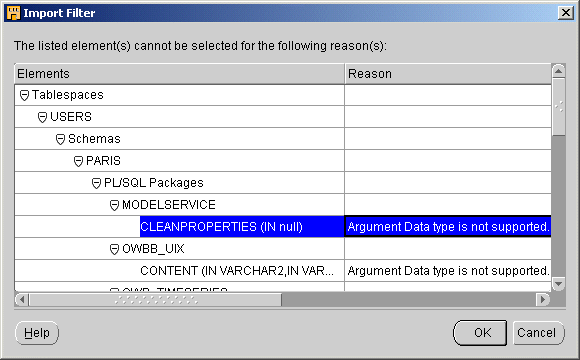
If you select items that cannot be included in a transportable module, then a dialog box is displayed listing items that cannot be included and describing why.
Figure 17-6 displays the Import Filter dialog box.
Review the summary information and click Finish to import the metadata of the selected tablespace and schema objects.
After the transportable module is created in your workspace, you can locate it on the Projects Navigator under the Transportable Modules node. Expand the tree to display the imported definitions.
Oracle Warehouse Builder creates separate modules for separate schemas. The schema names on the Projects Navigator mirror the schema names in your source database.
Because the objects contained in a transportable module mirror the source database, you cannot edit these objects using the user interface. If the source database changes, then you can reimport the objects. To delete objects from the transportable module, then right-click the object and select Delete. This action deletes the object from the definition of the transportable module but does not effect the underlying source database.
In the Projects Navigator, right-click a transportable module and select Configure to configure it for deployment to the target database. You set configuration parameters at the following levels:
For most used cases, you can accept the default settings for all the configuration parameters except "Password" setting. You must specify a password for each target schema. If the schema exists in the target, then specify an existing password. If the schema does not exist, then the schema can be created with the password you provide.
Depending on your company security polices, knowledge of schema passwords may be restricted to database administrators only. In that case, the database administrator must specify the password for each schema. Alternatively, developers can define new passwords for new schemas if the target has no existing schemas that match source schemas.
Set the following run time parameters for the transportable module:
Select the type of operating system for the target. For versions earlier than Oracle Database 10g, the type of operating system on the target computer must be the same as the source computer. For versions Oracle Database 10g or higher, you can deploy to any operating system from any operating system.
You should create a directory on the target computer dedicated to the deployment of transportable modules. This dedicated directory stores files generated at run time including temporary files, scripts, log files, and transportable tablespace data files. If you do not create a dedicated directory and type its full path as the Work Directory, then the generated files are saved under the run time home directory.
Oracle Warehouse Builder enables you to select whether you want to deploy only the tables in your transportable module or all the related catalog objects, such as views and sequences, as well. Select the TABLES_ONLY to deploy only tables. Otherwise, select the ALL_OBJECTS.
Use the TABLES_ONLY option to refresh the data in a transportable module. If you had previously deployed a transportable module with the ALL_OBJECTS option and want to replace only the tablespace from the same source, then redeploy the transportable module with the TABLES_ONLY option. The deployment drops the existing tablespace in the target, inserts the new one, and then recompiles the previously deployed metadata.
Similarly, if you previously deployed the transportable module using Data Pump, then the redeployment only modifies the tables in the transportable module.
By default, this setting is enabled and the tablespaces are transported. If you enable this setting, then also specify the settings under "Target DataFile Configuration Properties".
If both the source and target databases are Oracle 10g or higher, then consider disabling this setting. For example, if your table is 100 KB and its tablespace size is 10 MB, then you can deploy the table without deploying the entire tablespace. When you disable Transport Tablespace, Oracle Data Pump is used to deploy the table and you can specify the "Table Exists Action" setting.
Note:
If source or target location is not Oracle 10g, the Transport Tablespace option is selected by default. In that case, Transportable Tablespace is the only implementation method for data movement. If both source and target locations are Oracle 10g, then you can deselect Transport Tablespace and use Data Pump.If Transport Tablespace is selected, then there are further restrictions, depending on the versions of the source and target locations, as described in Table 17-1. When planning for data replications, take these restrictions into consideration. In general, Oracle Database 10g Release 2, is the preferred target database.
Table 17-1 Requirements for Replicating Data Between Database Versions
| Source location | Target location |
|---|---|
|
10g |
Targeting another Oracle 10g location requires that both databases must have the same character set and the same national character set. Targeting an Oracle8i or Oracle9i location is not possible. |
|
9i |
Targeting an Oracle9i or Oracle Database 10g location requires that both databases must have the same character set, the same national character set, and both databases must be on the same operating system platform. Targeting an Oracle8i or Oracle9i location is not possible. |
|
8i |
Targeting an Oracle8i, Oracle9i, or Oracle Database 10g requires all of the following:
|
Set the following schema parameters for the transportable module:
This property enables you to change the name of the source schema when it is deployed to the target. Select the Default or click the Ellipsis button to type the new name for your schema in the target and click OK. For example, you can change SCOTT to SCOTT1.
For existing schemas, type a valid password for the schema. For schemas to be created, Oracle Warehouse Builder creates the schema with the password you provide.
Specify the default tablespace to be used when creating the target schema. If you leave this setting blank, then the default specified by the target is used.
Specify what action should be taken if the schema exists in the target. The default value is Skip.
Specify what action should be taken if the schema does not exist in the target. The default value is Create.
When "Transport Tablespace" is disabled, use this property to specify what action should be taken if the table exists in the target. The default value is Skip.
When you use Oracle Data Pump by deselecting "Transport Tablespace", you can select this option to copy the entire source schema into the target.
When you use Oracle Data Pump by deselecting "Transport Tablespace", specify the maximum number of processes for the Oracle Database to use for carrying out the transfer of data.
You must set the following data file parameters for the transportable module:
Indicate the directory where you want the data file to be stored on your target computer. If you leave the directory unspecified, then the data file is stored in the "Work Directory".
Specify the name of the data file to be created in the target computer. You can use this parameter to rename the data file. Accept the DEFAULT to persist the data file name from the source database or click the Ellipsis button to type a new name for the data file, and click OK.
If this parameter is selected, then the existing data file is overwritten. Otherwise, the deployment is terminated if an existing data file is found.
When you enable "Transport Tablespace", set the following tablespace parameters for the transportable module:
If you are using a database before Oracle Database 10g, then the target tablespace name must be the same as your source tablespace name. For such cases, this field is read-only. If a tablespace with the same name exists in your target database, then the run time operation first drops the existing tablespace, and replaces it with the new one.
If you are using Oracle Database 10g or higher, then you can change the target tablespace name.
If this setting is selected, the existing tablespace is dropped and re-created in the target. By default, this setting is not selected and prevents you from deleting the tablespace in the target in the tablespace with the same name exists. In this case, the deployment process stops with an error.
When you deploy a transportable module, the Control Center displays the transportable module as including all the tables while the other catalog objects such as views are displayed separately. When you select a deploy action for the transportable module, the Control Center sets the associated catalog objects to the same deploy action.
During deployment of a transportable module, there are two ways for users to monitor the deployment progress. The first way is by the use of the Job Details window. The status line is instantly refreshed with the most up-to-date status. The message box immediately above the status line shows all the messages logged so far.
Another way of observing the progress is by viewing the log file that the transportable module deployment process generates. The transportable module log file is created in the Work Directory that the user has configured. The name of the file is The TM Name.log, for example TM1.log if the name of the transportable module is TM1. This file is a plain text file containing the same messages that you can see in the message box in the Job Details window. Example 17-1 shows the contents of a transportable module log file.
Currently, there are a total of 16 steps to view the log files. Some steps may be skipped depending on the user configurations, and some steps may contain error messages that transportable module considers ignorable, such as failures in creating referential constraints due to referenced tables not found errors. This log file contains important information. It must be carefully examined during and after the transportable module deployment completes.
Example 17-1 Log file containing important information
step1 begin: making connection to target db ...
step1 end: connected to target
Target OWB_HOME = /data/oracle/ora1010
step2 begin: making connection to source db...
step2 end: skipped.
step3 begin: making source tablespaces read only...
step3 end: skipped.
step4 begin: exporting tts...
step4 end: skipped.
step 5 begin: checking for existing datafiles on target...
step5 end: skipped.
step 6 begin: drop existing tablespaces
step6 end: skipped.
step7 begin: transporting datafiles...
step7 end: skipped.
step8 begin: managing schemas/users ...
step8 end: completed setting up target schemas
step9 begin: drop non-table schema objects...
step9 end: nothing to drop.
step10 begin: converting datafiles...
step10 end: skipped.
step 11 begin: importing tts ...
find or create a usable dblink to source.
step11 end: importing tts is not requested by user.
step 11 end: import tts is successful
step 12 begin: restore source tablespaces original status ...
step12 end: skipped.
step13 end: skipped.
step14 begin: non-tts import ...

Import: Release 10.1.0.4.0 - Production on Tuesday, 04 April, 2006 10:43
Copyright (c) 2003, Oracle.  All rights reserved.

Username:
Connected to: Oracle Database 10g Enterprise Edition Release 10.1.0.4.0 - Production
With the Partitioning, OLAP and Data Mining options
Starting "TMTGT_U"."SYS_IMPORT_TABLE_02":  TMTGT_U/********@(DESCRIPTION=(ADDRESS=(HOST=LOCALHOST)(PROTOCOL=tcp)(PORT=1521))(CONNECT_DATA=(SERVICE_NAME=ORA1010.US.ORACLE.COM))) parfile=/home/ygong/tmdir/TM1_imptts.par
Estimate in progress using BLOCKS method...
Processing object type TABLE_EXPORT/TABLE/TBL_TABLE_DATA/TABLE/TABLE_DATA
Total estimation using BLOCKS method: 64 KB
Processing object type TABLE_EXPORT/TABLE/TABLE
. . imported "TMU1"."TA"                                      2 rows
Processing object type TABLE_EXPORT/TABLE/STATISTICS/TABLE_STATISTICS
Processing object type TABLE_EXPORT/TABLE/CONSTRAINT/REF_CONSTRAINT
ORA-39083: Object type REF_CONSTRAINT failed to create with error:
ORA-00942: table or view does not exist
Failing sql is:
ALTER TABLE "TMU1"."TA" ADD CONSTRAINT "TA_T1_FK" FOREIGN KEY ("C") REFERENCES "TMU1"."T1" ("C") ENABLE

Job "TMTGT_U"."SYS_IMPORT_TABLE_02" completed with 1 error(s) at 10:44
step14: import has failures.
step14 end: non-tts import completed with warnings
step15 end: create flat file directories skipped.
step16 end: transporting flat files skipped.
After you successfully deploy a transportable module, you can use the objects in the transportable module in ETL designs. When you add source and target operators to a mapping, you can select objects from the transportable module folder.
A transportable module is located under the transportable modules node within the Databases node on the Projects Navigator.
You can edit a transportable module by right-clicking the name of the transportable module from the Projects Navigator and selecting Open. Oracle Warehouse Builder displays the Edit Transportable Module dialog box containing four tabs.
Oracle Warehouse Builder uses this connection information to access the source computer and import the metadata into its workspace. Oracle Warehouse Builder also uses this information during run time to move the tablespace data from the source to the target.
The Source Database tab is read-only. Once you have imported tablespace definitions from a source computer, you cannot change the location information.
The Tablespaces tab displays the tablespaces to be transported and their size. This tab is read-only. You can also view the tablespace size for individual data files in a tablespace. For details, see "Viewing Tablespace Properties".
Displays the available and selected target locations. You can move a location from Available Locations to Selected Locations, or configure a new location.
You can view the properties of a tablespace by right-clicking the name of the tablespace from the Projects Navigator and selecting Open. Oracle Warehouse Builder opens the Edit Tablespace dialog box. This property sheet displays the size of individual data files in a tablespace. It has two tabs, Name and Source Datafiles.
If your source data has changed since you last created a transportable module, then you can reimport the metadata to update your workspace definitions. When you open the Reimport dialog box, the source location you specified while creating the transportable module is stored and the source objects are displayed.
To reimport transportable module definitions:
From the Projects Navigator, right-click the Transportable Modules name and select Reimport.
The Re-create Transportable Module dialog box is displayed.
From the Available Database Objects column, select the objects you want to reimport.
The database objects that have been previously imported into the workspace are listed in bold. You can also choose to import new definitions.
Use the arrow buttons to move the objects to the Selected Database Objects column, and click OK.
Oracle Warehouse Builder reimports existing definitions and creates new ones. The transportable module reflects the changes and updates after the reimport is completed.
|
Copyright © 2000, 2011, Oracle and/or its affiliates. All rights reserved. Legal Notices |
|