| Oracle® Warehouse Builder Data Modeling, ETL, and Data Quality Guide 11g Release 2 (11.2) Part Number E10935-05 |
|
|
PDF · Mobi · ePub |
| Oracle® Warehouse Builder Data Modeling, ETL, and Data Quality Guide 11g Release 2 (11.2) Part Number E10935-05 |
|
|
PDF · Mobi · ePub |
Web services are the basis of the widely used Service-Oriented Architecture (SOA) approach to integrating enterprise applications. They enable easy access to remote content and application functionality using industry-standard mechanisms, without any dependency on the provider's platform, the location, or the service implementation.
Oracle Warehouse Builder-based solutions can participate fully in SOA-based architectures. You can publish certain Oracle Warehouse Builder objects as Web services, thus enabling other developers to use industry standards to leverage functionalities defined in these objects.
This chapter contains the following topics:
"Publishing Oracle Warehouse Builder Objects as Web Services"
"Using Secure Sockets Layer (SSL) to Access Web Services Securely"
A Web service is a software system designed to provide a standard, vendor-neutral method of accessing computing resources or services over a network. It uses open, XML-based standards and transport protocols to exchange data with calling clients.
A Web service generally consists of:
a published interface definition for the Web service, that describes messages that clients can send to the service and responses the Web service returns to the caller.
an implementation that provides the functionality exposed through the interface.
The caller of a Web service does not depend upon underlying implementation details such as the choice of programming language, application server technology or database. The published interface describes all information required for the caller to consume the Web service.
Because implementation differences are not exposed to the caller, Web services enable easy integration of software components from different technology vendors. The approach of building solutions based on Web services is commonly called Service-Oriented Architecture (SOA).
While there are several common approaches to building Web services, in enterprise computing, Web services generally interact using the XML-based standards Simple Object Access Protocol (SOAP) and Web Services Description Language (WSDL).
Simple Object Access Protocol (SOAP)
Simple Object Access Protocol (SOAP) is a protocol for exchanging XML-based messages over a computer network, normally using HTTP. SOAP forms the foundation layer of the Web services stack, providing a basic messaging framework that more abstract layers can build on. It is used to send Web service requests and to receive Web service responses.
Web Services Description Language (WSDL)
The Web Services Description Language (WSDL) is an XML-based service description of how to communicate using the Web service. It includes the following information:
Purpose and location (on a remote computer) of the Web service
Operations that you can perform on the Web service
Input parameters and return values for each operation
Protocol bindings and message formats required to interact with the Web services
The supported operations and messages are described abstractly, and then bound to a concrete network protocol and message format.
Web services provide the following advantages:
Support Service Oriented Architecture (SOA)
Enable sharing of application functionality between application developers
Enable you to build services that invoke data integration processes
Enable you to build applications faster because you can reuse application logic created by others
Oracle Warehouse Builder supports Web services integration using the SOAP and WSDL standards, and thus can be fully integrated into SOA-based enterprise architectures. Developers experienced with Oracle Warehouse Builder can create and leverage Web services-based solutions in their data integration designs using their existing tools, code, and skill set. For example, you can integrate your ETL design into larger solutions based on products such as Oracle BPEL Process Manager.
See Also:
Oracle Warehouse Builder Sources and Targets Guide for more information about Web services concepts.Oracle Warehouse Builder supports the following Web service-related functionality:
Publishing Oracle Warehouse Builder ETL jobs as SOAP-based Web services, which can then be invoked or consumed by other systems.
Calling Web services that expose functionality created outside of your Oracle Warehouse Builder ETL design.
These two areas of functionality enable Oracle Warehouse Builder-based designs to participate fully in SOA-based solutions.
Web services are defined within an application server module in the Design Center. An Application Server module is associated with the location to which the Web services are deployed. It contains Web services and Web service packages. Web service packages are primarily used to group related Web services and contain a set of Web services.
Use the Application Servers node in the Projects Navigator to define Web services based on existing Oracle Warehouse Builder objects. Use the Public Application Servers node in the Globals Navigator to define public Web services.
The process of making ETL processes designed using Oracle Warehouse Builder available to other application developers in the form of Web services is referred to as publishing Web services. To publish a Web service, you must create a WSDL file that contains information about your Web service and make this WSDL file available for remote access.
When you use Oracle Warehouse Builder to publish Web services, you must select the object whose functionality you want to publish as a Web service. The code generator generates the required WSDL file.
The process of using Web services that are made available remotely by other application developers in your ETL designs is called consuming Web services. To consume a Web service, you must know the location of the WSDL file of the Web service. You can then make a request to the Web service to perform the required task.
Before you consume remote Web services in your ETL designs, you must import the Web service into Oracle Warehouse Builder.
Public Web services are accessible across the workspace in which they are defined and are not limited to a particular project. Public Web services are created under the Public Application Servers node of the Globals Navigator.
Public Web services can only be based on URLs, not on Oracle Warehouse Builder objects. Creating public Web services enables you to create Web services based on existing WSDL files.
See Also:
"Creating Web Services Based on a URL" for more information about creating public Web services.You can make ETL processes defined using certain Oracle Warehouse Builder objects available to other application developers by publishing these objects as Web services. After you publish an Oracle Warehouse Builder object as a Web service, other developers can remotely access the Web service and use the functionality defined in this object. Because Web services use open, industry-standard mechanisms, the developers need not install Oracle Warehouse Builder or be familiar with how it works.
You can create Web services based on the following Oracle Warehouse Builder objects:
Mappings, including Code Template (CT) mappings
Process flows
Transformations
Data auditors
Table or module for Change Data Capture
Methods of Creating Web Services Based on Oracle Warehouse Builder Objects
Use one of the following methods to create Web services based on Oracle Warehouse Builder objects.
Publish Oracle Warehouse Builder objects as Web services.
See "Steps to Publish Oracle Warehouse Builder Objects as Web Services".
Define a Web service using the Create Web Service Wizard. Then generate and deploy the Web service.
See "Steps to Create Web Services Based on Oracle Warehouse Builder Objects" for information about creating Web services.
You can also publish Web services that are based on URLs as described in "Steps to Publish Web Services Based on a URL".
Note:
During the lifetime of the data warehouse, the definitions of the object on which a Web service is based can change. To propagate these changes to the Web service, redeploy the Web service using the steps described in "Deploying Web Services".When a Web service that is used in a process flow is modified and redeployed, ensure that you synchronize the Web service as described in "Synchronizing Web Service Activities with Their Referenced Web Services".
Supported Versions for Web Services
Table 16-1 lists the versions of standards and products supported by Oracle Warehouse Builder.
Table 16-1 Supported Versions of Standards and Products for Web Services
| Standard or Product | Version |
|---|---|
|
WSDL |
1.1 |
|
SOAP |
1.1, 1.2 |
|
OC4J standalone |
10g and later |
|
Oracle Application Server |
10g and later |
Steps to Publish Oracle Warehouse Builder Objects as Web Services
You can quickly publish an Oracle Warehouse Builder object as a Web service from the Projects Navigator. Right-click the object (such as mapping, process flow, data auditor, or transformation) to publish as a Web service and select Publish as Web Service. The Select Application Server or Web Service Package dialog box is displayed containing the existing application server modules and Web service packages. Select the application server module or Web service package to which the object should be published as a Web service. Oracle Warehouse Builder creates the Web service based on the selected object under the application server module or Web service package, and then publishes the Web service (deploys the Web service to the application server).
See Also:
"Example: Publishing Mappings as Web Services" for an example of publishing Oracle Warehouse Builder objects as Web services.Steps to Create Web Services Based on Oracle Warehouse Builder Objects
Use the following steps to publish Web services that are based on Oracle Warehouse Builder objects.
If you have not done so, in the Projects Navigator, create an Application Server module and its associated location. An Application Server module is a container for a set of Web services and Web service packages.
See Also:
Oracle Warehouse Builder Sources and Targets Guide for more information about creating Application Server modules.Create a Web service as described in "Creating Web Services Based on Oracle Warehouse Builder Objects".
Validate the Web service as described in "Validating Web Services".
Generate the Web service as described in "Generating Web Services".
Deploy the Web service as described in "Deploying Web Services".
You can use the functionality defined in the Web service by executing the Web service as described in "Executing Web Services".
Steps to Publish Web Services Based on a URL
Use the following steps to publish Web services that are based on a URL.
If you have not done so, in the Globals Navigator, create a public application server module, under the Public Application Servers node, and its associated location. A public application server module is a container for a set of Web services.
See Also:
Oracle Warehouse Builder Sources and Targets Guide for more information about creating public application server modules.Create a Web service as described in "Creating Web Services Based on a URL".
Validate the Web service as described in "Validating Web Services".
Generate the Web service as described in "Generating Web Services".
Deploy the Web service as described in "Deploying Web Services".
A Web service package is a container for a set of Web services. Use Web service packages to group a set of related Web services. A Web service package does not have any location associated with it and uses the same location details of the Application Server module that contains it.
You can create Web service packages only in the Projects Navigator and not in the Globals Navigator.
To create a Web service package:
Expand the project node under which you want to create a Web service package.
If you have not done so, create an application server module to contain the Web service package.
See Also:
Oracle Warehouse Builder Sources and Targets Guide for more information about creating application server modules.Expand the application server node under which you want to create the Web service package, right-click Web Service Packages, and then select New Web Service Package.
The Create Web Service Package dialog box is displayed.
Enter the following details in the Create Web Service Package dialog box.
Name: The name of the Web service package
Description: An optional description for the Web service package
Use the Projects Navigator to create Web services based on Oracle Warehouse Builder objects.
To create a Web service based on an Oracle Warehouse Builder object:
In the Projects Navigator, expand the project node and then the application server node under which you want to create a Web service.
Right-click the Web Services node and select New Web Service.
To create a Web service under a Web service package, in the Projects Navigator, right-click the Web service package and select New Web Service.
The Create Web Service Wizard is displayed.
On the Welcome page of the wizard, click Next.
On the Name and Description page, provide details as described in "Naming the Web Service" and click Next.
On the Implementation page, provide details as described in "Defining the Web Service Implementation" and click Next.
On the Review Specification page, review the details that you entered in the wizard. To modify any values, click Back. To complete the definition of the Web service, click Finish.
Click View Source to view the WSDL code that is generated by Oracle Warehouse Builder to implement this Web service.
The Web service is created and added to the navigator tree.
Alternatively, you can quickly create a Web service by right-clicking the object based on which you want to create a Web service and selecting Create Web Service. The Select Application Server or Web Service Package dialog box is displayed. Select the and click OK. The Web service is created and added under the application server node you selected.
Example: WSDL File for a Web Service
The following is an example of a WSDL file created for a Web service.
<definitions
     name="HttpSoap11"
     targetNamespace="http://dbWebService.packaging.sdk.jrt.wh.oracle/"
     xmlns="http://schemas.xmlsoap.org/wsdl/"
     xmlns:tns="http://dbWebService.packaging.sdk.jrt.wh.oracle/"
     xmlns:mime="http://http://schemas.xmlsoap.org/wsdl/mime/"
     xmlns:soap12="http://schemas.xmlsoap.org/wsdl/soap12/"
     xmlns:xsd="http://www.w3.org/2001/XMLSchema"
     xmlns:soap="http://schemas.xmlsoap.org/wsdl/soap/"
    >
    <types>
    </types>
    <message name="FUNCTION_TARGETInput">
        <part name="P1" type="xsd:string"/>
        <part name="P2" type="xsd:string"/>
    </message>
...
...
...
Use the Name and Description page to describe the Web service. Provide the following information on this page:
Name: The name of the Web service. The name should conform to Oracle Warehouse Builder naming standards.
Description: An optional description for the Web service.
Use the Implementation page to select Oracle Warehouse Builder object on which the Web service should be based.
Select one of the following options to create a Web service:
Create from a mapping
Create from a process flow
Create from a transformation
Create from a data auditor
Create from a table or module used for Change Data Capture
Based on the option that you select, the text area below the options displays the available objects on which you can base the Web service. Select Oracle Warehouse Builder object from this text area.
When you create a Web service based on a CT mapping, if the agent associated with the Web service is different from the agent associated with the Code Template mapping, a warning is displayed during validation. You can still generate, deploy, and run such a Web service. However, in some cases, the execution may fail.
While creating a Web service based on a CT mapping, it is recommended that the Web service use the same agent as the Code Template mapping.
When you validate a Web service, Oracle Warehouse Builder verifies the metadata definitions and configuration parameters to ensure that they are valid according to the rules defined by Oracle Warehouse Builder. When you validate a Web service, the WSDL file associated with the Web service is validated against the W3C WSDL schema. Successful validation ensures that code can be generated to deploy the Web service.
To validate a Web service, select the Web service in the Design Center and click Validate on the toolbar. Or, right-click the Web service in the Design Center, and select Validate.
You can also validate an application server module or a Web service package. This validates all the Web services contained in the application server module or Web service package.
Generating Web services creates the code required to deploy the Web service to the associated OC4J or Oracle Application Server location. When you generate a Web service, Oracle Warehouse Builder creates a corresponding WSDL file for each Web service. For Web services based on Oracle Warehouse Builder objects, an .ear file is also generated. For Web service packages, one .ear file is generated for each Web service.
The generated files are stored in a default location on the file system on which the Design client is installed. You cannot view or edit these generated files.
To generate a Web service, select the Web service and click Generate on the toolbar. Or right-click the Web service and select Generate. You can also generate an application server module or a Web service package, to generate code concurrently for all the Web services contained in the application server module or Web service package.
Note:
You cannot generate a public Web service. However, you can validate a public Web service.Deploying Web services uses the scripts created during generation to create the Web service in the agent location associated with the application server module containing the Web service.
When you deploy a Web service, the .ear file corresponding to this Web service is located in the OWB_HOME/owb/jrt/applications directory. This directory also contains a separate folder for each Web service deployed to the OC4J instance that is embedded in Oracle Warehouse Builder.
To deploy Web services, you need a Control Center Agent (CCA) and an OC4J instance.
You can deploy Web services to:
OC4J standalone instance
When you install Oracle Warehouse Builder, an OC4J instance is installed with it. You can deploy Web services to this OC4J instance or to an OC4J instance that is part of an Oracle Application Server instance.
Oracle Application Server
You can deploy Web services to any Oracle Application Server. Before you do so, create a URI location that points to this Oracle Application Server instance. For more information about creating a location related to an Oracle Application Server instance, see Oracle Warehouse Builder Sources and Targets Guide.
You can deploy Web services either from the Design Center or from the Control Center Manager.
Note:
You cannot deploy a public Web service.Prerequisites for Deploying Web Services
Before you deploy a Web service based on an Oracle Warehouse Builder object, ensure that you:
Deploy Oracle Warehouse Builder objects on which the Web service is based
Start the Control Center Agent
See Also:
"Starting the Control Center Agent (CCA)" for information about starting the Control Center Agent.From the Design Center, open the Control Center by selecting Control Center Manager from the Tools menu. In the Control Center Manager, expand the node that represents the location that contains the Web service. Select the Web service, set the Default Actions to Create, and click Deploy on the toolbar.
Oracle Warehouse Builder enables you to create public Web services from a URL. Public Web services are ones that you define under the Public Application Servers node of the Globals Navigator. You use public Web services primarily to leverage existing functionality, available as Web services, in ETL objects. Before you use existing Web services (local or remote) in your ETL designs, you must create a public Web service in Oracle Warehouse Builder that represents the functionality in the Web service.
To create a Web service from a URL, you need a URL pointing to the valid WSDL file. The URL can point to a WSDL file on the local file system or in a remote location. If the WSDL file is on a remote computer, then you must specify the proxy settings used to access the remote location.
Proxy Settings for Creating Web Services Based on External URLs
When you create a Web service based on an external URL, you must specify the proxy settings that is necessary to access the external URL. Use the following steps to set the proxy:
In the Design Center, select Preferences from the Tools menu.
The Preferences dialog box is displayed.
In the navigator tree on the left, select Web Browser and Proxy.
The Web Browser and Proxy preferences are displayed on the right of the Preferences dialog box.
Select Use HTTP Proxy Server and specify values for the following fields:
Host Name: Represents the name of the proxy server
Port Number: Represents the port number of the proxy server
Exceptions: Represents the addresses for which the proxy server is bypassed. Use an asterisk (*) as a wildcard and separate multiple entries using a vertical bar (|).
If your proxy server requires authentication, select Proxy Server Requires Authentication. Enter the credentials using the User Name and Password fields.
Click Test Proxy to test your proxy settings.
Steps to Create a Web Services Based on a URL
Use the following steps to create a Web Service based on a URL.
In the Globals Navigator of the Design Center, expand the application server node under which you want to create a Web service.
Right-click the application server node and select New Web Service.
The Create Web Service Wizard is displayed.
On the Welcome page of the wizard, click Next.
On the Name and Description page, provide details as described in "Naming and Describing a Public Web Service" and click Next.
On the Review Specification page, review the details that you entered in the wizard. To modify any values, click Back. To complete the definition of the Web service, click Finish.
Click View Source to view the WSDL code used to implement this Web service.
The Web service is created and added to the navigator tree.
Use the Name and Description page to specify the location of the WSDL file that acts as a basis for the Web service. This page contains the following fields:
Name: Represents the name of the Web service. The name is derived automatically from the WSDL file and you can edit it, if required.
WSDL File Location: Click Browse to specify the path of the WSDL file. The URL address can be the path of a local file or the URL address of a remote accessible across a network. The WSDL file contains the definitions of the existing Web service.
This property is displayed only when you use the Globals Navigator to create a Web service based on a URL.
Description: An optional description for the Web service.
Executing a Web service enables you to run the functionality defined in the Web service. You can run a Web service either from the Control Center Manager or from a Web browser.
Prerequisites for Executing Web Services
To run Web services, you must use a J2EE user who is granted the OWB_J2EE_EXECUTOR role. When you use the OC4J server embedded within Oracle Warehouse Builder, this role is created for you.
Note:
For Web services that contain CT mappings, if the Web service execution is likely to take more than a day, it is recommended that you split the job into smaller ones. The default transaction timeout for the OC4J is set to one day. If your job execution takes more than a day, then the execution times out and unexpected errors are encountered.Use one of the following methods to assign this role to a J2EE user:
Manage J2EE User Accounts option in the Repository Assistant
J2EE User Management option under the Tools menu of the Design Center
See Also:
"Using Secure Sockets Layer (SSL) to Access Web Services Securely" for more information about J2EE roles
Oracle Warehouse Builder Installation and Administration Guide for more information about managing J2EE users.
To run a Web service using the Control Center Manager:
In the Control Center Manager, expand the location node that contains the Web service, select the Web service and click Start on the toolbar. Or right-click the Web service and select Start.
The Select Operations dialog box is displayed. The Operations list contains the list of operations that you can perform using the Web service.
If your Web service contains only one operation, the Select Operations dialog box is not displayed.
In the Operations list, select the operation to perform and click OK.
The Input Parameters dialog box that is used to provide the execution parameters for the Web service is displayed.
In the Input Parameters dialog box, enter values for the displayed parameters.
The parameters listed depend on the type of object on which the Web service is based. For example, Web services based on PL/SQL mappings, process flows, and data auditors have the CUSTOM_PARAMS and SYSTEM_PARAMS parameters. Web services based on Code CT mappings contain the parameters OWB_PARAMS.
CUSTOM_PARAMS: Represents the values for the mapping input parameters used in the Web service.
For example, when you create a Web service based on a mapping and the mapping requires input parameters, use the CUSTOM_PARAMS field to enter values for these input parameters. Use commas to separate multiple values.
SYSTEM_PARAMS: Represents the values for mapping execution parameters, if any, such as Bulk Size, Audit Level, Operating Mode, Maximum Number of Errors, and Commit Frequency. When you have multiple system parameters, use a comma to separate each parameter.
For example, OPERATING_MODE=SET_BASED,AUDIT_LEVEL=NONE.
OWB_PARAMS: Represents the parameters of the CT mapping on which the Web service is based.
Click OK.
The Web service is run and the results of the execution are displayed in a new log window in the Design Center. The details displayed include the number of rows selected, inserted, updated, or deleted and any errors or warnings that occurred.
Use any browser to run Web services that were deployed to either the OC4J server embedded in Oracle Warehouse Builder or to other OC4J servers.
When you use the OC4J server embedded in Oracle Warehouse Builder to access Web services, all the prerequisites for Web service security are provided. You must provide basic authentication before you can run the Web service.
To run Web services using a browser:
Ensure that the prerequisites, as described in "Prerequisites for Executing Web Services", are satisfied.
(Optional) While executing Web services that were deployed to an OC4J server other than the one installed with Oracle Warehouse Builder, perform the steps listed in "Setting Up Secure Access on External OC4J Servers".
Note:
You may encounter errors while executing Web services that were not deployed to the OC4J server embedded in Oracle Warehouse Builder. See "Error Executing Web Services from the Secure Web Site" for information about resolving these errors.Open a Web browser, specify the following URL in the address bar, and press the Enter key.
http://host_name:8888/jndi_name/webservice
To run the Web service securely, use the following URL:
https://host_name:4443/jndi_name/webservice
The endpoint page for the Web service is displayed. If you use the AGENTWEBSERVICE Web service provided by Oracle Warehouse Builder, then the AgentWebService Endpoint page is displayed.
Here, host_name represents the host name of the computer on which the Web service is stored, and jndi_name is the name of the .ear file generated for the Web service. To run Web services using the AGENTWEBSERVICE installed with Oracle Warehouse Builder, use jrt as the jndi_name.
The default port numbers used for the Web service are 8888 and 4443. You can use different port numbers.
Follow the steps listed in "Performing Operations on Web Services Using a Browser" to run the Web service.
The Web service AGENTWEBSERVICE, under the AGENT_SERVER node of the Globals Navigator, is an embedded Web service that exposes the Agent server installed with Oracle Warehouse Builder as a Web service. The steps listed in this section are performed using the AgentWebService Endpoint page, which is the interface corresponding to the AGENTWEBSERVICE. This Web service is started automatically when the Control Center Agent (CCA) is started. However, you can use other Web service endpoints to perform operations defined by Web services.
Select the operation to perform on the Web service and provide the information required to perform the operation.
Following are some operations that you can select when you use AGENTWEBSERVICE.
isDeployed
See "Determining If a Web Service or Application Was Deployed to an OC4J Server"
runCCJob
abortJob
invokeEAR
Expand the Show Transport Info node and select Enable to the right of the label HTTP Authentication.
In the Transport Info section, enter details in the following fields:
Username: Name of a J2EE user, with the OWB_J2EE_OPERATOR role, that is used to run the Web service
Password: Password for the J2EE user that you specified in the Username field
Click Invoke.
The Test Result page containing the results of the operation is displayed.
Note:
Sometimes, after you enter the credentials and click Invoke, you may be prompted for credentials. Reenter the credentials of the J2EE that you specified in the Transport Info section.The isDeployed operation enables you to determine if a Web service or application is deployed to an OC4J server.
Use the following steps to determine if a Web service was deployed to an OC4J Server.
On the AgentWebService Endpoint page, select isDeployed in the Operation field.
In the jndiName field, enter the name of the application.
Use the jndi_name or the fully qualified application name. To determine this name, check the OWB_HOME/owb/jrt/applications directory.
If the Web service was deployed to the OC4J instance, the XML code on the Test Result page displays True.
The runCCJob operation enables you to run a Control Center job. Jobs include Web services defined using Oracle Warehouse Builder, mappings, and process flows.
Use the following steps to run a Control Center job.
On the AgentWebService Endpoint page, select runCCJob in the Operation field.
Provide information in the following fields:
username: Represents the name of the workspace user executing the Web service.
password: Represents the password of the user specified in the username field.
workspace: Represents the name of the workspace in which the Web service execution job should be run. If the user executing the Web service is not the workspace owner, then prefix the workspace name with the username (for example, test_user.my_workspace.)
location: Represents the physical name of the location to which the task is deployed.
task_type: Represents the type of task. Use the following values:
PLSQL - for PL/SQL mappings
SQL_LOADER - for SQL*Loader mappings
PROCESS - for process flows
SAP - for SAP mappings
DATA_AUDITOR - for Oracle Warehouse Builder data auditor mappings
task_name: Represents the physical name of the deployed object. For example, MY_MAPPING. For process flows, qualify the process flow name with the name of the process flow package to which it belongs (for example, MY_PROCESS_FLOW_PACK. MY_PROCESS_FLOW).
connection_string: Represents the connection information of the computer that has the Control Center Manager.
system_params: Represents the mapping execution parameters of the mapping, if any, such as Bulk Size or Commit Frequency. When you have multiple system parameters, use a comma to separate each parameter.
For example, OPERATING_MODE=SET_BASED,AUDIT_LEVEL=NONE.
custom_params: Represents the input parameters for the mapping.
The runCCJob operation returns 1 if the execution was successful, 2 if there were warnings, and 3 if there were errors in the execution.
The abortJob operation enables you to terminate a particular job that was submitted to the Control Center Manager.
Use the following steps to terminate a particular job.
On the AgentWebService Endpoint page, select abortJob in the Operation field.
In the jobID field, enter the Job ID of the Control Center job to terminate.
In the timeOut field, enter the value for the time out in milliseconds. Entering a zero in this field indicates that there is no timeout.
A return value of true in the Test Results page indicates that the terminate message was sent to the Control Center Manager.
The invokeEAR operation enables you to run deployed applications such as Web services and CT mappings.
Use the following steps to run a Web service or CT mapping.
On the AgentWebService Endpoint page, select invokeEAR in the Operation field.
In the jndiName field, enter the JNDI name of the Web service.
In the soa_params field, enter the values of the mapping execution parameters. Separate each value using a comma.
In the owb_params field, enter the values of the input parameters.
The Test Result page contains the Job ID of the Web service execution.
You can use the functionality defined in a Web service as part of a process flow. The Web service can either be created or imported into Oracle Warehouse Builder. To use Web services in a process flow, use the Web Service activity.
For an example of using Web services in process flows, see "Case Study: Using Web Services for Data Integration".
In process flows, Oracle Warehouse Builder only supports Web services that conform to the following rules:
Only Web services described through an accessible WSDL file are supported.
If the WSDL file contains multiple service, then one service must be nominated.
Web services that have basic authentications need a URI location to provide the credentials. You must set the Deployed Location property of the Web Service activity to this URI location.
If the Web service contains multiple port then the port must be nominated.
The port must use the http transport.
To use a Web service in a process flow:
In the Projects Navigator, create a process flow.
For more information about creating process flows, see "Steps for Defining Process Flows".
Add all the activities, except the Web service activity, that are part of the process flow and establish data flows between them.
If you are using an external Web service, import the Web service into Oracle Warehouse Builder by creating a public Web service in the Globals Navigator.
See Also:
"Creating Web Services Based on a URL" for more information about importing Web services.Drag and drop the Web service, either from the Projects Navigator or the Globals Navigator, onto the Process Flow Editor canvas.
or
From the Graph menu, select Available Objects. The Add Available Objects dialog box is displayed. Select the required Web service and click OK.
The Web Service Operation dialog box is displayed.
Select an operation from the available operations of the Web service and click OK. The selected operation is used in the process flow.
The Web service is added to the Process Flow Editor and its properties are listed in the Structure panel.
The operation in a synchronous Web service has both input and output messages. They are mapped to input or output parameters of the Web Service activity in the process flow.
Provide the required input values for the Web service activity properties. Select the property in the Structure panel, and use the Property Inspector to set values.
If the Web service needs authentication, create a URI location and set the Deployed Location property of the Web Service activity to this URI location.
Establish data flows to and from the Web Service activity.
Generate the process flow and resolve any errors that may occur.
Ensure that all Web services that you added to the process flow in the form of Web Service activities are deployed.
Deploy the process flow package containing the process flow created in Step 1. Use the Control Center Manager or right-click the process flow package in the Projects Navigator and select Deploy.
Run the process flow. Right-click the process flow in the Projects Navigator and select Start.
When the definition of a Web service is modified, you must propagate these changes to all the process flows that consume this Web service.
To synchronize Web services used in process flows:
Right-click the process flow that uses the Web service and select Open.
The Process Flow Editor for this process flow is displayed.
Select the Web Service activity that represents the Web service that has changed. From the Edit menu, select Synchronize.
The Synchronize dialog box is displayed. The object with which the Web service should be synchronized is selected, and you cannot modify this.
Specify the Matching Strategy by selecting one of the following matching options: Match By Object Id, Match By Object Position, or Match by Object Name.
For details about these options, click Help.
Specify the Synchronize Strategy by selecting Replace or Merge.
Click OK to synchronize the Web service with the object on which it is based.
The changes made to the Web service are propagated to the Web Service activity that is based on the Web service.
Because Web services are essentially functions, Oracle Warehouse Builder leverages the Web services support provided by Oracle Database to enable you to use Web services in mappings (which are PL/SQL packages). Thus, you can leverage functionality present in existing Web services.
Use one of the following methods to create a mapping that uses Web services as sources or targets:
Use the UTL_HTTP package.
Use the JPublisher utility to interface SQL to the Web service.
See "Steps to Consume a Web Service in a Mapping Using JPublisher".
Use the UTL_DBWS package to consume Web services.
Depending on the version of Oracle Database, you must download and install the DBWS utility to perform these tasks.
Use the script use_webservice_in_mapping.tcl located in the OWB_HOME/owb/misc/mappingWS directory to create an expert that you can use to consume Web services in mapping.
Steps to Consume a Web Service in a Mapping Using JPublisher
The JPublisher utility translates your object types (which can be Oracle objects, Varrays, nested tables, REFs, or object types) to Java classes and generates accessor methods for each of the object's attributes. JPublisher creates the mapping between object types and Java classes, and between object attribute types and their corresponding Java types.
For PL/SQL packages, JPublisher creates a class containing a wrapper method for each subprogram in the package. Like object methods, the wrapper methods generated for each subprogram are always instance methods, even when the original method is static. The wrapper methods generated by JPublisher provide a convenient way to invoke PL/SQL stored procedures from Java code or to invoke a Java stored procedure from a client Java program.
Use JPublisher to generate table function proxies for the WSDL file and publish PL/SQL wrapper and proxy code.
For example, the following command generates proxies for the Web service available at the URL http://99.22.32.21:9762/services/test_ws?wsdl.
jpub -user wh_tgt/wh_tgt_pswd -sysuser system/oracle -dir=test_ws
     -proxywsdl=http://90.22.32.21:9762/services/test_ws?wsdl
Here, wh_tgt and wh_tgt_pswd are the database credentials for Oracle Warehouse Builder location where the mapping is deployed.
JPublisher generates Java classes and PL/SQL wrappers and loads them into the specified schema (WH_TGT).
(Optional) Define PL/SQL code to call the Web service.
This step verifies that the callout to the table function works at the Oracle Database level, without involving Oracle Warehouse Builder.
The following example verifies that the callout to the function called my_func that is part of the package my_pack works correctly:
SELECT * FROM TABLE(WH_TGT.MY_PROC.MY_FUNC)
Import the Web service metadata, for which you generated table function proxies, into Oracle Warehouse Builder using the Import Metadata Wizard.
The metadata includes user-defined types and PL/SQL packages.
Open Oracle Warehouse Builder mapping in which you want to consume the Web service and add a Table Function operator to call the Web service. Perform the following tasks:
In the Table Function Name property of the Table Function operator, enter the name of the generated table function (from Step 1) to add to the mapping.
In the INGRP1 group of the Table Function operator, select the type of input accepted by the table function using the Input Parameter Type field.
Define the source rows that represent the input to the Web service.
Map the operator that represents the Web service input to the inout group of the Table Function operator.
Capture the output of the Web service in a table in the mapping.
Because the Table Function operator returns a collection type as output, use the Expand Object operator, if required, to map the individual out rows to the target table.
(Optional) If you set a Web proxy (for example you run behind a corporate firewall), use a Pre-Mapping Process operator that uses the procedure INITIALIZE_PROXY to configure the HTTP proxy.
Generate and run the mapping.
Where security is a primary concern, Oracle Warehouse Builder enables you to access Web services in a secure way using the Secure Sockets Layer (SSL). This ensures that messages exchanged between the OC4J server and the Web service are secured.
You can access Web services deployed to both the OC4J server embedded in Oracle Warehouse Builder and to other external OC4J servers securely.
See Also:
"Using a Browser to Run Web Services"Oracle Warehouse Builder provides the following three roles to facilitate Oracle Warehouse Builder Control Center Agent security.
OWB_J2EE_EXECUTOR: Enables grantees to run mappings in the Control Center Agent (CCA).
OWB_J2EE_OPERATOR: Includes the OWB_J2EE_EXECUTOR role and enables grantees to access and manipulate audit information.
OWB_J2EE_ADMINISTRATOR: Includes the OWB_J2EE_EXECUTOR role and enables grantees to administer OC4J and deploy Oracle Warehouse Builder objects to the Control Center Agent.
You can securely access Web services located on other OC4J servers (that are not embedded in Oracle Warehouse Builder). Before you do so, you must set up security on the OC4J server.
Use the following steps to set up secure access on other OC4J servers:
Create a key store with an RSA private/public key pair using the keytool utility.
The following example uses the RSA key pair generation algorithm to generate a key store that resides in a file named mykeystore.jks and which has a password of 123456.
%keytool -genkey -keylag RSA -keystore mykeystore.jks -storepass 123456
The keystore option sets the file name where the keys are stored. The storepass option sets the password for protecting the key store. If you omit the storepass option, then you are prompted for the password.
You are prompted to enter a key entry password. In OC4J 10.1.3.x implementations, the key store password must be the same as the key entry password.
The mykeystore.jks file is created in the current directory. The default alias of the key is mykey.
If you do not have a secure-web-site.xml file, create one in the following location: OWB_HOME/j2ee/home/config.
To start, copy whatever content you need from default-web-site.xml. This typically includes the following subelements under the <web-site> element:
<web-app> (for each Web application to secure)
<access-log> (for logging; confirm that this specifies an appropriate log file)
<default-web-app>
Update secure-web-site.xml with the following elements:
Update the web-site element to add secure="true" and to set the port number to some available port. For standalone OC4J, use the HTTP protocol, which is the default setting. To use the default of 443, you must be a super user.
When you set protocol="http" and secure="true", the HTTPS protocol is used.
The following is an example of a <web-site> element.
<web-site port="4443" secure="true" protocol="http"
display-name="Default Oracle OAS Containers for J2EE Web Site">
...
...
</web-site>
Add an entry under the web-site element to define the key store and its password as follows:
<ssl-config keystore="your_keystore" keystore-password="your_password" />
Here, your_keystore is the path to the key store—either absolute, or relative to OWB_HOME/j2ee/home/config (where the Web site XML file is located)—and your_password is the key store password.
Save the changes to secure-web-site.xml.
Enable the secure Web site by adding the secure Web site to the server.xml file located in OWB_HOME/owb/jrt/config directory.
Restart the OC4J server to ensure that the previous changes are applied.
If they are not yet created, create the OWB_J2EE_EXECUTOR, OWB_J2EE_OPERATOR, and OWB_J2EE_ADMINISTRATOR roles.
See the file system-jazn-data.xml file located in the OWB_HOME/owb/jrt/config folder.
Create the J2EE user used to run Web services and grant the OWB_J2EE_EXECUTOR role to this user.
For the OC4J server that is embedded in Oracle Warehouse Builder, you are provided with a secure key store for using SSL with Web services. This key store is available in the serverkeystore.jks file in the OWB_HOME/owb/jrt/config folder.
The default password for this key store is welcome. Use the JAVA_HOME/bin/keytool to change the password. Or just replace the key store with a newly created key store using JAVA_HOME/bin/keytool.
Company A and Company B have just been merged. Company A is located in San Francisco, USA, and Company B is located in Shanghai, China. Currently, they are still following their own separate business processes. You must develop a plan to integrate their business processes.
Company A uses Oracle Database to store their data and Oracle Warehouse Builder for data integration and ETL. A mapping is used to determine the total sales for a specified period.
Company B uses a SQL Server database to store data and Oracle Warehouse Builder for data integration and ETL. Because the source tables are in SQL Server, a CT mapping is used to determine the total sales over a specified period.
Company A stores the sales details in a table called ORDERS. The PRODUCTS table stores details about products. The mapping LOAD_TOTAL_SALES_MAP transforms source data and loads the details of total sales into the target table TOTAL_SALES. As part of the data integration requirement, the business processes of Company A and Company B must be integrated.
Publishing the mapping LOAD_TOTAL_SALES_MAP as a Web service, enables the functionality defined in the mapping to be accessed remotely, without dependency on the location, data format, or provider's platform.
Company A uses the following tables to store data:
ORDERS: contains the columns order_id, order_date, product_id, quantity, and customer_id
PRODUCTS: contains the columns product_id, product_name, product_desc, and product_price
CUSTOMERS: contains the columns customer_id, first_name, last_name, cust_address, and cust_city
Use the following steps to publish the LOAD_TOTAL_SALES_MAP as a Web service.
In the Projects Navigator, create an application server module called INTEGRATION_AS_MOD that contains the Web service you are creating. Ensure that the location details of this module are set to the agent location to which the Web service is deployed.
Expand the Oracle module that contains the LOAD_TOTAL_SALES_MAP mapping.
Right-click the LOAD_TOTAL_SALES_MAP mapping and select Publish as Web Service.
The Select Application Server or Web Service Package dialog box is displayed.
Select INTEGRATION_AS_MOD and click OK.
The Web service called WS_LOAD_TOTAL_SALES_MAP is created and deployed to the agent location associated with the application server module INTEGRATION_AS_MOD.
Company B uses a CT mapping called LOAD_TOT_SALES_CT_MAP to load aggregate sales during a specified period to the target table TOT_SALES. This mapping is similar to the mapping used by Company A. However, a CT mapping is used because the source tables ORDERS, PRODUCTS, and CUSTOMERS are stored in a SQL Server database.
Because Company B is located in China, the source tables store the sales figures in Chinese Yuan. However, because Company A and Company B have been merged, the sales head wants to see the consolidated sales of both companies in a common currency, U.S. Dollar. You must now convert the sales figures of Company B to U.S. Dollar.
To determine the conversion rate, you can use an external Currency Converter Web Service. This Web service takes two input parameters, From Currency and To Currency. Its output is the multiple that must be used to convert the From Currency to the To Currency. Because this is an external Web service, you must first import this Web service into Oracle Warehouse Builder.
Steps to Consume a Web Service in a Process Flow
"Modify the LOAD_TOT_SALES_CT_MAP Code Template (CT) Mapping".
"Create a Process Flow That Consumes the Currency Converter Web Service".
Edit the CT mapping LOAD_TOT_SALES_CT_MAP and add a Mapping Input operator and an Expression operator. The Mapping Input operator is used to provide the currency conversion value. The Expression operator is used to compute the total sales in U.S. Dollar by multiplying the total sales in Chinese Yuan with the conversion value and then loading the converted sales figures into the TOT_SALES table.
The Currency Converter Web service is an external Web service that is available at:
http://www.webservicex.net/CurrencyConvertor.asmx?WSDL
Before you can consume this Web service in a process flow, you must import this Web service into Oracle Warehouse Builder, using the following steps:
In the Globals Navigator, create an application server module called PUBLIC_AS_MOD.
To import a Web service that is based on a URL, you must create a public Web service in the Globals Navigator.
In the Globals Navigator, right-click PUBLIC_AS_MOD and select New Web Service to create a Web service based on a URL. This Web service is called WS_CURR_CONVERT.
Use the URL to the currency converter Web service to specify the WSDL file location.
For more details about creating a Web service based on a URL, see "Creating Web Services Based on a URL".
Use a process flow to establish the order in which objects are run and to use the output of an object as input to another. The process flow loads the target table with sales figures for Company B in U.S. Dollar.
Figure 16-1 displays the process flow that loads the TOT_SALES table with the sales figures for Company B in U.S. Dollar.
The Web service CONVERTSERVICE_CONVERSIONRATE is run first and its output is the conversion value that should be multiplied to a value in Chinese Yuan to convert it to U.S. Dollar. This value is provided as the input to the Mapping Input Parameter operator in the LOAD_TOT_SALES_CT_MAP CT mapping, represented by the Mapping activity CMAP1, that represents the conversion value.
Figure 16-1 Process Flow that Consumes a Web Service

You can integrate ETL functionality developed using Oracle Warehouse Builder with products such as Oracle BPEL Process Manager. This is achieved by publishing ETL objects as Web services that can be consumed by Oracle BPEL Process Manager.
Oracle BPEL Process Manager provides a comprehensive and easy-to-use solution for designing, deploying, and managing BPEL Processes.
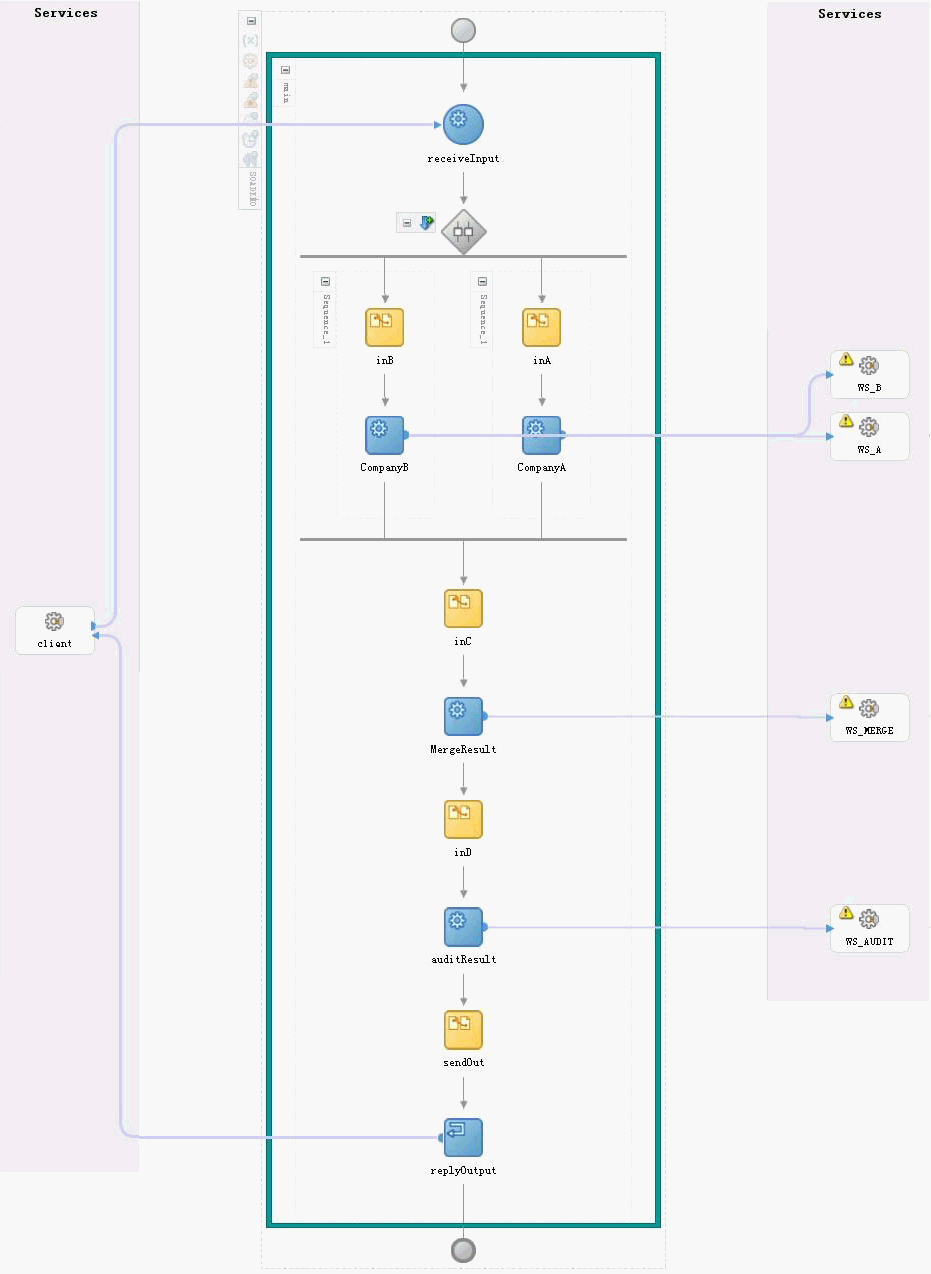
The sales head of Company A wants to evaluate the sales performance of both Company A and Company B over a specified time period. Both company A and Company B have their own processes to determine sales performance over a specified period. The need is to integrate these processes so that you have an easy way to determine the total sales, during a period, for the combined company.
Before You Integrate ETL Functionality with Oracle BPEL Process Manager
Company A uses the mapping LOAD_TOTAL_SALES_MAP, which is published as the Web service WS_LOAD_TOTAL_SALES_MAP. Company B uses the Code Template mapping LOAD_TOT_SALES_CT_MAP and a process flow to convert the sales in Chinese Yuan to U.S. Dollar. Ensure that you publish this process flow as a Web service. Also ensure that you publish any objects associated with these Web services.
Start the Oracle SOA Suite.
Start JDeveloper BPEL Designer
Create a BPEL process called BPEL_INTEG. This process uses the Web services created by Company A and Company B.
Figure 16-2 displays the process BPEL_INTEG.
Figure 16-2 BPEL Process that Uses Web Services
Deploy the BPEL process by right-clicking the BPEL process in the Applications Navigator, selecting Deploy, and choosing the deployment location.
You can use the Log panel to view the deployment results.
Login to BPEL Manager using a web browser.
On the Dashboard tab, select BPEL_INTEG in the Deployed BPEL Processes section.
Select the Initiate tab.
Enter values for the input parameters START_DATE and END_DATE using the Input field and click Post XML Message to run the BPEL process.
For example, enter the following value in the Input field: START_DATA=2007-01-01,END_DATA=2008-12-31.
View the audit trail for the Business Process Execution. Select the Instances tab of the BPEL Console and click the Flow link.
|
Copyright © 2000, 2011, Oracle and/or its affiliates. All rights reserved. Legal Notices |
|