| Oracle® Warehouse Builder Data Modeling, ETL, and Data Quality Guide 11g Release 2 (11.2) Part Number E10935-05 |
|
|
PDF · Mobi · ePub |
| Oracle® Warehouse Builder Data Modeling, ETL, and Data Quality Guide 11g Release 2 (11.2) Part Number E10935-05 |
|
|
PDF · Mobi · ePub |
One of the main functions of an extract, transformation, and loading (ETL) tool is to transform data. Oracle Warehouse Builder provides several methods of transforming data. This chapter discusses transformations and describes how to create custom transformations using Oracle Warehouse Builder. It also describes how to import transformation definitions.
This chapter contains the following topics:
Oracle Warehouse Builder provides an intuitive user interface that enables you to define transformations required for your source data. Use one of the following methods to transform source data.
Transformations: The Design Center includes a set of transformations used to transform data. You can use the predefined transformations provided by Oracle Warehouse Builder or define custom transformations that suit your requirements.
Custom transformations can be deployed to Oracle Database just like any other data object that you define in an Oracle module. For more information about transformations, see "About Transformations".
Operators: The Mapping Editor includes a set of prebuilt transformation operators that enable you to define common transformations when you define how data moves from source to target. Transformation operators are prebuilt PL/SQL functions, procedures, package functions, and package procedures. They take input data, perform operations on it, and produce output.
In addition to the prebuilt operators, you can use custom transformations that you define in the Mapping Editor through the Transformation operator. For more information about these operators, see Chapter 26, "Data Flow Operators."
Oracle Warehouse Builder enables you to reuse PL/SQL and to write your own custom PL/SQL transformations. These custom transformations can be used in Oracle Warehouse Builder mappings.
All major relational database management systems support SQL and all programs written in SQL can be moved from one database to another with very little modification. It means that all the SQL knowledge in your organization is fully portable to Oracle Warehouse Builder. Oracle Warehouse Builder enables you to import and maintain any existing complex custom code.
Custom transformations include procedures, functions, and packages. Oracle Warehouse Builder provides wizards to create each type of custom transformation. Custom transformations can belong to the public Oracle Custom library or to a module in a project.
Custom Transformations in the Public Oracle Custom Library
Custom transformations that are part of the public Oracle custom library can be used across all projects of the workspace in which they are defined. For example, you create a function called ADD_EMPL in the public Oracle Custom library of the workspace REP_OWNER. This procedure can be used across all the projects in REP_OWNER.
Use the Custom node of the Public Transformations node in the Globals Navigator to define custom transformations that can be used across all projects in the workspace.
To create a custom transformation in the Public Oracle Custom Library:
From the Globals Navigator, expand the Public Transformations node, and then the Oracle node.
Right-click the Custom node and select New.
The New Gallery dialog box is displayed containing the type of transformations that you can create. This includes functions, procedures, and packages. PL/SQL types can be created only as part of a package.
Select the type of transformation you want to create a click OK.
For table functions, Oracle Warehouse Builder displays the Create Table Function wizard. Use the wizard to define the table function as described in "Defining Table Functions".
For functions, procedures, and packages, the Create Function dialog box, Create Procedure dialog box, or Create Package dialog box respectively, is displayed. Provide a name and an optional description and click OK. For packages, the package is added to the Projects Navigator. For functions and procedures, the editor is displayed. Use the editor to define the function or procedure.
See "Defining Functions and Procedures" and "Defining PL/SQL Types".
Custom Transformations in a Project
Sometimes, you must define custom transformations that are required only in the current module or project. In such cases, you can define custom transformations in an Oracle module of a project. When you define a custom transformation in an Oracle module, the transformation is accessible from all the modules of the project in which it is defined. For example, consider the workspace owner called REP_OWNER, that contains two projects, PROJECT1 and PROJECT2. In the Oracle module called SALES of PROJECT1, you define a procedure called CALC_SAL. This procedure can be used in all modules belonging to PROJECT1, but is not accessible in PROJECT2.
To define a custom transformation in an Oracle module:
From the Projects Navigator, expand the Oracle Warehouse Builder module node under which you want to define a custom transformation.
Right-click the Transformations node and select New.
The New Gallery dialog box is displayed.
Select the type of transformation you want to create and click OK.
For functions and procedures, Oracle Warehouse Builder displays the Create Function or Create Procedure dialog box. Provide a name and an optional description and click OK. The editor for that transformation is displayed. Use the tabs on the editor to define the transformation. For packages, after you define a name and description and click OK, the package is added to the Projects Navigator. You can then define the transformations that are part of the package.
For table functions, Oracle Warehouse Builder displays the Welcome page of the Create Table Function Wizard. You can create PL/SQL types only under a package.
See Also:
For more information about defining each type of transformation, see the following sections:Complete the following steps using the Function Editor or Procedure Editor to define a function or procedure.
Note:
You cannot copy and paste functions across platforms. For example, you cannot copy a function from an Oracle module and paste it into a SQL Server module.Use the Name and Description page or the Name tab to describe the custom transformation. Specify the following details on this page:
Name: Represents the name of the custom transformation. For more information about naming conventions, see "Naming Conventions for Data Objects".
Description: Represents the description of the custom transformation. This is an optional field.
Use the Parameters tab to define, modify, or delete the parameters, both input and output, of the transformation. For functions, an additional field called Return Type is displayed. The Return Type field represents the data type of the value returned by the function. Select a return type from the available options in the list.
For transformations defined in an Oracle module, specify the following details for each parameter:
Name: Enter the name of the parameter.
Data Type: Select the data type of the parameter from the list.
I/O: Select the type of parameter. The options available are Input, Output, and I/O.
Required: Select Yes to indicate that a parameter is mandatory or No to indicate that it is not mandatory.
Default Value: Enter the default value for the parameter. The default value is used when you do not specify a value for the parameter when you run the function or procedure.
Transformations defined in a DB2 module contain the following details for each parameter: Name, Data Type, Length, Precision, Scale.
Length is applicable to character data types only and represents the length of the parameter. Precision represents the total number of digits enabled for the parameter and is applicable to numeric data types only. Scale represents the total number of digits to the right of the decimal point and is applicable to numeric data types only.
Transformations defined in a SQL Server module contain the following details for each parameter: Name, Data Type, Length, Precision, Scale, Required, Default Value.
Use the Implementation tab to specify or modify the implementation details, such as the code, of the transformation. Click Generate to validate and generate the implementation code.
Ensure that you save changes made to the function or procedure definition before you close the editor. You can save changes by clicking Save All on the toolbar or selecting Save from the File menu.
Table functions are functions that take a set of rows as input and produce a set of rows as output. The input to the table function can be scalar data types, collection data types (PL/SQL records, Varrays, and nested tables), or Ref Cursors. The output of table functions is either a nested table or a Varray. Table functions can be queried like a regular database table.
Parallelization eliminates the need for intermediate staging of table function output by enabling you to stream rows returned by the table function directly to the next process.
Table functions enable you to define and use more flexible and powerful transformations. You can create your own specialized transformations, without using the transformation operators provided, to perform tasks such as user-defined aggregations and data mining. Table functions provide support for parallel and pipelined execution of transformations, resulting in better performance.
See Also:
Oracle Database SQL Language Quick Reference for more information about table functionsUse the following steps to define a table function:
"Specifying Parallelism Options" (optional)
"Specifying Data Streaming Options" (optional)
Use the following fields on the Name page to describe the table function.
Name: Represents the name of the table function. The name must follow the naming conventions for Oracle Warehouse Builder objects.
To rename a table function, select the name and enter the new name. When you rename a table function, you must deploy it again. Also synchronize any mappings that use the table function.
Description: Represents an optional description, up to 4,000 characters long, for the table function.
The return type for table functions can be the following collection types: nested tables and Varrays. The Return Type page displays the collection types that you can select as the return type. Select the collection type to use as the return type of the table function.
For table functions defined under an Oracle module, you can use following as return type:
Nested tables and Varrays defined in an Oracle module that is contained by the project in which the table function is defined
Public nested tables that are defined as part of a package in the Globals Navigator
For public table functions, defined using the Globals Navigator, you can only use public nested tables or public Varrays as a return type.
Use the Parameters page or Parameters tab to define the input parameters of the table function. For each parameter, enter the following details:
Name: Enter the name of the parameter.
Type: Select the data type of the parameter from the list.
Parameters can be Oracle scalar data types or user-defined collection types, except nested tables. Typically the input parameters of table functions are the collection types such as Record Type, Table Type, or Ref Cursor Type. Since collection types are user-defined, you must define these types before you use them as data types for a table function parameter. You can define collection types only as part of a public package or a package within an Oracle module.
I/O: Select the type of parameter. The only option available for table functions is Input.
Required: Select Yes to indicate that a parameter is mandatory and No to indicate that it is not mandatory.
Default Value: Enter the default value for the parameter. The default value is used when you do not specify a value for the parameter when you run the table function.
To modify a parameter, select the parameter value and enter the new value. Redeploy the table function after you make this change.
You can parallelize the execution of table functions to eliminate the need for staging tables. When the execution of a table function is parallelized, the rows returned by the table function can be streamed directly into the next process without intermediate staging. It enables multithreaded, concurrent execution of table functions.
Parallel execution of table functions is performed using multiple slave processes. For a table function to be run in parallel, you must specify one input parameter, of type Ref cursor, that is used for data partitioning.
Provide the following details to parallelize the execution of your table function:
Parallel: Select this option to indicate that the execution of the table function should be parallelized.
This option is enabled only when one or more input parameters are of type Ref Cursor.
Partition Method: Select the partition method. You can choose Any, Range, or Hash as the partition method.
Parameters: Select the input parameter on which partitioning should be performed. Only parameters of type Ref cursor can be selected as partitioning parameters. Thus this field lists only input parameters of type Ref Cursor.
Attributes for Partitioning: Select the attributes in the Ref cursor on which partitioning should be performed. The Available Attributes section lists the attributes of the Ref cursor on which the table function input parameter is based. Select the attributes and use the arrows to move them to the Selected Attributes section.
Use the Order page to perform streaming on table functions. When you perform data streaming, the table function orders or clusters rows that it fetches from cursor arguments. Ordering or clustering is performed using a particular key or key columns. Clustering causes rows that have the same input key values to appear, but does not perform any ordering of rows.
To perform data streaming, enter the following information on this page.
Ordering Method: Specify the method used for data streaming. You can select Order By to order rows or Cluster By to cluster rows.
Attributes for Ordering: Select the attributes on which the ordering or clustering is performed. The Available Attributes section lists the attributes of the Ref cursor input parameter. Select one or more attributes and use the arrows to move the attributes to the Selected Attributes section.
On the Implementation page, specify the following details:
Pipelined: Select the Pipelined option to create a pipelined table function. Pipelining iteratively returns rows as they are produced, instead of returning them in a single batch after all the table function processing is complete. Pipelining enables table functions to return rows faster and reduces the memory required to cache table function results. Thus query response times are reduced. Pipelining enables tables functions to be used as a virtual table.
Implementation: In the Implementation section, a sample code is provided with comments for each part of the table function definition. Click Code Editor to display the Code Editor that enables you to edit the default sample code and enter the code for your table function.
Use the Create PL/SQL Type Wizard to create PL/SQL types. PL/SQL types must be defined within a package and they cannot exist independently.
PL/SQL types enable you to create collection types, record types, and REF cursor types in Oracle Warehouse Builder. You use PL/SQL types as parameters in subprograms or as return types for functions. Using PL/SQL types as parameters to subprograms enables you to process arbitrary number of elements. Use collection types to move data into and out of database tables using bulk SQL. For more information about PL/SQL types, see Oracle Database PL/SQL Language Reference.
Oracle Warehouse Builder enables you to create the following PL/SQL types:
PL/SQL Record types
Record types enable you to define records in a package. A record is a composite data structure that contains multiple fields. Use records to hold related items and pass them to subprograms using a single parameter.
For example, an EMPLOYEE record can contain details related to an employee such as ID, first name, last name, address, date of birth, date of joining, and salary. You can create a record type based on the EMPLOYEE record and use this record type to pass employee data between subprograms.
REF Cursor types
REF cursor types enable you to define REF cursors within a package. REF cursors are not bound to a single query and can point to different result sets. Use REF cursors when you want to perform a query in one subprogram and process the results in another subprogram. REF cursors also enable you to pass query result sets between PL/SQL stored subprograms and various clients such as an OCI client or an Oracle Forms application.
REF cursors are available to all PL/SQL clients. For example, you can declare a REF cursor in a PL/SQL host environment such as an OCI or Pro*C program, then pass it as an input host variable (bind variable) to PL/SQL. Application development tools such as Oracle Forms, which have a PL/SQL engine, can use cursor variables entirely on the client side. Or, you can pass cursor variables back and forth between a client and the database server through remote procedure calls.
Nested Table types
Use nested table types to define nested tables within a package. A nested table is an unordered set of elements, all of the same data type. They are similar to one-dimensional arrays with no declared number of elements. Nested tables enable you to model multidimensional arrays by creating a nested table whose elements are also tables.
For example, you can create a nested table type that can hold an arbitrary number of employee IDs. This nested table type can then be passed as a parameter to a subprogram that processes only the employee records contained in the nested table type.
The SALES table stores the daily sales of an organization that has offices across the world. This table contains the sale ID, sale date, customer ID, product ID, amount sold, quantity sold, and currency in which the sale was made. Management wants to analyze global sales for a specified time period using a single currency, for example the U.S. Dollar. Thus all sales values must be converted to U.S. Dollar. Because the currency exchange rates can change every day, the sales amounts must be computed using the exchange rate of the sale currency on the sale date.
Solution Using PL/SQL Record Types
Figure 9-1 displays the mapping that you use to obtain the sales amount in a specified currency using PL/SQL record types.
Figure 9-1 PL/SQL Record Type in a Mapping
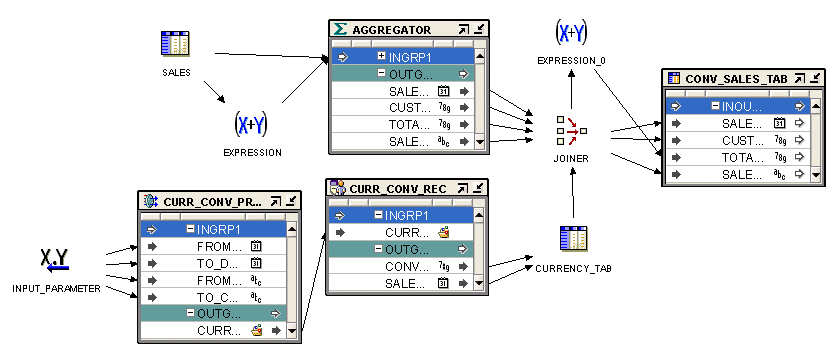
The mapping takes the individual sales data stored in different currencies, obtains the sales value in the specified currency, and loads this data into a target table. Use the following steps to create this mapping.
In the Globals Navigator, create a package. In this package, create a procedure called CURR_CONV_PROC.
This procedure obtains the currency conversion values on each date in a specified time interval from a Web site. The input parameters of this procedure are the sales currency, the currency to which the sale value must be converted, and the time interval for which the currency conversion is required. This data is stored in a PL/SQL record type of type CURR_CONV_REC. This record type contains two attributes: date and conversion value.
You create the PL/SQL record type as part of the package.
Create a mapping that contains a Transformation operator. This operator is bound to the CURR_CONV_PROC procedure.
Use a Mapping Input Parameter operator to provide values for the input parameters of the Transformation operator.
The output group of the Transformation operator is a PL/SQL record type of type CURR_CONV_REC.
Use an Expand Object operator to obtain the individual values stored in this record type and store these values in the table CURRENCY_TAB.
Use an Aggregator operator to aggregate sales details for each order.
The SALES table is a transactional table and stores data in normalized form. To obtain the aggregate sales for each order, use an Aggregator operator to aggregate sales data.
Use a Joiner operator to join the aggregated sales details, which is the output of the Aggregator operator, with the data in the CURRENCY_TAB table. The sale date is used as the join condition.
Use the Expression operator to multiply the sales amount with the currency exchange rate to get the total sales in the required currency. Load the converted sales data into the CONV_SALES_TAB table.
You can create PL/SQL types in the Projects Navigator or Globals Navigator of the Design Center.
Use the Create PL/SQL Types Wizard to create PL/SQL types. To display the Create PL/SQL Types Wizard, right-click the PL/SQL Types node under a package, and select New PL/SQL Type. The Welcome page of the Create PL/SQL Types Wizard is displayed. Click Next and then the wizard guides you through the following pages:
Use the Name and Description page to provide the name and an optional description for the PL/SQL type. Also use this page to select the type of PL/SQL type to create.
You can create any of the following PL/SQL types:
PL/SQL record type
REF cursor type
Nested table type
For more information about each PL/SQL type, see "About PL/SQL Types".
After specifying the name and selecting the type of PL/SQL type to create, click Next.
Use the Attributes page to define the attributes of the PL/SQL record type. You specify attributes only for PL/SQL record types. A PL/SQL record must have at least one attribute.
For each attribute, define the following:
Name: The name of the attribute. The name should be unique within the record type.
Data Type: The data type of the attribute. Select the data type from the list.
Length: The length of the data type, for character data types.
Precision: The total number of digits enabled for the attribute, for numeric data types.
Scale: The total number of digits to the right of the decimal point, for numeric data types.
Seconds Precision: The number of digits in the fractional part of the datetime field. It can be a number between 0 and 9. Seconds Precision is used only for TIMESTAMP, TIMESTAMP WITH TIME ZONE, and TIMESTAMP WITH LOCAL TIME ZONE data types.
Click Next to proceed to the next step.
Use the Return Type page to select the return type of the PL/SQL type. You must specify a return type only while creating REF cursors and nested tables.
To define REF cursors:
The return type for a REF cursor can only be a PL/SQL record type. If you know the name of the PL/SQL record type, then you can search for it by entering the name in the Search For field and clicking Go.
The area below the Search For field displays the available PL/SQL types. These PL/SQL types are grouped under the two nodes: Public and Private. Expand the Public node to view the PL/SQL types that are part of the Oracle Shared Library. The types are grouped by package name. The Private node contains PL/SQL types that are created as part of a package in an Oracle module. Only PL/SQL types that belong to the current project are displayed. Each Oracle module is represented by a node. Within the module, the PL/SQL types are grouped by the package to which they belong.
To define nested tables:
For nested tables, the return type can be a scalar data type or a PL/SQL record type. Select one of the following options based on what the PL/SQL type returns:
Select a scalar type as return type
This option enables you to create a PL/SQL type that returns a scalar type. Use the list to select the data type.
Select a PL/SQL record as return type
This option enables you to create a PL/SQL type that returns a PL/SQL record type. If you know the name of the PL/SQL record type that is returned, then type the name in the Search For field and click Go. The results of the search are displayed in the area below the option.
You can also select the return type from the list of available types displayed. The area below this option contains two nodes: Public and Private. The Public node contains PL/SQL record types that are part of the Oracle Shared Library. The PL/SQL record types are grouped by the package to which they belong. The Private node contains the PL/SQL record types created as transformations in each Oracle module in the current project. These are grouped by module. Select the PL/SQL record type that the PL/SQL type returns.
Click Next to proceed with the creation of the PL/SQL type.
The Summary page displays the options that you have chosen on the wizard pages. Review the options. Click Back to modify any options. Click Finish to create the PL/SQL type.
You can edit the definition of a custom transformation using the editors. Make sure you edit properties consistently. For example, if you change the name of a parameter, then you must also change its name in the implementation code.
After editing a custom transformation, ensure that you do the following:
Synchronize any mapping operators that reference the edited transformation with the edited transformation
Synchronization updates the definition of the transformation in the mapping with the changes made while editing.
Redeploy the mapping containing the edited transformation
The Edit Function dialog box enables you to edit function definitions. To edit a procedure definition, use the Edit Procedure dialog box.
Use the following steps to edit functions, procedures, or packages:
From the Projects Navigator, expand the Oracle module in which the transformation is created. Then expand the Transformations node.
To edit a transformation that is part of the public Oracle Custom library, from the Globals Navigator, expand the Public Transformations node, and then the Custom node.
Right-click the name of the function, procedure, or package to edit and select Open. Or, double-click the name of the function, procedure, or package.
For functions, the Function Editor is displayed. For procedures, the Procedure Editor is displayed. Use the following tabs to edit the function or procedure definition:
Name tab, see "Naming the Custom Transformation"
Parameters tab, see "Defining the Parameters"
Implementation tab, see "Specifying the Implementation"
For packages, Oracle Warehouse Builder displays the Edit Transformation Library dialog box. You can only edit the name and description of the package. You can edit the functions and procedures contained within the package using the steps used to edit functions or packages.
The Edit PL/SQL Type dialog box enables you to edit the definition of a PL/SQL type. Use the following steps to edit a PL/SQL type:
From the Projects Navigator, expand the Oracle module that contains the PL/SQL type. Then expand the Transformations node.
To edit a PL/SQL type stored in the public Oracle Custom library, expand the Public Transformations node in the Globals Navigator, and then the Custom node.
Expand the package that contains the PL/SQL type and then the PL/SQL Types node.
Right-click the name of the PL/SQL type to edit and select Open. Or, double-click the name of the PL/SQL type.
The Edit PL/SQL Type dialog box is displayed. Use the following tabs to edit the PL/SQL type:
The Name tab displays the name and the description of the PL/SQL type. Use this tab to edit the name or the description of the PL/SQL type.
To rename a PL/SQL type, select the name and enter the new name.
The Attributes tab displays details about the existing attributes of the PL/SQL record type. This tab is displayed for PL/SQL record types only. You can modify existing attributes, add new attributes, or delete attributes.
To add a new attribute, click the Name column of a blank row specify the details for the attribute. To delete an attribute, right-click the gray cell to the left the row that represents the attribute and select Delete.
Use the Return Type tab to modify the details of the return type of the PL/SQL type. For a REF cursor type, the return type must be a PL/SQL record. For a nested table, the return type can be a PL/SQL record type or a scalar data type.
You can edit the definition of a table function and modify its specification.
To edit table functions:
Expand the Oracle Module that contains the table function, the Transformations node, and then the Table Functions node.
For a global table function, expand the Public Transformations node and then the Custom node.
If the table function belongs to a package, first expand the package node. Right-click the name of the table function to edit and select Open. Or, double-click the name of the table function.
The Table Function Editor is displayed.
Use the following tabs to edit the table function:
Name tab, see "Naming the Table Function"
Return Type tab, see "Specifying the Return Type"
Parameters tab, see "Specifying Table Function Input and Output Parameters"
Partitions tab, see "Specifying Parallelism Options"
Order tab, see "Specifying Data Streaming Options"
Implementation tab, see "Specifying the Table Function Implementation"
Use the Import Metadata Wizard to import PL/SQL functions, procedures, and packages into an Oracle Warehouse Builder project. You can also import scalar functions from IBM DB2 and SQL Server databases.
You can edit, save, and deploy the imported PL/SQL functions and procedures. You can also view and modify imported packages.
To import transformations in to a project:
From the Projects Navigator, expand the project node and then the Databases node.
Expand the node corresponding to the database from which you want to import transformations.
For example, to import PL/SQL functions from an Oracle database, right-click the Oracle node. To import scalar functions from an IBM DB2UDB database, right-click the DB2 node.
Right-click the module into which you want to import transformations, select Import, and then Database Objects.
Oracle Warehouse Builder displays the Welcome page of the Import Metadata Wizard.
Click Next.
In the Object Type field of the Filter Information page, select PL/SQL Transformation to import PL/SQL transformations into an Oracle module or select Transformation to import scalar functions into an IBM DB2 UDB or a SQL Server module.
Click Next.
The Import Metadata Wizard displays the Object Selection page.
Select a function, procedure, or package from the Available Objects list. Move the objects to the Selected Objects list by clicking the right arrow to move a single object or the Move All button to move multiple objects.
Click Next.
The Import Metadata Wizard displays the Summary and Import page.
Verify the import information. Click Back to revise your selections.
Click Finish to import the selected PL/SQL transformations.
Oracle Warehouse Builder displays the Import Results page.
Click OK proceed with the import. Click Undo to cancel the import process.
The imported PL/SQL information appears under the Transformations node of the module into which you imported the data.
A movie rental company periodically updates the customer rental activity in its CUST_RENTAL_ACTIVITY table, where it stores the rental sales and overdue charges data for each customer. This table is used for different mailing campaigns. For example, in their latest mailing campaign, customers with high overdue charges are offered the company's new pay-per-view service.Currently, the movie rental company uses a PL/SQL package to consolidate their data. The existing PL/SQL package must be maintained manually by accessing the database. This code runs on an Oracle 8i database.
CREATE OR REPLACE PACKAGE RENTAL_ACTIVITY AS
  PROCEDURE REFRESH_ACTIVITY(SNAPSHOT_START_DATE IN DATE);
END RENTAL_ACTIVITY;
/
CREATE OR REPLACE PACKAGE BODY RENTAL_ACTIVITY AS
 PROCEDURE REFRESH_ACTIVITY(SNAPSHOT_START_DATE IN DATE) IS
   CURSOR C_ACTIVITY IS
    SELECT
      CUST.CUSTOMER_NUMBER CUSTOMER_NUMBER,
      CUST.CUSTOMER_FIRST_NAME CUSTOMER_FIRST_NAME,
      CUST.CUSTOMER_LAST_NAME CUSTOMER_LAST_NAME,
      CUST.CUSTOMER_ADDRESS CUSTOMER_ADDRESS,
      CUST.CUSTOMER_CITY CUSTOMER_CITY,
      CUST.CUSTOMER_STATE CUSTOMER_STATE,
      CUST.CUSTOMER_ZIP_CODE CUSTOMER_ZIP_CODE,
      SUM(SALE.RENTAL_SALES) RENTAL_SALES,
      SUM(SALE.OVERDUE_FEES) OVERDUE_FEES
    FROM  CUSTOMER CUST, MOVIE_RENTAL_RECORD SALE
    WHERE SALE.CUSTOMER_NUMBER = CUST.CUSTOMER_NUMBER AND
          SALE.RENTAL_RECORD_DATE >= SNAPSHOT_START_DATE
    GROUP BY
    CUST.CUSTOMER_NUMBER,
    CUST.CUSTOMER_FIRST_NAME,
    CUST.CUSTOMER_LAST_NAME,
    CUST.CUSTOMER_ADDRESS,
    CUST.CUSTOMER_CITY,
    CUST.CUSTOMER_STATE,
    CUST.CUSTOMER_ZIP_CODE;

   V_CUSTOMER_NUMBER NUMBER;
   V_CUSTOMER_FIRST_NAME VARCHAR2(20);
   V_CUSTOMER_LAST_NAME VARCHAR2(20);
   V_CUSTOMER_ADDRESS VARCHAR(50);
   V_CUSTOMER_CITY VARCHAR2(20);
   V_CUSTOMER_STATE VARCHAR2(20);
   V_CUSTOMER_ZIP_CODE VARCHAR(10);
   V_RENTAL_SALES NUMBER;
   V_OVERDUE_FEES NUMBER;

BEGIN
   OPEN C_ACTIVITY;
   LOOP
    EXIT WHEN C_ACTIVITY%NOTFOUND;
    FETCH
     C_ACTIVITY
    INTO
     V_CUSTOMER_NUMBER,
     V_CUSTOMER_FIRST_NAME,
     V_CUSTOMER_LAST_NAME,
     V_CUSTOMER_ADDRESS,
     V_CUSTOMER_CITY,
     V_CUSTOMER_STATE,
     V_CUSTOMER_ZIP_CODE,
     V_RENTAL_SALES,
     V_OVERDUE_FEES;

    UPDATE CUST_ACTIVITY_SNAPSHOT
    SET
     CUSTOMER_FIRST_NAME = V_CUSTOMER_FIRST_NAME,
     CUSTOMER_LAST_NAME = V_CUSTOMER_LAST_NAME,
     CUSTOMER_ADDRESS = V_CUSTOMER_ADDRESS,
     CUSTOMER_CITY = V_CUSTOMER_CITY,
     CUSTOMER_STATE = V_CUSTOMER_STATE,
     CUSTOMER_ZIP_CODE = V_CUSTOMER_ZIP_CODE,
     RENTAL_SALES = V_RENTAL_SALES,
     OVERDUE_FEES = V_OVERDUE_FEES,
     STATUS_UPDATE_DATE = SYSDATE
    WHERE
     CUSTOMER_NUMBER = V_CUSTOMER_NUMBER;

    IF SQL%NOTFOUND THEN
       INSERT INTO CUST_ACTIVITY_SNAPSHOT
       ( CUSTOMER_NUMBER,
         CUSTOMER_FIRST_NAME,
         CUSTOMER_LAST_NAME,
         CUSTOMER_ADDRESS,
         CUSTOMER_CITY,
         CUSTOMER_STATE,
         CUSTOMER_ZIP_CODE,
         RENTAL_SALES,
         OVERDUE_FEES,
         STATUS_UPDATE_DATE )
       VALUES
       ( V_CUSTOMER_NUMBER,
         V_CUSTOMER_FIRST_NAME,
         V_CUSTOMER_LAST_NAME,
         V_CUSTOMER_ADDRESS,
         V_CUSTOMER_CITY,
         V_CUSTOMER_STATE,
         V_CUSTOMER_ZIP_CODE,
         V_RENTAL_SALES,
         V_OVERDUE_FEES,
         SYSDATE );
     END IF;
   END LOOP;
END REFRESH_ACTIVITY;
END RENTAL_ACTIVITY;
/
This case study highlights the benefits of importing an existing custom PL/SQL package into Oracle Warehouse Builder and using its functionality to automatically maintain, update, and regenerate the PL/SQL code. Oracle Warehouse Builder enables you to automatically take advantage of new database features and upgrades by generating code that is optimized for new database versions. For example, if you have a PL/SQL package for Oracle8i, then by importing it into Oracle Warehouse Builder you can generate code for Oracle8i, Oracle9i, Oracle 10g, or Oracle 11g.
Also, by importing a custom package and re-creating its operations through an Oracle Warehouse Builder mapping, you can transparently run and monitor the operations. Otherwise, you must manually access the database to verify and update the code. Oracle Warehouse Builder also enables you to perform lineage and impact analysis on all ETL operations while the Runtime Audit Browser monitors the running of the code and logs errors.
You can migrate the PL/SQL code into Oracle Warehouse Builder using the following steps:
"Step 2: Create a "Black Box" Mapping" by using a custom transformation in an Oracle Warehouse Builder mapping
"Step 3: Reimplement Custom Code into a Mapping" by reimplementing the legacy PL/SQL code into a new Oracle Warehouse Builder mapping and phasing out the custom package
Follow these steps to handle a custom PL/SQL package in Oracle Warehouse Builder.
Step 1: Import the Custom PL/SQL Package
In the Projects Navigator, expand the Transformations node under the Oracle module into which you want to import the PL/SQL package refresh_activity(DATE). Use the Import Metadata Wizard to import the package by right-clicking Transformations, selecting Import, and then Database Objects. On the Filter Information page of this wizard, indicate that you are importing a PL/SQL Transformation.
After you finish the import, the package refresh_activity(DATE) appears under the Packages node of the Transformations folder.
Step 2: Create a "Black Box" Mapping
You can use the refresh_activity(DATE) procedure directly in a mapping without making any changes to it. In the mapping, you add a Post-Mapping Process operator to the mapping, with the package refresh_activity(DATE) selected.
In this example, you can immediately take advantage of the existing custom code. The learning curve and investment on resources is minimal. You may decide to maintain all the existing and developed PL/SQL code in this manner, using Oracle Warehouse Builder only to develop new processing units. Oracle Warehouse Builder enables you to use mappings that use the legacy code along with the new mappings you create. In such a case, although you can generate code for these mappings in Oracle Warehouse Builder, you cannot use Oracle Warehouse Builder features to maintain, update, or audit the code.
Because the legacy code is used as a "black box" that is not transparent to Oracle Warehouse Builder, you must maintain the legacy code manually. Thus, you cannot take advantage of Oracle Warehouse Builder features, such as run time audit browser, lineage and impact analysis, and optimized code generation, that rely on infrastructure code and metadata available for Oracle Warehouse Builder generated mappings.
Follow the next steps to take advantage of these features in Oracle Warehouse Builder and to automatically maintain, monitor, and generate your PL/SQL code.
Step 3: Reimplement Custom Code into a Mapping
To take advantage of the code generation, maintenance, and auditing features, you can reimplement the legacy PL/SQL code functionality using a mapping and phase out the custom "black box" package. The mapping created to provide the PL/SQL code functionality is called Rental_Activity.
The recommended method is to test out this new mapping by running it side by side with the "black box" mapping. If the testing is successful and the new mapping can perform all the operations included in the custom code, then the "black box" mappings can be phased out. Oracle Warehouse Builder enables you to maintain, update, and generate code from a mapping without performing manual updates in the database.
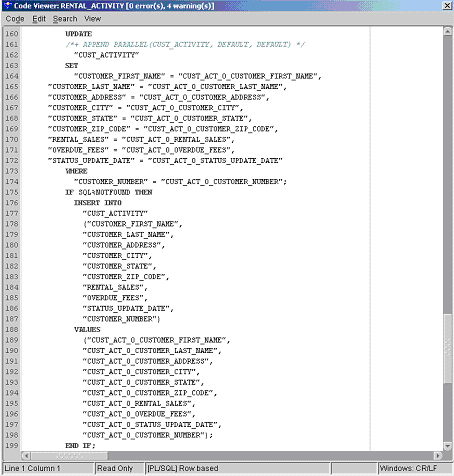
Figure 9-2 shows a sample of code generated from the Rental_Activity mapping that replicates the operations of the custom PL/SQL package for the movie rental company.
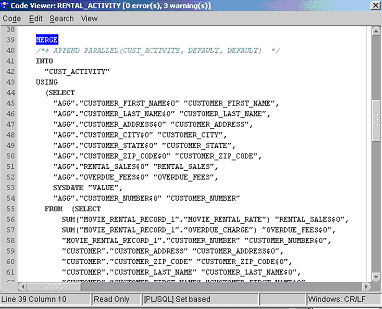
Step 4: Generate Code for Oracle Database 11g
If you upgrade to Oracle9i version of the database, you must redeploy the Rental_Activity mapping created in Step 3. Oracle Warehouse Builder generates code optimized for the new database version.
Figure 9-3 shows the MERGE statement from a sample of code generated for the same mapping for Oracle9i.
No manual steps are required to maintain and generate the new code. Also, you can transparently monitor and maintain their ETL operations. Oracle Warehouse Builder enables them to perform lineage and impact analysis on their mappings and the Runtime Audit Browser enables them to track and log errors when running the mappings.
Starting with Oracle Warehouse Builder 11g Release 2 (11.2), you can create, import, and use predefined functions within non-Oracle platforms as well. This release extends the usage of functions to the following platforms:
DB2
SQL Server
Like with Oracle modules, you can create a new function in DB2 and SQL Server modules. Similarly, you can also import existing functions from a DB2 or SQL Server database. Oracle Warehouse Builder also provides predefined functions in the Globals Navigator.
Note:
You cannot copy and paste functions across platforms. For example, you cannot copy a function from an Oracle module and paste it into a SQL Server module.When you define functions using the Custom node under the Public Transformations node of the Globals Navigator, they can be used only when you deploy objects to an Oracle Database location. However, you can use Oracle Warehouse Builder to load data into SQL Server and DB2 data objects also. In these cases, you must create user-defined functions to transform data for these platforms. Use the Databases node in the Projects Navigator to define functions for these databases.
Once you define functions for a DB2 or SQL Server database, you can use these functions in mappings and process flows with the help of the Transformation operator and Transformation activity, respectively. You can also publish these functions as Web Services.
To define an IBM DB2 or a SQL Server function:
In the Projects Navigator, expand the Databases node.
Depending on whether you are creating a function in DB2 or SQL Server, expand the DB2 or SQL Server node.
Expand the Transformations node and right-click the Functions node and select New Function.
The Create Function dialog box is displayed.
Enter a name and optional description for the function and click OK.
The Function Editor is displayed.
On the Parameters tab, provide the following information:
Return Type: Select the data type for the return type of the global function.
Parameters: Each function parameter is represented by a row in the table below the Return Type field. To create a parameter, enter a name on a blank cell and provide details, such as the data type and default value, for the parameter. The list in the Data Type column is populated depending on the platform you choose in the Platform field.
Note:
For SQL Server functions, @ is automatically prefixed to each parameter name.On the Implementation tab, enter the code that is used to implement the function on the platform that you selected in the Parameters tab.
From the View menu, select Code Templates.
The Code Templates tab is displayed in the Log window.
In the Code Templates tab, select the Function CT that is used to generate code for the function.
Oracle Warehouse Builder provides prebuilt Function CTs to generate code for DB2 and SQL Server databases. These Function CTs are located in the Globals Navigator under the BUILT_IN_CT node of the Public Code Templates folder. For DB2, you can use DB2_FCT and for SQL Server, you can use SQLSERVER_FCT.
You can import existing functions from DB2 and SQL Server databases. This is similar to importing Oracle functions.
To import DB2 or SQL Server functions:
Right-click an existing DB2 or SQL Server module, and select Import, Database Object.
The Import Metadata Wizard is displayed.
In the Filter Information page, select Transformations from Object Type.
In the Object Selection page, select the required functions and move them from the Available field to the Selected field.
Verify the information in the Summary page and click Finish to begin the import.
The imported functions are now visible under the module in the Projects Navigator.
Note:
Oracle Warehouse Builder enables you to import overloaded DB2 functions. However you cannot import overloaded SQL Server functions.The Heterogeneous node under the Public Transformations node of the Globals Navigator contains predefined functions that you can use for Oracle, SQL Server, and DB2 platforms.
Generic heterogeneous functions are categorized as follows:
Character
Conversion
Date
Numeric
Other
To view the function definition and the platform for which it is defined, double-click a function in any of the above categories. The Function Editor containing the Name, Parameter, and Expression tabs is displayed. Click the Parameter tab to view the platform for which the function is defined, the function parameters, and the function return type. Click the Expression tab to view the expression used for the SQL function and the platform for which the function is defined.
For details about the semantics of the expression provided, the parameters, and parameter data types, refer to the documentation for the particular platform.
At the time of creating DB2 or SQL Server functions, you associate a code template with the function. Therefore, you can only use these functions in mappings that are created under the Template Mappings node in Projects Navigator. These mappings are different from the normal mappings as they are used with code templates.
After you define a function, you can configure it by setting configuration parameters using the Configuration panel.
The following sections list the configuration parameters supported by Oracle Warehouse Builder for the Oracle platform.
You can set the following configuration parameters for functions defined on the Oracle platform.
Use this parameter to specify the privileges with which the function is run. Select one of the following options:
CURRENT_USER: Indicates that the function is run with the privileges of the current user, in the current user's schema. This limits the scope for name resolution. Oracle Database looks for the function by name in the current user's schema.
DEFINER: Indicates that the function is run with the privileges assigned to the owner of the schema that the function resides in. All external names are to be resolved within the same schema.
Select this option to indicate that the function is deterministic. Deterministic functions return the same results for a given set of arguments every time that the function is run.
Setting this option helps to avoid redundant function calls. If a stored function was called previously with the same arguments, then the previous result can be used. The function result should not depend on the state of session variables or schema objects. Otherwise, results might vary across calls. Only DETERMINISTIC functions can be called from a function-based index or a materialized view that has query-rewrite enabled.
This parameter is an optimization hint. Select this parameter to indicate to the Oracle Database that the function should be run in parallel whenever called from within a SQL query. The processing is split between parallel processes (UNIX), or threads (Windows). Setting this option results in a speed improvement on multiprocessor systems.
|
Copyright © 2000, 2011, Oracle and/or its affiliates. All rights reserved. Legal Notices |
|