Table of Contents
This chapter introduces MySQL Utilities and presents information on how to access and download MySQL Utilities. It also includes the basics of how to use the account login option common to all utilities.
What are the MySQL Utilities?
It is a package of utilities that are used for maintenance and administration of MySQL servers. These utilities encapsulate a set of primitive commands, and bundles them so they can be used to perform macro operations with a single command.
The utilities are written in Python, available under the GPLv2 license, and are extensible using the supplied library. They are designed to work with Python versions 2.6 or later and there is no support (yet) for Python v3.1.
How do we access the MySQL Utilities?
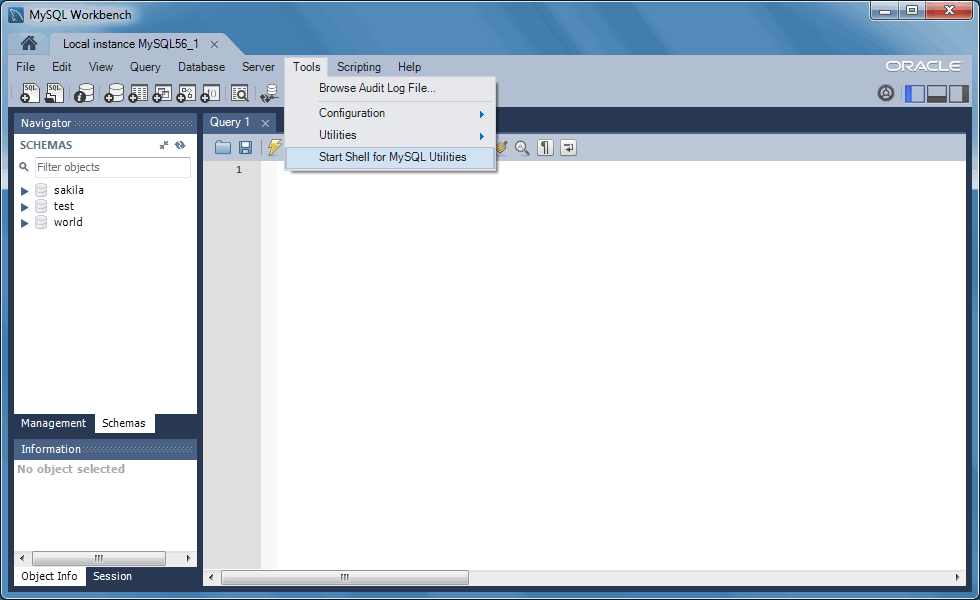
The MySQL Utilities are command line scripts, which by default are available in your system's PATH. Alternatively, if both MySQL Utilities and MySQL Workbench are installed, you can access their location from MySQL Workbench by selecting from the main menu, and then . This opens a terminal/shell window in the mysqluc utility shell. Type "help" to list the available commands.
You can launch any of the utilities listed by typing the name of the command. To find out what options are available, use the option, or read the appropriate manual page.
The utilities are designed to work on MySQL systems with grants
enabled but can also operate on servers started with the
--skip-grant-tables startup option. However, this
practice is strongly discouraged and should be used only in
situations where it is appropriate or deemed a last resort.
This section describes the ways you can connect to a MySQL server via a MySQL Utility or via the MySQL Utilities library methods.
To connect to a server, it is necessary to specify connection parameters such as the user name, host name, password, and either a port or socket. MySQL Utilities provides a number of ways to supply this information. All of the methods require specifying your choice via a command-line option such as --server, --master, --slave, etc. The methods include the following in order of most secure to least secure.
Use login-paths from your
.mylogin.cnffile (encrypted, not visible). Example :login-path[:port][:socket]Use a configuration file (unencrypted, not visible) Note: available in release-1.5.0. Example :
configuration-file-path[:section]Specify the data on the command-line (unencrypted, visible). Example :
user[:passwd]@host[:port][:socket]
The best way to specify server connection information is with
your .mylogin.cnf file. Not only is this
file encrypted, but any logging of the utility execution does
not expose the connection information. Thus, no user names,
passwords, ports, etc. are visible in the log. This is the
preferred method for using MySQL Utilities to connect to servers.
Utilities support the use of login-paths in the connection
string provided they use the following format
login-path-name[:port][:socket] where the port and
socket parameters are optional. If used, these optional
parameters override the respective options from the specified
login-path file.
When using login-paths, there are no default values except on Posix systems when specifying a socket. In this case, the host option defaults to localhost on port 3306. This means that combining the values specified in the login-path with the two optional values port and socket, one needs to specify at least a user, a hostname and a port or socket.
Use the mysql_config_editor tool (http://dev.mysql.com/doc/en/mysql-config-editor.html) to add the connection information as follows.
shell> mysql_config_editor set --login-path=instance_13001 --host=localhost --user=root --port=13001 --password
Enter password: <Password is prompted to be inserted in a more secure way>
Next, use the following command to confirm that the login-path
data was correctly added to .mylogin.cnf
(the encrypted file):
shell> mysql_config_editor print --login-path=instance_13001
[instance_13001]
user = root
password = *****
host = localhost
port = 13001
Once your .mylogin.cnf file is configured,
you need only specify the section of the
.mylogin.cnf file for the server
connection. For example, the section created in the previous
example is 'instance_13001'. Thus, we use
--server=instance_13001. The following shows the execution of a
utility specifying the login-path section.
shell> mysqlserverinfo --server=instance_13001 --format=vertical

# Source on localhost: ... connected.
*************************       1. row *************************
server: localhost:13001
config_file: /etc/my.cnf, /etc/mysql/my.cnf
binary_log: clone-bin.000001
binary_log_pos: 341
relay_log:
relay_log_pos:
version: 5.6.17-log
datadir: /Volumes/Source/source/temp_13001/
basedir: /Volumes/Source/source/bzr/mysql-5.6
plugin_dir: /Volumes/Source/source/bzr/mysql-5.6/lib/plugin/
general_log: OFF
general_log_file:
general_log_file_size:
log_error:
log_error_file_size:
slow_query_log: OFF
slow_query_log_file:
slow_query_log_file_size:
1 row.
#...done.
See the online MySQL Reference Manual for more information about
login-paths, the .mylogin.cnf file, and the
mysql_config_editor client.
If you have an installation where the MySQL Server version is
older (before 5.6.25 or 5.7.8) and my_print_defaults is newer,
then the Utilities cannot access the passwords in the
.login-path file because the newer
versions of my_print_defaults mask the passwords, but older
versions do not.
MySQL Utilities can also accept a configuration path and section for the server connection data. This allows you to store one or more sections with connection information. Saving the data in configuration files is more secure than specifying the data on the command-line but since the file is text, the data can still be read by anyone who can access the file.
To reference the configuration file, specify the path and file name followed by a section name in square brackets. The path is optional. If you do not specify it, the utility attempts to use your local configuration file (for example, my.cnf) if available.
For example, if you wanted to create a configuration file in /dev/env/test1/my.cnf and you created a section named server1, you would specify it as --server=/dev/env/test1/my.cnf[server1]. The corresponding section in the configuration file may look like the following.
[server1]
port=3308
user=root
password=other-pass
host=localhost
The following shows the execution of a utility using a configuration file.
shell> mysqlserverinfo.py --server=/dev/env/test1/my.cnf[server1] --format=vertical

# Source on localhost: ... connected.
*************************       1. row *************************
server: localhost:13001
config_file: /etc/my.cnf, /etc/mysql/my.cnf
binary_log: clone-bin.000001
binary_log_pos: 341
relay_log:
relay_log_pos:
version: 5.6.17-log
datadir: /Volumes/Source/source/temp_13001/
basedir: /Volumes/Source/source/bzr/mysql-5.6
plugin_dir: /Volumes/Source/source/bzr/mysql-5.6/lib/plugin/
general_log: OFF
general_log_file:
general_log_file_size:
log_error:
log_error_file_size:
slow_query_log: OFF
slow_query_log_file:
slow_query_log_file_size:
1 row.
#...done.
The least secure way to provide connection information for MySQL servers is to specify the data on the command-line. This is least secure because the data is visible on the command-line and is also visible in any log or redirection of the execution.
In this case, we specify the data in the following order:
user[:passwd]@host[:port][:socket]
where the passwd, port, and socket are optional. Each item is
described in more detail below.
The name of the user to connect.
The password to use when connecting. The default if no password is supplied is the empty password.
The domain name of the host or the IP address. This field accepts host names, and IPv4 and IPv6 addresses. It also accepts quoted values which are not validated and passed directly to the calling methods. This enables users to specify host names and IP addresses that are outside of the supported validation mechanisms.
The port to use when connecting to the server. The default if no port is supplied is 3306 (which is the default port for the MySQL server as well).
The socket to connect to (instead of using the host and port parameters).
The following demonstrates executing a utility using command-line options for connecting to a server.
shell> mysqlserverinfo.py --server=root:other-pass@localhost:3308 --format=vertical
# Source on localhost: ... connected.
*************************       1. row *************************
server: localhost:13001
config_file: /etc/my.cnf, /etc/mysql/my.cnf
binary_log: clone-bin.000001
binary_log_pos: 341
relay_log:
relay_log_pos:
version: 5.6.17-log
datadir: /Volumes/Source/source/temp_13001/
basedir: /Volumes/Source/source/bzr/mysql-5.6
plugin_dir: /Volumes/Source/source/bzr/mysql-5.6/lib/plugin/
general_log: OFF
general_log_file:
general_log_file_size:
log_error:
log_error_file_size:
slow_query_log: OFF
slow_query_log_file:
slow_query_log_file_size:
1 row.
#...done.
As of MySQL Utilities 1.4.4, this deprecated connection method issues a warning if you use this connection method.
If you build your own utilities using the MySQL Utilities library, there are various methods for connecting to MySQL servers. Methods that deal with connecting to servers can accept the following mechanisms for supplying the data.
As a Python dictionary containing the connection parameters.
As a connection specification string containing the connection parameters.
As a Server instance.
The dictionary lists the values by name as described above. For example, you would create code like the following.
# Set connection values
dest_values = {
    "user" : "root",
    "passwd" : "secret",
    "host" : "localhost",
    "port" : 3308,
    "unix_socket" : None,
}
The connection specification is a string the form
user[:passwd]@host[:port][:socket]
where the passwd, port, and socket are optional. This string is
parsed using the options.parse_connection function.
You can also specify an existing instance of the Server class. In this case, the new class copies the connection information.
There are two commonly used replication options for those
utilities that work with MySQL replication. These include the
--rpl-user= and
--discover-slaves-login= options.
In either case, these options permit users to specify a user
account name and (optionally) a password in the form of
user[:passwd].
Notice the use of the colon (:) to separate the values. Should a
user name or password contain a colon, the utility attempts to use
the first colon encountered (left-to-right) as the separator.
Thus, you should not use colons in your user names, but you may
use colons in the password.
However, it should be noted that some special characters may cause some platforms to mangle the command. Thus, you should use single quotes when specifying passwords with special characters as shown in the example below.
shell> mysqlreplicate [...] --rpl-user=rpl:'L5!w1SJzVuj40(p?tF@' [...]
Security is a big concern and MySQL Utilities is prepared to use a secure connection to MySQL server secure-connections using an encrypted connection with SSL. This section shows you how to use SSL when connecting to MySQL servers from any utility. All of the utilities use the same mechanism for establishing an SSL connection and include the following options.
The path to a file that contains a list of trusted SSL CAs.
The name of the SSL certificate file to use for establishing a secure connection.
The name of the SSL key file to use for establishing a secure connection.
Specifies if the server connection requires use of SSL. If an encrypted connection cannot be established, the connection attempt fails. Default setting is 0 (SSL not required).
In order to use SSL connections, the MySQL server must be
configure using the --ssl-ca
--ssl-cert and --ssl-key
options with a specific SSL certificate. The
--ssl option is used to enforce an SSL
option. That is, if an SSL connection cannot be made, do not
fall back to a normal connection. This option is not needed
unless you want to enforce an SSL connection.
If you are uncertain of how to create the SSL certificates, please following the steps indicated on Creating SSL and RSA Certificates and Keys.
Each utility permits the user to specify the
--ssl-ca, --ssl-cert,
--ssl-key, and --ssl
options to create a SSL connection to a MySQL server. Simply
specify the same options used when the server was started.
For example, if we wanted to get the information about a server
that supports SSL connections, we first identify the SSL
certificate authority (--ssl-ca), SSL
certificate (--ssl-cert), and SSL key
(--ssl-key). We want the connection to
default to a normal connection if an SSL connection cannot be
made, thus we omit the --ssl option.
Thus, we use the values from the server SSL configuration with the corresponding options for the utility. The following is an example of the running the serverinfo command with an SSL connection.
shell>mysqlserverinfo --server=root:pass@localhost:3307 \--ssl-ca=C:/newcerts/cacert.pem \--ssl-cert=C:/newcerts/client-cert.pem \--ssl-key=C:/newcerts/client-key.pem \--format=vertical# Source on localhost: ... connected. ************************* 1. row ************************* server: localhost:3307 config_file: binary_log: binary_log_pos: relay_log: relay_log_pos: version: 5.6.15 datadir: C:\MySQL\instance_3307\ basedir: C:\MySQL\mysql-5.6.15-winx64 plugin_dir: C:\MySQL\mysql-5.6.15-winx64\lib\plugin\ general_log: OFF general_log_file: general_log_file_size: log_error: C:\MySQL\instance_3307\clone.err log_error_file_size: 1569 bytes slow_query_log: OFF slow_query_log_file: slow_query_log_file_size: 1 row. #...done.