Getting Started Extending VisualVM
| Tutorial Download |
VisualVM is a tool for visualizing data sources. By default, it visualizes the following types of data sources—applications, hosts, snapshots, core dumps, heap dumps, and thread dumps. These data sources are visualized in VisualVM so that they can be monitored for purposes of analysis, management, and troubleshooting.
In this tutorial you will be introduced to the VisualVM APIs so that you can provide additional features to VisualVM. Principally, you will be shown how to get started using them and be given pointers for further resources, such as templates and samples.
In general, there are two types of reasons why you would want to extend VisualVM:
- Tool-Centric. In this scenario, you have a monitoring or management tool that you want to make available to VisualVM. For example, maybe you have a tool that shows an application's threads or processing speed in a new and interesting way. In this case, you would create a plugin that makes your tool available to VisualVM via new tabs and menu items, so that VisualVM users can benefit from the feature set provided by your tool.
- Application-Centric. In this scenario, you have an application with specific monitoring/management needs. For example, if your application is a deployment server, you might want to give users a graphic overview of the applications that are deployed to that server. In this case, you would need to introduce a new type of application to VisualVM. By default, all of your applications will be treated in the same default way and if, therefore, your application has one or more unique characteristics, and you want those characteristics to be supported in VisualVM, you would need to provide a plugin for a unique type of application in this way.
Contents
|
Introducing the VisualVM Entry Points
Entry points into VisualVM fall into the following categories:
- Tab extension. By default, VisualVM provides tabs with labels such as "Overview", "Monitor", and "Threads". You can create new tabs just like these. Optionally, your own tabs can be extendable so that others can plug subtabs into your tabs. Your tabs can either be available for all data sources in VisualVM or to specific types of data sources.
- Subtab extension. Within tabs such as those listed above, you can provide new subtabs. However, this is only possible if the tab has been defined to be "pluggable", which is explained below. The following tabs are all pluggable: "Overview", "Monitor", "Threads", "Heap Dump", and "Host". When you create a new subtab, you can specify its position in relation to the other subtabs within the tab. Subtabs can either be available for all data sources or for specific data sources.
- Menu extension. A data source, and its subnodes, can have one or more menu items added to their contextual menus.
- Application type extension. By default, all applications visualized in VisualVM are treated equally, that is, they all have the same icons and tabs, except if a plugin is provided to provide additional functionality. You might also want to provide functionality for a specific application, which means that you would need to define a new application type. You can do this to do something as simple as provide a distinguishing icon for a running instance of your application. Alternatively, you might want to provide a lot of functionality, including graphs, to show the processing of your specific application.
- Data source extension. The "Application" data source is only one of the types of data sources that can be monitored and managed in VisualVM. Another of the data sources is the "Host" data source, which lets you monitor and manage local and remote hosts. You might want to create new data sources, in situations where you want to monitor and manage a type of data source that VisualVM does not cater for by default.
A visual representation of the entry points into VisualVM:
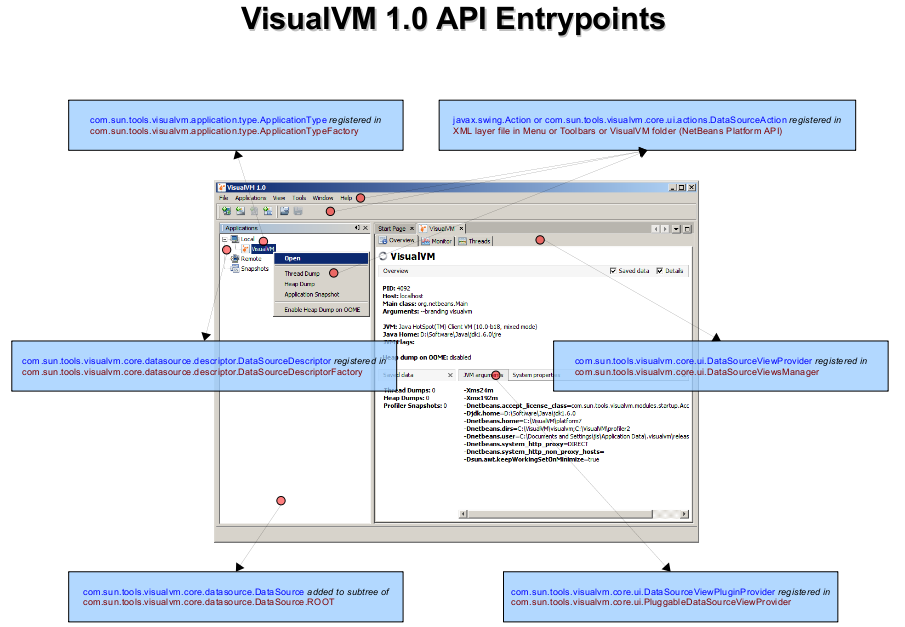
Entry points into VisualVM are implemented via the factory pattern. In that light, the main VisualVM APIs are as follows:
- Tabs
com.sun.tools.visualvm.core.ui.DataSourceViewProvider
/com.sun.tools.visualvm.core.ui.DataSourceViewTo make your tabs extendable, the following API must be extended, instead of com.sun.tools.visualvm.core.ui.DataSourceViewProvider:
com.sun.tools.visualvm.core.ui.PluggableDataSourceViewProvider - Subtabs
com.sun.tools.visualvm.core.ui.DataSourceViewPluginProvider
/com.sun.tools.visualvm.core.ui.DataSourceViewPlugin - Menu Items
com.sun.tools.visualvm.core.ui.actions.SingleDataSourceAction - Application Types
com.sun.tools.visualvm.application.type.MainClassApplicationTypeFactory
/com.sun.tools.visualvm.application.type.ApplicationType - Data Sources
com.sun.tools.visualvm.core.model.AbstractModelProvider
/com.sun.tools.visualvm.core.datasource.descriptor.DataSourceDescriptor
/com.sun.tools.visualvm.core.datasource.DataSource
The lifecycle of a VisualVM plugin is determined by a ModuleInstall class, which comes from the NetBeans APIs. Whenever you implement a new entry point into VisualVM, you need to provide code for registering and unregistering the entry point implementation. The relevant initialization code must be provided in the ModuleInstall class. When the plugin is loaded into VisualVM, the ModuleInstall.restored method is the first method that is called from your plugin. That is the method that should initialize the entry points. When the plugin is uninstalled, or when VisualVM closes down, the plugin's entry points need to be deregistered, from the ModuleInstall.uninstalled method. You will be shown some typical registration/deregistration code in the "Hello World" scenario that follows.
Preparing to Extend VisualVM
When you are planning to extend VisualVM, you need to do the following:
- Install JDK 7. VisualVM 1.3.7+ itself runs on JDK 7, even though it can monitor and manage applications running on earlier versions of the JDK. The plugins that you create need to therefore also make use of JDK 7 and not any earlier version of the JDK.
- Install NetBeans IDE 6.x. Though you are free to use any editor or IDE to develop VisualVM plugins, NetBeans IDE is optimized for plugin development for VisualVM. For example, the VisualVM plugin project structure, as well as several useful templates, can be generated by NetBeans IDE. At the time of writing, similar code generating features for VisualVM are not supported by other IDEs.
- Register VisualVM in NetBeans IDE. You will be building your VisualVM plugins against VisualVM, so that its plugins (and the APIs exposed by those plugins) are available to your own plugins. When you put the binary of VisualVM in the NetBeans Platform Manager, you will enable NetBeans IDE to compile your plugin against VisualVM. The VisualVM's APIs are then available to your plugin. Under the Tools menu, choose NetBeans Platform Manager, and then browse to the root folder of your VisualVM installation. Click Next and then click Finish. Later, when you create a VisualVM plugin project, you will be able to specify that the plugin should be built against the VisualVM binary that you registered above.
- Get the VisualVM Javadoc. API documentation for VisualVM 1.3.7 can be found here.
Creating a "Hello World" Plugin
Now, we'll say "Hello World". We will create a new tab that looks as follows:
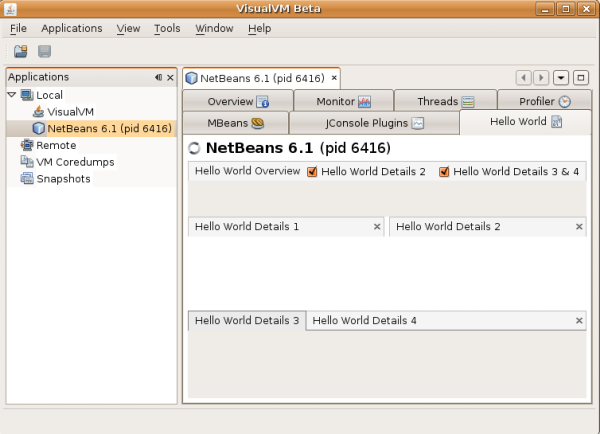
There will be no data in our tab, we'll simply create it and add some placeholders for content.
- In NetBeans IDE, choose File > New Project and then
choose NetBeans Modules > Module. Click Next. Create a new NetBeans module
called "HelloVisualVM" and make
sure to specify that
you want to build against the VisualVM binary that you registered earlier:
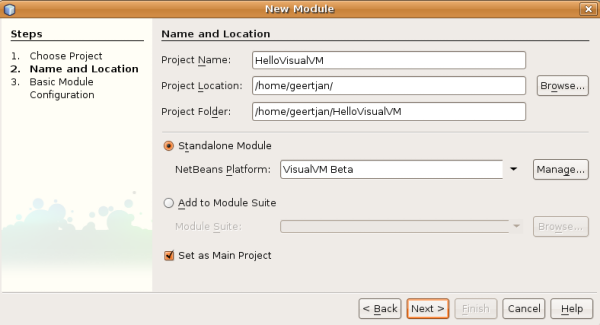
Click Next and fill out the next step as follows:
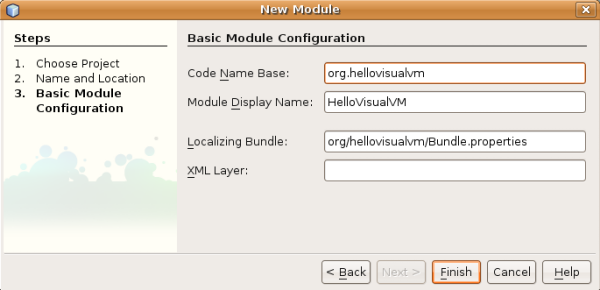
Click Finish.
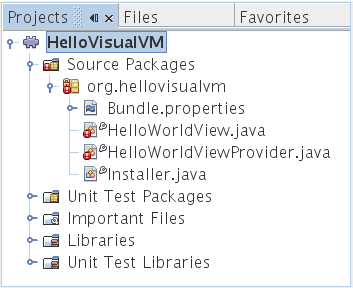
- Right-click the "HelloVisualVM" project node and choose New > Other.
In the New File dialog, use the "Module Installer" wizard, which will create the class that is called
when the plugin is installed into VisualVM. Here's where you'll find the wizard
in the New File dialog:

- Once you've completed the wizard, implement the ModuleInstall.restored
method and the ModuleInstall.uninstalled methods as follows:
@Override
public void restored() {
    HelloWorldViewProvider.initialize();
}

@Override
public void uninstalled() {
    HelloWorldViewProvider.unregister();
}
As you can see, we will define the above two methods in a class called "HelloWorldViewProvider", which we will define later. Therefore you can ignore the red error lines, because you will create the methods later.
- Now add a dependency on "VisualVM-Core", which provides the APIs into the VisualVM. Do this by right-clicking the project node, choosing "Properties", and then setting the dependency in the "Libraries" tab.
- Create a class called "HelloWorldViewProvider", as follows:
class HelloWorldViewProvider extends DataSourceViewProvider<Application> {

    private static DataSourceViewProvider<Application> instance =  new HelloWorldViewProvider();

    @Override
    public boolean supportsViewFor(Application application) {
        //Always shown:
        return true;
    }

    @Override
    public synchronized DataSourceView createView(final Application application) {
        return new HelloWorldView(application);

    }

    static void initialize() {
        DataSourceViewsManager.sharedInstance().addViewProvider(instance, Application.class);
    }

    static void unregister() {
        DataSourceViewsManager.sharedInstance().removeViewProvider(instance);
    }

}
By reading the Javadoc that you downloaded earlier, you'll know what the two overridden methods above are all about.
- Finally, we'll create our HelloWorldView class, which is created by our provider above:
class HelloWorldView extends DataSourceView { private DataViewComponent dvc; //Reusing an image from the sources: private static final String IMAGE_PATH = "com/sun/tools/visualvm/coredump/resources/coredump.png"; // NOI18N public HelloWorldView(Application application) { super(application, "Hello World", new ImageIcon(Utilities.loadImage(IMAGE_PATH, true)).getImage(), 60, false); } @Override protected DataViewComponent createComponent() { //Data area for master view: JEditorPane generalDataArea = new JEditorPane(); generalDataArea.setBorder(BorderFactory.createEmptyBorder(14, 8, 14, 8)); //Panel, which we'll reuse in all four of our detail views for this sample: JPanel panel = new JPanel(); //Master view: DataViewComponent.MasterView masterView = new DataViewComponent.MasterView ("Hello World Overview", null, generalDataArea); //Configuration of master view: DataViewComponent.MasterViewConfiguration masterConfiguration = new DataViewComponent.MasterViewConfiguration(false); //Add the master view and configuration view to the component: dvc = new DataViewComponent(masterView, masterConfiguration); //Add configuration details to the component, which are the show/hide checkboxes at the top: dvc.configureDetailsArea(new DataViewComponent.DetailsAreaConfiguration( "Hello World Details 1", true), DataViewComponent.TOP_LEFT); dvc.configureDetailsArea(new DataViewComponent.DetailsAreaConfiguration( "Hello World Details 2", true), DataViewComponent.TOP_RIGHT); dvc.configureDetailsArea(new DataViewComponent.DetailsAreaConfiguration( "Hello World Details 3 & 4", true), DataViewComponent.BOTTOM_RIGHT); //Add detail views to the component: dvc.addDetailsView(new DataViewComponent.DetailsView( "Hello World Details 1", null, 10, panel, null), DataViewComponent.TOP_LEFT); dvc.addDetailsView(new DataViewComponent.DetailsView( "Hello World Details 2", null, 10, panel, null), DataViewComponent.TOP_RIGHT); dvc.addDetailsView(new DataViewComponent.DetailsView( "Hello World Details 3", null, 10, panel, null), DataViewComponent.BOTTOM_RIGHT); dvc.addDetailsView(new DataViewComponent.DetailsView( "Hello World Details 4", null, 10, panel, null), DataViewComponent.BOTTOM_RIGHT); return dvc; } } - Right-click the project node and choose "Run".
This will install the plugin in a new instance of VisualVM
and you'll see your new tab, for all application types:
Congratulations you have completed the Hello World scenario!
Troubleshooting
If the instructions for the Hello World sample, as described above, do not work for you, do the following:
- Use the "Download Sample" link at the top of this page to download the sample.
- Install the downloaded NBM file into NetBeans IDE via Tools | Plugins | Downloaded.
- Open the New Project wizard (Ctrl-Shift-N) and find
the sample in the Samples | NetBeans Modules category, as
shown here:

- Complete the wizard and, if you have not set VisualVM as
your NetBeans Platform, you will see the project, together with
some error badges, as shown here:
- Choose Tools | NetBeans Platforms, click Add Platform, and browse to the installation
folder of VisualVM, to register it:
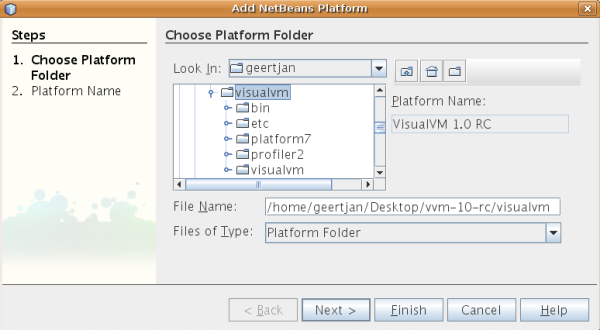
Click Next and then click Finish.
- Right-click the "HelloVisualVM" project node in the Projects window and choose Properties. In the Libraries panel, choose VisualVM as your NetBeans Platform. When you close the Project Properties dialog, the error marks should no longer be present.
- Run the project, and the result should be the same as the last step of the previous section.
Now inspect the sources of the sample and compare them to your own to see where the problem is.
Appendix A: VisualVM File Templates
The NetBeans Plugin Portal provides wizards that you might find helpful when getting started extending VisualVM:
- VisualVM View Template. Gives you the Java classes needed for creating a new tab for a specified data source, together with the applicable project dependencies.
- VisualVM Application Type Template. Gives you the Java classes needed for VisualVM to recognize a new Java application, via its main class, so that a new node will be created with a unique display name and icon, for the specified application, together with the applicable project dependencies.
- VisualVM Action Template. Gives you the Java class, layer.xml entries, and project dependencies for a new menu item in the explorer view for a specified data source.
In each case, the Plugin Portal page describes the steps to take when using the template and it also shows you most of the code that is generated for you.
Appendix B: VisualVM API Samples
The NetBeans Plugin Portal provides a collection of 7 samples, covering the most common ways in which you would want to plug into VisualVM:

Go here to get the samples, which are described here on Javalobby.
Appendix C: VisualVM API Reference
When you check out the VisualVM sources, you will find that the following modules make up the application. Each provides a set of APIs that you can use to extend the module in question:
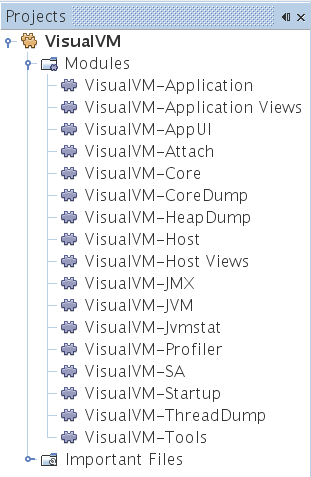
A brief overview of the API-related packages provided
by the VisualVM modules that you see above, together
with FAQs that you might have about concepts
relating to the packages in question:
| Package | Description | Related FAQs |
|---|---|---|
| com.sun.tools.visualvm.core.datasource | Provides the classes that represent DataSources. A DataSource can either be an Application, a Host, a CoreDump, a SnapShot, or a custom-defined DataSource that is contributed by a third party plugin. | |
| com.sun.tools.visualvm.core.datasupport | Provides listeners and interfaces for supporting data sources. | |
| com.sun.tools.visualvm.application.views.monitor | Provides the entry point into the "Monitor" tab. | |
| com.sun.tools.visualvm.application.views.overview | Provides the entry point into the "Overview" tab. | |
| com.sun.tools.visualvm.application.views.threads | Provides the entry point into the "Threads" tab. | |
| com.sun.tools.visualvm.core.explorer | Provides entry points into the explorer view. For example, you can create new menu items on a node in the explorer view, you can listen to changes, and you can specify what should happen when a node is expanded or collapsed. | |
| com.sun.tools.visualvm.heapdump | Provides the entry point into the "Heap Dump" tab. | |
| com.sun.tools.visualvm.core.model | Provides classes that define the backing model of new DataSources. For example, these classes are used for synchronization purposes. | |
| com.sun.tools.visualvm.application.type | Provides predefined generic application types. For example, an application type is provided for Java Web Start applications, so that when an application is deployed via Java Web Start, a distinct text is shown in VisualVM, to easily identify the deployed application. There is also a default application type so that all applications are recognized in one way or another. | |
| com.sun.tools.visualvm.core.datasource.descriptor | Provides classes that you need to use when creating new data sources, such as new application types. | |
| com.sun.tools.visualvm.host | Provides a common interface for DataSources that represent a host, that is, localhost or remote host. | |
| com.sun.tools.visualvm.jmx | Provides classes that let you work with Java Management Extensions (JMX). For example, you can check whether JMX is enabled for an application and then enable/disable functionality provided by your plugin. | |
| com.sun.tools.visualvm.jvm | Provides classes that let you define functionality for specific versions of the JVM. For example, there is a "SunJVM_6" class, as well as a "SunJVM_7" class. Per class, you can check whether features, such as JVM monitoring, are enabled and then enable/disable functionality provided by your plugin. | |
| com.sun.tools.visualvm.core.scheduler | Provides scheduler services. For example, it provides an interval based scheduler service that you can use to execute tasks at predefined intervals. | |
| com.sun.tools.visualvm.application.snapshot | Provides entry points into snapshots. For example, you can retrieve a list of registered snapshots. | |
| com.sun.tools.visualvm.threaddump | Provides the entry point into the "Thread Dump" tab. | |
| com.sun.tools.visualvm.core.ui | Provides entry points that let you create new tabs and subtabs. For example, in addition to creating tabs and subtabs, you can define where they should be displayed relative to existing tabs and subtabs and define whether they are pluggable. | |
| com.sun.tools.visualvm.core.ui.components | Provides the components that you can use to define the tabs and subtabs. For example, each tab is divided into a master area with four detail areas, each of which can have configuration areas for showing/hiding them. |
Appendix D: Further Reading
To continue learning about the VisualVM APIs, you are recommended to consult the following resources:
- Get the VisualVM Javadoc. API documentation for VisualVM 1.3.7 can be found here.
- VisualVM Developer FAQ. A complete list of typical questions that can be asked in relation to the VisualVM APIs, together with many code samples that answer them.
- VisualVM Sources. If you read the VisualVM sources, you will be able to answer several of your API implementation questions. For example, you can find several pluggable views in the sources that you can learn from when creating your own pluggable views.
- VisualVM Plugins. When you download the VisualVM
sources, you will find that you have also downloaded the sources
of a set of plugins. You can inspect these plugins and learn
from them. Treat them as samples. At the time of writing, the plugins bundled
with the sources are as follows:
- GlassFish. This plugin provides a new application type for the GlassFish server. A new application type node is created for each running GlassFish instance. All deployed applications are represented by subnodes, with further subnodes for each servlet in the application. Furthermore, tabs specific to each server instance, application, and servlet are also provided.
- MBeans. This plugin provides a new tab for all applications that have JMX enabled. The information provided in the tab is exactly the same as the information provided by the MBeans tab in the JDK's JConsole application.
- JConsole. This plugin makes VisualVM receptive to JConsole plugins, so that investment in JConsole plugins is not lost when you transfer from JConsole to VisualVM.
- Blog entries by Geertjan Wielenga. Geertjan is
the technical writer responsible for documenting the VisualVM APIs.
While learning about the VisualVM APIs, he wrote a series of blog
entries about the VisualVM APIs he was learning about.
Note: Several APIs have changed since these blog entries were written, but they should at least give you an idea of what is involved in each particular scenario described.
The relevant blog entries are as follows:
- Getting Started Extending VisualVM (Part 1). Here you create your first tab extension. You discover that VisualVM tabs are broken down into master views, master view configurations, and detail views. That blog entry is reproduced in the "Hello World" section of this tutorial.
- Getting Started Extending VisualVM (Part 2). Here you create an application type extension, with a subtab extension within the Overview tab and a menu extension, both specifically for the application type.
- Getting Started Extending VisualVM (Part 3). Here you are introduced to application type subnodes and you are referred to the GlassFish plugin for related source code.
- Getting Started Extending VisualVM (Part 4). Here the extendability of the "Overview" tab, "Monitor" tab, and "Threads" tab are highlighted. In addition, you are shown how to make your own tabs extendable.
- Getting Started Extending VisualVM (Part 5). Here the extendability of the "Host" data source is discussed. Code is provided for adding a tab to the Localhost view and a subtab to its Overview tab.
- Getting Started Extending VisualVM (Part 6). Here you learn a lot about the primary actors of VisualVM—data sources. In addition, you are shown all the code that you need for creating your own data source.
- Getting Started Extending VisualVM (Part 7). Here you find out how to create a tab for comparing data from multiple instances of the same data source type. In this case, the tab contains the system properties (or JVM arguments) of all the running Java applications, at the same time.