| Oracle® Automatic Storage Management Administrator's Guide 11g Release 2 (11.2) Part Number E18951-03 |
|
|
PDF · Mobi · ePub |
| Oracle® Automatic Storage Management Administrator's Guide 11g Release 2 (11.2) Part Number E18951-03 |
|
|
PDF · Mobi · ePub |
This chapter describes how to administer Oracle Automatic Storage Management Cluster File System (Oracle ACFS) using Oracle Enterprise Manager.
This chapter contains the following topics:
All Oracle ASM administration tasks begin with the Oracle Automatic Storage Management Home page in Oracle Enterprise Manager. For information about the Oracle ASM home page and how to access that page, see "Oracle Automatic Storage Management Home Page".
For information about using command-line tools to administer Oracle ACFS file systems, see Chapter 13, "Oracle ACFS Command-Line Tools". For information about the basic steps for creating Oracle ACFS file systems, see "Basic Steps to Manage Oracle ACFS Systems".
This section discusses how to manage Oracle ACFS volumes and file systems with Oracle Enterprise Manager.
This section contains the following topics:
To create an Oracle ACFS volume, perform the following steps.
Access the Disk Groups page from the Oracle ASM home page.
Click the Volumes link in the General tab of the Disk Group page. See Figure 10-6.
Click Create in the Volumes tab of the Disk Group page.
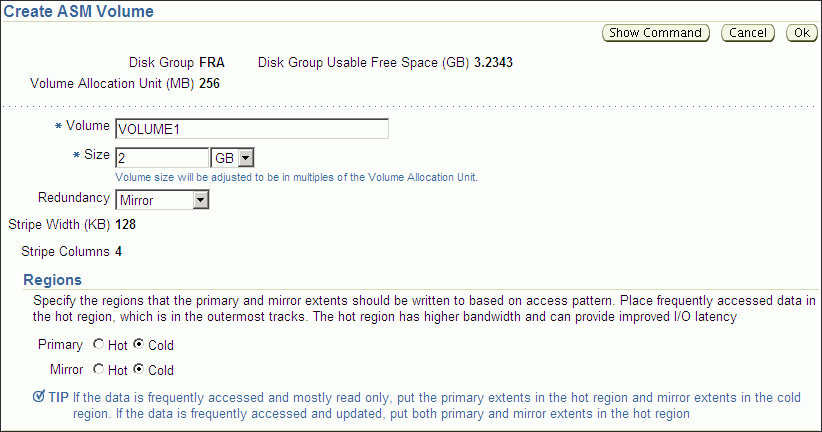
The Create ASM Volume page displays, shown in Figure 10-1.
Enter the volume name (maximum 11 characters), disk group name that contains the volume, and the initial size of the volume.
You can also select the redundancy setting for the volume and the region settings for primary and mirror extents. For information about redundancy settings, refer to "Mirroring, Redundancy, and Failure Group Options". For information about hot and cold disk regions, refer to "Intelligent Data Placement". For information about creating a volume with the ASMCMD volcreate command, refer to "volcreate".
Figure 10-1 shows the Oracle ASM Create ASM Volume page.
Figure 10-1 Oracle Automatic Storage Management Create ASM Volume Page
To create an Oracle ACFS file system on a volume in a disk group, perform the following steps.
Access the Volumes tab of the Disk Group page. See Figure 10-6.
Select an existing volume in the disk group and click Create ASM Cluster File System.
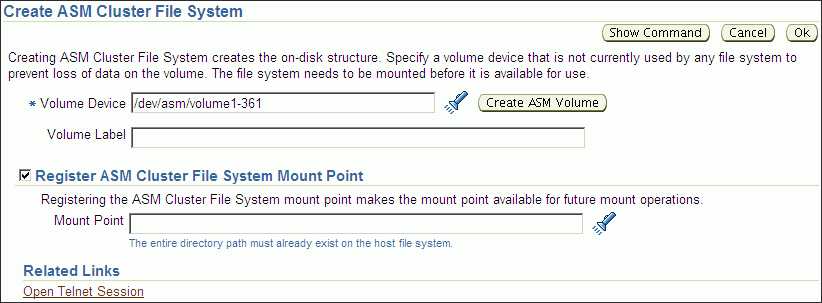
Figure 10-2 shows the Create ASM Cluster File System page.
The compatibility parameters COMPATIBLE.ASM and COMPATIBLE.ADVM must be set to 11.2 or higher for the disk group. See "Disk Group Compatibility Attributes".
On the Create ASM Cluster File System page, enter the information to create a file system. You can optionally register and mount the file system.
You must enter the volume name. You can enter an optional volume label.
You can optionally choose to register and mount the file system when it is created. Select a mount point from available directories.
Enter the host credentials needed to run the command when prompted. To register or mount a file system, you need root or administrator privileges. For information about the registry process, see "About the Oracle ACFS Mount Registry".
After a directory has been selected, click Show Command to have Oracle Enterprise Manager generate the commands that you can run at an operating system prompt. Examples of commands on a Linux system are:
/sbin/mkfs -t acfs -b 4k /dev/asm/volume1-361
/sbin/acfsutil registry -f -a /dev/asm/volume1-361 /oracle/acfsmounts/acfs2
/bin/mount -t acfs -rw /dev/asm/volume1-361 /oracle/acfsmounts/acfs2
You can also generate the commands to register or mount an Oracle ACFS file system on the ASM Cluster File System tab. See Figure 10-3.
Figure 10-2 Oracle Automatic Storage Management Create Oracle ACFS Page
To view and modify information about Oracle ACFS file systems, click the ASM Cluster File System link in the Oracle ASM home page.
Figure 10-3 shows the ASM Cluster File System tab in Oracle Enterprise Manager. This tab lists all of the Oracle ACFS associated with the Oracle ASM instance.
On this page, you can choose to mount, dismount, delete, create snapshot, view content, register, and deregister a selected file system. In addition, you can create a file system, mount all file systems, or dismount all file systems.
For each Oracle ACFS, the columns provide information for Mount Point, Availability, State, Snapshots, Used (%), Used (GB), Size (GB), Allocated Space, Redundancy, Volume, and Disk Group. Redundancy, Volume, and Disk Group columns are on the far right of the page and are not shown in the illustration. The mount point, snapshots, volume, and disk group are provided as links to further information.
Figure 10-3 Oracle Automatic Storage Management Oracle ACFS Page

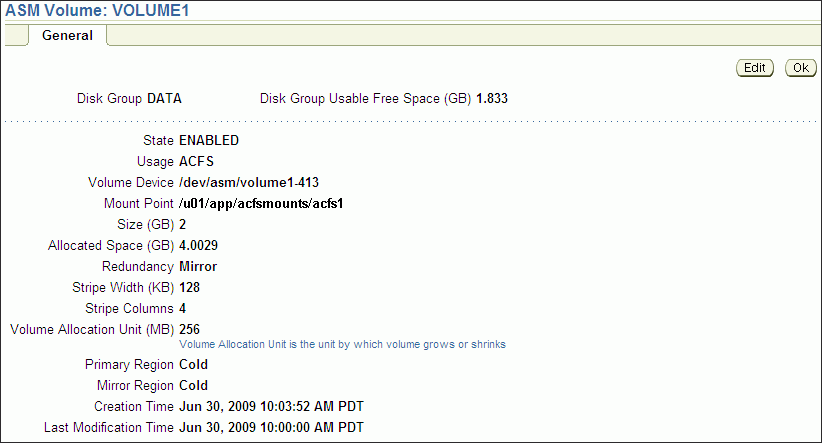
To view information about a specific volume, click the volume name in the Volume column on the ASM Cluster File System page.
Figure 10-4 shows the General tab of the ASM Volumes page.
Figure 10-4 Oracle Automatic Storage Management General Tab of the Volumes Page
To view information about a file system, click the link in the Mount Point column on the ASM Cluster File System page.
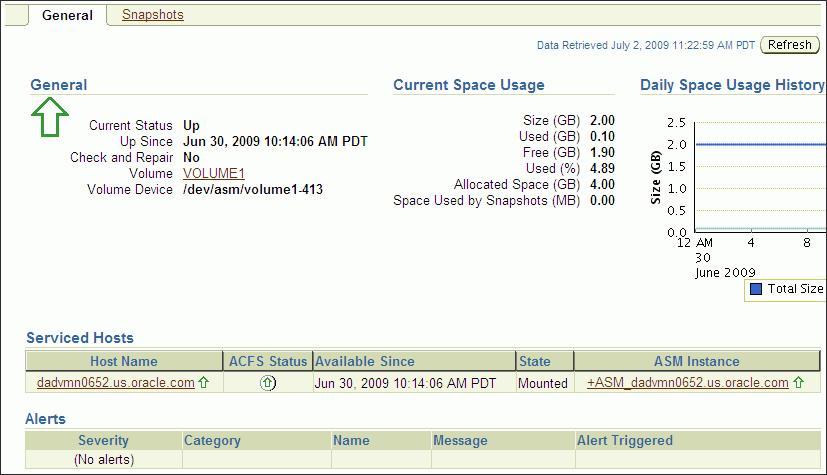
Figure 10-5 shows the General tab of the ASM Cluster File System page.
Figure 10-5 Oracle Automatic Storage Management Oracle ACFS General Page
To view information about a disk group for an Oracle ACFS, click the disk group name in the Disk Group column on the ASM Cluster File System page. The General tab of the Disk Group page displays as shown in Figure 9-7.
To view information about volumes in a disk group, click the Volumes tab at the top of the Disk Group page.
Figure 10-6 shows the Oracle ACFS Volume page.
Figure 10-6 Oracle Automatic Storage Management Oracle ACFS Volume Page

To view and modify information about existing snapshots or create snapshots for a file system, perform the following steps.
Click the ASM Cluster File System tab on the Oracle ASM home page
Click a mount point link in the Mount Point column as shown in Figure 10-3
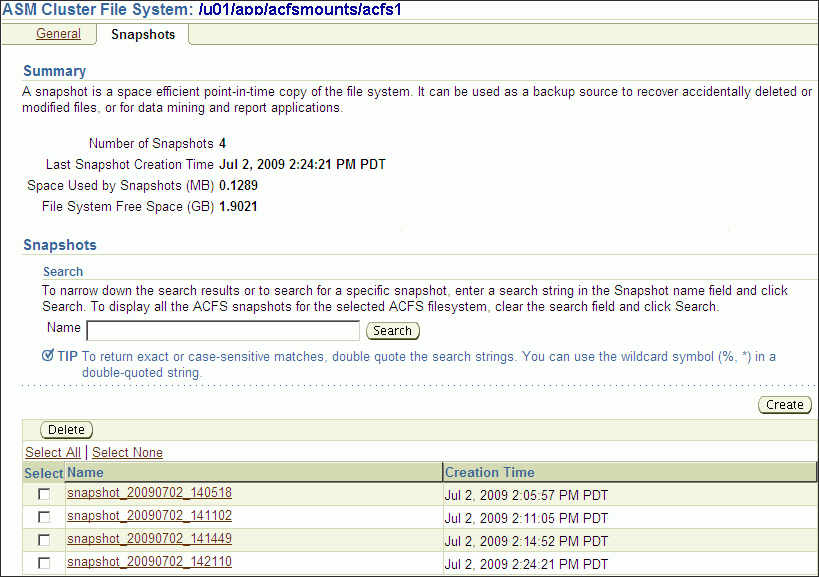
Click the Snapshots tab, shown in Figure 10-7.
Optionally, you can click a number link for existing snapshots in the Snapshots column on the ASM Cluster File System page to display the Snapshots page.
On the Snapshots page, you can create snapshots or search for and display specific snapshots. To search for a snapshot, enter a name with optional wildcard characters in the search field then click Search.
Figure 10-7 Oracle Automatic Storage Management Oracle ACFS Snapshots Tab
To create a snapshot, perform the following steps.
Click Create in the Snapshots page.
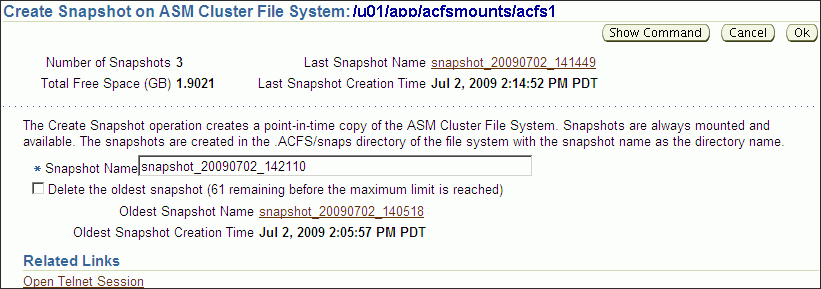
Figure 10-8 shows the Create Snapshot page.
Complete the information on the page.
Accept the default snapshot name, or provide a name. Optionally, you can choose to delete the oldest snapshot.
When you have completed the screen, you can click OK to run the command, or click Show Command to view the generated command.
For example, the following is a generated command for creating a snapshot:
/sbin/acfsutil snap create "snapshot_20090702_142135" /oracle/acfsmounts/acfs1
To run the generated command, you need the appropriate privileges on the host computer. Oracle Enterprise Manager prompts you to enter host credentials if they have not been set up.
You can also open a Telnet session from the Create Snapshot page to manually enter the generated operating system command.
Figure 10-8 Oracle Automatic Storage Management Create Snapshot Page
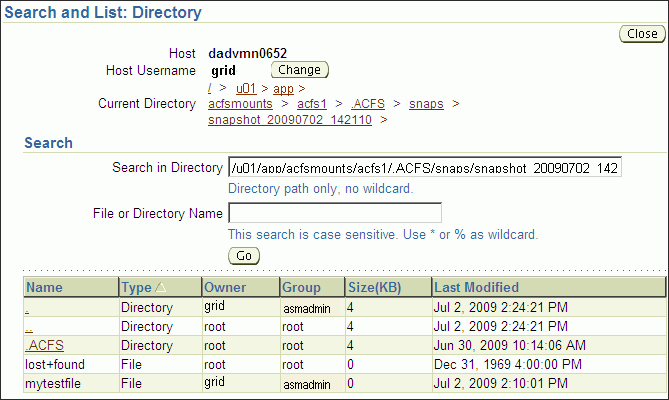
To drill down in a snapshot directory, click the snapshot name in the Snapshots page to display the Search and List Directory page.
Figure 10-9 shows the Search and List Directory page for a specific snapshot directory. The directory contains the snapshots of the file system
Figure 10-9 Oracle Automatic Storage Management Search and List Directory Page
