| Oracle® Database Administrator's Guide 11g Release 2 (11.2) Part Number E25494-02 |
|
|
PDF · Mobi · ePub |
| Oracle® Database Administrator's Guide 11g Release 2 (11.2) Part Number E25494-02 |
|
|
PDF · Mobi · ePub |
You prioritize Oracle Scheduler jobs using three Scheduler objects: job classes, windows, and window groups. These objects prioritize jobs by associating jobs with database resource manager consumer groups. This in turn controls the amount of resources allocated to these jobs. In addition, job classes enable you to set relative priorities among a group of jobs if all jobs in the group are allocated identical resource levels.
This section contains:
Job classes provide a way to group jobs for prioritization. They also provide a way to easily assign a set of attribute values to member jobs. Job classes influence the priorities of their member jobs through job class attributes that relate to the database resource manager. See "Allocating Resources Among Jobs Using Resource Manager" for details.
There is a default job class that is created with the database. If you create a job without specifying a job class, the job will be assigned to this default job class (DEFAULT_JOB_CLASS). The default job class has the EXECUTE privilege granted to PUBLIC so any database user who has the privilege to create a job can create a job in the default job class.
This section introduces you to basic job class tasks, and discusses the following topics:
See Also:
"Job Classes" for an overview of job classes.Table 29-8 illustrates common job class tasks and their appropriate procedures and privileges:
Table 29-8 Job Class Tasks and Their Procedures
| Task | Procedure | Privilege Needed |
|---|---|---|
|
Create a job class |
|
|
|
Alter a job class |
|
|
|
Drop a job class |
|
|
See "Scheduler Privileges" for further information regarding privileges.
You create a job class using the CREATE_JOB_CLASS procedure or Enterprise Manager. Job classes are always created in the SYS schema.
The following statement creates a job class for all finance jobs:
BEGIN
  DBMS_SCHEDULER.CREATE_JOB_CLASS (
   job_class_name             =>  'finance_jobs',
   resource_consumer_group    =>  'finance_group');
END;
/
All jobs in this job class are assigned to the finance_group resource consumer group.
To query job classes, use the *_SCHEDULER_JOB_CLASSES views.
See Also:
"About Resource Consumer Groups"You alter a job class by using the SET_ATTRIBUTE procedure or Enterprise Manager. Other than the job class name, all the attributes of a job class can be altered. The attributes of a job class are available in the *_SCHEDULER_JOB_CLASSES views.
When a job class is altered, running jobs that belong to the class are not affected. The change only takes effect for jobs that have not started running yet.
You drop one or more job classes using the DROP_JOB_CLASS procedure or Enterprise Manager. Dropping a job class means that all the metadata about the job class is removed from the database.
You can drop several job classes in one call by providing a comma-delimited list of job class names to the DROP_JOB_CLASS procedure call. For example, the following statement drops three job classes:
BEGIN
  DBMS_SCHEDULER.DROP_JOB_CLASS('jobclass1, jobclass2, jobclass3');
END;
/
You can change the relative priorities of jobs within the same job class by using the SET_ATTRIBUTE procedure. Job priorities must be in the range of 1-5, where 1 is the highest priority. For example, the following statement changes the job priority for my_job1 to a setting of 1:
BEGIN
  DBMS_SCHEDULER.SET_ATTRIBUTE (
   name           =>   'my_emp_job1',
   attribute      =>   'job_priority',
   value          =>   1);
END;
/
You can verify that the attribute was changed by issuing the following statement:
SELECT JOB_NAME, JOB_PRIORITY FROM DBA_SCHEDULER_JOBS;

JOB_NAME                       JOB_PRIORITY
------------------------------ ------------
MY_EMP_JOB                                3
MY_EMP_JOB1                               1
MY_NEW_JOB1                               3
MY_NEW_JOB2                               3
MY_NEW_JOB3                               3
Overall priority of a job within the system is determined first by the combination of the resource consumer group that the job's job class is assigned to and the current resource plan, and then by relative priority within the job class.
See Also:
Oracle Database PL/SQL Packages and Types Reference for detailed information about the SET_ATTRIBUTE procedure
Windows provide a way to automatically activate different resource plans at different times. Running jobs can then see a change in the resources that are allocated to them when there is a change in resource plan. A job can name a window in its schedule_name attribute. The Scheduler then starts the job with the window "opens." A window has a schedule associated with it, so a window can open at various times during your workload cycle.
The key attributes of a window are its:
Schedule
This controls when the window is in effect.
Duration
This controls how long the window is open.
Resource plan
This names the resource plan that activates when the window opens.
Only one window can be in effect at any given time. Windows belong to the SYS schema.
All window activity is logged in the *_SCHEDULER_WINDOW_LOG views, otherwise known as the window logs. See "Window Log" for examples of window logging.
This section introduces you to basic window tasks, and discusses the following topics:
See Also:
"Windows" for an overview of windows.Table 29-9 illustrates common window tasks and the procedures you use to handle them.
Table 29-9 Window Tasks and Their Procedures
| Task | Procedure | Privilege Needed |
|---|---|---|
|
Create a window |
|
|
|
Open a window |
|
|
|
Close a window |
|
|
|
Alter a window |
|
|
|
Drop a window |
|
|
|
Disable a window |
|
|
|
Enable a window |
|
|
See "Scheduler Privileges" for further information regarding privileges.
You can use Enterprise Manager or the DBMS_SCHEDULER.CREATE_WINDOW package procedure to create windows. When using the package procedure, you can leave the resource_plan parameter NULL. In this case, when the window opens, the current plan remains in effect.
You must have the MANAGE SCHEDULER privilege to create windows.
When you specify a schedule for a window, the Scheduler does not check if there is already a window defined for that schedule. Therefore, this may result in windows that overlap. Also, using a named schedule that has a PL/SQL expression as its repeat interval is not supported for windows
See the CREATE_WINDOW procedure in Oracle Database PL/SQL Packages and Types Reference for details on window attributes.
The following example creates a window named daytime that enables the mixed_workload_plan resource plan during office hours:
BEGIN
   DBMS_SCHEDULER.CREATE_WINDOW (
     window_name      => 'daytime',
     resource_plan    => 'mixed_workload_plan',
     start_date       => '28-APR-09 08.00.00 AM',
     repeat_interval  => 'freq=daily; byday=mon,tue,wed,thu,fri',
     duration         => interval '9' hour,
     window_priority  => 'low',
     comments         => 'OLTP transactions have priority');
END;
/
To verify that the window was created properly, query the view DBA_SCHEDULER_WINDOWS. As an example, issue the following statement:
SELECT WINDOW_NAME, RESOURCE_PLAN, DURATION, REPEAT_INTERVAL FROM DBA_SCHEDULER_WINDOWS;

WINDOW_NAME   RESOURCE_PLAN         DURATION       REPEAT_INTERVAL
-----------   -------------------   -------------  ---------------
DAYTIME       MIXED_WORKLOAD_PLAN   +000 09:00:00  freq=daily; byday=mon,tue,wed,thu,fri
You alter a window by modifying its attributes. You do so with the SET_ATTRIBUTE and SET_ATTRIBUTE_NULL procedures or Enterprise Manager. With the exception of WINDOW_NAME, all the attributes of a window can be changed when it is altered. See the CREATE_WINDOW procedure in Oracle Database PL/SQL Packages and Types Reference for window attribute details.
When a window is altered, it does not affect an active window. The changes only take effect the next time the window opens.
All windows can be altered. If you alter a window that is disabled, it will remain disabled after it is altered. An enabled window will be automatically disabled, altered, and then reenabled, if the validity checks performed during the enable process are successful.
See Oracle Database PL/SQL Packages and Types Reference for detailed information about the SET_ATTRIBUTE and SET_ATTRIBUTE_NULL procedures.
When a window opens, the Scheduler switches to the resource plan that has been associated with it during its creation. If there are jobs running when the window opens, the resources allocated to them might change due to the switch in resource plan.
There are two ways a window can open:
According to the window's schedule
Manually, using the OPEN_WINDOW procedure
This procedure opens the window independent of its schedule. This window will open and the resource plan associated with it will take effect immediately. Only an enabled window can be manually opened.
In the OPEN_WINDOW procedure, you can specify the time interval that the window should be open for, using the duration attribute. The duration is of type interval day to second. If the duration is not specified, then the window will be opened for the regular duration as stored with the window.
Opening a window manually has no impact on regular scheduled runs of the window.
When a window that was manually opened closes, the rules about overlapping windows are applied to determine which other window should be opened at that time if any at all.
You can force a window to open even if there is one already open by setting the force option to TRUE in the OPEN_WINDOW call or Enterprise Manager.
When the force option is set to TRUE, the Scheduler automatically closes any window that is open at that time, even if it has a higher priority. For the duration of this manually opened window, the Scheduler does not open any other scheduled windows even if they have a higher priority. You can open a window that is already open. In this case, the window stays open for the duration specified in the call, from the time the OPEN_WINDOW command was issued.
Consider an example to illustrate this. window1 was created with a duration of four hours. It has how been open for two hours. If at this point you reopen window1 using the OPEN_WINDOW call and do not specify a duration, then window1 will be open for another four hours because it was created with that duration. If you specified a duration of 30 minutes, the window will close in 30 minutes.
When a window opens, an entry is made in the window log.
A window can fail to switch resource plans if the current resource plan has been manually switched using the ALTER SYSTEM statement with the FORCE option, or using the DBMS_RESOURCE_MANAGER.SWITCH_PLAN package procedure with the allow_scheduler_plan_switches argument set to FALSE. In this case, the failure to switch resource plans is written to the window log.
See Oracle Database PL/SQL Packages and Types Reference for detailed information about the OPEN_WINDOW procedure and the DBMS_RESOURCE_MANAGER.SWITCH_PLAN procedure.
There are two ways a window can close:
Based on a schedule
A window will close based on the schedule defined at creation time.
Manually, using the CLOSE_WINDOW procedure
The CLOSE_WINDOW procedure will close an open window prematurely.
A closed window means that it is no longer in effect. When a window is closed, the Scheduler will switch the resource plan to the one that was in effect outside the window or in the case of overlapping windows to another window. If you try to close a window that does not exist or is not open, an error is generated.
A job that is running will not close when the window it is running in closes unless the attribute stop_on_window_close was set to TRUE when the job was created. However, the resources allocated to the job may change because the resource plan may change.
When a running job has a window group as its schedule, the job will not be stopped when its window is closed if another window that is also a member of the same window group then becomes active. This is the case even if the job was created with the attribute stop_on_window_close set to TRUE.
When a window is closed, an entry will be added to the window log DBA_SCHEDULER_WINDOW_LOG.
See Oracle Database PL/SQL Packages and Types Reference for detailed information about the CLOSE_WINDOW procedure.
You drop one or more windows using the DROP_WINDOW procedure or Enterprise Manager. When a window is dropped, all metadata about the window is removed from the *_SCHEDULER_WINDOWS views. All references to the window are removed from window groups.
You can drop several windows in one call by providing a comma-delimited list of window names or window group names to the DROP_WINDOW procedure. For example, the following statement drops both windows and window groups:
BEGIN
  DBMS_SCHEDULER.DROP_WINDOW ('window1, window2, window3,
   windowgroup1, windowgroup2');
END;
/
Note that if a window group name is provided, then the windows in the window group are dropped, but the window group is not dropped. To drop the window group, you must use the DROP_WINDOW_GROUP procedure.
See Oracle Database PL/SQL Packages and Types Reference for detailed information about the DROP_WINDOW procedure.
You disable one or more windows using the DISABLE procedure or with Enterprise Manager. Therefore, the window will not open. However, the metadata of the window is still there, so it can be reenabled. Because the DISABLE procedure is used for several Scheduler objects, when disabling windows, they must be preceded by SYS.
A window can also become disabled for other reasons. For example, a window will become disabled when it is at the end of its schedule. Also, if a window points to a schedule that no longer exists, it becomes disabled.
If there are jobs that have the window as their schedule, you will not be able to disable the window unless you set force to TRUE in the procedure call. By default, force is set to FALSE. When the window is disabled, those jobs that have the window as their schedule will not be disabled.
You can disable several windows in one call by providing a comma-delimited list of window names or window group names to the DISABLE procedure call. For example, the following statement disables both windows and window groups:
BEGIN
  DBMS_SCHEDULER.DISABLE ('sys.window1, sys.window2,
   sys.window3, sys.windowgroup1, sys.windowgroup2');
END;
/
See Oracle Database PL/SQL Packages and Types Reference for detailed information about the DISABLE procedure.
You enable one or more windows using the ENABLE procedure or Enterprise Manager. An enabled window is one that can be opened. Windows are, by default, created enabled. When a window is enabled using the ENABLE procedure, a validity check is performed and only if this is successful will the window be enabled. When a window is enabled, it is logged in the window log table. Because the ENABLE procedure is used for several Scheduler objects, when enabling windows, they must be preceded by SYS.
You can enable several windows in one call by providing a comma-delimited list of window names. For example, the following statement enables three windows:
BEGIN
  DBMS_SCHEDULER.ENABLE ('sys.window1, sys.window2, sys.window3');
END;
/
See Oracle Database PL/SQL Packages and Types Reference for detailed information about the ENABLE procedure.
Window groups provide an easy way to schedule jobs that must run during multiple time periods throughout the day, week, and so on. If you create a window group, add windows to it, and then name this window group in a job's schedule_name attribute, the job runs during all the windows in the window group.
Window groups reside in the SYS schema. This section introduces you to basic window group tasks, and discusses the following topics:
See Also:
"Window Groups" for an overview of window groups.Table 29-10 illustrates common window group tasks and the procedures you use to handle them.
Table 29-10 Window Group Tasks and Their Procedures
| Task | Procedure | Privilege Needed |
|---|---|---|
|
Create a window group |
|
|
|
Drop a window group |
|
|
|
Add a member to a window group |
|
|
|
Drop a member from a window group |
|
|
|
Enable a window group |
|
|
|
Disable a window group |
|
|
See "Scheduler Privileges" for further information regarding privileges.
You create a window group by using the DBMS_SCHEDULER.CREATE_GROUP procedure, specifying a group type of 'WINDOW'. You can specify the member windows of the group when you create the group, or you can add them later using the ADD_GROUP_MEMBER procedure. A window group cannot be a member of another window group. You can, however, create a window group that has no members.
If you create a window group and you specify a member window that does not exist, an error is generated and the window group is not created. If a window is already a member of a window group, it is not added again.
Window groups are created in the SYS schema. Window groups, like windows, are created with access to PUBLIC, therefore, no privileges are required to access window groups.
The following statement creates a window group called downtime and adds two windows (weeknights and weekends) to it:
BEGIN
  DBMS_SCHEDULER.CREATE_GROUP (
   group_name   =>  'downtime',
   group_type   =>  'WINDOW',
   member       =>  'weeknights, weekends');
END;
/
To verify the window group contents, issue the following queries as a user with the MANAGE SCHEDULER privilege:
SELECT group_name, enabled, number_of_members FROM dba_scheduler_groups
  WHERE group_type = 'WINDOW';

GROUP_NAME     ENABLED  NUMBER_OF_MEMBERS
-------------- -------- -----------------
DOWNTIME       TRUE                     2

SELECT group_name, member_name FROM dba_scheduler_group_members;

GROUP_NAME      MEMBER_NAME
--------------- --------------------
DOWNTIME        "SYS"."WEEKENDS"
DOWNTIME        "SYS"."WEEKNIGHTS"
You drop one or more window groups by using the DROP_GROUP procedure. This call will drop the window group but not the windows that are members of this window group. To drop all the windows that are members of this group but not the window group itself, you can use the DROP_WINDOW procedure and provide the name of the window group to the call.
You can drop several window groups in one call by providing a comma-delimited list of window group names to the DROP_GROUP procedure call. You must precede each window group name with the SYS schema. For example, the following statement drops three window groups:
BEGIN
DBMS_SCHEDULER.DROP_GROUP('sys.windowgroup1, sys.windowgroup2, sys.windowgroup3');
END;
/
You add windows to a window group by using the ADD_GROUP_MEMBER procedure.
You can add several members to a window group in one call, by specifying a comma-delimited list of windows. For example, the following statement adds two windows to the window group window_group1:
BEGIN
  DBMS_SCHEDULER.ADD_GROUP_MEMBER ('sys.windowgroup1','window2, window3');
END;
/
If an already open window is added to a window group, the Scheduler will not start jobs that point to this window group until the next window in the window group opens.
You can remove one or more windows from a window group by using the REMOVE_GROUP_MEMBER procedure. Jobs with the stop_on_window_close flag set will only be stopped when a window closes. Dropping an open window from a window group has no impact on this.
You can remove several members from a window group in one call by specifying a comma-delimited list of windows. For example, the following statement drops two windows:
BEGIN
  DBMS_SCHEDULER.REMOVE_GROUP_MEMBER('sys.window_group1', 'window2, window3');
END;
/
You enable one or more window groups using the ENABLE procedure. By default, window groups are created ENABLED. For example:
BEGIN
  DBMS_SCHEDULER.ENABLE('sys.windowgroup1, sys.windowgroup2, sys.windowgroup3');
END;
/
You disable a window group using the DISABLE procedure. A job with a disabled window group as its schedule does not run when the member windows open. Disabling a window group does not disable its member windows.
You can also disable several window groups in one call by providing a comma-delimited list of window group names. For example, the following statement disables three window groups:
BEGIN
  DBMS_SCHEDULER.DISABLE('sys.windowgroup1, sys.windowgroup2, sys.windowgroup3');
END;
/
The Database Resource Manager (Resource Manager) controls how resources are allocated among database sessions. It not only controls asynchronous sessions like Scheduler jobs, but also synchronous sessions like user sessions. It groups all "units of work" in the database into resource consumer groups and uses a resource plan to specify how the resources are allocated among the various consumer groups. The primary system resource that the Resource Manager allocates is CPU.
For Scheduler jobs, resources are allocated by first assigning each job to a job class, and then associating a job class with a consumer group. Resources are then distributed among the Scheduler jobs and other sessions within the consumer group. You can also assign relative priorities to the jobs in a job class, and resources are distributed to those jobs accordingly.
You can manually change the current resource plan at any time. Another way to change the current resource plan is by creating Scheduler windows. Windows have a resource plan attribute. When a window opens, the current plan is switched to the window's resource plan.
The Scheduler tries to limit the number of jobs that are running simultaneously so that at least some jobs can complete, rather than running a lot of jobs concurrently but without enough resources for any of them to complete.
The Scheduler and the Resource Manager are tightly integrated. The job coordinator obtains database resource availability from the Resource Manager. Based on that information, the coordinator determines how many jobs to start. It will only start jobs from those job classes that will have enough resources to run. The coordinator will keep starting jobs in a particular job class that maps to a consumer group until the Resource Manager determines that the maximum resource allocated for that consumer group has been reached. Therefore, there might be jobs in the job table that are ready to run but will not be picked up by the job coordinator because there are no resources to run them. Therefore, there is no guarantee that a job will run at the exact time that it was scheduled. The coordinator picks up jobs from the job table on the basis of which consumer groups still have resources available.
The Resource Manager continues to manage the resources that are assigned to each running job based on the specified resource plan. Keep in mind that the Resource Manager can only manage database processes. The active management of resources does not apply to external jobs.
Note:
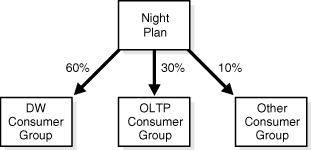
The Resource Manager is active only when CPU utilization approaches 100%.The following example illustrates how resources are allocated for jobs. Assume that the active resource plan is called "Night Plan" and that there are three job classes: JC1, which maps to consumer group DW; JC2, which maps to consumer group OLTP; and JC3, which maps to the default consumer group. Figure 29-2 offers a simple graphical illustration of this scenario.
This resource plan clearly gives priority to jobs that are part of job class JC1. Consumer group DW gets 60% of the resources, thus jobs that belong to job class JC1 will get 60% of the resources. Consumer group OLTP has 30% of the resources, which implies that jobs in job class JC2 will get 30% of the resources. The consumer group Other specifies that all other consumer groups will be getting 10% of the resources. Therefore, all jobs that belong in job class JC3 will share 10% of the resources and can get a maximum of 10% of the resources.
Note that resources that remain unused by one consumer group are available from use by the other consumer groups. So if the jobs in job class JC1 do not fully use the allocated 60%, the unused portion is available for use by jobs in classes JC2 and JC3. Note also that the Resource Manager does not begin to restrict resource usage at all until CPU usage reaches 100%. See Chapter 27, "Managing Resources with Oracle Database Resource Manager" for more information.
|
Copyright © 2001, 2011, Oracle and/or its affiliates. All rights reserved. Legal Notices |
|