| Oracle® Warehouse Builder Data Modeling, ETL, and Data Quality Guide 11g Release 2 (11.2) Part Number E10935-05 |
|
|
PDF · Mobi · ePub |
| Oracle® Warehouse Builder Data Modeling, ETL, and Data Quality Guide 11g Release 2 (11.2) Part Number E10935-05 |
|
|
PDF · Mobi · ePub |
This chapter contains the following topics:
Use schedules to plan when and how often to run operations that you designed within Oracle Warehouse Builder. You can apply schedules to mappings and process flows to run in Oracle Database 10g or later.
You can define schedules to run repeatedly based on an interval you define in the user interface. For each schedule you define, Oracle Warehouse Builder generates codes that follows the iCal calendaring standards, which can be deployed to a scheduler such as Oracle Scheduler or Oracle Concurrent Manager.
When you are in the development phase of using Oracle Warehouse Builder, you may not want to schedule mappings and process flows but rather start and stop them immediately from a Control Center as described in "Deploying Objects".
Overview of Defining Schedules
Schedules are defined in projects and contained in Calendar modules under the Schedules node on the Projects Navigator. Calendar modules are used to group a set of related schedules that are deployed to the same location.
A schedule definition contains details about when and how often operations you define using Oracle Warehouse Builder are run. When you define a schedule, specify the following details:
Start date and time
The date and time when the schedule begins to run
Schedule frequency
The frequency at which the schedule is run (for example, daily, weekly, and so on)
Repeat interval
The time intervals at which the schedule is repeated when it is active. The repeat interval determines how often the schedule repeats. For example, you define a schedule whose frequency is weekly. For the repeat interval of this schedule, you specify that this schedule should repeat every two weeks, on Tuesday.
End date and time
The date and time at which the schedule stops execution
Once you define a schedule, you can associate it with ETL objects so that the objects are run according to the details defined in the schedule. You can associate schedules with mappings, Code Template (CT) mappings, process flows, and data auditors.
For example, you create a schedule that starts on 12-mar-08 and that ends on 11-mar-09. You define the schedule frequency as weekly and the repeat interval as every week on Friday. You then associate this schedule with a mapping. Your mapping is run according to the details specified in the schedule. The mapping runs every Friday between 12-mar-08 and 11-mar-09.
Overview of Deploying Schedules
The location to which you deploy schedules depends on the ETL objects with which the schedule is associated. Scheduled jobs must be deployed to an Oracle Database location. Process flow packages must be deployed either to an Oracle Workflow location or to a Concurrent Manager location.
Scheduled jobs may reference an executable object, such as a process flow or a mapping. If a job references a process flow, then you must deploy the process flow to Oracle Workflow and deploy the scheduled job to either a database location or a Concurrent Manager location.
Use the following steps to define a schedule.
Expand the project node under which you want to create your schedule.
If you have not done so, create a Calendar module to contain your schedule.
To create a Calendar module, right-click the Schedules node and select New Calendar module. The Create Module Wizard is displayed. Use this wizard to create the Calendar module. Ensure that the location associated with this module is the location to which you want your schedules to be deployed.
Right-click the Calendar module in which you want to create your schedule, and select New Calendar.
The Create Schedule Wizard is displayed.
On the Welcome page, click Next.
On the Name and Description page, provide a name and an optional description for the schedule and click Next.
Ensure that the schedule name is unique within the Calendar module in which it is displayed. See "Naming Conventions for Data Objects" for more information.
On the Choose Start and End Time page, select the time zone, start time, and end time for the schedule. Click Next.
For more information about setting these values, see "Start and End Dates and Times".
Note:
The Create Schedule Wizard does not contain all the available scheduling capabilities. To access the full range of scheduling capabilities, after you define a schedule using the wizard, use the Schedule Editor to specify additional scheduling capabilities.On the Choose the Frequency and Repeat Interval page, specify the frequency and repeat interval for the schedule. Click Next.
For more information about setting the frequency and repeat interval, see "Defining Schedules To Repeat".
See Also:
"Example Schedules" for examples of schedules.On the Summary page, review the options that you selected for the schedule. Click Finish to define the schedule.
The schedule is created and added to the Projects Navigator under the Calendar module.
Defining a schedule creates the metadata for the schedule in the workspace. Before you can use this schedule to run ETL jobs at the times defined in the schedule, you must deploy the schedule. When you deploy a schedule to an Oracle Database location, the schedule is created in the database scheduler.
Use the Schedule Editor to edit schedules.
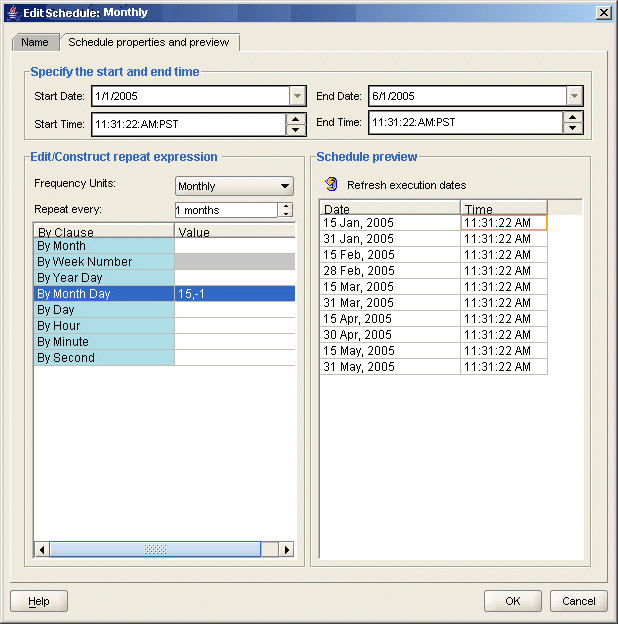
Figure 11-1 shows the Schedule Editor with the "Start and End Dates and Times" at the top of the editor.
The repeat expression appears in the lower-left panel of the editor. Use the repeat expression to specify the "Frequency Unit", "Repeat Every", and one or more "By Clauses".
The schedule preview appears in the lower-right panel. The preview refreshes each time you press the Enter key or navigate to a new cell on the Schedule Editor. If you specify an invalid schedule, then the preview displays an error message.
For examples of schedules that you can define, see "Example Schedules".
The start and end dates and times define the duration for which the schedule is valid.
Begin by specifying the time zone. You can accept the default start date or specify a time in the future. Be sure to change the default end date, which equals the default start date.
When working in the wizard, click Next to view the next page.
When working in the Schedule Editor, the start date and time become the defaults for the By Clauses in the Repeat Expression. The execution time in Schedule Preview corresponds to the Start Time.
The repeat expression determines how often the schedule is run. Define the repeat expression by specifying the Frequency Unit, the Repeat Every value, and one or more By Clauses values.
When you are working in the wizard, By Clauses are not available. After you complete the wizard, you can open the schedule and set the By Clauses using the Schedule Editor.
The Frequency Unit determines the type of recurrence. The possible values are YEARLY, MONTHLY, WEEKLY, DAILY, HOURLY, MINUTELY, and SECONDLY.
Also, you can define schedules to run One Time.
The Repeat Every value specifies how often the recurrence repeats. The default value is 1 and the maximum value is 999. If you select YEARLY for the Frequency Unit and leave the Repeat Every value at 1, then the schedule is evaluated for every year included in the date range that you specify in "Start and End Dates and Times". For the same schedule, if you change Repeat Every to 2, the schedule is evaluated only every other year within the specified date range.
By Clauses enable you to define repeat expressions for complex schedules, such as a schedule to run the first Friday of any month that contains 5 weeks. For each clause, you can either enter values or click the Ellipsis button to view a selector dialog box. If your goal is to know how to quickly type in values, then first use the selector dialog box to learn what values are valid, and then see "Example Schedules".
Figure 11-2 displays the selector dialog box to pick months in a year.
Figure 11-2 Selector dialog box for Picking Months in a Year
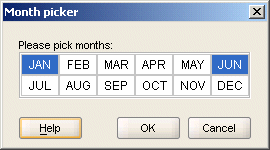
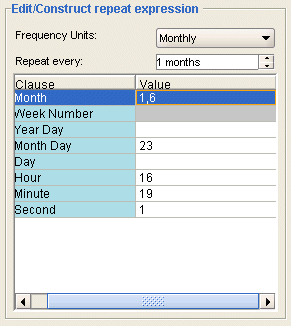
When you use the selector dialog box and click OK, the results are displayed in the Schedule Editor. In this way, you can use the selector dialog box to learn what values are valid.
Figure 11-3 displays the Schedule Editor with the results.
Figure 11-3 Month Clause for January and June
You can define the following by clauses:
This specifies in which month or months the schedule is valid. If you type in values, then use numbers such as 1 for January and 3 for March, or use three-letter abbreviations such as FEB for February and JUL for July.
Only when you select Yearly for the "Frequency Unit" can you schedule by the week number in the year.
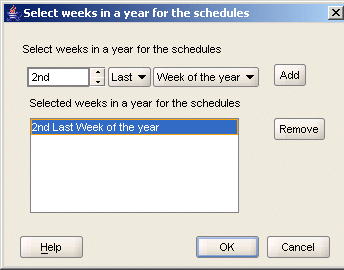
You can either type in values or click the Ellipsis button to view the selector dialog box. If you type in values, then valid values include positive and negative integers from 1 to 52 or 53, depending on the year. For example, to set a schedule to run on the second to last week of the year, you can either type -2 or fill in the selector dialog box.
Figure 11-4 displays the Selector dialog box with the schedule that runs on the second to last week of every year.
Figure 11-4 By Week Number Clause Set to Second To Last Week of the Year
The By Week Number clause follows the ISO-8601 standard, which defines the week as starting with Monday and ending with Sunday. Also, the first week of a year is defined as the week containing the first Thursday of the Gregorian year and containing January 4th.
Using this standard, a calendar year can have 52 or 53 weeks. Part of week 1 may be in the previous calendar year. Part of week 52 may be in the following calendar year. If a year has a week 53, then part of it must be in the following calendar year.
As an example, in the year 1998, week 1 began on Monday, December 29th, 1997. The last week, week 53, ended on Sunday, January 3rd, 1999. Therefore, December 29th, 1997, is in the first week of 1998 and January 1st, 1999, is in the 53rd week of 1998.
Use this clause to specify the day of the year as a number. A value of 1 equates to January 1st and 35 is February 4th. Valid values are 1 to 366 and -366 to -1.
The negative values are useful for identifying the same dates year after year despite the occurrence of leap years. For example, the 60th day of the year is March 1st except for leap years when it is February 29th. To calculate the appropriate negative value, count backward from the last day of the year. Therefore, the By Year Day for December 31st is -1. December 30th is -2. To define a schedule for every March 1st, despite leap years, set By Year Day to -306.
This clause specifies the day of the month as a number. Valid values are 1 to 31 and -1 to -31. An example is 10, which means the 10th day of the selected month. Use the minus sign (-) to count backward from the last day. For example, if you set the By Month Day clause to -1, the schedule runs on the last day of every month. A value of -2 runs the schedule on the next to last day of every month.
This clause specifies the day of the week from Monday to Sunday in the form MON, TUE, and so on.
You can prefix the By Day values with positive and negative numbers. The numeric prefix that you can use depends on the value that you select for the "Frequency Unit".
If you select Yearly as the frequency, you can prefix By Day with values that represent the weeks in a year, 1 to 53 and -53 to -1. Therefore, By Day set to 26Fri equates to the 26th Friday of the year. An entry of -1Mon when the frequency equals Yearly, equates to the last Monday of the year.
If you select Monthly as the frequency, you can prefix By Day with values that represent the weeks in a month, 1 to 5 and -5 to -1. In this case, an entry of -1Mon with frequency set to Monthly results in the last Monday of every month.
This clause enables you to schedule by the hour. Valid values are 0 to 23 where 0 is midnight, 5 is 5 a.m., 13 is 1 p.m., and 23 is 11 p.m.
Use this clause to schedule by the minute. Valid values are 0 to 59. As an example, 45 means 45 minutes past the hour.
Use this clause to schedule by the second. Valid values are 0 to 59. As an example, 30 means 30 seconds past the minute.
If your Oracle Database version is 10g Release 2 or later, you can use this clause to schedule based on the position of items in a previously evaluated list of timestamps. Use other By clauses to return a list of timestamps. Then add the By Set Position clause to select one or more items from that list. This clause is useful for requirements such as running a job on the last workday of the month. Valid values are 1 through 9999. A negative number selects an item from the end of the list (-1 is the last item, -2 is the next to last item, and so on) and a positive number selects from the front of the list. The clause is always evaluated last and only once per frequency. The supported frequencies are MONTHLY and YEARLY.
Use Table 11-1 as a guide for defining schedules.
Table 11-1 Example Repeat Expressions for Schedules
| Schedule Description | Frequency Units | Repeat Every | By Clause |
|---|---|---|---|
|
Every Friday |
weekly |
1 week |
By Day = FRI |
|
Every other Friday |
weekly |
2 weeks |
By Day = FRI |
|
Last day of every month. |
monthly |
1 month |
By Month Day = -1 |
|
Second-to-last day of every month |
monthly |
1 month |
By Month Day = -2 |
|
First Friday of any month containing 5 weeks |
monthly |
1 month |
By Day = -5FRI |
|
Last workday of every month |
monthly |
1 month |
By Day = MON,TUE,WED,THU,FRI; By Set Pos = -1 |
|
On March 10th |
yearly |
1 year |
By Month = MAR By Month Day = 10 |
|
Every 12 days |
daily |
12 days |
Not applicable |
|
Every day at 8 a.m. and 5 p.m. |
daily |
1 day |
By Hour = 8,17 |
|
On the second Wednesday of every month |
monthly |
1 month |
By Day = 2 WED |
|
Every hour for the first 3 days of every month |
hourly |
1 hour |
By Month Day = 1,2,3 |
After you define a schedule, you associate the schedule with an ETL object. It enables you to run the ETL object at the times specified in the schedule. You can associate schedules with mappings, Code Template (CT) mappings, process flows, and data auditors.
Steps to Apply Schedules to ETL Objects
In the Projects Navigator, right-click the ETL object to which you want to apply a schedule, and select Configure.
A Configuration tab containing the configuration parameters for the selected object is displayed in the Document window.
Click the Ellipsis button on the Referred Calendar field.
The Referred Calendar dialog box containing the list of available schedules is displayed.
For any mapping or process flow to schedule, the physical name must be 25 characters or fewer and the business name must be 1995 characters or fewer. This restriction enables Oracle Warehouse Builder to append to the mapping name the suffix _job and other internal characters required for deployment and execution.
Select the schedule to apply to the selected object and click OK.
Deploy the schedule and any associated schedules.
When properly deployed with its associated objects, the target schema runs the ETL object based on the schedule that you created.
After you successfully deployed a mapping or a process flow, you can schedule it to run in Oracle Enterprise Manager.
Note:
For more information about creating jobs and schedules, refer to the Oracle Enterprise Manager Concepts and the Oracle Enterprise Manager Help system.To schedule a mapping or process flow in Oracle Enterprise Manager:
Successfully deploy the mapping or process flow in Oracle Warehouse Builder.
Connect to Enterprise Manager as an Oracle Warehouse Builder repository owner or repository user.
Create a scheduler job that uses the WB_RT_API_EXEC.RUN_TASK function in a PL/SQL block.
For more information about this function, see "The WB_RT_API_EXEC.RUN_TASK Function".
Create a schedule for running the job.
This script enables you to start the ETL process from SQL*Plus, and to use scheduling tools such as cron, AT, Autosys, and Tivoli.
The sqlplus_exec_template.sql script is located in the following directory: OWB_HOME/owb/rtp/sql.
SQLPLUS_EXEC_TEMPLATE rt_owner location task_type task_name
       system_params custom_params
Provide a value for each of the following arguments.
rt_owner: The repository owner.
location: For PL/SQL mappings and process flows, specify the location you used for deployment.
For SQL*Loader and SAP mappings, set this parameter to PlatformSchema. This is a case-sensitive variable.
task_type: Enter the appropriate task type for the mapping or the process flow.
PLSQLMAP: PL/SQL mapping
SQLLOADERCONTROLFILE: SQL*Loader mapping
PROCESSFLOW: Process flow
ABAPFILE: SAP mapping
DATAAUDITOR: Data Auditor mapping
SCHEDULEDJOB: Oracle Warehouse Builder scheduled job
task_name: The physical name of the mapping or the process flow
system_params: Values of system parameters for this task type. These values override the default values. Enter the parameters in the form name=value. Separate multiple parameters with commas, and enclose the entire string in double quotes. A backslash (\) is the escape character, when you must include commas or double quotes as literal text.
The following examples are correct:
","
"this_param=true"
"this_param=true, that_param=2"
custom_params: Values of a custom parameter defined for this task. Refer to system_params for the syntax.
In each of the following examples, you must provide the path to sqlplus.exe and to sqplus_exec_template.sql.
sqlplus user/password@tns_name @sqlplus_exec_template MY_RUNTIME MY_WAREHOUSE PLSQL MY_MAPPING "," ","

sqlplus user/password@tns_name @sqlplus_exec_template MY_RUNTIME PlatformSchema SQL_LOADER MY_LOAD "," ","

sqlplus user/password@tns_name @sqlplus_exec_template MY_RUNTIME MY_WORKFLOW PROCESS MY_PROCESS "," ","

sqlplus user/password@tns_name @sqlplus_exec_template MY_RUNTIME PlatformSchema ABAP MY_SAP "," ","
The RUN_TASK function of the WB_RT_API_EXEC PL/SQL package enables you to schedule and run the ETL process from Oracle Warehouse Builder.
The return value is affected by the parameters of the function.
When background=0 and oem_friendly=0:
When background=0 and oem_friendly=1:
When background=1:
RUN_TASK
     ( location        IN   VARCHAR2,
       task_type       IN   VARCHAR2,
       task_name       IN   VARCHAR2,
       custom_params   IN   VARCHAR2   DEFAULT NULL,
       system_params   IN   VARCHAR2   DEFAULT NULL,
       oem_friendly    IN   NUMBER     DEFAULT 0,
       background      IN   NUMBER     DEFAULT 0
     )
     RETURN NUMBER;
Provide a value for each of the following parameters:
location: For PL/SQL mappings and process flows, specify the location you used for deployment.
For SQL*Loader and SAP mappings, set this parameter to PlatformSchema. This is a case-sensitive variable.
task_type: Enter the appropriate task type for the mapping or the process flow.
PLSQLMAP or PLSQL: PL/SQL mapping
SQLLoader or SQLLoaderControlFile or SQLLoaderMap: SQL*Loader mapping
Process or ProcessFlow: Process flow
ABAPFile or SAPMap or SAP: SAP mapping
DataAuditor: Data auditor mapping
ScheduledJob: Oracle Warehouse Builder schedule object
AppsCMScheduler: Concurrent Manager schedule job
DBMSScheduler: Database schedule job
Note:
Previously, you could specifytask_type using both, a numeric value and a literal value. For example, you could use 3 to specify ProcessFlow, or 4 to specify SAP and so on. But starting with 11g Release 2 (11.2), numeric values are no longer valid. It is mandatory to use the literal value. The value can be in uppercase, lowercase, or in mixed case. For example, PROCESSFLOW, ProcessFlow, and processflow are all valid.task_name: The name of the mapping or the process flow.
custom_params: Values of a custom parameter defined for this task. Refer to system_params for the syntax.
system_params: Values of system parameters for this task type. These values override the default values. Enter the parameters in the form name=value.
Separate multiple parameters with commas, and enclose the entire string in double quotes. A backslash (\) is the escape character, when you must include commas or double quotes as literal text.
The following examples are correct:
","
"this_param=true"
"this_param=true, that_param=2"
oem_friendly: Controls the return values. Set to 1 for execution in Enterprise Manager, or set to 0 for other environments.
background: Controls execution of the task. Set to 1 for background, or set to 0 for foreground.
The following example displays the return value of the function, which runs a mapping named CUSTOMER_MAP in SALES_TARGET_LOCATION.
BEGIN
DBMS_OUTPUT.PUT_LINE('Result: ' || TO_CHAR(gccrep.wb_rt_api_exec.run_task(
'SALES_TARGET_LOCATION','PLSQLMAP','CUSTOMER_MAP', null, null, 1)));
END;
|
Copyright © 2000, 2011, Oracle and/or its affiliates. All rights reserved. Legal Notices |
|