| Oracle® Database Advanced Security Administrator's Guide 11g Release 2 (11.2) Part Number E10746-05 |
|
|
PDF · Mobi · ePub |
| Oracle® Database Advanced Security Administrator's Guide 11g Release 2 (11.2) Part Number E10746-05 |
|
|
PDF · Mobi · ePub |
Entrust Authority (formerly known as Entrust/PKI) is a suite of PKI products provided by Entrust, Inc., that provides certificate generation, certificate revocation, and key and certificate management. Oracle Advanced Security is integrated with Entrust Authority so both Entrust and Oracle users can enhance their Oracle environment security.
This appendix contains the following topics:
Entrust-enabled Oracle Advanced Security provides:
Integration with Entrust Authority Certificate Revocation
Note:
Oracle Advanced Security has been certified as Entrust-Ready by Entrust, Inc., as of Release 8.1.7.See Also:
http://www.entrust.com for more informationEntrust-enabled Oracle Advanced Security supports the use of Entrust credentials for X.509-based authentication and single sign-on. Instead of using an Oracle wallet to hold user PKI credentials, Oracle Advanced Security can access PKI credentials that are created by Entrust Authority and held in an Entrust profile (a.epf file). Users who have deployed Entrust software within their enterprise are able to use it for authentication and single sign-on to Oracle Database.
Entrust-enabled Oracle Advanced Security uses the extensive key management and rollover functionality provided by Entrust Authority, which shields users from the complexity of a PKI deployment. For example, users are automatically notified when their certificates are expiring, and certificates are reissued according to preferences that administrators can configure.
Entrust provides a certificate authority component, which natively checks certificate revocation status and enables the revocation of certificates.
Users using Entrust credentials for authentication to Oracle are assured that the revocation status of the certificate is checked, and connections are prevented if the certificate is revoked.
To implement Entrust-enabled Oracle Advanced Security, the following system components are required:
Contact your Entrust representative to get these components.
Note:
Oracle Advanced Security supports Entrust Authority Security Manager, Entrust Authority Server Login Feature, and Entrust Authority IPSec Negotiator Toolkit versions 6.0 and later.Contact your Entrust representative for the latest product classification and naming details.
Entrust Authority for Oracle requires a database for storing information about Entrust users and the infrastructure, and a Lightweight Directory Access Protocol (LDAP)-compliant directory for information such as user names, public certificates, and certificate revocation lists.
Entrust Authority for Oracle comprises the following software components:
Entrust Authority Security Manager is the centerpiece of Entrust's PKI technology. It performs core certificate authority, certificate, and user management functions, such as creating users and user profiles containing the user's credentials.
Note:
Oracle only supports the use of Entrust-enabled Oracle Advanced Security with versions of Entrust Authority Security Manager that run on Oracle Database.See Also:
Chapter 8, "Configuring Secure Sockets Layer Authentication", for information about certificate authorities.Entrust Authority Security Manager supports unattended login, also called Server Login, which eliminates the need for a Database Administrator (DBA) to repeatedly enter a password for the Entrust profile on the server. With unattended login, the DBA need only enter a password once to open the Entrust profile for the server to authenticate itself to multiple incoming connections.
Entrust Authority Self-Administration Server is the administrator's secure interface to Entrust Authority Security Manager.
Entrust Entelligence Desktop Manager provides support for user key management and single sign-on functionality on both clients and server by enabling Oracle Database server process access to incoming SSL connections.
Note:
Do not install Entrust Entelligence Desktop Manager on the server computer because it uses unattended login credentials files with.ual extensions.
Refer to "Configuring Entrust on the Server" for information about creating.ual files.
Entrust Authority Server Login Feature is required for single sign-on functionality on servers operating on UNIX platforms.
Entrust Authority Server Login Feature provides single sign-on by enabling Oracle Database server process access to incoming SSL connections. Without this capability, a database administrator or other privileged user would have to enter the password for the Entrust profile on the server for every incoming connection.
Contact your Entrust representative to get Entrust Authority Server Login Feature.
The Entrust Authority IPSec Negotiator Toolkit is required on both clients and servers for integrating the Oracle Advanced Security SSL stack with Entrust Authority, enabling SSL authentication to use Entrust profiles.
Contact your Entrust representative to get Entrust Authority IPSec Negotiator Toolkit.
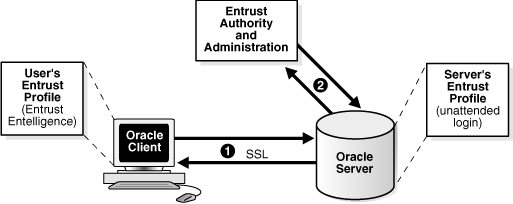
Figure G-1 illustrates the following Entrust authentication process:
The Entrust user on the Oracle client establishes a secure connection with the server using SSL and Entrust credentials.
The Oracle SSL adapter on the server communicates with the Entrust Authority to check the certificate revocation status of the Entrust user.
Note:
Figure G-1 does not include client and server profiles creation, which is presumed.Figure G-1 Entrust Authentication Process
This section describes the following tasks, which are required to configure Entrust-enabled Oracle Advanced Security SSL authentication:
Installing Oracle Advanced Security and Related Products for Entrust-Enabled SSL
Configuring SSL on the Client and Server for Entrust-Enabled SSL
This section describes how to create Entrust profiles, which can be created by either administrators or users. On UNIX platforms, administrators create the Entrust profiles for all clients. On Windows platforms, users can create their own Entrust profiles.
Administrators create Entrust profiles as follows:
The Entrust administrator adds the Entrust user using the Entrust Authority Self-Administration Server.
See Also:
The Entrust administration documentation for information about creating Entrust UsersThe administrator enters the user's name and password.
The Entrust Authority creates the profile, or.epf file.
The administrator securely sends all profile-related files to the user. The preset password can be changed by the user.
Entrust users create their own Entrust profiles as follows:
The Entrust administrator adds the Entrust user using the Entrust Authority Self-Administration Server. In the New User dialog box, the Create Profile option should be deselected.
See Also:
The Entrust administration documentation for information about creating Entrust profilesThe user receives a secure e-mail notification from the administrator that contains a reference number, authorization code, and expiration date.
The user navigates to the Create Entrust Profiles screen in Entrust Entelligence Desktop Manager as follows:
Start, Programs, Entrust, Entrust Profiles, Create Entrust Profiles
The user enters the reference number, authorization code, and expiration date provided in the e-mail notification, creating a profile, or.epf file, and the Entrust initialization file.
For Oracle Advanced Security 11g Release 2 (11.2), Entrust support installs in Typical mode. A single Oracle installation supports the use of both Oracle Wallets and Entrust profiles.
See Also:
Oracle Database operating system-specific installation documentationConfigure SSL on the client and server.
See Also:
Chapter 8, "Configuring Secure Sockets Layer Authentication", for information about configuring SSL on the client and server and skip the section that describes the Oracle wallet location.The steps for configuring Entrust on the client vary according to the type of platform:
If the client resides on a non-Windows platform, perform the following steps:
Set the JAVA_HOME variable to the JDK or JRE location.
For example:
>setenv JAVA_HOME $ORACLE_HOME/JRE
Set WALLET_LOCATION in the sqlnet.ora file.
For example:
WALLET_LOCATION=
(SOURCE=
(METHOD=entr)
(METHOD_DATA =
    (PROFILE=profile_location)
    (INIFILE=initialization_file_location)
)
)
If the client resides on a Windows platform, ensure that the Entrust Entelligence Desktop Manager component is installed on the client and perform the following steps to set up the Entrust credentials.
Set the WALLET_LOCATION parameter in the sqlnet.ora file.
For example:
WALLET_LOCATION=
(SOURCE=
(METHOD=entr)
(METHOD_DATA=
    (INIFILE=initialization_file_location)
)
)
where initialization_file_location is the path to the.ini file.
Select the Entrust icon on the system tray to open the Entrust_Login dialog box.
Log on to Entrust by entering the profile name and password.
The steps for configuring Entrust on the server vary according to the type of platform:
If the server is a UNIX platform, ensure that the Entrust/Server Login Toolkit component is installed on the server and perform the following steps:
See Also:
"Required System Components for Entrust-Enabled Oracle Advanced Security" for information about downloading the Entrust Server Login toolkit.Stop the Oracle database instance.
Set the WALLET_LOCATION parameter in the sqlnet.ora and listener.ora files to specify the paths to the server's profile and the Entrust initialization file:
WALLET_LOCATION =
  (SOURCE =
      (METHOD = ENTR)
      (METHOD_DATA =
          (PROFILE = profile_location)
          (INIFILE = initialization_file_location)
      )
  )
Set the CLASSPATH environment variable to include the following paths:
$ORACLE_HOME/JRE/lib/rt.jar
$ORACLE_HOME/JRE/lib/i18n.jar
$ORACLE_HOME/jlib/ewt*.jar
$ORACLE_HOME/jlib/help*.jar
$ORACLE_HOME/jlib/share*.jar
$ORACLE_HOME/jlib/swingall*.jar
$ORACLE_HOME/network/jlib/netentrust.jar
Enter the etbinder command to create unattended login credentials, or.ual files by using the following steps:
Set the PATH environment variable to include the path to the etbinder command, which is located in the /bin directory where the Server Login Toolkit is installed.
Set the LD_LIBRARY_PATH to include the path to the Entrust libraries.
Set the SSL_ENTRUST_INI environment variable to include the full path to the Entrust initialization file.
Enter the command as follows:
etbinder
When prompted to enter the location of the profile file, enter the full path name, including the name of the file. Then, when prompted, type in the password.
A message displays indicating that the credentials file (filename.ual) has been created.
Note:
Ensure that the listener has a TCPS listening endpoint, then start the listener.Start the Oracle database instance.
If the server is on a Windows platform, perform the following steps:
See Also:
"Required System Components for Entrust-Enabled Oracle Advanced Security" for information about downloading Entrust Entelligence Desktop Manager.Stop the Oracle database instance.
Set the WALLET_LOCATION parameter in the sqlnet.ora and listener.ora files to specify the paths to the server's profile and the Entrust initialization file:
WALLET_LOCATION =
(SOURCE =
(METHOD = ENTR)
(METHOD_DATA =
    (PROFILE = profile_location)
    (INIFILE = initialization_file_location)
)
)
Run the Entrust binder command to create unattended login credentials, which are files with a.ual extension. Ensure that the owner of the.ual file is the same as the owner of the Oracle service.
To run the binder command Select
Start, Programs, Entrust Toolkit, Server Login, Entrust Binder
Enter the path to the profile, the password, and the path to the Entrust initialization file. A message informs you that you have successfully created a credential file.
Start the Oracle database instance.
Note:
For all Windows environments, Oracle recommends that you do not install Entrust Entelligence Desktop Manager on the server computer.Create global users in the database based on the distinguished name (DN) of each Entrust user.
For example:
SQL> create user jdoe identified globally as 'cn=jdoe,o=oracle,c=us';
where "cn=jdoe, o=oracle, c=us" is the Entrust distinguished name of the user.
Use SQL*Plus to connect to the Oracle instance as follows:
sqlplus /@net_service_name
where net_service_name is the service name of the Oracle instance.
The Entrust_Login dialog box is displayed.
Enter the path to the profile and the password.
If you did not specify a value for the WALLET_LOCATION parameter, you are prompted to enter the path to the Entrust initialization file.
Note:
Oracle recommends that the initialization file be specified in theWALLET_LOCATION parameter file.An application must be specifically modified to work with Entrust. If a product is designated as Entrust-ready, then it has been integrated with Entrust by using an Entrust toolkit.
For example, Oracle has modified its SSL libraries to access an Entrust profile instead of an Oracle wallet.
In addition, the following restrictions apply:
The use of Entrust components for digital signatures in applications based on Oracle is not supported.
The Entrust-enabled Oracle Advanced Security integration is only supported with versions of Entrust Authority Release 6.0 and later running on Oracle Database.
The use of earlier releases of Entrust Authority with Entrust-enabled Oracle Advanced Security is not supported.
Interoperability between Entrust and non-Entrust PKIs is not supported.
Entrust has certified Oracle Internet Directory version 2.1.1 for Release 8.1.7 and subsequent releases.
This section describes how to diagnose errors returned from Entrust to Oracle Advanced Security users.
Note:
Entrust returns the following generic error message to Oracle Advanced Security users:ORA-28890 "Entrust Login Failed"
This troubleshooting section describes how to get more details about the underlying error, and how to diagnose the problem.
You may encounter the following error messages regardless of what platform you are running Entrust on.
Entrust /Authority is not online
Invalid Entrust profile password specified
Invalid path to the Entrust profile specified
Invalid Entrust initialization file specified
Entrust Server Login program has not executed on the server
sqlnet.ora file:
On the client:
TRACE_LEVEL_CLIENT=16
TRACE_DIRECTORY_CLIENT=valid_client_directory_name
TRACE_FILE_CLIENT=client
TRACE_UNIQUE_CLIENT=ON
On the server:
TRACE_LEVEL_SERVER=16
TRACE_DIRECTORY_SERVER=valid_server_directory name
TRACE_FILE_SERVER=server
TRACE_UNIQUE_SERVER=ON
Search for and locate the string IKMP in the generated trace file. Adjacent to this string, error messages are listed that provide details about the problem you are encountering. This detailed error code information is returned by the Entrust API.
Note:
The following are examples of valid client directory names for setting theTRACE_DIRECTORY_CLIENT or TRACE_DIRECTORY_SERVER parameters in the sqlnet.ora file:
(UNIX) /tmp
(Windows) C:\TEMP
WALLET_LOCATION parameter does not specify the Entrust initialization file location in the client side sqlnet.ora file.WALLET_LOCATION parameter in the sqlnet.ora file on the client.
You may encounter the following error messages if you are running Entrust on a Windows platform.
listener.log file on the server when you attempt to log in to Entrust.Remove the.ual file
De-install the Server Login
Specify the Entrust initialization file location in the SSL_ENTRUST_INI_FILE parameter in the client sqlnet.ora file
then the server may not be able to authenticate the client when you enter the following command:
sqlplus/@net_service_name
Select Control Panel, then Services.
In the Services dialog box, double click OracleTNSListener and change the Log On As from the System Account to the account that is currently logged in. This enables the server process to read the.ual file. Click OK to make the change and you are returned to the Services dialog box.
In the Services dialog box, make the same changes for OracleService.
Make the following changes to the listener.ora file:
Specify only TCPS as the PROTOCOL in the listener ADDRESS. For example, change all of the PROTOCOL definitions to TCPS as follows:
listener_name=
   (DESCRIPTION=
      (ADDRESS=(PROTOCOL=TCPS) (KEY=extproc0))
      (ADDRESS=(PROTOCOL=TCPS) (HOST=sales-pc) (PORT=1521)))
Bringing up the listener only using TCPS will show whether there is a problem accessing the Entrust profile when you turn on tracing.
Set the SSL_CLIENT_AUTHENTICATION parameter to FALSE as follows:
SSL_CLIENT_AUTHENTICATION=FALSE
Turn on tracing by setting the following parameters:
TRACE_LEVEL_LISTENER=16
TRACE_DIRECTORY_LISTENER=C:\temp
The trace file is created in the C:\temp directory.
Make the following changes to the sqlnet.ora file to turn on tracing:
TRACE_LEVEL_SERVER=16
TRACE_DIRECTORY_SERVER=C:\temp
The trace file is created in the C:\temp directory.
Ensure that Entrust Entelligence Desktop Manager is not installed on the server.
Search for and locate the string fail or ntz* function calls. Adjacent to these, error messages are listed that provide details about the problem you are encountering.
The following items apply to all platforms:
Confirm that the Entrust Authority is online.
Confirm that the.ual file is generated. These files are created for unattended login credentials.
Note:
Oracle recommends that you generate an unattended login credential file (.ual file) for the server only. If you generate a.ual file for the server only, then when users attempt to log in, they are presented a GUI that prompts them for their password and their Entrust profile name. After users supply this information, the connection request is forwarded to the Entrust server, which looks up the revocation file and the.ual file to determine the permissions for granting the request.Confirm that the Entrust initialization file contains the following entry in the first section that specifies the Entrust Settings:
IdentityLibrary=location
The full path to the location of the libidapi.so file should be specified in the IdentityLibrary parameter. This parameter setting enables generating a.ual file on the server.
Ensure that all Entrust toolkits, including the Entrust IPSEC Negotiator toolkit and the Server Login toolkit, are the same version so they are compatible.
Ensure that you have specified TCP/IP with SSL in the SQLNET.AUTHENTICATION_SERVICES parameter in the sqlnet.ora file as shown in the following example:
SQLNET.AUTHENTICATION_SERVICES=(tcps, authentication_type1, authentication_ type2)
The following checklist items apply only to Entrust installations on the Windows platform.
Ensure that you are logged into Entrust Entelligence Desktop Manager and retry.
Select Windows, then Control Panel, and click Services to confirm that the Entrust Login Interface service has started and is running.
Confirm that the Entrust initialization file location is specified in the SSL_ENTRUST_INI_FILE parameter of the sqlnet.ora file. However, if you select not to specify the location there, then the Entrust initialization file must reside in c:\WINNT.
Ensure that you are not running Entrust Entelligence Desktop Manager if your database is running on a Microsoft platform. If this is the case, then only the.ual file, which enables unattended login, is required.
See Also:
Step 4 of "Configuring Entrust on a Windows Server" for information about creating a.ual file with the Entrust binder command.Confirm that Entrust Authority, as specified in the Entrust Initialization file, is accessible and running.
Confirm that the profile password is correctly entered.
If an Oracle database server fails to log in to Entrust, confirm that the unattended login credential file (.ual) is generated using a valid password. Also, confirm that the versions for Entrust Server Login toolkit and Entrust IPSEC Negotiator toolkit match (that is, that the IPSec Toolkit 6.0 works with Server Login Toolkit 6.0).
Ensure that the Entrust initialization file has the following entry in the first section, Entrust Settings:
IdentityLibrary = location
where location is the location of libidapi.so, including the file name.
|
Copyright © 1996, 2012, Oracle and/or its affiliates. All rights reserved. Legal Notices |
|