| Oracle® XML Developer's Kit Programmer's Guide 11g Release 2 (11.2) Part Number E23582-01 |
|
|
PDF · Mobi · ePub |
| Oracle® XML Developer's Kit Programmer's Guide 11g Release 2 (11.2) Part Number E23582-01 |
|
|
PDF · Mobi · ePub |
This chapter contains these topics:
TransX Utility enables you to transfer XML to a database. More specifically, the TransX utility is an application of XML SQL Utility (XSU) that loads translated seed data and messages into a database schema. If you have data to be populated into a database in multiple languages, then the utility provides the functionality that you would otherwise need to develop with XSU.
The TransX utility is particularly useful when handling multilingual XML. The utility does the following:
Automatically manages the change variables, start sequences, and additional SQL statements that would otherwise require multiple inserts or sessions. Thus, translation vendors do not need to work with unfamiliar SQL and PL/SQL scripts.
Automates character encoding. Consequently, loading errors due to incorrect encoding are impossible so long as the data file conforms to the XML standard.
Reduces globalization costs by preparing strings to be translated, translating the strings, and loading them into the database.
Minimizes translation data format errors and accurately loads the translation contents into pre-determined locations in the database. When the data is in a predefined format, the TransX utility validates it.
Eliminates syntax errors due to varying Globalization Support settings.
Does not require the UNISTR construct for every piece of NCHAR data.
This chapter assumes that you are familiar with XML SQL Utility (XSU) because TransX is an application of XSU.
This section describes the following features of the TransX utility:
When inserting multilingual data or data translations into an Oracle database, or when encoding, each XML file requires validation. The traditional translation data loading method is to change the NLS_LANG environment variable setting when switching load files. This variable sets the language and territory used by the client application and the database server. It also sets the client character set, which is the character set for data entered or displayed by a client program.
In the traditional method, each load file is encoded in a character set suitable for its language, which is necessary because translations must be performed in the same file format—typically in a SQL script—as the original. The NLS_LANG setting changes as files are loaded to adapt to the character set that corresponds to the language. As well as consuming time, this approach is error-prone because the encoding metadata is separate from the data itself.
With the TransX utility you use an XML document with a predefined format called a dataset. The dataset contains the encoding information and the data so that you can transfer multilingual data without changing NLS_LANG settings. The TransX utility frees development and translation groups by maintaining the correct character set while loading XML data into the database.
See Also:
Oracle Database Globalization Support Guide to learn about theNLS_LANG environment variableThe TransX utility provides a command-line interface and programmable API. The utility complies with a data format defined to be the canonical method for the representation of seed data loaded into the database. The format is intuitive and simplified for use by translation groups. The format specification defines how translators can describe the data so that it is loaded in an expected way. You can represent the values in the data set with scalar values or expressions such as constants, sequences, and queries.
Table 12-1 describes other useful TransX utility features.
Table 12-1 TransX Utility Features
| Feature | TransX Utility . . . |
|---|---|
|
Command-line interface |
Provides easy-to-use commands. |
|
User API |
Exposes a Java API. |
|
Validation |
Validates the data format and reports errors. |
|
Whitespace handling |
Does not consider whitespace characters in the data set as significant unless otherwise specified in various granularity. |
|
Unloading |
Exports the result into the standard data format based on an input query. |
|
Intimacy with translation exchange format |
Enables transformation to and from translation exchange format. |
|
Localized user interface |
Provides messages in many languages. |
This section contains the following topics:
TransX is accessible through the following API:
oracle.xml.transx.loader class, which contains the getLoader() method to obtain a TransX instance
oracle.xml.transx.TransX interface, which is the TransX API
Figure 12-1 illustrates the basic process for using the TransX API to transfer XML to an Oracle database.
Figure 12-1 Basic Process of a TransX Application
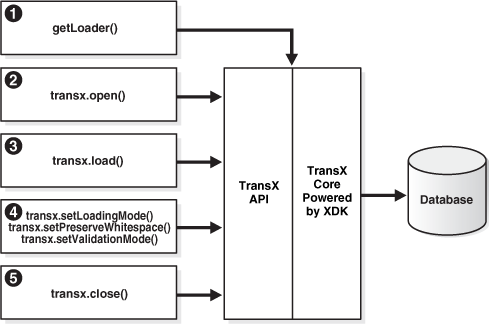
The basic process of a TransX application is as follows:
Create a TransX loader object. Instantiate the TransX class by calling getLoader() as follows:
TransX transx = loader.getLoader();
Start a data loading session by supplying database connection information with TransX.open(). You create a session by supplying the JDBC connect string, database username, and database password. You have the following options:
Create the connection with the JDBC OCI driver. The following code fragment illustrates this technique and connects with the supplied user name and password:
transx.open( "jdbc:oracle:oci8:@", user, passwd );
Create the connection with the JDBC thin driver. The thin driver is written in pure Java and can be called from any Java program. The following code fragment illustrates this technique and connects:
transx.open( "jdbc:oracle:thin:@//myhost:1521/myservicename", user,passwd);
The thin driver requires the host name (myhost), port number (1521), and the service name (myservicename). The database must have an active TCP/IP listener.
Note:
If you are just validating your data format, then you do not need to establish a database connection because the validation is performed by TransX. Thus, you can invoke theTransX.validate() method without a preceding open() call.Configure the TransX loader. Table 12-2 describes configuration methods.
Table 12-2 TransX Configuration Methods
| Method | Description |
|---|---|
|
|
Sets the operation mode on duplicates. The mode determines TransX behavior when there are one or more existing rows in the database whose values in the key columns are the same as those in the dataset to be loaded. You can specify the constants |
|
|
Sets the case of language tag. By default the loader uses the style specified in the |
|
|
Specifies how the loader should handle whitespace. The default is |
|
|
Sets the validation mode. The default is |
The following example specifies that the loader should skip duplicate rows and not validate the dataset:
transx.setLoadingMode( LoadingMode.SKIP_DUPLICATES );
transx.setValidationMode( false );
Load the datasets by invoking TransX.load(). The same JDBC connection is used during the iteration of the load operations. For example, load three datasets as follows:
String  datasrc[] = {"data1.xml", "data2.xml", "data3.xml"};
...
for ( int i = 0 ; i < datasrc.length ; i++ )
{
  transx.load( datasrc[i] );
}
Close the loading session by invoking TransX.close(). This method call closes the database connection:
transx.close();
See Also:
Oracle Database Java Developer's Guide to learn about Oracle JDBC
Oracle Database XML Java API Reference to learn about TransX classes and methods
Demo programs for the TransX utility are included in $ORACLE_HOME/xdk/demo/java/transx. Table 12-3 describes the XML files and programs that you can use to test the utility.
Table 12-3 TransX Utility Sample Files
| File | Description |
|---|---|
|
|
A text file that describes how to set up the TransX demos. |
|
|
A sample output file. The following command generates a file transx -s "jdbc:oracle:thin:@//myhost:1521/myservicename" user
-pw emp.xml emp
The |
|
|
A SQL file that drops the tables and sequences created for the demo. |
|
|
A sample Java application that creates a JDBC connection and loads three datasets into the database. |
|
|
A SQL script that creates two tables and a sequence for use by the demo application. |
|
|
A sample dataset. |
Documentation for how to compile and run the sample programs is located in the README. The basic steps are as follows:
Change into the $ORACLE_HOME/xdk/demo/java/transx directory (UNIX) or %ORACLE_HOME%\xdk\demo\java\transx directory (Windows).
Make sure that your environment variables are set as described in "Setting Up the Java XDK Environment". It is recommended that you set the $ORACLE_SID (UNIX) or %ORACLE_SID% (Windows) environment variables to the default database.
Note:
For security purposes, do not expose passwords in command-line interfaces. If "-pw" is specified instead of the password in TransX, the user will be prompted for the password [ Enter password : ]. When the user types the password, it will not be echoed; instead, "*"s will be printed in the command window.Set up the sample database objects by executing txdemo1.sql. Connect to the database and run the txdemo1.sql script as follows:
@txdemo1
Run the TransX utility from the command line. For example, assume that you want to connect with the Java thin driver and that your host is myhost, your port is 1521, and your service name is myservicename. Enter the user name where the token user appears. You can execute the following command to load dataset txdemo1.xml:
transx "jdbc:oracle:thin:@//myhost:1521/myservicename" user -pw txdemo1.xml
When the operation is successful, nothing is printed out on your terminal.
Query the database to determine whether the load was successful. For example:
SELECT * FROM i18n_messages;
Drop the demo objects to prepare for another test. Connect to the database and run the txclean.sql script as follows:
@txclean
Compile the Java demo program. For example:
javac txdemo1.java
Run the Java program, using the same JDBC and database connection data that you used when invoking the command-line interface. For example:
java txdemo1 "jdbc:oracle:thin:@//myhost:1521/myservicename" user -pw\
txdemo1.xml
Perform the same query test (step 5) and clean-up operation (step 6) as before.
Run the TransX Utility to unload data into the predefined XML format. For example:
transx -s "jdbc:oracle:thin:@//myhost:1521/myservicename" user
 -pw emp.xml emp
Compare the data in emp.xml with emp-dlf.xml.
Note:
For simplicity in demonstrating this feature, this example does not perform the password management techniques that a deployed system normally uses. In a production environment, follow the Oracle Database password management guidelines, and disable any sample accounts. See Oracle Database Security Guide for password management guidelines and other security recommendations.TransX utility is packaged with Oracle Database. By default, the Oracle Universal Installer installs the utility on disk. As explained in "Java XDK Component Dependencies", the TransX library is $ORACLE_HOME/lib/xml.jar (UNIX) and %ORACLE_HOME%\lib\xml.jar (Windows).
You can run the TransX utility from the operating system command line with the following syntax:
java oracle.xml.transx.loader
The XDK includes a script version of TransX named $ORACLE_HOME/bin/transx (UNIX) and %ORACLE_HOME%\bin\transx.bat (Windows). Assuming that your PATH variable is set correctly, you can run TransX as follows:
transx options parameters
transx.bat options parameters
For example, the following command shows valid syntax:
transx -s "jdbc:oracle:thin:@//myhost:1521/myservicename" user -pw emp.xml emp
Table 12-4 describes the options for the TransX utility.
Table 12-4 TransX utility Command-line Options
| Option | Meaning | Description |
|---|---|---|
-u |
Update existing rows. |
Does not skip existing rows but updates them. To exclude a column from the update operation, set the |
-e |
Raise exception if a row is already existing in the database. |
Throws an exception if a duplicate row is found. By default, TransX skips duplicate rows. Rows are considered duplicate if the values for lookup-key column(s) in the database and the data set are the same. |
-x |
Print data in the database in the predefined format. |
Similar to the |
|
|
Save data in the database into a file in the predefined format. |
Performs unloading. TransX Utility queries the database, formats the result into the predefined XML format, and stores it under the specified file name. |
|
|
Print the XML to load. |
Prints out the data set for insert in the canonical format of XSU. |
|
|
Print the XML for update. |
Prints out the data set for update in the canonical format of XSU. |
|
|
Omit validation (as the data set is parsed it is validated by default). |
Causes TransX Utility to skip the format validation, which is performed by default. |
|
|
Validate the data format and exit without loading. |
Causes TransX Utility to perform validation and exit. |
|
|
Preserve white space. |
Causes TransX Utility to treat whitespace characters (such as \t, \r, \n, and ' ') as significant. The utility condenses consecutive whitespace characters in string data elements into one space character by default. |
|
|
Set the case of language tag. |
Causes TransX Utility to override the style of normalizing the case of language tag specified in the |
Note the following command-line option exceptions:
-u and -e are mutually exclusive.
-v must be the only option followed by data, as shown in the examples.
-x must be the only option followed by connect information and a SQL query, as shown in the examples.
Omitting all arguments results in the display of the usage information shown in Table 12-4.
Table 12-5 describes the command-line parameters for the TransX utility.
Table 12-5 TransX utility Command-line Parameters
| Parameter | Description |
|---|---|
connect_string |
The JDBC connect string. See Oracle Database JDBC Developer's Guide, |
username |
Database user name. |
password |
Password for the database user, or " |
datasource |
An XML document specified by filename or URL. |
options |
Described in Table 12-4, "TransX utility Command-line Options". |
The TransX utility is especially useful for populating a database with multilingual data. To use the utility to transfer data in and out of a database schema you must create a dataset that maps to this schema. This section describes a typical use scenario in which you use TransX to organize translated application messages in a database.
This section contains the following topics:
To build an internationalized system, it is essential to decouple localizable resources from business logic. A typical example of such a resource is translated text information. Data that is specific to a particular region and shares a common language and cultural conventions must be organized with a resource management facility that can retrieve locale-specific information. A database is often used to store such data because of easy maintenance and flexibility.
Assume that you create the table with the structure and content shown in Example 12-1 and insert data.
Example 12-1 Structure of Table translated_messages
CREATE TABLE translated_messages
(
  MESSAGE_ID       NUMBER(4)
     CONSTRAINT tm_mess_id_nn NOT NULL
, LANGUAGE_ID      VARCHAR2(42)
, MESSAGE          VARCHAR2(200)
);
The column language_id is defined in this table so that applications can retrieve messages based on the preferred language of the end user. It contains abbreviations of language names to identify the language of messages.
Example 12-2 shows sample data for the table.
Example 12-2 Query of translated_messages
MESSAGE_ID  LANGUAGE_ID  MESSAGE
----------  -----------  ----------------------------------
1           us           Welcome to System X
2           us           Please enter username and password
See Also:
Oracle Database Globalization Support Guide for Oracle language abbreviationsChapter 13, "Data Loading Format (DLF) Specification" describes the complete syntax of the Data Loading Format (DLF) language. This language is used to create a DLF document that provides the input to TransX.
Given the dataset (the input data) in the canonical format, the TransX utility loads the data into the designated locations in the database. Note that TransX does not create the database objects: you must create the tables or views before attempting to load data.
An XML document that represents the translated_messages table created in Example 12-1 looks something like Example 12-3. The dataset reflects the structure of the target table, which in this case is called translated_messages.
<?xml version="1.0"?>
<table name="translated_messages">
  <!-- Specify the unique identifier -->
  <lookup-key>
    <column name="message_id" />
    <column name="language_id" />
  </lookup-key>
  <!-- Specify the columns into which data will be inserted -->
  <columns>
    <column name="message_id"  type="number"/>
    <column name="language_id" type="string" constant="us" translate="yes"/>
    <column name="message"     type="string" translate="yes"/>
  </columns>
  <!-- Specify the data to be inserted -->
  <dataset>
    <row>
      <col name="message_id">1</col>
      <col name="message" translation-note="dnt'X'">Welcome to System X</col>
    </row>
    <row>
      <col name="message_id">2</col>
      <col name="message">Please enter username and password</col>
    </row>
    <!-- ... -->
  </dataset>
</table>
The XML document in Example 12-3 starts with the following declaration:
<?xml version="1.0"?>
Its root element <table>, which has an attribute that specifies the name of the table, encloses all the other elements:
<table name="translated_messages">
...
</table>
As explained in "Elements in DLF", the <table> element contains three subsections:
The preceding sections map to elements in Example 12-3 as follows:
<lookup-key>...</lookup-key>
<columns>...</columns>
<dataset>...</dataset>
The lookup keys are columns used to evaluate rows if they already exist in the database. Because we want a pair of message and language IDs to identify a unique string, the document lists the corresponding columns. Thus, the message_id, language_id, and message columns in table translated_messages map to the attributes in the <column> element as follows:
<column name="message_id"  type="number"/>
<column name="language_id" type="string" constant="us" translate="yes"/>
<column name="message"     type="string" translate="yes"/>
The columns section should mirror the table structure because it specifies which piece of data in the dataset section maps to which table column. The column names should be consistent throughout the XML dataset and database. You can use the <column> attributes in Table 12-6 to describe the data to be loaded. Note that these attributes form a subset of the DLF attributes described in "Attributes in DLF".
Table 12-6 <column> Attributes
| Attribute | Description | Example |
|---|---|---|
|
type |
Specifies the datatype of a column in the dataset. This attribute specifies the kind of text contained in the |
<column name="col" type="string" /> |
|
constant |
Specifies a constant value. A column with a fixed value for each row does not have to repeat that same value. |
<column name="col" type="string" constant="us" /> |
|
language |
The language attribute indicates that the column is the language column, which stores a language tag. It works in the same way as the constant attribute, except for the role to declare the column is the language column. |
<column name="language" type="string" language="us" /> |
|
sequence |
Specifies a sequence in the database used to fill in the value for this column. |
<column name="id" type="number" sequence="id_sq" /> |
|
translate |
Indicates whether the text of this column or parameter is to be translated. |
<column name="msg" type="string" translate="yes"/> |
The constant attribute of a <column> element specifies a value to be stored into the corresponding column for every row in the dataset section. Because in this example we are working in the original language, the language_id column is set to the value us.
Defining the Language Column
Alternatively, the language_id column may use the language attribute instead of the constant attribute. A DLF document with the language attribute can use the lang attribute in the xml namespace. A language column can use the "%x" placeholder to get its value from the standard xml:lang attribute at the root table element.Thus translate="yes" is not needed, because the value "%x" does not have to be translated. The result of loading this DLF is the same as Example 10-3.
Example 12-4 example.xml with a Language Attribute
<?xml version="1.0"?>
<table xml:lang="us" name="translated_messages">
  <!-- Specify the unique identifier -->
  <lookup-key>
    <column name="message_id" />
    <column name="language_id" />
  </lookup-key>
  <!-- Specify the columns into which data will be inserted -->
  <columns>
    <column name="message_id"  type="number"/>
    <column name="language_id" type="string" language="%x"/>
    <column name="message"     type="string" translate="yes"/>
  </columns>
  <!-- Specify the data to be inserted -->
  <dataset>
    <row>
      <col name="message_id">1</col>
      <col name="message" translation-note="dnt'X'">Welcome to System X</col>
    </row>
    <row>
      <col name="message_id">2</col>
      <col name="message">Please enter username and password</col>
    </row>
    <!-- ... -->
  </dataset>
</table>
As explained in Table 13-10, the valid values for the type attribute are string, number, date, and dateTime. These values correspond to the datatypes defined in the XML schema standard, so each piece of data should conform to the respective datatype definition. In particular, it is important to use the ISO 8601 format for the date and dateTime datatypes, as shown in Table 12-7.
Table 12-7 date and dateTime Formats
| Datatype | Format | Example |
|---|---|---|
|
date |
CCYY-MM-DD |
2009-05-20 |
|
dateTime |
CCYY-MM-DDThh:mm:ss |
2009-05-20T16:01:37 |
Example 12-5 shows how you can represent a table row with dateTime data in a TransX dataset.
As explained in "Attributes in DLF", you can use the translation attribute to specify whether the column contains translated data. In Example 12-3, two <column> elements use the translate attribute differently. The attribute for the language_id column specifies that the value of the constant attribute should be translated:
<column name="language_id" type="string" constant="us" translate="yes"/>
In contrast, the following translate attribute requests translation of the data in the dataset section with a name that matches this column:
<column name="message" type="string" translate="yes"/>
For example, the preceding element specifies that the following messages in the dataset section should be translated:
<col name="message" translation-note="dnt'X'">Welcome to System X</col>
<col name="message">Please enter username and password</col>
When translating messages for applications, you may decide that specified words or phrases should be left untranslated. The translation-note attribute shown in the preceding example achieves this goal.
An XSLT processor can convert the preceding format into another format for exchanging translation data among localization service providers for use with XML-based translation tools. This transformation insulates developers from tasks such as keeping track of revisions, categorizing translatable strings into units, and so on.
Example 12-6 shows what the document in Example 12-3 looks like after translation.
<?xml version="1.0"?>
<table xml:lang="es" name="translated_messages">
<!-- Specify the unique identifier -->
<lookup-key>
<column name="message_id" />
<column name="language_id" />
</lookup-key>
<!-- Specify the columns into which data will be inserted -->
<columns>
<column name="message_id" type="number"/>
<column name="language_id" type="string" constant="es"
translate="yes"/>
Example 12-7 shows what the document in Example 12-4 looks like after translation. Unlike the previous example, the column definition is not changed.
Example 12-7 example_es.xml with a Language Attribute
<?xml version="1.0"?>
<table xml:lang="es"  name="translated_messages">
  <!-- Specify the unique identifier -->
  <lookup-key>
    <column name="message_id" />
    <column name="language_id" />
  </lookup-key>
  <!-- Specify the columns into which data will be inserted -->
  <columns>
    <column name="message_id"  type="number"/>
    <column name="language_id" type="string" language="%x"/>

:
:
If you use a text editor or a traditional text-based translation tool during the translation process, it is important to maintain the encoding of the document. After a document is translated, it may be in a different encoding from the original. As explained in "XML Declaration in DLF", If the translated document is in an encoding other than Unicode, then add the encoding declaration to the XML declaration on the first line. A declaration for non-Unicode encoding looks like the following:
<?xml version="1.0" encoding="ISO-8859-15"?>
To ensure that the translation process does not lose syntactic integrity, process the document as XML. Otherwise, you can check the format by specifying the -v option of the command-line interface. If a syntactic error exists, the utility prints the location and description of the error. You must fix errors for the data transfer to succeed.
Suppose that you want to load the sample documents in Example 12-3 and Example 12-8 into the translated_messages table that you created in Example 12-1. You can use the sample program in Example 12-8, which you can find in the TransX demo directory, to load the data.
// Copyright (c) 2001 All rights reserved Oracle Corporation

import oracle.xml.transx.*;

public class txdemo1 {

  /**
   * Constructor
   */
  public txdemo1() {
  }

  /**
   * main
   * @param args
   *
   * args[0] : connect string
   * args[1] : username
   * args[2] : password
   * args[3+] : xml file names
   */
  public static void main(String[] args) throws Exception {

    // instantiate a transx class
    TransX  transx = loader.getLoader();

    // start a data loading session
    transx.open( args[0], args[1], args[2] );

    // specify operation modes
    transx.setLoadingMode( LoadingMode.SKIP_DUPLICATES );
    transx.setValidationMode( false );

    // load the dataset(s)
    for ( int i = 3 ; i < args.length ; i++ )
    {
      transx.load( args[i] );
    }

    // cleanup
    transx.close();
  }
}
The txdemo1.java program follows these steps:
Create a TransX loader object. For example:
TransX transx = loader.getLoader();
Open a data loading session. The first three command-line parameters are the JDBC connect string, database username, and database password. These parameters are passed to the TransX.open() method. The program includes the following statement:
transx.open( args[0], args[1], args[2] );
Configure the TransX loader. The program configures the loader to skip duplicate rows and to validate the input dataset. The program includes the following statements:
transx.setLoadingMode( LoadingMode.SKIP_DUPLICATES );
transx.setValidationMode( false );
Load the data. The first three command-line parameters specify connection information; any additional parameters specify input XML documents. The program invokes the load() method for every specified document:
for ( int i = 3 ; i < args.length ; i++ )
{
  transx.load( args[i] );
}
Close the data loading session. The program includes the following statement:
transx.close();
After compiling the program with javac, you can run it from the command line. The following example uses the Java thin driver to connect to instance mydb on port 1521 of computer myhost. It connects to the user schema and loads the XML documents example.xml and example_es.xml:
java txdemo1 "jdbc:oracle:thin:@//myhost:1521/mydb" user -pw example.xml
     example_es.xml
In building a multilingual software system, translations usually become available at a later stage of development. They also tend to evolve over a period of time. If you need to add messages to the database, then you can add new rows in your <dataset> definition by running the TransX utility again. TransX recognizes which rows are new and inserts only the new messages based on the columns specified in the <lookup-key> section. If some messages are updated, then run TransX with the -u option to update existing rows with the data specified in XML, as shown in the following example:
transx -u "jdbc:oracle:thin:@//myhost:1521/mydb" user -pw example.xml
       example_es.xml
After using the program in Example 12-8 to load the data, you can query the translated_messages table to see the results. The results should look like the following:
MESSAGE_ID  LANGUAGE_ID  MESSAGE
----------  -----------  ----------------------------------
1           us           Welcome to System X
1           es           Bienvenido al Sistema X
2           us           Please enter username and password
2           es           Porfavor entre su nombre de usuario y su contraseña
An application can retrieve a message in a specific language by using the language_id and message_id columns in a WHERE clause. For example, you can execute the following query:
SELECT message
FROM   translated_messages
WHERE  message_id = 2
AND    language_id = 'es';

MESSAGE
----------------------------------
Porfavor entre su nombre de usuario y su contraseña
|
Copyright © 2001, 2011, Oracle and/or its affiliates. All rights reserved. Legal Notices |
|