| Oracle® Database 2 Day + Java Developer's Guide 11g Release 2 Part Number E12137-02 |
|
|
PDF · Mobi · ePub |
| Oracle® Database 2 Day + Java Developer's Guide 11g Release 2 Part Number E12137-02 |
|
|
PDF · Mobi · ePub |
In this chapter, you will see how you can modify the sample application and add functionality that allows users to edit, update, and delete data in Oracle Database. This chapter includes the following sections:
In outline, a bean is a Java class that has properties, events and methods. For each of its properties, the bean also includes accessors, that is get and set methods. Any object that conforms to certain basic rules can be a bean. There is no special class that has to be extended to create a bean.
In the steps for creating a sample application in this chapter, a JavaBean is used to hold a single employee record. When a user wants to edit an existing record or add a new one, it is used as a container to hold the changed or new values for a single row of a table to prepare the row for using to update the database.
The bean contains properties for each field in an employee record, and then JDeveloper creates the accessors (get and set methods) for each of those properties. You will see how to create a JavaBean for the sample application in the following subsections:
Employee.java is the JavaBean that is used in the sample application to hold a single employee record and modify its contents. To create a JavaBean, do the following:
Right-click the View project, and from the shortcut menu, click New.
In the New Gallery dialog box, select the All Technologies tab.
Expand the General category and select JavaBeans in the General category. From the Items list, select Bean. Click OK.
In the Create Bean dialog box, enter Employee as the name, hr as the package, and ensure that the Extends: field is set to java.lang.Object. Click OK to create the bean.
Save the file. The Employee.java file should now contain the following code:
package hr;

public class Employee {
  public Employee(){
  }
}
In the JavaBean, you must create one field for each column in the Employees table, and accessor methods (get and set methods) for each field.
Add an import statement for java.sql.Date, which is the field type for one of the fields:
import java.sql.Date;
Add a field to the Employee class for each of the columns in the Employees table. Each field is private, and the field types are as follows:
private Integer employeeId;
  private String firstName;
  private String lastName;
  private String email;
  private String phoneNumber;
  private Date hireDate;
  private String jobId;
  private Double salary;
  private Double commissionPct;
  private Integer departmentId;
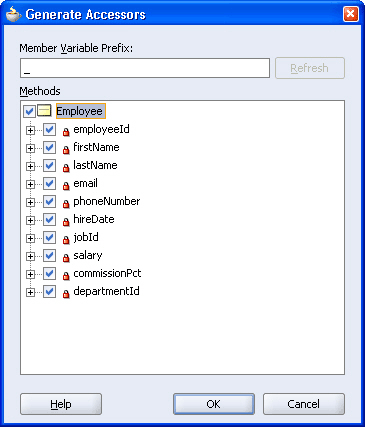
Right-click on the Source Editor page and select Generate Accessors from the shortcut menu. In the Generate Accessors dialog box, select the top-level Employee node. A check mark is displayed for that node and for all the fields. Click OK. Figure 5-1 shows the Generate Accessors dialog box with all the fields selected.
Save the file. The Employee.java file should now contain the following code:
Example 5-1 Skeleton Code for a Basic Java Bean with Accessor Methods
package hr;
import java.sql.Date;

public class Employee {
    public Employee() {
    }
    private Integer employeeId;
    private String firstName;
    private String lastName;
    private String email;
    private String phoneNumber;
    private Date hireDate;
    private String jobId;
    private Double salary;
    private Double commissionPct;
    private Integer departmentId;

    public void setEmployeeId(Integer employeeId) {
        this.employeeId = employeeId;
    }

    public Integer getEmployeeId() {
        return employeeId;
    }

    public void setFirstName(String firstName) {
        this.firstName = firstName;
    }

    public String getFirstName() {
        return firstName;
    }
...
...
...
...
// This list has been shortened and is not comprehensive. The actual code contains // accessor methods for all the fields declared in the bean.

    public void setDepartmentId(Integer departmentId) {
        this.departmentId = departmentId;
    }

    public Integer getDepartmentId() {
        return departmentId;
    }
}
Updating a row in a database table from a Java application requires you to do the following tasks:
Create a method that finds a particular employee row. This is used to display the values for a particular employee on an edit page.
Create a method that takes the updated employee data from the bean and updates the database.
On the main application page, in every row of employee data, include a link that allows a user to edit the data for that employee. The links take the user to the edit.jsp file with the data for that employee displayed, ready for editing.
Create a JSP page called edit.jsp, that includes a form and a table to display all the data of a single employee and allows a user to change the values.
Create a JSP page that processes the form on the edit.jsp page, writes the updated values to the Employee.java bean and calls the updateEmployee method.
You will see how to do this in the following sections:
The method you create in these steps is used to find the record for a particular employee. It is used when a user wants to edit or delete a particular employee record, and selects a link for that employee on the Employee.java page.
If the DataHandler class is not already open in the Java Source Editor, double-click it in the Application Navigator to open it.
In the DataHandler class, declare a new method that identifies the employee record to be updated:
public Employee findEmployeeById(int id) throws SQLException {

}
Within the body of this method, create a new instance of the Employee bean called selectedEmp.
Employee selectedEmp = new Employee();
Connect to the database.
getDBConnection();
Create a Statement object, define a ResultSet type, and formulate the query. Add a trace message to assist with debugging.
stmt =
  conn.createStatement(ResultSet.TYPE_SCROLL_SENSITIVE,
                       ResultSet.CONCUR_READ_ONLY);
query = "SELECT * FROM Employees WHERE employee_id = " + id;
System.out.println("\nExecuting: " + query);
Run the query and use a ResultSet object to contain the result.
rset = stmt.executeQuery(query);
Use the result set returned in rset to populate the fields of the employee bean using the set methods of the bean.
while (rset.next()) {
  selectedEmp.setEmployeeId(new Integer(rset.getInt("employee_id")));
  selectedEmp.setFirstName(rset.getString("first_name"));
  selectedEmp.setLastName(rset.getString("last_name"));
  selectedEmp.setEmail(rset.getString("email"));
  selectedEmp.setPhoneNumber(rset.getString("phone_number"));
  selectedEmp.setHireDate(rset.getDate("hire_date"));
  selectedEmp.setSalary(new Double(rset.getDouble("salary")));
  selectedEmp.setJobId(rset.getString("job_id"));
}
Return the populated object.
return selectedEmp;
In the following steps, you will see how to create a method to update employee data in the database:
Open the DataHandler class.
Declare an updateEmployee method as follows:
public String updateEmployee(int employee_id, String first_name,
                             String last_name, String email,
                             String phone_number, String salary,
                             String job_id) throws SQLException {

}
Within the body of this method, create an instance of the Employee bean, containing details for the selected employee:
Employee oldEmployee = findEmployeeById(employee_id);
Connect to the database.
getDBConnection();
Create a Statement object and specify the ResultSet type as before.
stmt =
  conn.createStatement(ResultSet.TYPE_SCROLL_SENSITIVE,
                       ResultSet.CONCUR_READ_ONLY);
Create a StringBuffer to accumulate details of the SQL UPDATE statement that needs to be built:
StringBuffer columns = new StringBuffer( 255 );
For each field in an employee record, check whether the user has changed the value and if so, add relevant code to the StringBuffer. For each item added after the first one, add a comma to separate the items. The following code checks if the first_name variable changed, and if so, adds details to the SQL in the StringBuffer that will be used to update the database:
if ( first_name != null &&
     !first_name.equals(oldEmployee.getFirstName() ) )
  {
    columns.append( "first_name = '" + first_name + "'" );
  }
For the last_name, before appending the new last name, check to see whether there are already some changes in the StringBuffer and if so, append a comma to separate the new change from the previous one. Use the following code:
if ( last_name != null &&
      !last_name.equals(oldEmployee.getLastName() ) ) {
    if ( columns.length() > 0 ) {
      columns.append( ", " );
    }
    columns.append( "last_name = '" + last_name + "'" );
  }
Use the samecode logic to check for changes made to email, and phone_number.
Note:
Only significant parts of the code are included within this procedure. Example 5-2 contains the complete code for this method.For the salary field, obtain a String value to add to the StringBuffer as follows:
if ( salary != null &&
      !salary.equals( oldEmployee.getSalary().toString() ) ) {
    if ( columns.length() > 0 ) {
      columns.append( ", " );
    }
    columns.append( "salary = '" + salary + "'" );
When the whole set of changes has been assembled, check to see whether there are in fact any changes, that is, whether the StringBuffer contains anything. If so, construct a SQL UPDATE statement using the information in the StringBuffer and execute it. If the StringBuffer does not contain any changes, output a message saying so:
if ( columns.length() > 0 )
  {
    sqlString = "update Employees SET " + columns.toString() +
            " WHERE employee_id = " + employee_id;
    System.out.println("\nExecuting: " + sqlString);
    stmt.execute(sqlString);
  }
  else
  {
    System.out.println( "Nothing to do to update Employee Id: " +
                        employee_id);
  }
Return the word "success".
return "success";
Save your work and make the file to check there are no syntax errors.
Example 5-2 contains the complete code for this method.
Example 5-2 Method for Updating a Database Record
public String updateEmployee(int employee_id, String first_name,
                             String last_name, String email,
                             String phone_number, String salary,
                             String job_id) throws SQLException {

  Employee oldEmployee = findEmployeeById(employee_id);
  getDBConnection();
  stmt = conn.createStatement(ResultSet.TYPE_SCROLL_SENSITIVE,
                              ResultSet.CONCUR_READ_ONLY);

  StringBuffer columns = new StringBuffer( 255 );
  if ( first_name != null &&
     !first_name.equals( oldEmployee.getFirstName() ) )
  {
    columns.append( "first_name = '" + first_name + "'" );
  }
  if ( last_name != null &&
      !last_name.equals( oldEmployee.getLastName() ) ) {
    if ( columns.length() > 0 ) {
      columns.append( ", " );
    }
    columns.append( "last_name = '" + last_name + "'" );
  }
  if ( email != null &&
      !email.equals( oldEmployee.getEmail() ) ) {
    if ( columns.length() > 0 ) {
      columns.append( ", " );
    }
    columns.append( "email = '" + email + "'" );
  }
  if ( phone_number != null &&
      !phone_number.equals( oldEmployee.getPhoneNumber() ) ) {
    if ( columns.length() > 0 ) {
      columns.append( ", " );
    }
    columns.append( "phone_number = '" + phone_number + "'" );
  }
  if ( salary != null &&
      !salary.equals( oldEmployee.getSalary().toString() ) ) {
    if ( columns.length() > 0 ) {
      columns.append( ", " );
    }
    columns.append( "salary = '" + salary + "'" );
  }
  if ( job_id != null &&
      !job_id.equals( oldEmployee.getJobId() ) ) {
    if ( columns.length() > 0 ) {
      columns.append( ", " );
    }
    columns.append( "job_id = '" + job_id + "'" );
  }

  if ( columns.length() > 0 )
  {
  sqlString =
    "UPDATE Employees SET " + columns.toString() +
      " WHERE employee_id = " + employee_id;
    System.out.println("\nExecuting: " + sqlString);
    stmt.execute(sqlString);
  }
  else
  {
    System.out.println( "Nothing to do to update Employee Id: " +
                        employee_id);
  }
  return "success";
}
In the following steps, you add a link to each row of the employees table on the employees.jsp page, that users will click to edit that row.
Open employees.jsp in the Visual Editor.
Add an extra column to the table that displays employee details. To do this, position the cursor in the last column of the table, right-click and select Table from the shortcut menu, then select Insert Rows Or Columns. In the Insert Rows or Columns dialog box, select Columns and After Selection and click OK.
This extra column will contain the link that reads Edit for each row. Each of these links leads to a separate page where the selected employee record can be edited. To do this, double-click the scriptlet that is inside the Employees table, to display the Scriptlet Properties dialog box.
Modify the scriptlet to include a link to the edit.jsp page. The modified scriptlet should contain the following code:
while (rset.next ())
    {
    out.println("<tr>");
      out.println("<td>" +
      rset.getString("first_name") + "</td><td> " +
      rset.getString("last_name") + "</td><td> " +
      rset.getString("email") + "</td><td> " +
      rset.getString("job_id") + "</td><td>" +
      rset.getString("phone_number") + "</td><td>" +
      rset.getDouble("salary") +
      "</td><td> <a href=\"edit.jsp?empid=" + rset.getInt(1) +
      "\">Edit</a></td>");
    out.println("<tr>");
    }
When the edit link is clicked for any employee, this code passes the employee ID to the edit.jsp page, which will handle the employee record updates. The edit.jsp page will use this to search for the record of that particular employee in the database.
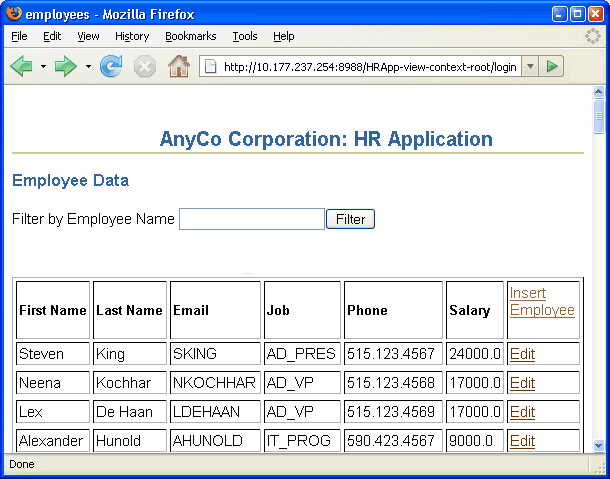
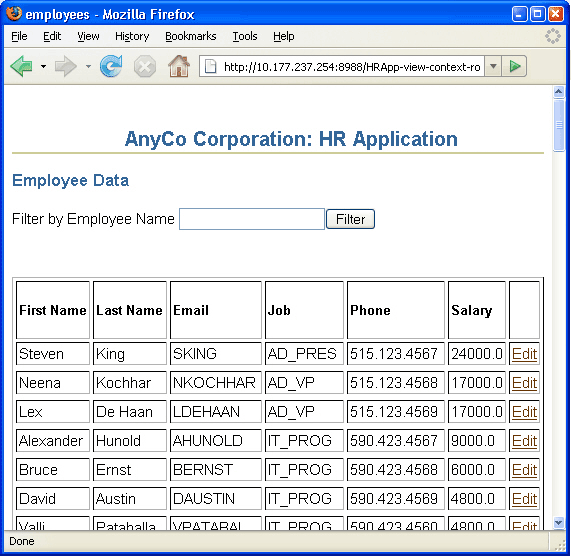
Save employees.jsp. Figure 5-2 shows employees.jsp when it is run and displayed in a browser, illustrating the link users can click to edit employee data.
Figure 5-2 Link to Edit Employees in employees.jsp
In this section, you will create the edit.jsp file that allows users to update an employee record.
Create a new JSP page and name it edit.jsp. Accept all other defaults.
Give the page the same heading as earlier, AnyCo Corporation: HR Application, apply the Heading 2 style to it, and align it to the center of the page.
On the next line, type Edit Employee Record, with the Heading 3 style applied. Align this heading to the left of the page.
Add the JDeveloper style sheet to the page.
Add a jsp:usebean tag. Enter empsbean as the ID, and hr.DataHandler as the Class. Set the Scope to session, and click OK.
Position the cursor after the useBean tag and add another jsp:usebean tag. This time enter employee as the ID, browse to select hr.Employee as the class, and leave the Scope as page. Click OK.
Add a Scriptlet to the page. The scriptlet code passes the employee ID to the findEmployeeById method and retrieves the data inside the Employee bean. Enter the following code in the Insert Scriptlet dialog box:
Integer employee_id = new Integer(request.getParameter("empid"));
employee = empsbean.findEmployeeById(employee_id.intValue());
Add a Form to the page. In the Insert Form dialog, enter update_action.jsp for the Action field. You cannot select this page from the drop down list as you have not yet created it.
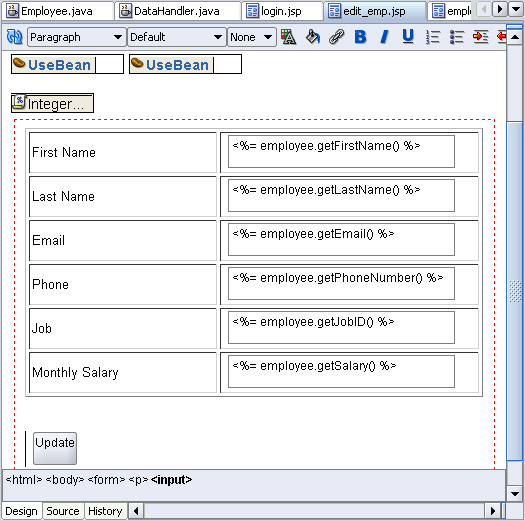
Add a Table to the page. Position it inside the Form. Specify a 6-row and 2-column layout, and accept other layout defaults.
In the first column, enter the following headings, each on a separate row: First Name, Last Name, Email, Phone, Job, Monthly Salary.
Drag a Hidden Field component from the HTML Forms page of the Component Palette. Drop it in the second column, adjacent to the First Name heading. In the Insert Hidden Field dialog, enter employee_id as the Name property and enter <%= employee.getEmployeeId() %> as the Value property.
Drag a Text Field component to this column, adjacent to the First Name heading. In the Insert Text Field dialog, enter first_name in the Name field, and <%= employee.getFirstName() %> in the Value field. Click OK.
Drag a second Text Field component to this column, adjacent to the Last Name heading. In the Insert Text Field dialog, enter last_name in the Name field, and <%= employee.getLastName() %> in the Value field. Click OK.
In a similar way, add text fields adjacent to each of the remaining column headings, using email, phone_number, job_id, and salary as the field names and the corresponding getter method for each field. These are specified in the following table.
Add a Submit button in the form, below the table. Enter Update as its Value.
Save the application.
The resultant edit.jsp page should look similar to the page shown in Figure 5-3.
Figure 5-3 Creating a JSP Page to Edit Employee Details
In this section, you will see how to create the update_action.jsp file. This page processes the form on the edit.jsp page that allows users to update an employee record. There are no visual elements on this page, this page is used only to process the edit.jsp form and returns control to the employees.jsp file.
Create a new JSP page and call it update_action.jsp. Accept all other defaults for the page in the JSP Creation Wizard.
Drag a Page Directive component from the JSP page of the Component Palette onto the page. In the Insert Page Directive dialog box, browse to import java.sql.ResultSet. Click OK.
Add a jsp:usebean tag. Enter empsbean as the ID, and hr.DataHandler as the Class. Set the Scope to session, and click OK.
Add a Scriptlet to the page. Enter the following code into the Insert Scriptlet dialog box:
Integer employee_id = new Integer(request.getParameter("employee_id"));
String first_name = request.getParameter("first_name");
String last_name = request.getParameter("last_name");
String email = request.getParameter("email");
String phone_number = request.getParameter("phone_number");
String salary = request.getParameter("salary");
String job_id = request.getParameter("job_id");
empsbean.updateEmployee(employee_id.intValue(), first_name, last_name, email, phone_number, salary, job_id );
Drag a jsp:forward tag onto the page. In the Insert Forward dialog box, enter employees.jsp for the Page property.
Save your work.
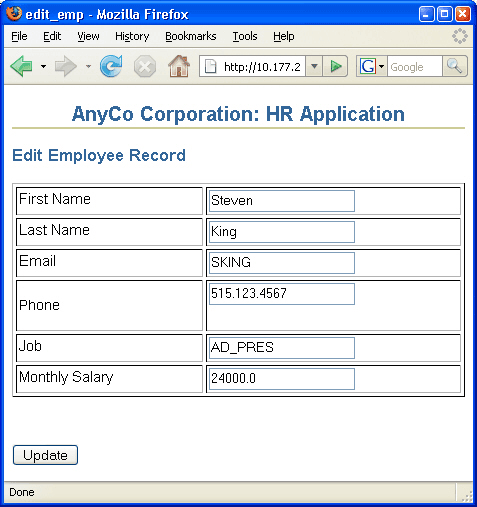
Run the project and test whether you can edit an employee record. Click Edit for any employee on the employees.jsp page, and you should be directed to the page shown in Figure 5-4. Modify any of the employee details and check whether the change reflects in the employees.jsp page.
The steps for inserting a new employee record to the Employees table are similar to the process for updating an employee record:
Create a method to insert a new employee row into the Employees table.
Add a link to the main application page, allowing a user to click to insert a new employee. The link takes the user to an insert.jsp with an empty form ready for the user to enter details for the new row.
Create a JSP page to process the form on the insert.jsp page.
Create a JSP page with form controls for users to enter the values for the new employee.
This section covers the creation of Java application code for inserting new employee data in the following subsections:
In the following steps, you will create a method for inserting a new employee record.
Open DataHandler.java in the Java Source Editor.
Declare a method to add a new employee record.
public String addEmployee(String first_name,
  String last_name, String email,
  String phone_number, String job_id, int salary) throws SQLException {

}
Add a line to connect to the database.
getDBConnection();
Create a Statement object, define a ResultSet type as before, and formulate the SQL statement.
stmt =
  conn.createStatement(ResultSet.TYPE_SCROLL_SENSITIVE,
                       ResultSet.CONCUR_READ_ONLY);
sqlString =
  "INSERT INTO Employees VALUES (EMPLOYEES_SEQ.nextval, '" +
  first_name + "','" +
  last_name + "','" +
  email + "','" +
  phone_number + "'," +
  "SYSDATE, '" +
  job_id + "', " +
  salary + ",.30,100,80)";
Note:
The last three columns (Commission, ManagerId, and DepartmentId) contain hard-coded values for the sample application.Add a trace message, and then run the SQL statement.
Return a message that says "success" if the insertion was successful.
Make the file to check for syntax errors.
Example 5-3 shows the code for the addEmployee() method.
Example 5-3 Method for Adding a New Employee Record
public String addEmployee(String first_name,
  String last_name, String email,
  String phone_number, String job_id, int salary) throws SQLException {
  getDBConnection();
  stmt = conn.createStatement(ResultSet.TYPE_SCROLL_SENSITIVE,
                              ResultSet.CONCUR_READ_ONLY);
  sqlString =
    "INSERT INTO Employees VALUES (EMPLOYEES_SEQ.nextval, '" +
     first_name + "','" +
    last_name + "','" +
    email + "','" +
    phone_number + "'," +
    "SYSDATE, '" +
    job_id + "', " +
    salary + ",.30,100,80)";

  System.out.println("\nInserting: " + sqlString);
  stmt.execute(sqlString);
  return "success";
}
In these steps, you add a link to the header row of the employees table that users can click to add a new employee.
Open employees.jsp in the Visual Editor.
Drag a Hyper Link component from the HTML Common page of the Component Palette into the empty column header cell at the end of the header row. In the Insert HyperLink dialog box, enter insert.jsp in the HyperLink field, and Insert Employee in the Text field. You cannot browse to find insert.jsp as you have not yet created it. Click OK.
Save employees.jsp.
In these steps, you create the insert.jsp page, which allows users to enter details of a new employee record.
Create a new JSP page and call it insert.jsp.
Give the page the same heading as before, AnyCo Corporation: HR Application, and format it as Heading 2, and center it.
On the next line enter Insert Employee Record, and apply the Heading 3 format. Align this heading to the left of the page.
Add the JDeveloper stylesheet to the page.
Add a Form. In the Insert Form dialog box, enter insert_action.jsp for the Action property, and click OK.
Add a Table inside the Form. Specify that you want 6 rows and 2 columns and accept all other layout defaults.
In the first column, enter the following headings, each on a separate row: First Name, Last Name, Email, Phone, Job, Monthly Salary.
Drag and drop a Text Field into the column to the right of the First Name header. In the Insert Field dialog box, type first_name in the Name property.
Drag a Text Field next to each of the Last Name, Email, Phone, and Monthly Salary headers. Specify the values for each of these text fields for the Name property in the Insert Field dialog box. The values are indicated in the following table:
| Text Field For | Set the Name Property To |
|---|---|
| Last Name | last_name |
email |
|
| Phone | phone_number |
| Monthly Salary | salary |
This procedure is different for the Job row.
Drag a Combo Box component from the HTML Forms page of the Component Palette to the column next to the Job heading.
In the Insert Select dialog box, enter job_id as the name, and 1 as the size. Click on the add (+) icon and enter SA_REP in the Value field, and in the Caption field, enter Sales Representative. Click on the add(+) sign to add each of the following job titles, then click OK.
| Value | Caption |
|---|---|
HR_REP |
HR Representative |
PR_REP |
PR Representative |
MK_MAN |
Marketing Manager |
SA_MAN |
Sales Manager |
FI_MAN |
Finance Manager |
IT_PROG |
Software Developer |
AD_VIP |
Vice President |
Drag a Submit button to the Form below the table. In the Insert Submit Button dialog box, enter Add Employee for the Value property.
Save your work.
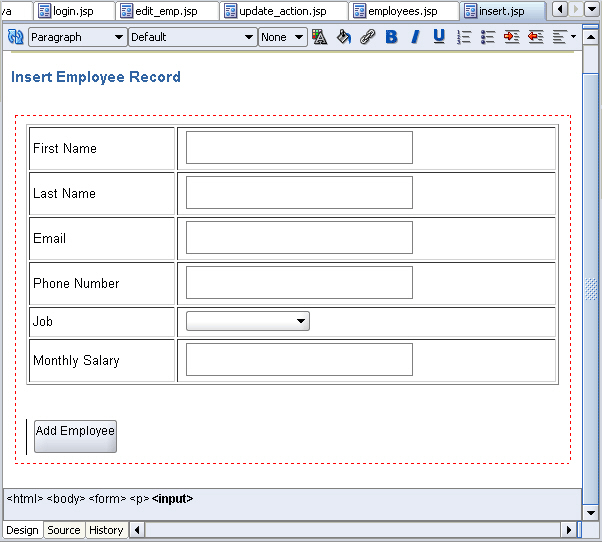
Figure 5-5 shows the insert.jsp page in the Visual Editor.
In these steps, you create the insert_action.jsp page. This is a page that processes the form input from insert.jsp, which is the page on which users enter a new employee record. There are no visual elements on this page, and it is only used to process the insert.jsp form and return control to the employees.jsp file.
Add a jsp:usebean tag. As before, enter empsbean as the ID, and hr.DataHandler as the Class. Set the Scope to session, and click OK.
Position the cursor after the useBean tag and add a Scriptlet to the page. Enter the following code into the Insert Scriptlet dialog box:
String first_name = request.getParameter("first_name");
String last_name = request.getParameter("last_name");
String email = request.getParameter("email");
String phone_number = request.getParameter("phone_number");
String job_id = request.getParameter("job_id");
Integer salary = new Integer(request.getParameter("salary"));

empsbean.addEmployee(first_name, last_name, email, phone_number, job_id, salary.intValue());
Drag a jsp:forward tag onto the page. In the Insert Forward dialog box, enter employees.jsp.
Save your work.
Run the View project to test whether you can insert a new employee record.
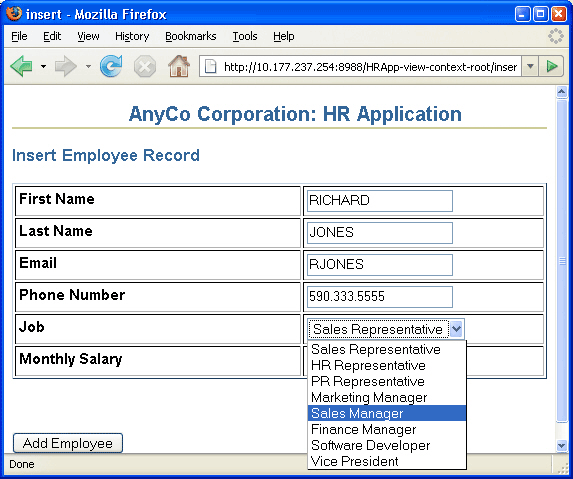
To insert an employee, click Insert Employee on the employees.jsp page shown in Figure 5-6.
Figure 5-7 shows the page where you can insert new employee data with some data filled in, and the list of jobs being used to select a job.
The steps for deleting a record are similar to those for editing and inserting a record:
Use the method created in Creating a Method to Identify an Employee Record to identify a particular employee row. This is used to identify the row to be deleted.
Create a method that deletes an employee record from the database.
Add a link to the main application page for each row, allowing a user to click to delete the employee in that row. The link takes the user to a delete_action.jsp, with the ID of the employee whose record is to be deleted.
To delete the employee from the database, create a JSP page to call the delete method created in Step 2.
This section discusses the following tasks related to deleting employee data:
The method created in the following steps is used to delete employee records by ID:
Declare a new method that identifies the employee record to be deleted:
public String deleteEmployeeById(int id) throws SQLException {

}
Connect to the database as before.
getDBConnection();
Create a Statement object, define a ResultSet type as before, and formulate the SQL statement. Add a trace message to assist with debugging.
stmt =
  conn.createStatement(ResultSet.TYPE_SCROLL_SENSITIVE,
                       ResultSet.CONCUR_READ_ONLY);
sqlString = "DELETE FROM Employees WHERE employee_id = " + id;
System.out.println("\nExecuting: " + sqlString);
Run the SQL statement.
stmt.execute(sqlString);
If the SQL statement runs without any errors, return the word, Success.
return "success";
Example 5-4 shows the code for the deleteEmployeeById() method.
Example 5-4 Method for Deleting an Employee Record
public String deleteEmployeeById(int id) throws SQLException {
        getDBConnection();
        stmt = conn.createStatement(ResultSet.TYPE_SCROLL_SENSITIVE,
                                ResultSet.CONCUR_READ_ONLY);
    sqlString = "DELETE FROM Employees WHERE employee_id = " + id;
    System.out.println("\nExecuting: " + sqlString);
    stmt.execute(sqlString);
    return "success";
}
In the following instructions, you add a link to each row of the employees table on the employees.jsp page. Clicking on that link will delete all employee data for that row.
Open employees.jsp in the Visual Editor.
In the column you created to contain the Edit link, add another link for deleting the row. To do this, double-click the scriptlet that is inside the Employees table, to display the Scriptlet Properties dialog box.
Modify the scriptlet to include a link to a delete_action.jsp page. The modified scriptlet should contain the following code:
while (rset.next ())
    {
    out.println("<tr>");
      out.println("<td>" +
      rset.getString("first_name") + "</td><td> " +
      rset.getString("last_name") + "</td><td> " +
      rset.getString("email") + "</td><td> " +
      rset.getString("job_id") + "</td><td>" +
      rset.getString("phone_number") + "</td><td>" +
      rset.getDouble("salary") +
      "</td><td> <a href=\"edit.jsp?empid=" + rset.getInt(1) +
      "\">Edit</a>   <a href=\"delete_action.jsp?empid=" +
      rset.getInt(1) + "\">Delete</a></td>");
    out.println("<tr>");
    }
Save employees.jsp.
In the following steps, you create the delete_action.jsp page, which is a page that only processes the delete operation. There are no visual elements on this page.
Add a jsp:usebean tag. As before, enter empsbean as the ID, and hr.DataHandler as the Class. Set the Scope to session, and click OK.
Add a Scriptlet to the page. Enter the following code into the Insert Scriptlet dialog box:
Integer employee_id =
 new Integer(request.getParameter("empid"));
empsbean.deleteEmployeeById(employee_id.intValue());
Drag Forward from the Component Palette to add a jsp:forward tag to the page. In the Insert Forward dialog box, enter employees.jsp.
Save your work.
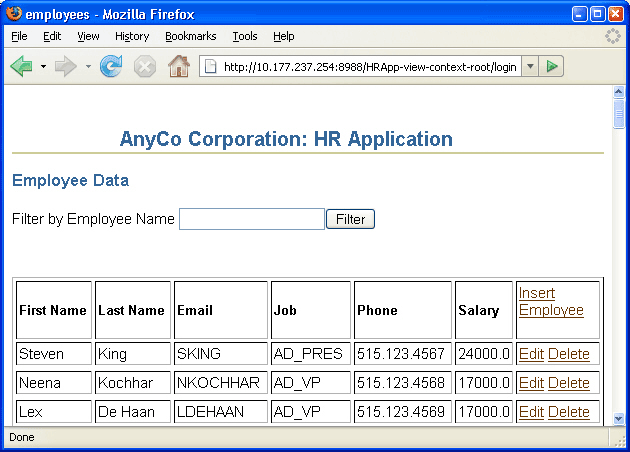
Run the project and try deleting an employee. Figure 5-8 shows the links for deleting employee records from the employees.jsp.
Figure 5-8 Link for Deleting an Employee from employees.jsp
If you click Delete for any of the employee records, then that employee record will be deleted.
A SQLException object instance provides information on a database access error or other errors. Each SQLException instance provides many types of information, including a string describing the error, which is used as the Java Exception message, available via the getMessage method.
The sample application uses try and catch blocks, which are the Java mechanism for handling exceptions. With Java, if a method throws an exception, there needs to be a mechanism to handle it. Generally, a catch block catches the exception and specifies the course of action in the event of an exception, which could simply be to display the message.
Each JDBC method throws a SQLException if a database access error occurs. For this reason, any method in an application that executes such a method must handle the exception.
All the methods in the sample application include code for handling exceptions. For example, the getDBConnection, which is used to get a connection to the database, throws SQLException, as does the getAllEmployees method as follows:
public ResultSet getAllEmployees() throws SQLException {
}
For an example of code used to catch and handle SQLExceptions, refer to the code in the authenticateUser method in the DataHandler.java class. In this example, a try block contains the code for the work to be done to authenticate a user, and a catch block handles the case where the authentication fails.The following sections describe how to add code to the sample application to catch and handle SQLExceptions.
To handle SQL exceptions in the methods in the sample application, do the following:
Ensure that the method throws SQLException. For example, the method:
public ResultSet getAllEmployees() throws SQLException
Use try and catch blocks to catch any SQLExceptions. For example, in the getAllEmployees method, enclose your existing code in a try block, and add a catch block as follows:
public ResultSet getAllEmployees() throws SQLException {
  try {
    getDBConnection();
    stmt =
      conn.createStatement(ResultSet.TYPE_SCROLL_SENSITIVE,
                           ResultSet.CONCUR_READ_ONLY);
    sqlString = "SELECT * FROM Employees order by employee_id";
    System.out.println("\nExecuting: " + sqlString);
    rset = stmt.executeQuery(sqlString);
  }
  catch (SQLException e) {
    e.printStackTrace();
  }
  return rset;
}
As another example, the deleteEmployee method rewritten to use try and catch blocks would return "success" only if the method was successful, that is, the return statement is enclosed in the try block. The code could be as follows:
public String deleteEmployeeById(int id) throws SQLException {

    try {
      getDBConnection();
      stmt =
        conn.createStatement(ResultSet.TYPE_SCROLL_SENSITIVE,
                             ResultSet.CONCUR_READ_ONLY);
      sqlString = "delete FROM Employees where employee_id = " + id;
      System.out.println("\nExecuting: " + sqlString);

      stmt.execute(sqlString);
      return "success";
    }
    catch (SQLException e) {
      e.printStackTrace();
    }
  }
As a refinement to the code for the sample application, you can create a method that can be used in any method that might throw a SQLException, to handle the exception. As an example, the following method could be called in the catch block of any of the methods in the sample application. This method cycles through all the exceptions that have accumulated, printing a stack trace for each.
Example 5-5 Adding a Method to Handle Any SQLException in the Application
public void logException( SQLException ex )
{
  while ( ex != null ) {
    ex.printStackTrace();
    ex = ex.getNextException();
  }
}
In addition, in the catch block, you can return text that explains why the method has failed. The catch block of a method could therefore be written as follows:
catch ( SQLException ex )  {
  logException( ex );
  return "failure";
}
To add this feature to your application:
Edit each of the methods to include try and catch blocks.
In the catch block of each method, run the logException method.
For methods that have a return value of String, include a return statement to return a message indicating that the method has failed such as:
return "failure";
The web.xml file is the deployment descriptor file for a web application. One section of the web.xml file can be used for defining a start page for the application, for example:
<web-app>
...
  <welcome-file>
    myWelcomeFile.jsp
  </welcome-file>
...
</web-app>
If you do not define a welcome page in your web.xml file, generally a file with the name index, with extension .html, .htm, or .jsp if there is one, is used as the starting page. With JDeveloper, you can define which page is to be the default run target for the application, that is, the page of the application that is displayed first, by defining it in the properties of the project.
Once the application has started, and the start page has been displayed, navigation through the application is achieved using the following scheme:
Links, in the form of HTML anchor tags, define a target for the link, usually identifying another JSP page to which to navigate, and some text for the link.
HTML submit buttons, are used to submit forms on the pages, such as forms for entering new or changed data.
jsp:forward tags, which are executed on JSP pages that handle queries and forms, to forward to either the same JSP page again, or another JSP page.
In the following steps, you create the index.jsp page, which will be the default starting page for the application. The page does not include any display elements, and simply forwards the user to the application login page, login.jsp. To do this you use the jsp:forward tag. A jsp:forward tag runs on JSP pages that handle queries and forms, to forward to either the same JSP page again, or another JSP page.
Create a new JSP page and call it index.jsp.
For the sample application, we will not add any text to this page. From the JSP page of the Component Palette, drag Forward to include a jsp:forward tag in the page.
In the Insert Forward dialog box for the forward tag, enter login.jsp as the Page.
You can now specify this new page as the default target for the application as follows:
In the Application Navigator, right-click the View project and choose Project Properties.
In the displayed tree, select Run/Debug/Profile. In the Run/Debug/Profile area, ensure that Use Project Settings is selected, and in the Run Configurations area, ensure that Default Configurations is selected. Click Edit.
In the Edit Launch Settings dialog box, select Launch Settings. In the Launch Settings area on the right, click Browse next to the Default Run Target field and navigate to find the new index.jsp page you just created and click OK. Then click OK again to close the dialog box.
You can now run your application by right-clicking in the View project and select Run from the shortcut menu. The application runs and runs index.jsp, which has been set as the default launch target for the application. The index.jsp forwards you directly to the login page, login.jsp, which is displayed in your browser.
|
Copyright © 2007, 2012, Oracle and/or its affiliates. All rights reserved. Legal Notices |
|